HOW TO: Upgrade from vCenter Server Appliance (VCSA) 5.5 to 6.0

Andrew Hancock (VMware vExpert PRO / EE Fellow/British Beekeeper)![]() VMware and Virtualization Consultant
VMware and Virtualization Consultant
 VMware and Virtualization Consultant
CERTIFIED EXPERT
EE Fellow, MVE, Expert of the Year 2021,2017-11, Scribe 2016-2012, Author of the Year 2018-6,2013-2012 VMware vExpert Pro, vExpert 2022-2011
Published:
Browse All Articles > HOW TO: Upgrade from vCenter Server Appliance (VCSA) 5.5 to 6.0
In my previous Experts Exchange Articles, most have featured Basic and Intermediate VMware and Virtualisation Topics. If you would like to read my Basic VMware articles, they are listed at the end of this article for your convenience.
This article will show you how to upgrade from vCenter Server Appliance (VCSA) 5.5 to 6.0.Please know that you cannot trial the VMware vCenter Server Appliance 6.0. You must have a license for VMware vSphere vCenter Server 6.0 to download the appliance from VMware. Previous versions of the VMware vCenter Server Appliance were supplied as a ready made OVF for download, but this procedure has since changed in version 6.0, and an ISO (DVD image) now has to be downloaded.
To do this, please:
1. Install the VMware-ClientIntegrationPlugin-6.0.0.exe application
Double click the VMware-ClientIntegrationPlugin-6.0.0.exe application.
![vcsa1.jpg]()
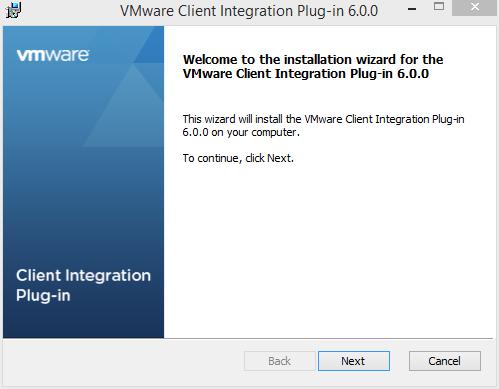
Click Next to start the installation.
![vcsa2.jpg]()
Accept the End User License Agreement, and click Next to continue.
![vcsa3.jpg]()
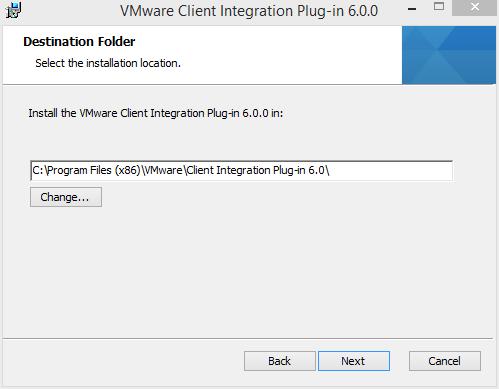
You can change the program location if required. Click Next to continue.
![vcsa4.jpg]()
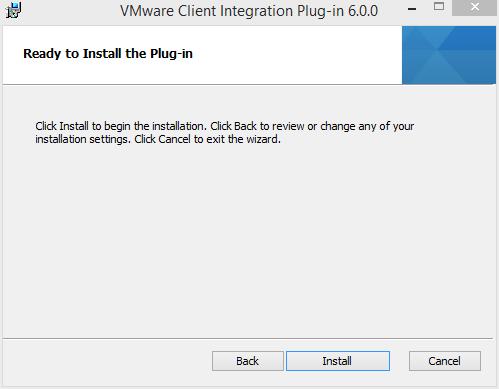
Click Install to start the installation.
![vcsa5.jpg]()
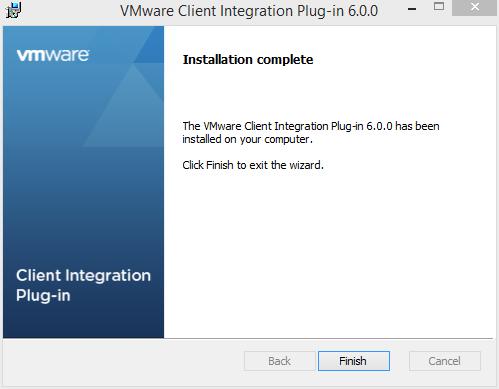
Click Finish to complete the installation.
![vcsa6.jpg]()
2. Upgrading the VMware vCenter Server Appliance 5.5.
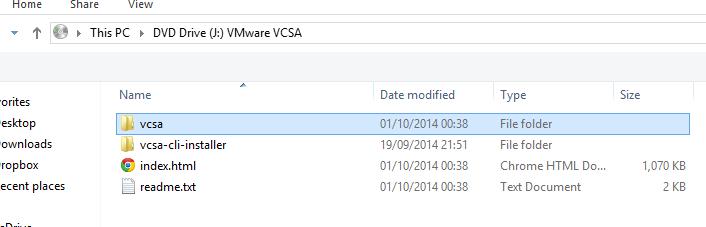
Double click the index.html file in the root of the DVD.
![vcsa7.jpg]()
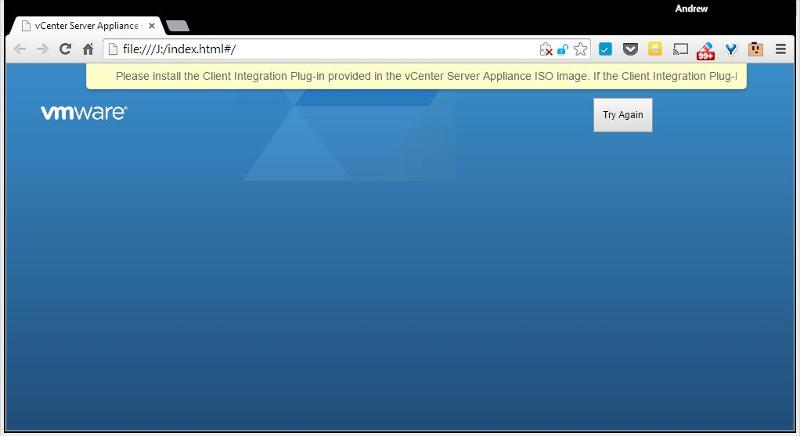
Ensure pop-up blockers are set to no block for the Client Integration Plugin.
![vcsa8.jpg]()
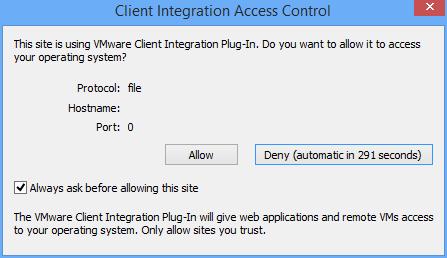
Select Allow so that the VMware Client Integration Plug-In can access the operating system.
![vcsa9.jpg]()
Select and click Install.
![2015-07-28-15-34-59-My-First-Windows-VM-]()
Click Upgrade to continue.
![2015-07-28-15-38-26-192.168.10.128---vSp]()
Click OK to continue the upgrade.
![2015-07-28-15-39-18-2015-07-28-15-38-26-]()
Select "I accept the terms of the license agreement" and click Next to continue.
![2015-07-28-15-40-53-2015-07-28-15-39-18-]()
Enter the FQDN or IP Address of the ESXi Host server which is hosting VCSA 5.5, followed by the root username and password. Click Next to continue whilst the server is validated, and select Yes if a certificate warning is presented.
![2015-07-28-15-45-35-192.168.10.128---vSp]()
Enter a different name for the new/upgraded appliance. Click Next to continue.
![2015-07-28-15-47-37-2015-07-28-15-45-35-]()
Enter IP Addresses, usernames and passwords for the existing vCenter Server Appliance 5.5 and ESXi 5.5 host server. Click Next to continue (validation can take several minutes).
![2015-07-28-15-48-44-2015-07-28-15-47-37-]()
Select the appliance size from the drop down selection and select Next to continue.
![2015-07-28-16-01-30-2015-07-28-15-47-37-]()
Select a datastore for the upgraded appliance.
![2015-07-28-16-03-29-2015-07-28-16-01-30-]()
Set up a temporary network for the upgrade and migration (we use DHCP for this process). Click Next to continue.
![2015-07-28-16-05-18-2015-07-28-16-04-06-]()
Check the summary, and click Finish to start the upgrade.
![2015-07-28-16-09-59-2015-07-28-16-05-18-]()
The upgrade will start.
![2015-07-28-16-11-47-2015-07-28-16-09-59-]()
Towards the end of the upgrade, the new appliance is powered up.
![2015-07-28-16-28-34-My-First-Windows-VM-]()
Additional packages are installed.
![2015-07-28-16-34-50-My-First-Windows-VM-]()
Data is exported from the old appliance.
![2015-07-28-16-35-54-192.168.10.128---vSp]()
Once it does so, it will start vCenter Services.
![2015-07-28-16-42-34-Greenshot.jpg]()
The update is now complete.
![2015-07-28-17-04-43-192.168.10.128---vSp]()
Click Close.
![vcsa6.jpg]()
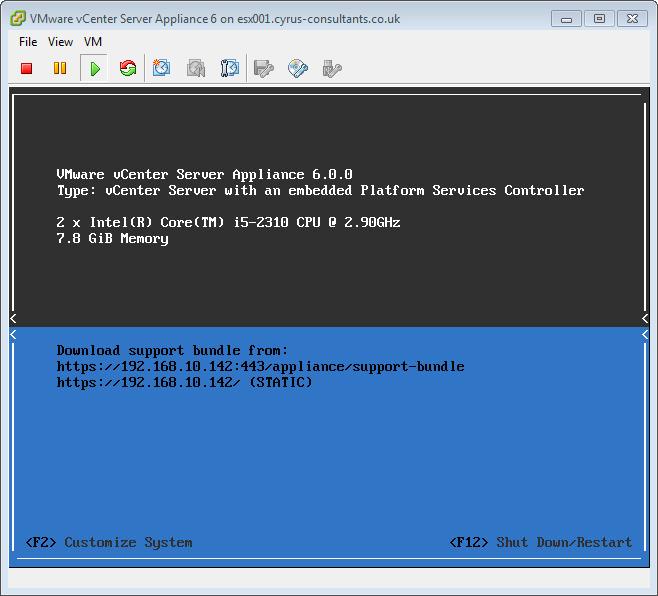
If you check the inventory on your ESXi 5.5 host, you will have a new VMware vCenter Server Appliance 6 in the inventory with the older appliance powered off.If you open the console, you will see the new coloured console.
![vcsa6a.jpg]()
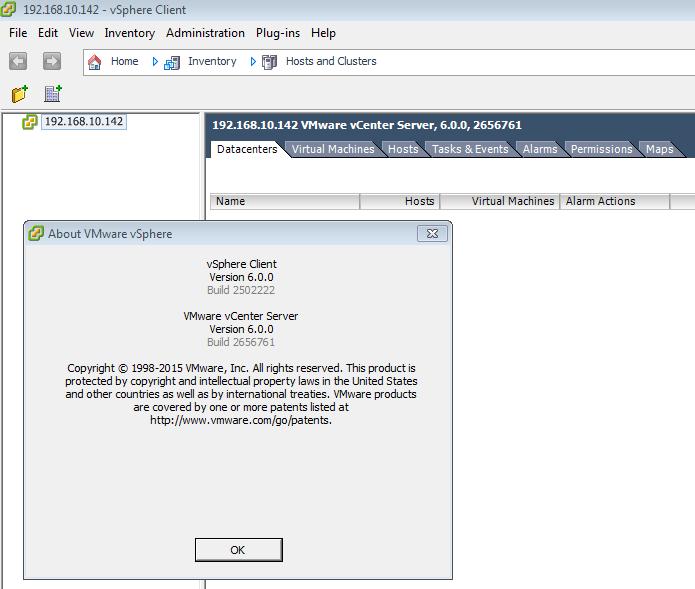
4. Testing the VMware vCenter Server Appliance
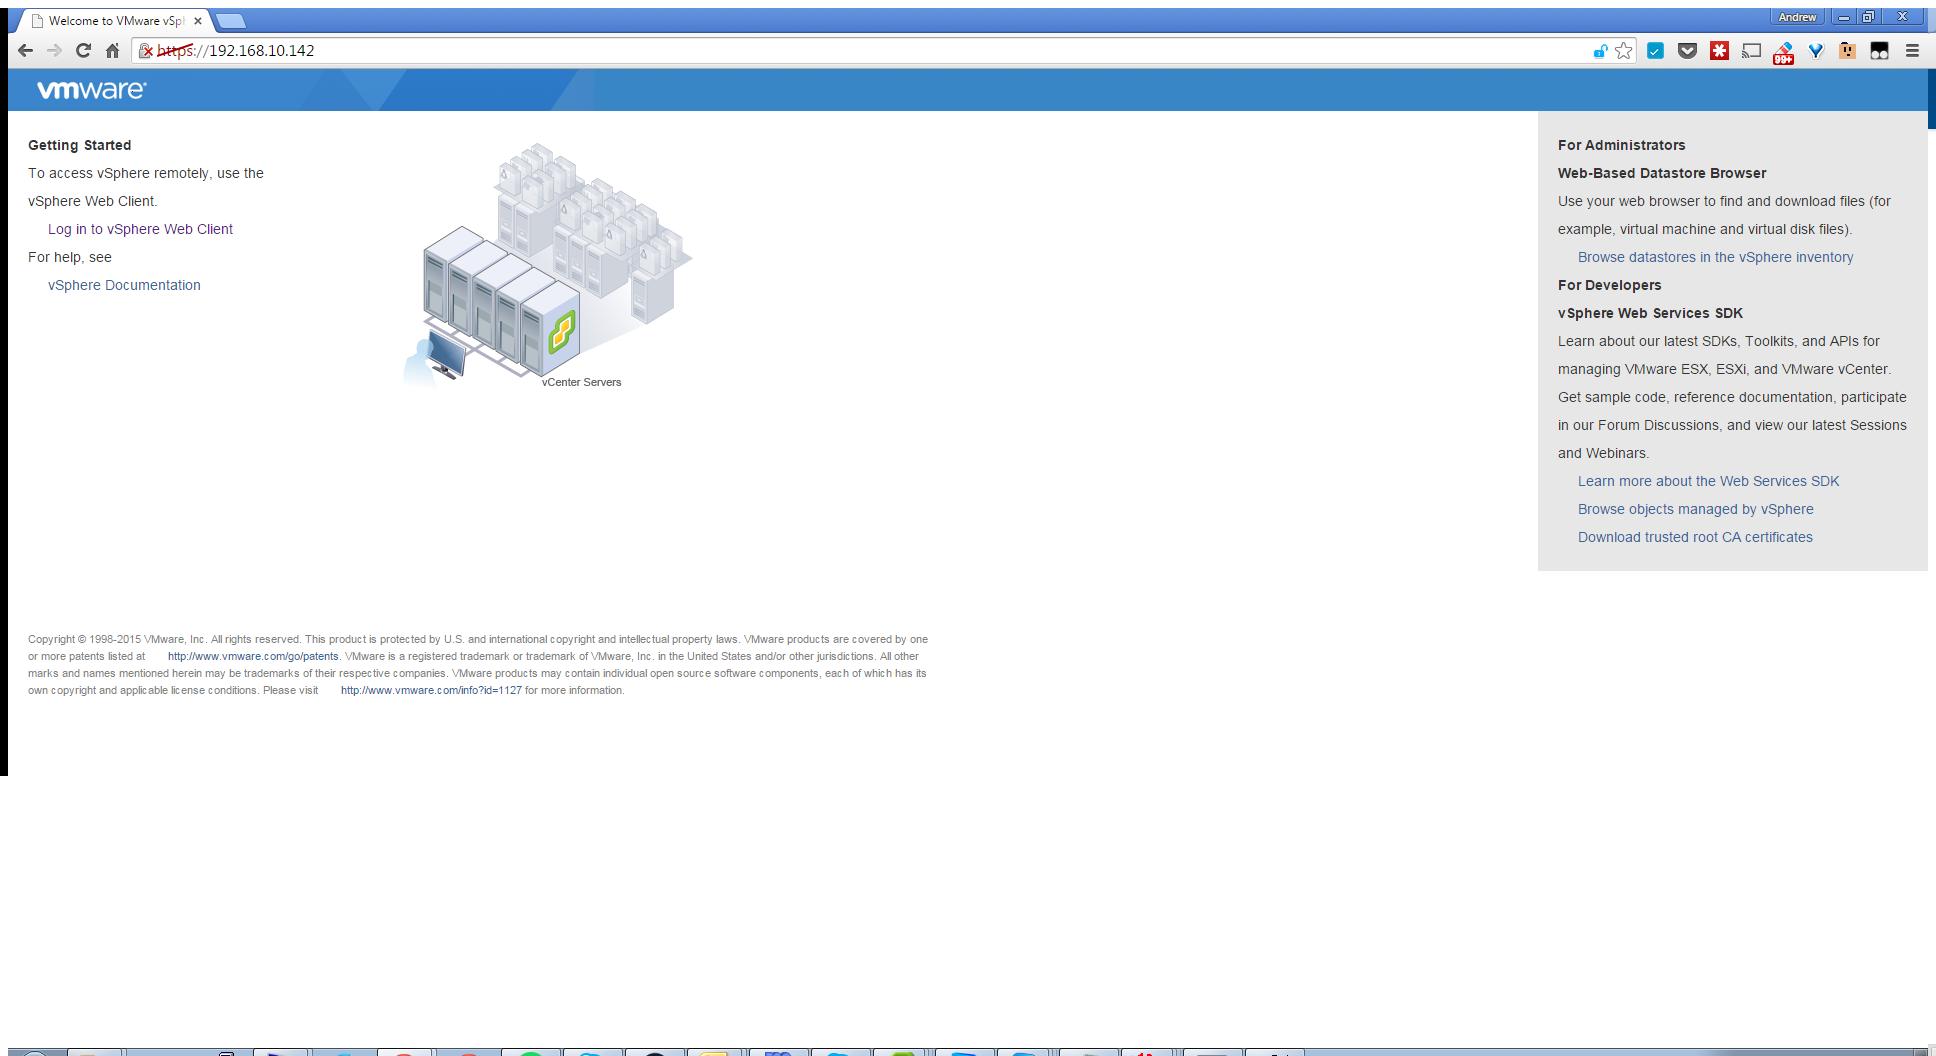
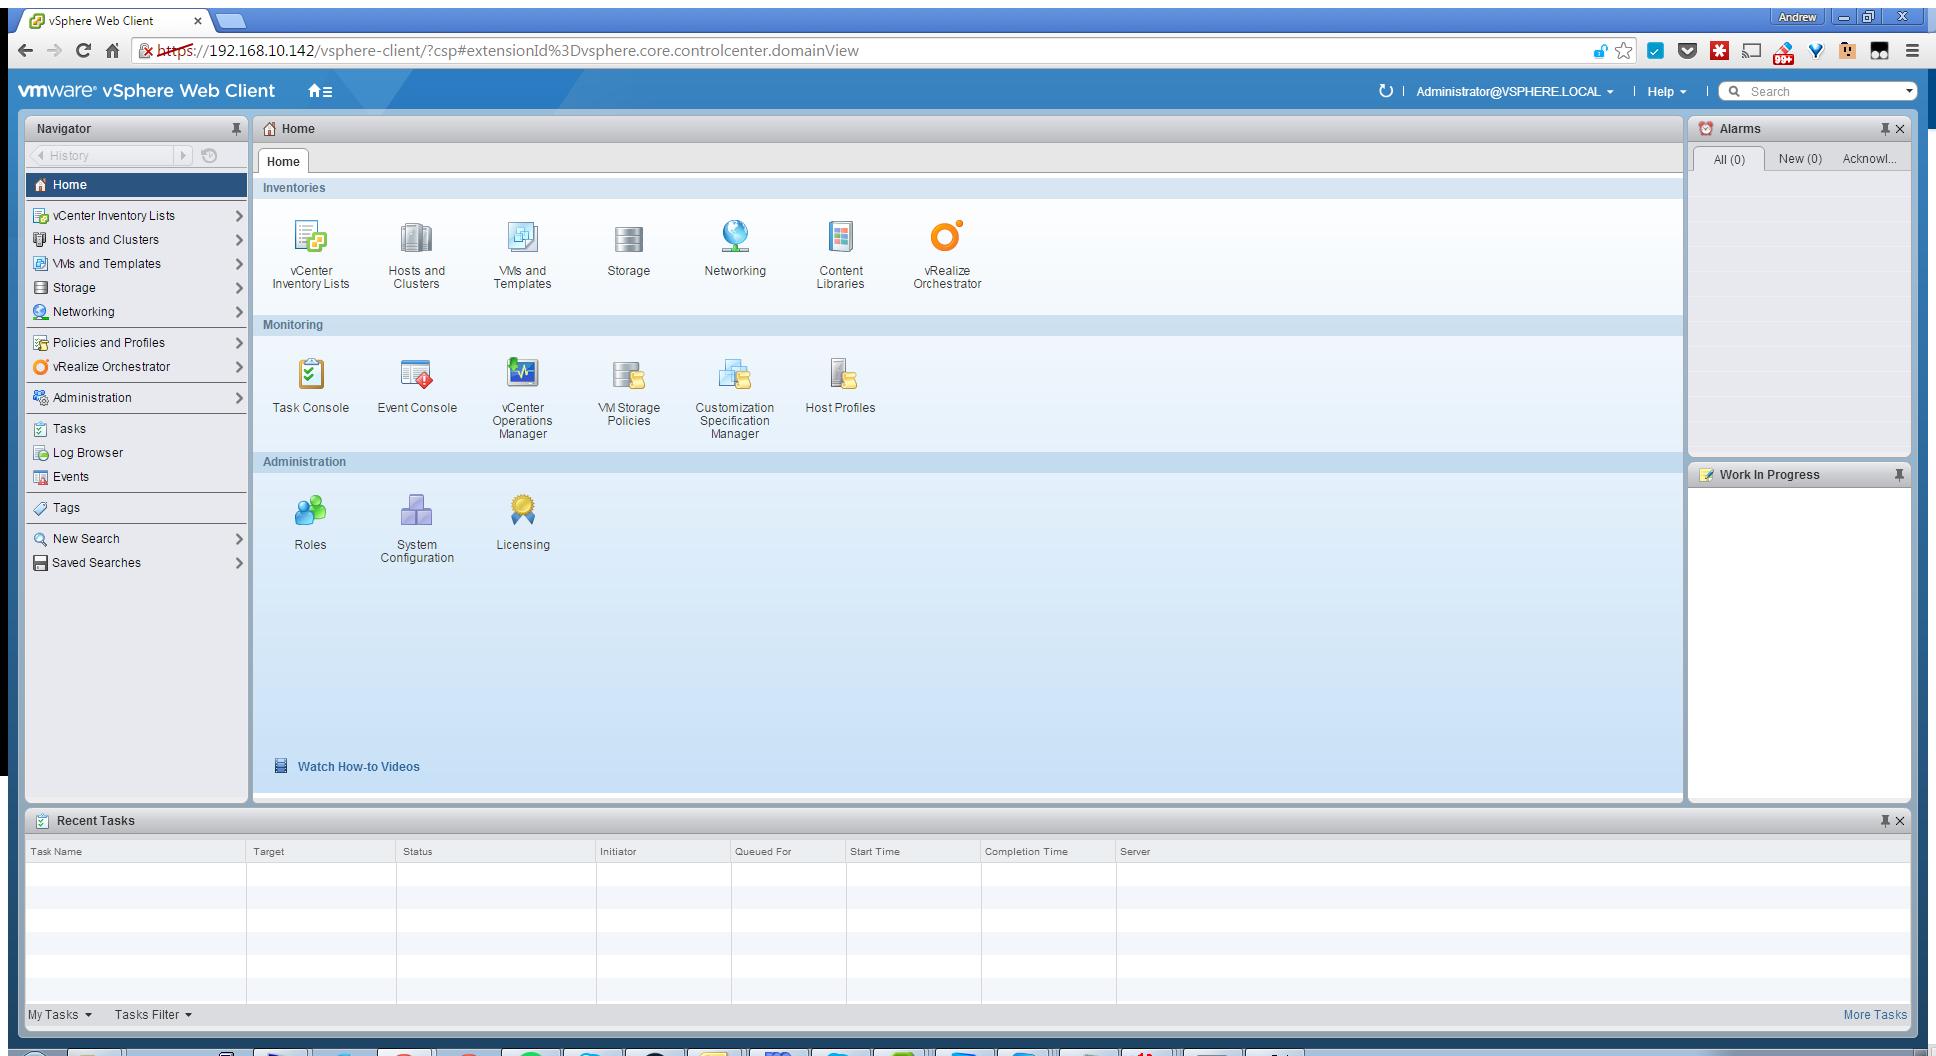
Using the vSphere Client or a Web Browser, you can check and connect to your vCenter Server (use the Administrator@vsphere.local account and password to login first time). The address for your web browser is https://<IP Address>:9443/vsphere-client/.
![vcsa6b.jpg]()
![vcsa6c.jpg]()
![vcsa6d.jpg]() Congratulations you have successfully upgraded your VMware vSphere vCenter Server Appliance (VCSA) 5.5 to 6.0.
Congratulations you have successfully upgraded your VMware vSphere vCenter Server Appliance (VCSA) 5.5 to 6.0.
Basic VMware Articles Series:
During this series of articles VMware released VMware vSphere 5.5 and VMware vSphere Hypervisor ESXi 5.5. These articles are also applicable to VMware vSphere Hypervisor ESXi 5.0 and 5.5. For consistency, I have used VMware vSphere Hypervisor ESXi 5.1 throughout this series.
Part 1: HOW TO: Install and Configure VMware vSphere Hypervisor 5.1 (ESXi 5.1)
Part 2: HOW TO: Connect to the VMware vSphere Hypervisor 5.1 (ESXi 5.1) using the vSphere Client
Part 3: HOW TO: Create an ISO CD-ROM/DVD-ROM image (*.iso), and MD5 checksum signature, for use with VMware vSphere Hypervisor 5.1 (ESXi 5.1)
Part 4: HOW TO: Upload an ISO CD-ROM/DVD-ROM image to a VMware datastore for use with VMware vSphere Hypervisor 5.1 (ESXi 5.1) using the vSphere Client, and checking its MD5 checksum signature is correct.
Part 5: HOW TO: Enable SSH Remote Access on a VMware vSphere Hypervisor 5.1 (ESXi 5.1)
Part 6: HOW TO: Create your first Linux Virtual Machine on a VMware vSphere Hypervisor 5.1 (ESXi 5.1) Host Server
Part 7: HOW TO: Create your first Windows Virtual Machine on a VMware vSphere Hypervisor 5.1 (ESXi 5.1) Host Server
Part 8: HOW TO: Install VMware Tools for Windows on a VMware Windows virtual machine on a VMware vSphere Hypervisor 5.1 (ESXi 5.1) Host Server
Part 9: HOW TO: Install VMware Tools for Linux on a VMware Linux virtual machine on a VMware vSphere Hypervisor 5.1 (ESXi 5.1) Host Server
Part 10: HOW TO: Backup (Export) and Restore (Import) virtual machines to VMware vSphere Hypervisor 5.1 for FREE
Part 11: HOW TO: Suppress Configuration Issues System logs on host are stored on non-persistent storage
Part 12: HOW TO: Configure and Replace the SSL Certificate on a VMware vSphere Hypervisor 5.1 (ESXi 5.1) Host Server
Part 13: HOW TO: Configure basic networking on a VMware vSphere Hypervisor 5.1 (ESXi 5.1) Host Server************************************************************************************************
Thank you for reading my article, please leave valuable feedback. If you liked my VMware article and would like to see more Articles from me, please click the Yes button near the: Was this article helpful? at the bottom of this article just below and to the right of this information. Thank You. Do not forget if you have a question about this article or another VMware, Virtualisation, Windows Server 2012 question, why not post a Question for Me and the other Experts Exchange Experts in the VMware, Virtualisation, Windows 2008, Windows 2012 Zones. I look forward to hearing from you. - Andy :- twitter @einsteinagogo
************************************************************************************************
This article will show you how to upgrade from vCenter Server Appliance (VCSA) 5.5 to 6.0.Please know that you cannot trial the VMware vCenter Server Appliance 6.0. You must have a license for VMware vSphere vCenter Server 6.0 to download the appliance from VMware. Previous versions of the VMware vCenter Server Appliance were supplied as a ready made OVF for download, but this procedure has since changed in version 6.0, and an ISO (DVD image) now has to be downloaded.
To do this, please:
- Download the VMware-VCSA-all-x.y.z-abcd
efg.iso (DVD image) from VMware. The file name used in this tutorial is called VMware-VCSA-all-6.0.0-2656 757.iso. - Burn or mount the VMware-VCSA-all-6.0.0-2656
757.iso (DVD image) on your administration workstation. - In the VCSA folder on the DVD, install the VMware-ClientIntegrationPl
ugin-6.0.0 .exe before you begin (you will need to close your browser first). - Ensure you have a full backup of current VCSA 5.5 appliance.
1. Install the VMware-ClientIntegrationPl
Double click the VMware-ClientIntegrationPl

Click Next to start the installation.
Accept the End User License Agreement, and click Next to continue.

You can change the program location if required. Click Next to continue.
Click Install to start the installation.
Click Finish to complete the installation.
2. Upgrading the VMware vCenter Server Appliance 5.5.
Double click the index.html file in the root of the DVD.
Ensure pop-up blockers are set to no block for the Client Integration Plugin.
Select Allow so that the VMware Client Integration Plug-In can access the operating system.
Select and click Install.
Click Upgrade to continue.
Click OK to continue the upgrade.
Select "I accept the terms of the license agreement" and click Next to continue.
Enter the FQDN or IP Address of the ESXi Host server which is hosting VCSA 5.5, followed by the root username and password. Click Next to continue whilst the server is validated, and select Yes if a certificate warning is presented.
Enter a different name for the new/upgraded appliance. Click Next to continue.
Enter IP Addresses, usernames and passwords for the existing vCenter Server Appliance 5.5 and ESXi 5.5 host server. Click Next to continue (validation can take several minutes).
Select the appliance size from the drop down selection and select Next to continue.
Select a datastore for the upgraded appliance.
Set up a temporary network for the upgrade and migration (we use DHCP for this process). Click Next to continue.
Check the summary, and click Finish to start the upgrade.
The upgrade will start.
Towards the end of the upgrade, the new appliance is powered up.
Additional packages are installed.
Data is exported from the old appliance.
Once it does so, it will start vCenter Services.

The update is now complete.
Click Close.

If you check the inventory on your ESXi 5.5 host, you will have a new VMware vCenter Server Appliance 6 in the inventory with the older appliance powered off.If you open the console, you will see the new coloured console.
4. Testing the VMware vCenter Server Appliance
Using the vSphere Client or a Web Browser, you can check and connect to your vCenter Server (use the Administrator@vsphere.loca
 Congratulations you have successfully upgraded your VMware vSphere vCenter Server Appliance (VCSA) 5.5 to 6.0.
Basic VMware Articles Series:
During this series of articles VMware released VMware vSphere 5.5 and VMware vSphere Hypervisor ESXi 5.5. These articles are also applicable to VMware vSphere Hypervisor ESXi 5.0 and 5.5. For consistency, I have used VMware vSphere Hypervisor ESXi 5.1 throughout this series.
Part 1: HOW TO: Install and Configure VMware vSphere Hypervisor 5.1 (ESXi 5.1)
Part 2: HOW TO: Connect to the VMware vSphere Hypervisor 5.1 (ESXi 5.1) using the vSphere Client
Part 3: HOW TO: Create an ISO CD-ROM/DVD-ROM image (*.iso), and MD5 checksum signature, for use with VMware vSphere Hypervisor 5.1 (ESXi 5.1)
Part 4: HOW TO: Upload an ISO CD-ROM/DVD-ROM image to a VMware datastore for use with VMware vSphere Hypervisor 5.1 (ESXi 5.1) using the vSphere Client, and checking its MD5 checksum signature is correct.
Part 5: HOW TO: Enable SSH Remote Access on a VMware vSphere Hypervisor 5.1 (ESXi 5.1)
Part 6: HOW TO: Create your first Linux Virtual Machine on a VMware vSphere Hypervisor 5.1 (ESXi 5.1) Host Server
Part 7: HOW TO: Create your first Windows Virtual Machine on a VMware vSphere Hypervisor 5.1 (ESXi 5.1) Host Server
Part 8: HOW TO: Install VMware Tools for Windows on a VMware Windows virtual machine on a VMware vSphere Hypervisor 5.1 (ESXi 5.1) Host Server
Part 9: HOW TO: Install VMware Tools for Linux on a VMware Linux virtual machine on a VMware vSphere Hypervisor 5.1 (ESXi 5.1) Host Server
Part 10: HOW TO: Backup (Export) and Restore (Import) virtual machines to VMware vSphere Hypervisor 5.1 for FREE
Part 11: HOW TO: Suppress Configuration Issues System logs on host are stored on non-persistent storage
Part 12: HOW TO: Configure and Replace the SSL Certificate on a VMware vSphere Hypervisor 5.1 (ESXi 5.1) Host Server
Part 13: HOW TO: Configure basic networking on a VMware vSphere Hypervisor 5.1 (ESXi 5.1) Host Server**************************
Thank you for reading my article, please leave valuable feedback. If you liked my VMware article and would like to see more Articles from me, please click the Yes button near the: Was this article helpful? at the bottom of this article just below and to the right of this information. Thank You. Do not forget if you have a question about this article or another VMware, Virtualisation, Windows Server 2012 question, why not post a Question for Me and the other Experts Exchange Experts in the VMware, Virtualisation, Windows 2008, Windows 2012 Zones. I look forward to hearing from you. - Andy :- twitter @einsteinagogo
**************************
EE Fellow, MVE, Expert of the Year 2021,2017-11, Scribe 2016-2012, Author of the Year 2018-6,2013-2012 VMware vExpert Pro, vExpert 2022-2011
Have a question about something in this article? You can receive help directly from the article author. Sign up for a free trial to get started.
Comments (0)