

Browse All Articles > Excel Macros: Solutions using the Current Selection
Preamble
If you have followed a link to this article from an Excel question involving a macro solution, it is probably for the first section, starting just below. Use the [Back] button of your browser to return to the question.
If you are an Expert in the Excel zone or if you are simply interested in macros using the current selection, skip over the tutorial and go to the Introduction section of the technical article, towards the end.
How to implement the solution?
¯¯¯¯¯¯¯¯¯¯¯¯¯¯¯¯¯¯¯¯¯¯¯¯¯¯
The solution you have been offered is a code snippet; it looks something like this:
It will look somewhat like this:
![VB Editor opened from Excel]() You now have two applications running, Excel and VB. Unlike anything you have seen up to now on a computer, you have two applications working on the same file, as can be seen in the title bars. Saving the workbook from Excel and saving the "VBA Project" from the Visual Basic Editor is exactly equivalent.
You now have two applications running, Excel and VB. Unlike anything you have seen up to now on a computer, you have two applications working on the same file, as can be seen in the title bars. Saving the workbook from Excel and saving the "VBA Project" from the Visual Basic Editor is exactly equivalent.
You should now have see something called "Module1" in the project explorer, and you should see a blank window, with perhaps the friendly greeting "Option Explicit" at the top. Nothing explicit about it, and this is not the place to make it so; just leave it there for good luck.
Now switch to the comment with the macro, select the entire snippet and copy. Switch back to Visual Basic and paste everything into that white space, below the line with "Option Explicit", where the cursor stands already.
You should see:
From the menu, choose: (Compile | <VBAProject>). The name of the project may vary, but if you are certain that the module (visible in the project explorer) is part of your workbook, then it's the correct project.
If you get an error while compiling, and if you can't correct it, report back. Again, state the error message and the selected word in context, for example:
That's it! The workbook has learned a new trick. We don't know if it's the right trick, but the macro is ready to be run.
If the Visual Basic Editor is still open:
____________________
With luck, you can leave the tutorial here, but please scroll down to end of the article, and click "yes" if you found it useful.
The following sections give additional and sometimes more technical information.
¯¯¯¯¯¯¯¯¯¯¯¯¯¯¯¯¯¯¯¯
Interlude
A computer expert in "geek mode", using Excel 2003 US, can perform the above in three seconds, starting from the EE post: [Select All], Ctrl+C, Alt+Tab (to Excel), Alt+(F11,I,M), Ctrl+V, Alt+F4, <select cells>, Alt+F8, [Enter]. Done!
-- Oops! compile error? wait... (Even experts make mistakes!)
Better to take it slow. Still, if you get a compile error, or a run-time error, VB will be opened for you, or it will open when you use the button [Debug]. A line should be highlighted. If you report the error, please note the message, the line where the error occurred, and, if a word is selected, which one it is.
Editing the macro
If you need to make changes to the macro, you can return to the VB Editor just like the first time. Normally, "Module1" will already be open in the current window. If not, a double-click on its name in the project explorer will open it.
You can also locate and open your macro from Excel:
Compatibility Issues
Excel 2007 uses a default format, with extension '.xlsx', which does not support macros for security reasons (see below). In order to add macros and use them, the workbook must be saved using the "Macro enabled Workbook Format", with extension '.xlsm'.
Many other file formats do not support macros. If you save using an older format, like Excel 4, or any non-Excel format, including CSV, the macros will disappear.
Tip: If you need to run a macro on a file that does not support them, you can open another workbook containing the macro, at the same time. The macro will be available in both workbooks, and will work as expected in both.
Warnings
You have added a macro to your workbook. A macro can potentially do harmful things, like deleting your "MyPictures" folder, or send friendly e-mails to your contact list. If you have obtained the macro from a trusted location, it won't do anything like that, of course, but only you know that.
Please be aware of the following consequences:
Macro Security
If you close and re-open the workbook, the macro might no longer work, or you might get the message:
The exact behaviour regarding workbooks with macros depends on the settings in (Tools | Macro | Security), and on which are the "trusted zones" in relation with the file location. Be aware, however, that changing these settings might be against your company policies! Contact your IT department in case of doubt.
Email Virus Warnings
Sending a workbook containing macros is a potential risk. What if you had maliciously developed the next "I love you" virus in the monthly budget report? Many mail systems will delete or quarantine any workbook containing macros, and the recipient will get a "removed attachment" signal at best...
Removing the macro
To remove the macro from the workbook, you need to switch to the Visual Basic Editor again (press Alt+F11). Once in VB, simply choose (File | Remove Module1...), validate, and save.
Note: the Macro dialog box offers the option to delete a macro, without opening the VB Editor. However, this will not remove the module that contained it.
What we have learned
The workbook has been taught a new trick. The macro is saved along with the workbook, and can be executed as many times as needed. It will only affect the current selection.
A macro can trigger different security and email warnings. If needed, it can be removed from the workbook by deleting the module containing it.
In case of problems, please report back to the question where the macro was posted (for debugging) or contact you IT Department (for security issues).
Good luck! -- (°v°)
____________________
This is the end of the Tutorial. If you found it useful, please scroll down to the end of the article and click "yes".
The rest of the article is meant for VB developers, and EE experts. Of course, you are welcome to read further if you are interested.
¯¯¯¯¯¯¯¯¯¯¯¯¯¯¯¯¯¯¯¯
Introduction
Some types of questions keep popping up in the Excel Zone, one of which starts with "I need to change all cells...". It might be a formatting issue, changing the actual value, or any other type of procedural change. Sometimes, the answer doesn't require VB, and a sequence of expertly constructed menu selections and shortcuts produces the expected result.
What if it does require VB? A solution involving VB should be as simple as possible to implement. If the solution can be made to work with the current selection, this article can help to create and support it.
In the rest of this article, you will find some background considerations, an simple example, and the template to create solutions. The tutorial above is there to assist you, and to raise the quality of your answer.
Rationale
In terms of VB-literacy, the target audience of a solution can be ranked like this:
» Macro? - What is a macro?
» Ah, yes. Recording, replaying. I know that!
» I'm a beginner at VB, please be gentle.
» You really mean a VB procedure, don't you?
» Historically, the word "macro" was...
If a solution can be used by the first group, it's a winner. Using a macro, even editing a macro, is part of the interface. Ideally, the solution should read:
» Paste the module below into a new module
» Select the cells you want to change
» Run the macro
If you need more help...
The tutorial is the content of the ellipsis.
Why the Selection object?
Tools and menu actions affecting the current selection are perfectly natural in the familiar Excel user interface. Implementing a macro is sufficiently complex as it is, and nothing further should be required to actually use it.
A macro can be integrated easily into the user environment.
Creating something that resembles other Excel features is also rewarding ("so that's how it's done?") and easily understandable ("for every selected cell, if the value is negative, let the background be red").
Only two serious technical considerations are involved in using the Selection: it's not necessarily a range, and if it is, it can contain millions of cells... The template macro addresses both problems.
The Template
To make things more realistic, here is the problem at hand, inspired by an actual question.
» Check the selection type
» restrict the selection to the used range.
It's quite simple, and rather robust. The actual template to copy and paste is:
Conclusion
I have posted solutions very close to the suggested template numerous times, and I'm not that active in the Excel zones. It's always difficult to guess the expertise of the Asker, and the required dosage of instructions and theory is always difficult to estimate.
The tutorial provides a convenient fall-back; proficient Askers will skip over the suggested "further instructions", while beginners -- those of the first group -- might benefit from a more verbose reference page.
I hope some fellow Experts will feel comfortable using this article as well, or that it will inspire them to write similar instructions and templates for frequently offered solutions. (FAQ>FOS? That's an idea!)
Best of luck with your solutions, to Askers and Experts alike!
Markus G Fischer
(°v°)
If you have followed a link to this article from an Excel question involving a macro solution, it is probably for the first section, starting just below. Use the [Back] button of your browser to return to the question.
If you are an Expert in the Excel zone or if you are simply interested in macros using the current selection, skip over the tutorial and go to the Introduction section of the technical article, towards the end.
How to implement the solution?
¯¯¯¯¯¯¯¯¯¯¯¯¯¯¯¯¯¯¯¯¯¯¯¯¯¯
The solution you have been offered is a code snippet; it looks something like this:
Sub TryThis()

                         ' some vaguely readable things here
                         ' ending with:

End Sub1. The Visual Basic Editor
companion program to edit macrosYou want to add a macro to your workbook, but this isn't done in Excel. Macros are written in a language called "Visual Basic (for Applications)" -- VBA or commonly VB -- and they require a dedicated editor.
Up to Excel 2003, or on the MacIntosh
Choose (Tools | Macros | Visual Basic Editor)
or press Alt+F11
Choose (Tools | Macros | Visual Basic Editor)
or press Alt+F11
In Excel 2007 and above
For simplicity, press Alt+F11
Note: If you intend to work frequently with macros, you should make the Developer tab visible, from the Popular section of the Excel Options. We will assume here that you didn't and use the keyboard short-cuts instead.
For simplicity, press Alt+F11
Note: If you intend to work frequently with macros, you should make the Developer tab visible, from the Popular section of the Excel Options. We will assume here that you didn't and use the keyboard short-cuts instead.
It will look somewhat like this:
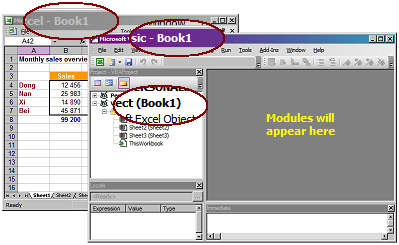 You now have two applications running, Excel and VB. Unlike anything you have seen up to now on a computer, you have two applications working on the same file, as can be seen in the title bars. Saving the workbook from Excel and saving the "VBA Project" from the Visual Basic Editor is exactly equivalent.
How is that even possible?In Excel, you select a workbook among several opened workbooks using the (Windows) menu. In VB, you use the "project explorer" (at the left in the figure), listing all workbooks, even hidden workbooks. The correct workbook should already be selected.
Workbooks have two containers: one for the worksheets, and one for the " VB modules". It's like a small factory with an administrative building and workshops. Modules are the workshops.
Excel, the administration, know everything about numbers, sales plans, and monthly budgets. It also knows how to give orders -- read "run macros". The task will be performed in the workshop, where everybody speaks "basic", and only "basic".
Technically, the VB Editor has been built specifically to work with a container application, which will host the modules in its own files. The same editor is used for Word and PowerPoint, among others, but it can't open any file by itself.
2. Inserting a Module
modules are sheets containing macrosThis is done from the main menu (Insert | Module).You should now have see something called "Module1" in the project explorer, and you should see a blank window, with perhaps the friendly greeting "Option Explicit" at the top. Nothing explicit about it, and this is not the place to make it so; just leave it there for good luck.
Now switch to the comment with the macro, select the entire snippet and copy. Switch back to Visual Basic and paste everything into that white space, below the line with "Option Explicit", where the cursor stands already.
You should see:
Option Explicit

                      Sub TryThis()

                         ' some almost readable things here
                         ' still ending with

End Sub3. Compiling the Project
check spelling and grammar in "basic"From the menu, choose: (Compile | <VBAProject>). The name of the project may vary, but if you are certain that the module (visible in the project explorer) is part of your workbook, then it's the correct project.
If you get an error while compiling, and if you can't correct it, report back. Again, state the error message and the selected word in context, for example:
I get a "compile error", "variable not defined", and the word "ActiveWrokbook" is selected in line 14 of your code snippet.If nothing happens, everything is fine. That's an old tradition for compilers: they talk only to complain, never to say anything nice (like some people I know...).
4. Running the Macro
does it do what you intend it to do?That's it! The workbook has learned a new trick. We don't know if it's the right trick, but the macro is ready to be run.
If the Visual Basic Editor is still open:
If you wish, click [Save] -- this saves the workbook
remember the name of the macro
close the Editor, or switch back to Excel
From Excel, select the cells you want affected, and run the macro.
Press Alt+F8
(or choose (Tools | Macro | Macros...), respectively [Developer tab], Macros)
(or choose (Tools | Macro | Macros...), respectively [Developer tab], Macros)
Select the macro from the list
and click [Run]
If everything works as expected, you can repeat the last step as many times as needed, on other selections. If not, you will have to debug the code.
____________________
With luck, you can leave the tutorial here, but please scroll down to end of the article, and click "yes" if you found it useful.
The following sections give additional and sometimes more technical information.
¯¯¯¯¯¯¯¯¯¯¯¯¯¯¯¯¯¯¯¯
Interlude
A computer expert in "geek mode", using Excel 2003 US, can perform the above in three seconds, starting from the EE post: [Select All], Ctrl+C, Alt+Tab (to Excel), Alt+(F11,I,M), Ctrl+V, Alt+F4, <select cells>, Alt+F8, [Enter]. Done!
-- Oops! compile error? wait... (Even experts make mistakes!)
Better to take it slow. Still, if you get a compile error, or a run-time error, VB will be opened for you, or it will open when you use the button [Debug]. A line should be highlighted. If you report the error, please note the message, the line where the error occurred, and, if a word is selected, which one it is.
Editing the macro
If you need to make changes to the macro, you can return to the VB Editor just like the first time. Normally, "Module1" will already be open in the current window. If not, a double-click on its name in the project explorer will open it.
You can also locate and open your macro from Excel:
Press Alt+F8
(or choose (Tools | Macro | Macros...), respectively [Developer tab], Macros)
(or choose (Tools | Macro | Macros...), respectively [Developer tab], Macros)
Select the macro from the list
and click [Edit]
Compatibility Issues
Excel 2007 uses a default format, with extension '.xlsx', which does not support macros for security reasons (see below). In order to add macros and use them, the workbook must be saved using the "Macro enabled Workbook Format", with extension '.xlsm'.
Many other file formats do not support macros. If you save using an older format, like Excel 4, or any non-Excel format, including CSV, the macros will disappear.
Tip: If you need to run a macro on a file that does not support them, you can open another workbook containing the macro, at the same time. The macro will be available in both workbooks, and will work as expected in both.
Warnings
You have added a macro to your workbook. A macro can potentially do harmful things, like deleting your "MyPictures" folder, or send friendly e-mails to your contact list. If you have obtained the macro from a trusted location, it won't do anything like that, of course, but only you know that.
Please be aware of the following consequences:
Macro Security
If you close and re-open the workbook, the macro might no longer work, or you might get the message:
<File name> contains macros.At least, that's explicit: disabling the macro(s) will prevent any code or potential virus from running, while enabling them lets them do as they please. But hopefully, you do trust that particular macro.
Macros may contain viruses. It is usually safe to disable macros, but if the macros are legitimate, you might loose some functionality.
[Disable Macros] [Enable Macros] [More Info]
The exact behaviour regarding workbooks with macros depends on the settings in (Tools | Macro | Security), and on which are the "trusted zones" in relation with the file location. Be aware, however, that changing these settings might be against your company policies! Contact your IT department in case of doubt.
Email Virus Warnings
Sending a workbook containing macros is a potential risk. What if you had maliciously developed the next "I love you" virus in the monthly budget report? Many mail systems will delete or quarantine any workbook containing macros, and the recipient will get a "removed attachment" signal at best...
Removing the macro
To remove the macro from the workbook, you need to switch to the Visual Basic Editor again (press Alt+F11). Once in VB, simply choose (File | Remove Module1...), validate, and save.
Note: the Macro dialog box offers the option to delete a macro, without opening the VB Editor. However, this will not remove the module that contained it.
What we have learned
The workbook has been taught a new trick. The macro is saved along with the workbook, and can be executed as many times as needed. It will only affect the current selection.
A macro can trigger different security and email warnings. If needed, it can be removed from the workbook by deleting the module containing it.
In case of problems, please report back to the question where the macro was posted (for debugging) or contact you IT Department (for security issues).
Good luck! -- (°v°)
____________________
This is the end of the Tutorial. If you found it useful, please scroll down to the end of the article and click "yes".
The rest of the article is meant for VB developers, and EE experts. Of course, you are welcome to read further if you are interested.
¯¯¯¯¯¯¯¯¯¯¯¯¯¯¯¯¯¯¯¯
Introduction
Some types of questions keep popping up in the Excel Zone, one of which starts with "I need to change all cells...". It might be a formatting issue, changing the actual value, or any other type of procedural change. Sometimes, the answer doesn't require VB, and a sequence of expertly constructed menu selections and shortcuts produces the expected result.
What if it does require VB? A solution involving VB should be as simple as possible to implement. If the solution can be made to work with the current selection, this article can help to create and support it.
In the rest of this article, you will find some background considerations, an simple example, and the template to create solutions. The tutorial above is there to assist you, and to raise the quality of your answer.
Rationale
In terms of VB-literacy, the target audience of a solution can be ranked like this:
» Macro? - What is a macro?
» Ah, yes. Recording, replaying. I know that!
» I'm a beginner at VB, please be gentle.
» You really mean a VB procedure, don't you?
» Historically, the word "macro" was...
If a solution can be used by the first group, it's a winner. Using a macro, even editing a macro, is part of the interface. Ideally, the solution should read:
» Paste the module below into a new module
» Select the cells you want to change
» Run the macro
If you need more help...
The tutorial is the content of the ellipsis.
Why the Selection object?
Tools and menu actions affecting the current selection are perfectly natural in the familiar Excel user interface. Implementing a macro is sufficiently complex as it is, and nothing further should be required to actually use it.
A macro can be integrated easily into the user environment.
Creating something that resembles other Excel features is also rewarding ("so that's how it's done?") and easily understandable ("for every selected cell, if the value is negative, let the background be red").
Only two serious technical considerations are involved in using the Selection: it's not necessarily a range, and if it is, it can contain millions of cells... The template macro addresses both problems.
The Template
To make things more realistic, here is the problem at hand, inspired by an actual question.
We noticed that our inventory numbers, like 001-1, 001-2, 345-9, do not sort correctly when the bin number (after the dash) goes above 9, as in 345-10, 345-11. We decided to reformat them like this: 001-01, 001-02, etc.That's a typical "I need to change all cells..." question. The answer is, along with the standard instructions (and link to this article):
How can we reformat all numbers to the new standard?
Sub AdjustBinNumber()

                          Dim rngSel As Range
                          Dim rngC As Range

                          ' Validate current selection
                          If TypeName(Selection) <> "Range" Then Exit Sub
                          Set rngSel = Intersect(Selection, Selection.WorkSheet.UsedRange)
                          If rngSel Is Nothing Then Exit Sub

                          ' adjust any bin numbers found
                          For Each rngC In rngSel.Cells
                              If rngC Like "[0-9][0-9][0-9]-[0-9]" Then
                                  rngC = Left(rngC, 4) & "0" & Right(rngC, 1)
                              End If
                          Next rngC

End Sub» Check the selection type
» restrict the selection to the used range.
It's quite simple, and rather robust. The actual template to copy and paste is:
Sub Solution()

                          Dim rngSel As Range
                          Dim rngC As Range

                          ' Validate current selection
                          If TypeName(Selection) <> "Range" Then Exit Sub
                          Set rngSel = Intersect(Selection, Selection.WorkSheet.UsedRange)
                          If rngSel Is Nothing Then Exit Sub

                          ' the solution checks all cells, and...
                          _

End SubConclusion
I have posted solutions very close to the suggested template numerous times, and I'm not that active in the Excel zones. It's always difficult to guess the expertise of the Asker, and the required dosage of instructions and theory is always difficult to estimate.
The tutorial provides a convenient fall-back; proficient Askers will skip over the suggested "further instructions", while beginners -- those of the first group -- might benefit from a more verbose reference page.
I hope some fellow Experts will feel comfortable using this article as well, or that it will inspire them to write similar instructions and templates for frequently offered solutions. (FAQ>FOS? That's an idea!)
Best of luck with your solutions, to Askers and Experts alike!
Markus G Fischer
(°v°)
Have a question about something in this article? You can receive help directly from the article author. Sign up for a free trial to get started.
Comments (2)
Author
Commented:I appreciate the fact that articles are submitted to a real editorial process. It requires more work, but that's what makes an article worth publishing for a large audience. Earning the "EE-approved" status is worth the effort, thank you for that as well!
Now that it's "out there", I'm especially interested in feedback from Experts trying to use this article as part of their answers.
(°v°)
Commented:
Ravi.