

Browse All Articles > Printing labels with Access
Introduction
Printing labels is one of those things that can be surprisingly fun or extremely tedious, depending on the program being used.
The first time I had to teach "labels", it was fun. The program was WordPerfect -- some antique DOS version without even a print preview feature -- and it was fun because it was easy, and it worked. Before the morning break, every student had printed a first sheet of "fake" labels, in reality photocopies of an original with hand-drawn rectangles.
Once I (reluctantly) switched to Word, the fun was gone. Labels had become complicated. Something be be feared and somewhat magical, like many other features of that program. It was no longer possible to cover labels, envelopes, columns, and basic mail-merge in one day; labels alone required one day.
This article is about Access. What will it be? fun or tedious?
If you have used the "label wizard", you probably think the latter. There is obviously some magic involved: sometimes it works and other times you are informed that "some data may not be displayed" or that "the section width is greater than the page width", you get the wrong paper size, or experience some other mishaps.
There are explanations for all of them, just as tedious as the symptoms, but their fundamental cause is simple. The "wizard", just like Word, doesn't use virtual pages, but tries to solve everything using the physical page. A typographer will automatically treat a label as nothing more than a special paper size, and compose content for that size. The second problem, how to print several compositions on one large "label sheet" is a distinct task, but in reality an easy one. The wizard, obviously, isn't a typographer.
This article demonstrates a simple and efficient way to handle labels in Access, perhaps pleasant enough for them to become fun again. Although the screen shots are from version 2003, exactly the same method works in all versions.
Label Wizardry
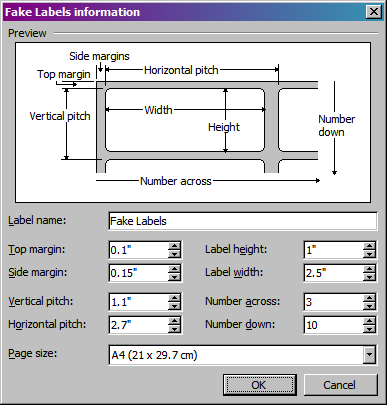
I am not going to explain how to use the wizards, but they provide a good introduction, especially in the way they fail. Like for my classes, I didn't buy any actual labels, but invented my own. I will need to define "custom" labels. Let's peek into Word 2003, to get a feeling of how labels are viewed in Office applications.
![label definition in Word 2003]() The figure scales automatically as I enter the measurements -- very cool! -- and thus provides an accurate description of my labels. Eight numbers are needed, and only the choice of the word "margin" instead of "offset" is at all disputable. We will come to what margins are shortly.
The figure scales automatically as I enter the measurements -- very cool! -- and thus provides an accurate description of my labels. Eight numbers are needed, and only the choice of the word "margin" instead of "offset" is at all disputable. We will come to what margins are shortly.
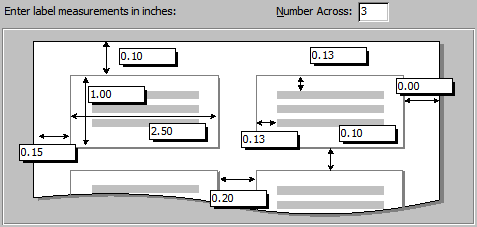
The "New Report: Label Wizard" in Access 2003 presents things a bit differently, but needs essentially the same metrics.
![label definition in Access 2003]() The number of rows is missing; it will be determined by the page size. Measuring the space between labels is equivalent with measuring the pitch (in Word's wizard). But there are three more numbers: two internal margins (why two?) and the right-side offset between the border of the page and the last label. That seems wrong: can't it be calculated? It could if the page size was known, but apparently it isn't... and can't be selected!
The number of rows is missing; it will be determined by the page size. Measuring the space between labels is equivalent with measuring the pitch (in Word's wizard). But there are three more numbers: two internal margins (why two?) and the right-side offset between the border of the page and the last label. That seems wrong: can't it be calculated? It could if the page size was known, but apparently it isn't... and can't be selected!
The real problem occurs when the [OK] button is pressed: "One or more margins are set outside the printable area of the page. Would you like to increase the appropriate margins?" If you don't comply, the labels won't print properly, but if you do, the wizard doesn't increase the margins. It increases the offsets of the labels. What are you supposed to do? unstick the labels and move them?
If you go through with it anyway, you will notice that the wizard attempts to use the detail section as label, just like Word attempts to use table cells. And that is wrong. The new 2.5" × 1" labels should be treated just like a new paper size, but that would require the concept of virtual pages on a physical page. We will abandon the wizard(s) here, and proceed as a typographer would.
Labels as Pages
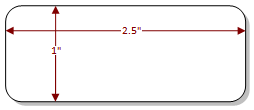
Let's imagine we want to print new price tags for products. The size 2.5" × 1" has been selected, probably as stickers. We don't need to know yet how they will be arranged on a page -- for all we know a special label printer will be used.
![the selected label]() There are five elements to be placed: should the price be in the middle or in the lower right corner? should we place the packaging between the name and the price or in a corner? do we go for a computer listing look with a mono-spaced font or an elaborate layout with different font sizes? can we use colours?
There are five elements to be placed: should the price be in the middle or in the lower right corner? should we place the packaging between the name and the price or in a corner? do we go for a computer listing look with a mono-spaced font or an elaborate layout with different font sizes? can we use colours?
This isn't the topic of this article, and you can probably imagine the possibilities. One of the proposed templates is selected and approved (or you simply whipped one up, in good taste naturally).
![typographical template]() The printed area, called "le miroir de page" in French -- before "page mirroring" started to mean something entirely different -- is surrounded by white-space, called "blanc". Incidentally, the entire upper right corner and the area at the left of the price are also "blanc"; typographers know that "blanc reads" just like "letters read", it's all part of the written language, equivalent to rhythm and pauses in the spoken language.
The printed area, called "le miroir de page" in French -- before "page mirroring" started to mean something entirely different -- is surrounded by white-space, called "blanc". Incidentally, the entire upper right corner and the area at the left of the price are also "blanc"; typographers know that "blanc reads" just like "letters read", it's all part of the written language, equivalent to rhythm and pauses in the spoken language.
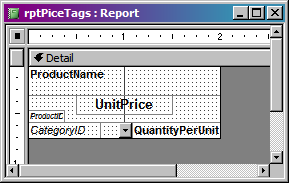
I'm digressing again. The technical information we need is as the right. Inner margins have been chosen, one eighth and one quarter of an inch, leaving a used area, a "mirror" of two by three-quarter inches. And that is the report's detail section.
![report detail section in design view]() The inner size of the window is about that of an actual label, the background grey represents the amount of "blanc" that will be distributed equally around the printed area.
The inner size of the window is about that of an actual label, the background grey represents the amount of "blanc" that will be distributed equally around the printed area.
Notice the two-line text box for prices, explaining why the price is just a little too low below short product names. A bit harder to see: the combo box for the category name overlaps the text box for the field 'quantity per unit'. Both are competing for the central space: a long packaging description could step over the centre, not necessarily overwriting the category name, if it happens to be a short one.
The wizard, and perhaps some novice users of Access, will instead create a detail section having the exact size of the label. It makes sense in terms of "blanc reads": the visual presence of the margins helps to design the label. But that was the previous step, creating the template, not necessarily done in Access. Once the template exists, the margins should be collapsed.
To clarify: to start with a detail section mimicking an actual label is perfectly fine during the typographical design stage. Once a layout has been created, the group of controls should be moved to the upper left corner, and the section size reduced to the "mirror" only.
This is important because, when the label margins are left within the section, it means that the overall margins need to be reduced. When these margins become smaller than the printer's minimal margins, Access will complain. This is something it doesn't handle at all gracefully, even if there is nothing to print there. In the figure below, I used a printer with rather large "unprintable margins", and the labels are physically just inside them. This is not a problem as long as the detail section doesn't reach them.
We now have our design, and a "mirror", let's talk about printing.
Printing the Labels
The typographer's job is done, we need to put on our printer's cap. We have something measuring 2" × .75" to be printed perfectly centred on 2.5" × 1" labels, 30 on a page. Now all the page metrics become important, like offsets and pitch. Strangely, those we really need are yet missing...
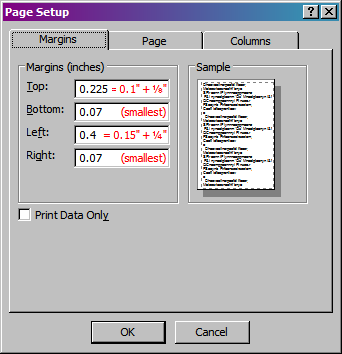
![print layout metrics]() Elementary school arithmetic, perhaps, but it needs to be done. The left "mirror" offset between the page border and the first printing area, equals the label offset plus the label left margin. Access will call this offset the "margin". Typographically, it isn't... but it would be if printing on normal paper without labels. To avoid confusion, let's call it the "page margin".
Elementary school arithmetic, perhaps, but it needs to be done. The left "mirror" offset between the page border and the first printing area, equals the label offset plus the label left margin. Access will call this offset the "margin". Typographically, it isn't... but it would be if printing on normal paper without labels. To avoid confusion, let's call it the "page margin".
![report page setup -- margins]() The bottom and right margins should not be calculated at all. Simply set them to some small value; they will be whatever remains after printing the labels.
The bottom and right margins should not be calculated at all. Simply set them to some small value; they will be whatever remains after printing the labels.
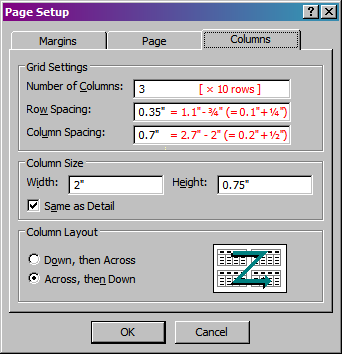
![report page setup -- columns]() For this method, the option "same as detail" should be left checked. It is possible to specify another width than the detail section -- in which case the column spacing needs to be adjusted accordingly -- but the row height doesn't work as expected.
For this method, the option "same as detail" should be left checked. It is possible to specify another width than the detail section -- in which case the column spacing needs to be adjusted accordingly -- but the row height doesn't work as expected.
And that, as they say, was it!
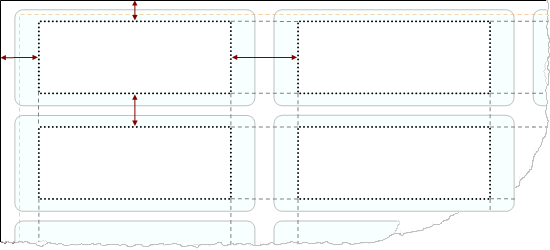
![printed labels (at 68% zoom)]() The dotted rectangles represent the "mirrors", and aren't meant to be printed, naturally.
The dotted rectangles represent the "mirrors", and aren't meant to be printed, naturally.
Label Design Techniques
The single most important thing to mention is that labels can't grow. This means the section should have both "can grow: no" and "can shrink: no". If there is nothing to be printed below them, you can however have growing controls. When you set "can grow: yes", it will automatically be reset for the section, which is normally friendly but a little annoying when building labels.
If you need static information below -- a label's page footer -- you cannot have growing text boxes. It is possible to do so using a tiny sub-report (see the demo database), but we won't go into details here. In most cases, leave "can grow: no" for all controls. Make your text boxes large enough to accommodate for the largest information they can display(or are likely to display during the life of the application). If this means a three-line text box for the address, so be it.
Growing text boxes have another effect, however: they push the controls below down (or pull them with the option "can shrink: yes"). To obtain a similar effect, provided you accept to use a single font setting, is obtained through multi-line concatenation.
Concatenation is the operation of building text from smaller elements, and it is especially important when the space is limited. More information can be found in the article Concatenation in Access Reports (and Forms).
Since space is measured, precise alignment and stacking can become difficult. If you use very small fonts (size 6 is still readable when printed), you start to wish for a zoom feature in design view. Become acquainted with (Format | Align | ...) and (Format | Size | ...), also available from the context menu: they will be your best friends.
The final sections show Visual Basic solutions to two common requests. There is no harm in reading them even if you don't program and don't need the solutions, but you can also skip over to the description of the demo file.
Skipping a number of Labels
When we print the price tags from our example, we are likely to use only a part of the last sheet of labels. What to do with the remaining labels? Many people would like to use them the next time, but that requires skipping over the used (or already missing) labels on the top of the page.
There aren't any good solution without using Visual Basic. But luckily, the code is easy to understand and quite generic.
The "report open" event occurs before it even becomes visible. The variable iSkip is set to something impossible and then the code will loop until it becomes valid: a number between zero and twenty-nine (there are thirty labels per sheet).
The InputBox prompts the user and suggests the default value "0". If the user presses [Cancel], nothing is returned, so the entire reporting process is canceled as well (Cancel = True). If something was entered, an attempt is made to convert it to a number. If the number is in range, the loop terminates, and printing starts.
The "detail format" event occurs after each label has been formatted, but before printing (or including it in the preview). If iSkip is different from zero, we want to skip this label position. "Print section" is set to False (it will not print anything), and "next record" is also set to False (the first product price tag still awaits printing). However, the third setting of the family, "move layout" is left True, and the variable is decremented (one less to skip). Nothing is printed, the current record doesn't advance, but the print position moves to the next label.
To use the module, open the Visual Basic editor from your report in design view, and copy-paste the entire module. You will probably need to adjust the authorised label counts, the "30" and the input box prompt, but that is all.
Printing one page of labels
In many circumstances, it is useful to print full sheets instead of individual labels. One can even imagine label reports used only for that purpose: print one sheet of a given label. For example, you could create your own business card in a tiny detail section and print it several times on thick paper, which you then cut into cards (there is pre-cut paper for that purpose). Or you have written an invitation and want to print twenty copies, four on a page.
You proceed exactly like in the example at the start of this article: design, test, obtain the metrics, etc. You only need a way to tell the report to repeat every "label" (or business card, invitation, etc.) thirty times. The Visual Basic code for that is deceptively simple:
To insert this single line of code, select the detail section and find the "on print" event in the property sheet. Create the module and the event using the small builder button (with the ellipsis) and paste the line starting with "If PrintCount..." between the newly created lines, "Private Sub..." and "End Sub". Again, adjust the label count.
The demo file
Although a demo file is absolutely not required to understand and use the method described here, it might be useful to tweak the exact example described, and it's always good to practice on foreign scratch data. Also, there is a bonus for fellow Access instructors.
The file contains only three tables, one pop-up form, and half a dozen reports.
Conclusion
I haven't been "teaching labels" in Access a lot. But by avoiding the wizard entirely, and doing labels as they should be done, typographically, I was always able to make it fun. Detail sections arranged in evenly spaced columns aren't true "virtual pages", but they come close enough for us to use the concept, to good effect.
With that in mind, it is even possible to repair a failed attempt of the label wizard, or to improve on it. However, I hope you are far beyond that level by now.
Success with your labels!
Markus G Fischer
(°v°)
about unrestricted Access
Printing labels is one of those things that can be surprisingly fun or extremely tedious, depending on the program being used.
The first time I had to teach "labels", it was fun. The program was WordPerfect -- some antique DOS version without even a print preview feature -- and it was fun because it was easy, and it worked. Before the morning break, every student had printed a first sheet of "fake" labels, in reality photocopies of an original with hand-drawn rectangles.
Once I (reluctantly) switched to Word, the fun was gone. Labels had become complicated. Something be be feared and somewhat magical, like many other features of that program. It was no longer possible to cover labels, envelopes, columns, and basic mail-merge in one day; labels alone required one day.
This article is about Access. What will it be? fun or tedious?
If you have used the "label wizard", you probably think the latter. There is obviously some magic involved: sometimes it works and other times you are informed that "some data may not be displayed" or that "the section width is greater than the page width", you get the wrong paper size, or experience some other mishaps.
There are explanations for all of them, just as tedious as the symptoms, but their fundamental cause is simple. The "wizard", just like Word, doesn't use virtual pages, but tries to solve everything using the physical page. A typographer will automatically treat a label as nothing more than a special paper size, and compose content for that size. The second problem, how to print several compositions on one large "label sheet" is a distinct task, but in reality an easy one. The wizard, obviously, isn't a typographer.
This article demonstrates a simple and efficient way to handle labels in Access, perhaps pleasant enough for them to become fun again. Although the screen shots are from version 2003, exactly the same method works in all versions.
Label Wizardry
I am not going to explain how to use the wizards, but they provide a good introduction, especially in the way they fail. Like for my classes, I didn't buy any actual labels, but invented my own. I will need to define "custom" labels. Let's peek into Word 2003, to get a feeling of how labels are viewed in Office applications.
 The figure scales automatically as I enter the measurements -- very cool! -- and thus provides an accurate description of my labels. Eight numbers are needed, and only the choice of the word "margin" instead of "offset" is at all disputable. We will come to what margins are shortly.
The "New Report: Label Wizard" in Access 2003 presents things a bit differently, but needs essentially the same metrics.
 The number of rows is missing; it will be determined by the page size. Measuring the space between labels is equivalent with measuring the pitch (in Word's wizard). But there are three more numbers: two internal margins (why two?) and the right-side offset between the border of the page and the last label. That seems wrong: can't it be calculated? It could if the page size was known, but apparently it isn't... and can't be selected!
The real problem occurs when the [OK] button is pressed: "One or more margins are set outside the printable area of the page. Would you like to increase the appropriate margins?" If you don't comply, the labels won't print properly, but if you do, the wizard doesn't increase the margins. It increases the offsets of the labels. What are you supposed to do? unstick the labels and move them?
If you go through with it anyway, you will notice that the wizard attempts to use the detail section as label, just like Word attempts to use table cells. And that is wrong. The new 2.5" × 1" labels should be treated just like a new paper size, but that would require the concept of virtual pages on a physical page. We will abandon the wizard(s) here, and proceed as a typographer would.
Labels as Pages
Let's imagine we want to print new price tags for products. The size 2.5" × 1" has been selected, probably as stickers. We don't need to know yet how they will be arranged on a page -- for all we know a special label printer will be used.
 There are five elements to be placed: should the price be in the middle or in the lower right corner? should we place the packaging between the name and the price or in a corner? do we go for a computer listing look with a mono-spaced font or an elaborate layout with different font sizes? can we use colours?
This isn't the topic of this article, and you can probably imagine the possibilities. One of the proposed templates is selected and approved (or you simply whipped one up, in good taste naturally).
 The printed area, called "le miroir de page" in French -- before "page mirroring" started to mean something entirely different -- is surrounded by white-space, called "blanc". Incidentally, the entire upper right corner and the area at the left of the price are also "blanc"; typographers know that "blanc reads" just like "letters read", it's all part of the written language, equivalent to rhythm and pauses in the spoken language.
I'm digressing again. The technical information we need is as the right. Inner margins have been chosen, one eighth and one quarter of an inch, leaving a used area, a "mirror" of two by three-quarter inches. And that is the report's detail section.
 The inner size of the window is about that of an actual label, the background grey represents the amount of "blanc" that will be distributed equally around the printed area.
Notice the two-line text box for prices, explaining why the price is just a little too low below short product names. A bit harder to see: the combo box for the category name overlaps the text box for the field 'quantity per unit'. Both are competing for the central space: a long packaging description could step over the centre, not necessarily overwriting the category name, if it happens to be a short one.
The wizard, and perhaps some novice users of Access, will instead create a detail section having the exact size of the label. It makes sense in terms of "blanc reads": the visual presence of the margins helps to design the label. But that was the previous step, creating the template, not necessarily done in Access. Once the template exists, the margins should be collapsed.
To clarify: to start with a detail section mimicking an actual label is perfectly fine during the typographical design stage. Once a layout has been created, the group of controls should be moved to the upper left corner, and the section size reduced to the "mirror" only.
This is important because, when the label margins are left within the section, it means that the overall margins need to be reduced. When these margins become smaller than the printer's minimal margins, Access will complain. This is something it doesn't handle at all gracefully, even if there is nothing to print there. In the figure below, I used a printer with rather large "unprintable margins", and the labels are physically just inside them. This is not a problem as long as the detail section doesn't reach them.
We now have our design, and a "mirror", let's talk about printing.
Printing the Labels
The typographer's job is done, we need to put on our printer's cap. We have something measuring 2" × .75" to be printed perfectly centred on 2.5" × 1" labels, 30 on a page. Now all the page metrics become important, like offsets and pitch. Strangely, those we really need are yet missing...
 Elementary school arithmetic, perhaps, but it needs to be done. The left "mirror" offset between the page border and the first printing area, equals the label offset plus the label left margin. Access will call this offset the "margin". Typographically, it isn't... but it would be if printing on normal paper without labels. To avoid confusion, let's call it the "page margin".
Left page margin = left offset + left label margin
Top page margin = top offset + top label margin
Column spacing = horizontal pitch - label width
(= horizontal gap + label left and right margins)
(= horizontal gap + label left and right margins)
Row spacing = vertical pitch - label height
(= vertical gap + label top and bottom margins)
The numbers are simply entered into the relevant tabs of the "page setup" dialogue:
(= vertical gap + label top and bottom margins)
 The bottom and right margins should not be calculated at all. Simply set them to some small value; they will be whatever remains after printing the labels.
 For this method, the option "same as detail" should be left checked. It is possible to specify another width than the detail section -- in which case the column spacing needs to be adjusted accordingly -- but the row height doesn't work as expected.
And that, as they say, was it!
 The dotted rectangles represent the "mirrors", and aren't meant to be printed, naturally.
Label Design Techniques
The single most important thing to mention is that labels can't grow. This means the section should have both "can grow: no" and "can shrink: no". If there is nothing to be printed below them, you can however have growing controls. When you set "can grow: yes", it will automatically be reset for the section, which is normally friendly but a little annoying when building labels.
If you need static information below -- a label's page footer -- you cannot have growing text boxes. It is possible to do so using a tiny sub-report (see the demo database), but we won't go into details here. In most cases, leave "can grow: no" for all controls. Make your text boxes large enough to accommodate for the largest information they can display(or are likely to display during the life of the application). If this means a three-line text box for the address, so be it.
Growing text boxes have another effect, however: they push the controls below down (or pull them with the option "can shrink: yes"). To obtain a similar effect, provided you accept to use a single font setting, is obtained through multi-line concatenation.
Concatenation is the operation of building text from smaller elements, and it is especially important when the space is limited. More information can be found in the article Concatenation in Access Reports (and Forms).
Since space is measured, precise alignment and stacking can become difficult. If you use very small fonts (size 6 is still readable when printed), you start to wish for a zoom feature in design view. Become acquainted with (Format | Align | ...) and (Format | Size | ...), also available from the context menu: they will be your best friends.
The final sections show Visual Basic solutions to two common requests. There is no harm in reading them even if you don't program and don't need the solutions, but you can also skip over to the description of the demo file.
Skipping a number of Labels
When we print the price tags from our example, we are likely to use only a part of the last sheet of labels. What to do with the remaining labels? Many people would like to use them the next time, but that requires skipping over the used (or already missing) labels on the top of the page.
There aren't any good solution without using Visual Basic. But luckily, the code is easy to understand and quite generic.
Option Explicit

                      Dim iSkip As Integer   ' number of labels to skip

                      Private Sub Detail_Format(Cancel As Integer, FormatCount As Integer)
                          If iSkip Then
                              Me.PrintSection = False
                              Me.NextRecord = False
                              iSkip = iSkip - 1
                          End If
                      End Sub

                      Private Sub Report_Open(Cancel As Integer)

                          Dim strAnswer As String

                          iSkip = -1
                          Do Until 0 <= iSkip And iSkip < 30
                              strAnswer = InputBox("number of labels to skip (0-29)", , 0)
                              If strAnswer = vbNullString Then Cancel = True: Exit Sub
                              If IsNumeric(strAnswer) Then iSkip = strAnswer
                          Loop

End SubThe "report open" event occurs before it even becomes visible. The variable iSkip is set to something impossible and then the code will loop until it becomes valid: a number between zero and twenty-nine (there are thirty labels per sheet).
The InputBox prompts the user and suggests the default value "0". If the user presses [Cancel], nothing is returned, so the entire reporting process is canceled as well (Cancel = True). If something was entered, an attempt is made to convert it to a number. If the number is in range, the loop terminates, and printing starts.
The "detail format" event occurs after each label has been formatted, but before printing (or including it in the preview). If iSkip is different from zero, we want to skip this label position. "Print section" is set to False (it will not print anything), and "next record" is also set to False (the first product price tag still awaits printing). However, the third setting of the family, "move layout" is left True, and the variable is decremented (one less to skip). Nothing is printed, the current record doesn't advance, but the print position moves to the next label.
To use the module, open the Visual Basic editor from your report in design view, and copy-paste the entire module. You will probably need to adjust the authorised label counts, the "30" and the input box prompt, but that is all.
Printing one page of labels
In many circumstances, it is useful to print full sheets instead of individual labels. One can even imagine label reports used only for that purpose: print one sheet of a given label. For example, you could create your own business card in a tiny detail section and print it several times on thick paper, which you then cut into cards (there is pre-cut paper for that purpose). Or you have written an invitation and want to print twenty copies, four on a page.
You proceed exactly like in the example at the start of this article: design, test, obtain the metrics, etc. You only need a way to tell the report to repeat every "label" (or business card, invitation, etc.) thirty times. The Visual Basic code for that is deceptively simple:
Private Sub Detail_Print(Cancel As Integer, PrintCount As Integer)
                          If PrintCount < 30 Then Me.NextRecord = False
End SubTo insert this single line of code, select the detail section and find the "on print" event in the property sheet. Create the module and the event using the small builder button (with the ellipsis) and paste the line starting with "If PrintCount..." between the newly created lines, "Private Sub..." and "End Sub". Again, adjust the label count.
The demo file
Although a demo file is absolutely not required to understand and use the method described here, it might be useful to tweak the exact example described, and it's always good to practice on foreign scratch data. Also, there is a bonus for fellow Access instructors.
The file contains only three tables, one pop-up form, and half a dozen reports.
rptPriceTags is the example built throughout the article. It still contains the dotted rectangle representing the "mirror".
rptPriceTags_Skip and rptPriceTags_Page are copies, with the Visual Basic code added to skip a number of labels and to print thirty copies of each label, respectively.
rptCard is a "business card" demonstration, the idea being to print on A4 paper, and then cut the page four times in half to get 16 A8 cards. This report should fail on printers with any significant unprintable areas, and on Letter size.
rptShipping prints four "shipping slips" per page, on yet unspecified large labels. It demonstrates advanced techniques to obtain "growing" and "shrinking" effects on a non-growing detail section. The address uses multi-line concatenation, and a small non-growing sub-report is also included. If the allotted area is too small, information will be lost.
rptFakeLabels, finally, uses report line and circle drawing methods to print a fake label sheet. It is entirely configurable, and you can print fake labels for any exercise you can think of. The "factory settings" are those of the article.
Note: label frames falling outside of the print margins will not be visible, but the metrics will otherwise be accurate. Use the smallest page margins possible.
labels.mdb
Note: label frames falling outside of the print margins will not be visible, but the metrics will otherwise be accurate. Use the smallest page margins possible.
Conclusion
I haven't been "teaching labels" in Access a lot. But by avoiding the wizard entirely, and doing labels as they should be done, typographically, I was always able to make it fun. Detail sections arranged in evenly spaced columns aren't true "virtual pages", but they come close enough for us to use the concept, to good effect.
With that in mind, it is even possible to repair a failed attempt of the label wizard, or to improve on it. However, I hope you are far beyond that level by now.
Success with your labels!
Markus G Fischer
(°v°)
about unrestricted Access
Have a question about something in this article? You can receive help directly from the article author. Sign up for a free trial to get started.
Comments (12)
Commented:
Commented:
My grief is printing tractor-fed labels.
Getting Access, Windows and an Okidata Microline 320 turbo to agree on how far to roll the single label Avery 4145 labels has been ... challenging.
Getting XP, Win 7 and Access to all agree that the paper is NOT Letter is the first step
Getting them to agree on a paper-size they believe the Okidata can print to is also a challenge.
And then getting it set up so that they don't have to manually adjust the paper roll every 8 labels or so has been impossible.
Time to take another whack at it!
Author
Commented:As I recall from years back (writing printer drivers for WordPerfect), these printers have a trigger area which would automatically generate a form feed if written to. This article specifically shows how to avoid writing outside the print area, even if the wizard-created labels would suggest you should. It also helps to set a larger page size than it really is in the printer driver, and to rely on the printer's form feed handling to advance to the top of the next page. This assumes you can set the printer's page size independently from the drivers...
The first goal is to have a two page report print on the same location for both pages (meaning the form feed metrics work). After that, the labels become the fun part!
(^v°)
Commented:
A 4145 is technically called 2.5" Wide x 15/16" Long
The actual fold on the label measures to 1.0"
The driver will not believe that the Okidata can print to a 15/16" page, so I am stuck creating a 1" high custom paper type.
I can create a 15/16" high paper size, but the Access GUI won't permit it to be selected as a paper size
I can try to force Access to use via VBA--but that is tough given the physical environment.
Any time you touch the report in design view it reverts to Letter paper size, so I have code to force it back to a proper page size
One Okidata is on WinXP-32 bit and shared while the other is on Win7-64 bit and shared.
This makes deploying a common front-end that will just work...challenging
The labels themselves print singly, one at a time.
Reports that need to be snail mailed are generated.
A form is opened with a combo box to select one of 2600 clients and one of three possible mailing addresses.
A command button is pushed, a label prints, a new client is selected.
Repeat, until the mailing labels have all been printed.
Stick them on envelopes, stuff the envelopes and mail.
So, the report is strictly a one page affair.
Getting them to print in exactly the same place is the challenge :)
Nick67
Commented:
View More