Can't Install an Antivirus - Windows Security Center still detects previous AV


Published:
Browse All Articles > Can't Install an Antivirus - Windows Security Center still detects previous AV
Oftentimes after the removal of an Antivirus, Windows Security Center will still report that it's installed and prevent the installation of a new one. I've seen many threads where users have experienced this problem.
This can happen with either rogue or legitimate Antivirus/Anti-spyware/Firewall products that support WMI integration e.g., Kaspersky, AVG, SAV, Panda etc., that after the program has been uninstalled, Windows Security Center will still report that the non-existent AV/AS or Firewall is still enabled therefore preventing the installation of an antivirus.
Even after using Symantec's CleanWipe to remove SAV, Security Center still detect it as installed.
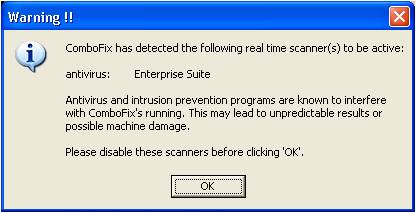
When scanning with ComboFix you will be alerted that the previous antivirus is STILL RUNNING in the background even though all its files and registry entries had been removed as the case of this rogue Enterprise Suite below:
![CF alert]()
The entries in the DDS and ComboFix logs will still show 'enabled'.
AV: Enterprise Suite *On-access scanning enabled* (Updated) {1ED39ED7-08A3-4E29-8DAC-5D10956F61A3}
FW: Enterprise Suite *enabled* {FF6B533C-4F16-43D9-BBC2-927BCFFAC6CA}
Here is an example thread, where Enterprise Suite had been removed from the system and yet WSC is still detecting it:
*Cannot Install an Anti-Virus*
https://www.experts-exchange.com/questions/24936303/Cannot-Install-an-Anti-Virus.html
So until the offending antivirus or Firewall entry is removed from the root\securitycenter WMI namespace, the user won't be able to install an antivirus.
TO RESOLVE THIS PROBLEM:
Click on Start menu > Run > type in:
wbemtest
Click OK
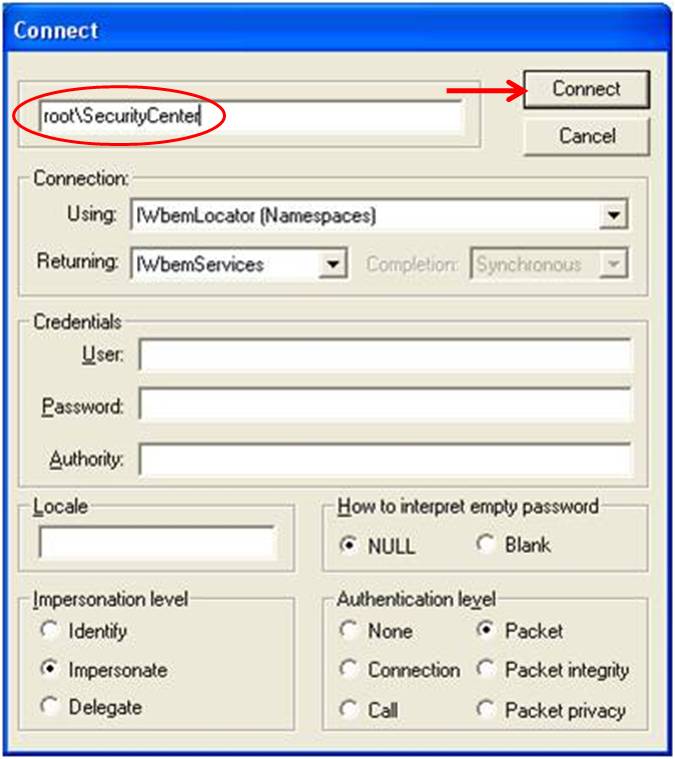
Connect to root\SecurityCenter
You would need to change the root\default to root\securitycenter
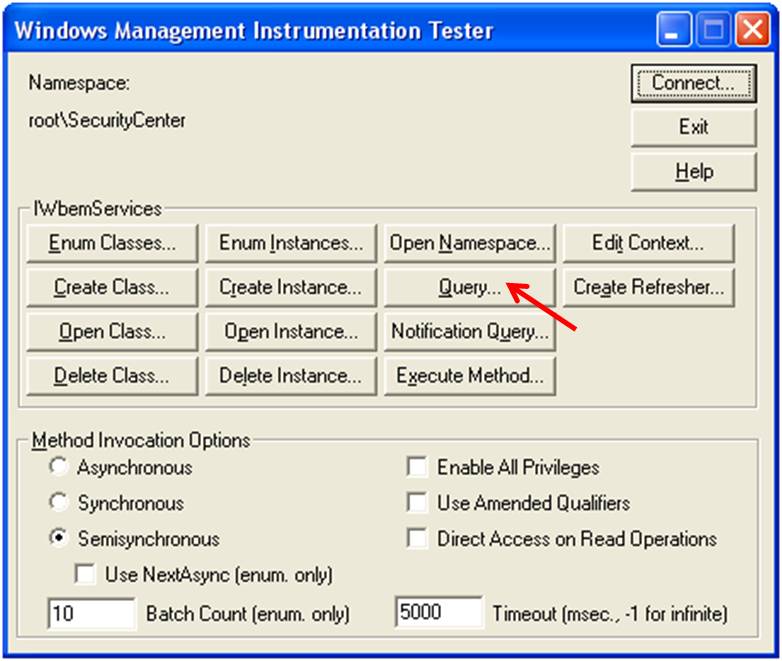
Click on Query tab
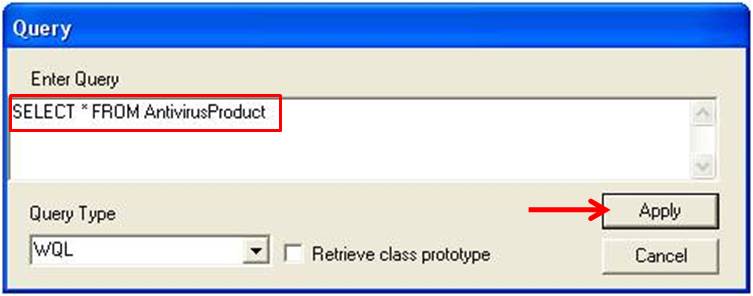
Type in SELECT * FROM AntivirusProduct
Click on Apply
In the Query result window, highlight the offending antivirus and click Delete.
Steps For Windows 7:
Run wbemtest
Click on Connect tab.
Instead of typing "root\SecurityCenter" for the namespace you need to type in
root\SecurityCenter2
Click Connect
Click on "Enum Instances"
In the "Enter superclass name" field, type in "AntivirusProduct" as the superclass name.
In the QueryResult window, delete the entry of your antivirus.
If it helps, below are the screenshots:(Windows XP)
1. Click on Start > Run > type in: wbemtest click OK and the WMI Tester window opens:
![Image1]()
2. Connect to root\SecurityCenter. The root\default will be showing so you need to overtype it with root\SecurityCenter, then click the 'Connect' tab.
![Image2]()
3. Then click on the Query tab.
![image3]()
4. In the Query window that opens, type in: SELECT * FROM AntivirusProduct
Click Apply.
![Image4]()
5. Then highlight the offending antivirus and click Delete.
![Image5]()
And that's it, Windows Security Center will no longer detect the previous AV and you can
install a new one.
If there is more than one result and you're not sure which one, just doubleclick to check the properties to make sure you're only deleting the ones that are no longer installed in the system.
If you want to remove a Firewall entry then replace your query to select Firewall - SELECT * FROM FirewallProduct.
I hope you'll find this article helpful.
This can happen with either rogue or legitimate Antivirus/Anti-spyware/Fir
Even after using Symantec's CleanWipe to remove SAV, Security Center still detect it as installed.
When scanning with ComboFix you will be alerted that the previous antivirus is STILL RUNNING in the background even though all its files and registry entries had been removed as the case of this rogue Enterprise Suite below:
The entries in the DDS and ComboFix logs will still show 'enabled'.
AV: Enterprise Suite *On-access scanning enabled* (Updated) {1ED39ED7-08A3-4E29-8DAC-5
FW: Enterprise Suite *enabled* {FF6B533C-4F16-43D9-BBC2-9
Here is an example thread, where Enterprise Suite had been removed from the system and yet WSC is still detecting it:
*Cannot Install an Anti-Virus*
https://www.experts-exchange.com/questions/24936303/Cannot-Install-an-Anti-Virus.html
So until the offending antivirus or Firewall entry is removed from the root\securitycenter WMI namespace, the user won't be able to install an antivirus.
TO RESOLVE THIS PROBLEM:
Click on Start menu > Run > type in:
wbemtest
Click OK
Connect to root\SecurityCenter
You would need to change the root\default to root\securitycenter
Click on Query tab
Type in SELECT * FROM AntivirusProduct
Click on Apply
In the Query result window, highlight the offending antivirus and click Delete.
Steps For Windows 7:
Run wbemtest
Click on Connect tab.
Instead of typing "root\SecurityCenter" for the namespace you need to type in
root\SecurityCenter2
Click Connect
Click on "Enum Instances"
In the "Enter superclass name" field, type in "AntivirusProduct" as the superclass name.
In the QueryResult window, delete the entry of your antivirus.
If it helps, below are the screenshots:(Windows XP)
1. Click on Start > Run > type in: wbemtest click OK and the WMI Tester window opens:

2. Connect to root\SecurityCenter. The root\default will be showing so you need to overtype it with root\SecurityCenter, then click the 'Connect' tab.
3. Then click on the Query tab.
4. In the Query window that opens, type in: SELECT * FROM AntivirusProduct
Click Apply.
5. Then highlight the offending antivirus and click Delete.

And that's it, Windows Security Center will no longer detect the previous AV and you can
install a new one.
If there is more than one result and you're not sure which one, just doubleclick to check the properties to make sure you're only deleting the ones that are no longer installed in the system.
If you want to remove a Firewall entry then replace your query to select Firewall - SELECT * FROM FirewallProduct.
I hope you'll find this article helpful.
Have a question about something in this article? You can receive help directly from the article author. Sign up for a free trial to get started.
Comments (19)
Commented:
Commented:
Author
Commented:Commented:
We just had a couple of questions in the Spyware Zones about this and I will post a link to your Article.
Thanks!
Author
Commented:I saw a question recently which I think this article relates to.
View More