Securing your Virtual Private Cloud (VPC) Environment in Amazon Web Services (AWS)


Published:
Browse All Articles > Securing your Virtual Private Cloud (VPC) Environment in Amazon Web Services (AWS)
Security is one of the biggest concerns when moving and migrating your data from your on-premise location to the Public Cloud. Where is your data? Who can access it? Will it be safe from accidental deletion? All of these questions and more are important, and AWS knows and addresses this.
Due to AWS being a global company deploying exactly the same services in all corners of the globe it has had to set the highest level of security conforming to all regulations in each country. As a result, someone who is simply using S3 to store their personal photos gets the same level of security as a multi million dollar company who require the most vigorous of security regulations.
AWS complies with a number of different security standards that can be found here.
When it comes to Security, AWS operates within a shared responsibility model. This means that the security ‘of’ the Cloud lies with AWS, and the security ‘in’ the cloud lays with you the user. To break this down a bit further, the physical access to the Data Centres, Availability Zones, Regions, Edge Locations, Compute, Networking and Storage is the responsibility of AWS. Your data and its encryption, configuration of your VPC security covering ACLs, Security Groups, IAM, patching of EC2 instances etc, is your responsibility.
More information on the Shared model can be found here.
The rest of this article will detail certain elements that you can use you enhance your security ‘in’ the Cloud, your area of responsibility that will help secure your Virtual Private Cloud (VPC).
Identity Access Management (IAM)
Controlling who has access to your environment is the best place to start when trying to lock your infrastructure down. The Identity Access Management Service allows you to set up Users, Groups, Policies and Roles to control who has authorisation to access resources and perform certain tasks within your AWS account.
Users are objects within IAM that are setup to allow the different users you wish to log in and have access to your AWS Account. They are issued a username and a password that are then issued to the specified user. What this user can do once logged in is defined by individual policies assigned to them, or either their Group or Role associations, or all 3.
![Picture1.png]() A Policy is a mapping of access rights, they contain permissions that can be as broad as allowing open access to a Service such as CloudFront or as restrictive as allowing a specific user to access a certain Bucket in S3 during a specified time period. These Policies can then be assigned to Users (although this is not best practise) or Groups, the preferred option.
A Policy is a mapping of access rights, they contain permissions that can be as broad as allowing open access to a Service such as CloudFront or as restrictive as allowing a specific user to access a certain Bucket in S3 during a specified time period. These Policies can then be assigned to Users (although this is not best practise) or Groups, the preferred option.
![Picture2.png]()
A tool to assist you in the creation of these policies can be found here.
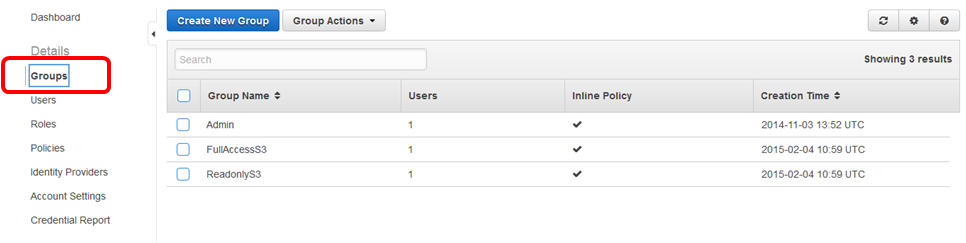
A Group is an object within IAM that has policies assigned to it giving that Group the associated permissions. Users are then associated with 1 or more groups depending on access required. Typically Groups are given meaningful names for easy identification of their purpose.
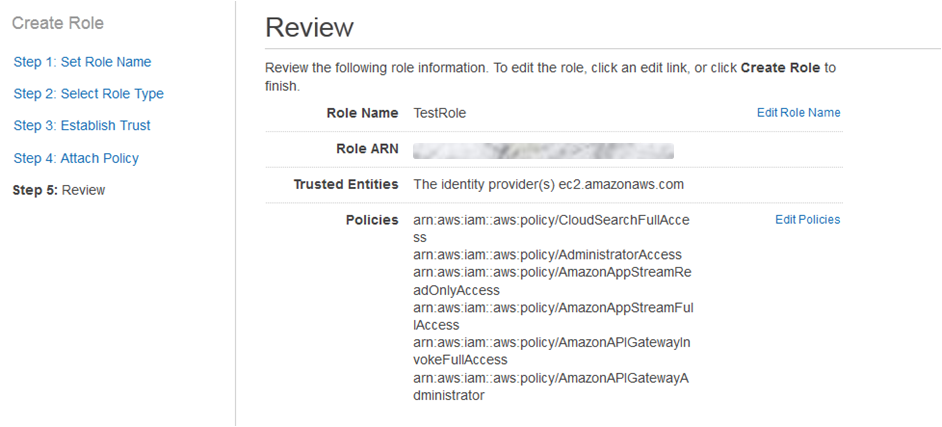
![Picture3.png]() Roles within IAM can be assigned to users as well as an EC2 resource. This functionality allows the EC2 instance to make an API request to another service without having to have a hard coded username and password in the application making the call. For example, you may have an application that needs write access to a specific bucket in S3, assigning a role with this access to the EC2 resource is all that’s needed. This removes the need to have user credentials being used by the application which in turn increases security by avoiding usernames and passwords on the instance itself. A Role can only be applied to an instance during its creation and not afterwards.
Roles within IAM can be assigned to users as well as an EC2 resource. This functionality allows the EC2 instance to make an API request to another service without having to have a hard coded username and password in the application making the call. For example, you may have an application that needs write access to a specific bucket in S3, assigning a role with this access to the EC2 resource is all that’s needed. This removes the need to have user credentials being used by the application which in turn increases security by avoiding usernames and passwords on the instance itself. A Role can only be applied to an instance during its creation and not afterwards.
![Picture4.png]() Setting up your Users, Groups, Policies and Roles correctly will help you control and manage who can access which resource and also prevent unnecessary usernames and passwords being held locally.
Setting up your Users, Groups, Policies and Roles correctly will help you control and manage who can access which resource and also prevent unnecessary usernames and passwords being held locally.
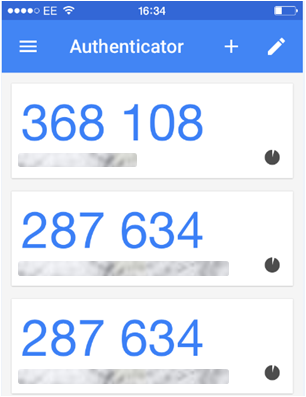
As an added layer of security for the users, you should enforce Multi Factor Authentication on their accounts in addition to their passwords. Once they log in with their username and password they will be promoted to enter an authentication code from the AWS MFA device. The MFA tool that I use is an app called Google Authenticator which I have installed on my iPhone.
![Picture5.png]()
There is an additional service that IAM offers regarding encryption Keys. It provides a Key Management Service (KMS). This allows you to create and manage any encryption keys that you want to use to encrypt the data you store on AWS Services such as EB, S3 and Redshift etc. More information on KMS can be found here.
Security Groups:
Providing security at an instance level within your VPC is managed by the implementation of Security Groups. Security Groups are similar to firewalls in that they have inbound and outbound rules that control which services can communicate between external sources and the instance its associated to. These services are typically protocols with a specific port or range of ports. The Source can be a single host IP address, a custom IP address range, another Security Group or open to everyone. It’s important to note that Security Groups provide stateful connectivity of their rule sets.
These Security group are applied to instances and controls the traffic that is allowed to communicate in and out of the instance.
Security Groups are created and managed within either the ‘EC2’ or ‘VPC’ service of the AWS or via command line. From here you can modify existing Security groups or create new ones and delete the old and redundant.
![Picture6.png]() You are able to assign a either single or multiple Security Groups to an instance. When launching your instances you are able to select existing Security Groups to assign to the instance, or create a new one at that stage. If you need to add or remove Security Groups to a running instance, select the instance from within AWS Console and click ‘Actions > Networking > Change Security Groups’
You are able to assign a either single or multiple Security Groups to an instance. When launching your instances you are able to select existing Security Groups to assign to the instance, or create a new one at that stage. If you need to add or remove Security Groups to a running instance, select the instance from within AWS Console and click ‘Actions > Networking > Change Security Groups’
Network Access Control Lists
Security at a Network level is governed by Network ACLs and work similarly to Security Groups, however NACLs provide stateless connectivity. NACLs are assigned at the Subnet level and therefore restrict the traffic before it hits an Instance. Each ACL rule consists of inbound and outbound rules sets comprising of a rule number, protocol, port range, source and an Allow or Deny. The rules with the lowest number are reviewed first. At the end of all NACLs is an explicit ‘Deny’ which means if the traffic being filtered by the NACL doesn’t fit ANY other rule the traffic will be denied entry to the Subnet and dropped.
Network ACL’s are configured and managed within the ‘VPC’ section of the AWS Console. By default all NACLs allow all traffic from any source over any protocol. This rule should be removed for optimal security and replaced with rules of traffic that you are expecting from sources known using appropriate protocols. Note: you are not able to remove the explicit Deny all at the end of the NACL, so be sure you include the correct rules both inbound and outbound of your custom NACLs.
![Picture7.png]() Once the NACL has been created you must then associate it the appropriate Subnet within your VPC for the subnet to operate the new traffic restrictions.
Once the NACL has been created you must then associate it the appropriate Subnet within your VPC for the subnet to operate the new traffic restrictions.
Subnet Route Tables
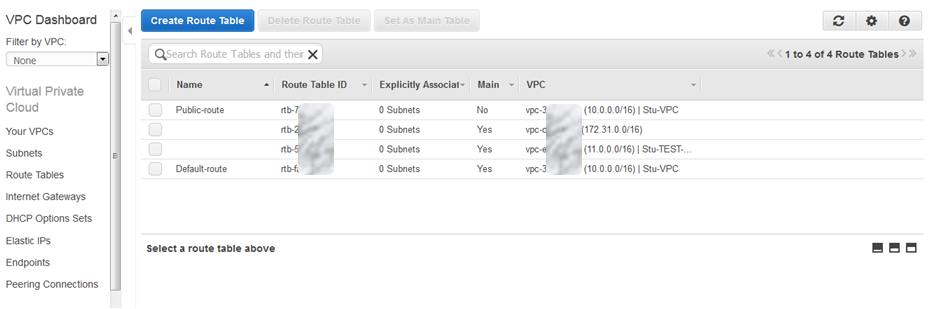
Once you have created your subnets within your VPC you must ensure it has the correct Route Table. The default route table has access to all other Subnets within your VPC and so it’s a good idea to set up your own Route Tables and apply these tables to each subnet. Only one Route Table can be applied to a subnet at a time.
Look at the design of your VPC and which subnets you have to ascertain which areas of the network need to talk to each other. Once you have mapped this out, create the same logical mapping with your route tables. There is no need to include a route to another subnet if the resources in each never need to talk to each other. Restricting this access is best practise from a Route Table Security perspective.
![Picture8.png]() Public/Private Subnets
Public/Private Subnets
With your VPC you may have elements of your infrastructure that do not need to be public facing and therefore could be in a ‘Private’ subnet. This simply means that the EC2 resources within that subnet will not be contactable over the public internet. As a result the instances will not have a Public IP address or EIP (Elastic IP Address) associated to them. Instances in Public subnet must have a Public IP associated to them allowing them to communicate with the Internet Gateway and out onto public services across the internet.
An example of this implementation would be to have a backend RDS database in a private Subnet that services request from a Web Server sitting in a Public subnet. The Web Server would process requests received over the internet to its web site. If a database request was required, the Web Server would contact the RDS database in the Private subnet via the routing table, NACLs and Security Groups in place.
Creating this separation of subnets provides better security for your back end services and prevents them residing in the same open subnet as your public servers.
You should only have publically serviceable instances within your Public Subnets and all other instances should be in Private subnets separated by further Routing Tables, NACs and Security Groups.
Bastion Hosts
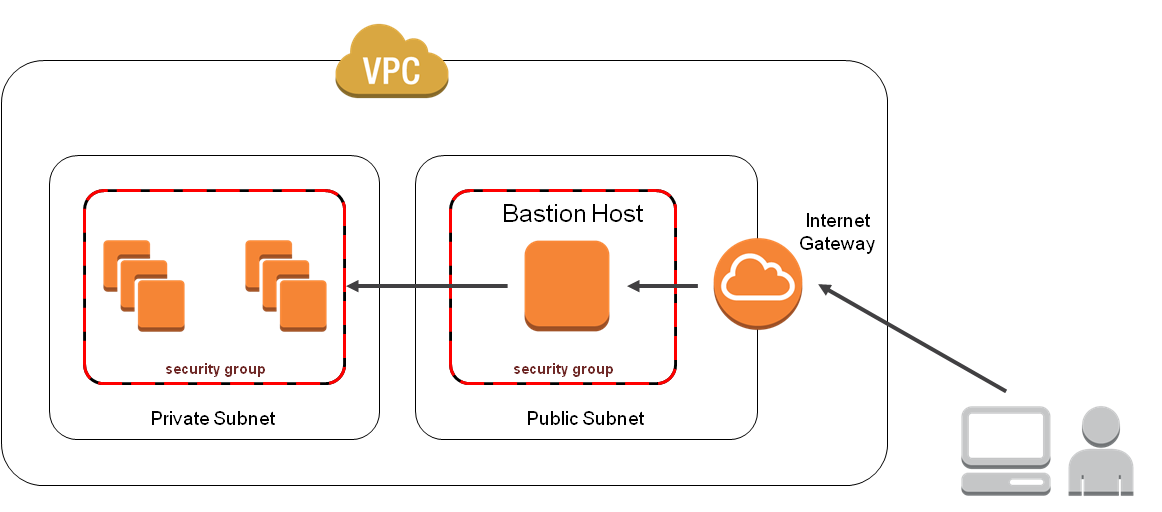
It’s a good idea from a support perspective to set up a Bastion Host within a Public Subnet. This will allow you to connect remotely onto this host, there you will be able to RDP or SSH onto instances that are nested within your Private Subnets assuming the correct security has been configured. This prevents the need to assign public IP addresses to all of your instances that you need to be able to remotely connect to.
This allows you to lock down the Security Groups of your private instances to a smaller scale as all incoming connectivity will only be from the Bastion Host instead of setting up a range of IP addresses. As with all security, the more restrictive the access is, the tighter the security will be and more difficult to break. The diagram below shows how a Bastion Host would be set up.
![Picture9.png]()
Security is a huge subject and this article only covered the very tip of the iceberg when it comes down to considering your security throughout your VPC infrastructure. There are numerous security elements that link specifically to different AWS services, such as S3, RDS, and EC2 etc. I hope you can use this article as a foundation to securing the baseline of your Virtual Private Cloud allowing you to develop deeper security within each AWS service that you implement on top of it.
Thank you for taking the time to read my article, if you have any feedback please do leave a comment below.
If you liked this article or found it helpful please click the 'Good Article' button at the bottom of this article, it would be very much appreciated.
I look forward to your comments and suggestions.
Stuart Scott
Due to AWS being a global company deploying exactly the same services in all corners of the globe it has had to set the highest level of security conforming to all regulations in each country. As a result, someone who is simply using S3 to store their personal photos gets the same level of security as a multi million dollar company who require the most vigorous of security regulations.
AWS complies with a number of different security standards that can be found here.
When it comes to Security, AWS operates within a shared responsibility model. This means that the security ‘of’ the Cloud lies with AWS, and the security ‘in’ the cloud lays with you the user. To break this down a bit further, the physical access to the Data Centres, Availability Zones, Regions, Edge Locations, Compute, Networking and Storage is the responsibility of AWS. Your data and its encryption, configuration of your VPC security covering ACLs, Security Groups, IAM, patching of EC2 instances etc, is your responsibility.
More information on the Shared model can be found here.
The rest of this article will detail certain elements that you can use you enhance your security ‘in’ the Cloud, your area of responsibility that will help secure your Virtual Private Cloud (VPC).
Identity Access Management (IAM)
Controlling who has access to your environment is the best place to start when trying to lock your infrastructure down. The Identity Access Management Service allows you to set up Users, Groups, Policies and Roles to control who has authorisation to access resources and perform certain tasks within your AWS account.
Users are objects within IAM that are setup to allow the different users you wish to log in and have access to your AWS Account. They are issued a username and a password that are then issued to the specified user. What this user can do once logged in is defined by individual policies assigned to them, or either their Group or Role associations, or all 3.
 A Policy is a mapping of access rights, they contain permissions that can be as broad as allowing open access to a Service such as CloudFront or as restrictive as allowing a specific user to access a certain Bucket in S3 during a specified time period. These Policies can then be assigned to Users (although this is not best practise) or Groups, the preferred option.

A tool to assist you in the creation of these policies can be found here.
A Group is an object within IAM that has policies assigned to it giving that Group the associated permissions. Users are then associated with 1 or more groups depending on access required. Typically Groups are given meaningful names for easy identification of their purpose.
 Roles within IAM can be assigned to users as well as an EC2 resource. This functionality allows the EC2 instance to make an API request to another service without having to have a hard coded username and password in the application making the call. For example, you may have an application that needs write access to a specific bucket in S3, assigning a role with this access to the EC2 resource is all that’s needed. This removes the need to have user credentials being used by the application which in turn increases security by avoiding usernames and passwords on the instance itself. A Role can only be applied to an instance during its creation and not afterwards.
 Setting up your Users, Groups, Policies and Roles correctly will help you control and manage who can access which resource and also prevent unnecessary usernames and passwords being held locally.
As an added layer of security for the users, you should enforce Multi Factor Authentication on their accounts in addition to their passwords. Once they log in with their username and password they will be promoted to enter an authentication code from the AWS MFA device. The MFA tool that I use is an app called Google Authenticator which I have installed on my iPhone.
There is an additional service that IAM offers regarding encryption Keys. It provides a Key Management Service (KMS). This allows you to create and manage any encryption keys that you want to use to encrypt the data you store on AWS Services such as EB, S3 and Redshift etc. More information on KMS can be found here.
Security Groups:
Providing security at an instance level within your VPC is managed by the implementation of Security Groups. Security Groups are similar to firewalls in that they have inbound and outbound rules that control which services can communicate between external sources and the instance its associated to. These services are typically protocols with a specific port or range of ports. The Source can be a single host IP address, a custom IP address range, another Security Group or open to everyone. It’s important to note that Security Groups provide stateful connectivity of their rule sets.
These Security group are applied to instances and controls the traffic that is allowed to communicate in and out of the instance.
Security Groups are created and managed within either the ‘EC2’ or ‘VPC’ service of the AWS or via command line. From here you can modify existing Security groups or create new ones and delete the old and redundant.
 You are able to assign a either single or multiple Security Groups to an instance. When launching your instances you are able to select existing Security Groups to assign to the instance, or create a new one at that stage. If you need to add or remove Security Groups to a running instance, select the instance from within AWS Console and click ‘Actions > Networking > Change Security Groups’
Network Access Control Lists
Security at a Network level is governed by Network ACLs and work similarly to Security Groups, however NACLs provide stateless connectivity. NACLs are assigned at the Subnet level and therefore restrict the traffic before it hits an Instance. Each ACL rule consists of inbound and outbound rules sets comprising of a rule number, protocol, port range, source and an Allow or Deny. The rules with the lowest number are reviewed first. At the end of all NACLs is an explicit ‘Deny’ which means if the traffic being filtered by the NACL doesn’t fit ANY other rule the traffic will be denied entry to the Subnet and dropped.
Network ACL’s are configured and managed within the ‘VPC’ section of the AWS Console. By default all NACLs allow all traffic from any source over any protocol. This rule should be removed for optimal security and replaced with rules of traffic that you are expecting from sources known using appropriate protocols. Note: you are not able to remove the explicit Deny all at the end of the NACL, so be sure you include the correct rules both inbound and outbound of your custom NACLs.
 Once the NACL has been created you must then associate it the appropriate Subnet within your VPC for the subnet to operate the new traffic restrictions.
Subnet Route Tables
Once you have created your subnets within your VPC you must ensure it has the correct Route Table. The default route table has access to all other Subnets within your VPC and so it’s a good idea to set up your own Route Tables and apply these tables to each subnet. Only one Route Table can be applied to a subnet at a time.
Look at the design of your VPC and which subnets you have to ascertain which areas of the network need to talk to each other. Once you have mapped this out, create the same logical mapping with your route tables. There is no need to include a route to another subnet if the resources in each never need to talk to each other. Restricting this access is best practise from a Route Table Security perspective.
 Public/Private Subnets
With your VPC you may have elements of your infrastructure that do not need to be public facing and therefore could be in a ‘Private’ subnet. This simply means that the EC2 resources within that subnet will not be contactable over the public internet. As a result the instances will not have a Public IP address or EIP (Elastic IP Address) associated to them. Instances in Public subnet must have a Public IP associated to them allowing them to communicate with the Internet Gateway and out onto public services across the internet.
An example of this implementation would be to have a backend RDS database in a private Subnet that services request from a Web Server sitting in a Public subnet. The Web Server would process requests received over the internet to its web site. If a database request was required, the Web Server would contact the RDS database in the Private subnet via the routing table, NACLs and Security Groups in place.
Creating this separation of subnets provides better security for your back end services and prevents them residing in the same open subnet as your public servers.
You should only have publically serviceable instances within your Public Subnets and all other instances should be in Private subnets separated by further Routing Tables, NACs and Security Groups.
Bastion Hosts
It’s a good idea from a support perspective to set up a Bastion Host within a Public Subnet. This will allow you to connect remotely onto this host, there you will be able to RDP or SSH onto instances that are nested within your Private Subnets assuming the correct security has been configured. This prevents the need to assign public IP addresses to all of your instances that you need to be able to remotely connect to.
This allows you to lock down the Security Groups of your private instances to a smaller scale as all incoming connectivity will only be from the Bastion Host instead of setting up a range of IP addresses. As with all security, the more restrictive the access is, the tighter the security will be and more difficult to break. The diagram below shows how a Bastion Host would be set up.
Security is a huge subject and this article only covered the very tip of the iceberg when it comes down to considering your security throughout your VPC infrastructure. There are numerous security elements that link specifically to different AWS services, such as S3, RDS, and EC2 etc. I hope you can use this article as a foundation to securing the baseline of your Virtual Private Cloud allowing you to develop deeper security within each AWS service that you implement on top of it.
Thank you for taking the time to read my article, if you have any feedback please do leave a comment below.
If you liked this article or found it helpful please click the 'Good Article' button at the bottom of this article, it would be very much appreciated.
I look forward to your comments and suggestions.
Stuart Scott
Have a question about something in this article? You can receive help directly from the article author. Sign up for a free trial to get started.
Comments (2)
Commented:
Commented:
The account credentials might be one day compromised ,the CC Credentials are hidden , but not the ability to purchase Extra instances witch hackers might abuse if they get access to it ?