

Browse All Articles > Add a Delete Button to the Windows 7 Explorer Toolbar
This article describes how to add a Delete button to the Windows 7 Explorer toolbar. In the followup article, we'll see how to add your own custom buttons to that Win7 toolbar.
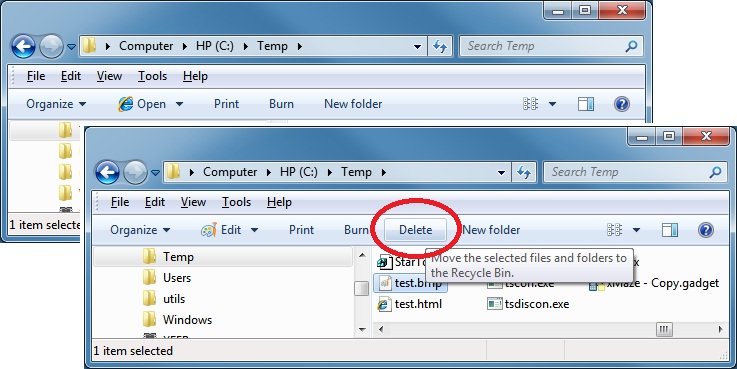
With Win7, if you want to delete a file, you can drag it to the Recycle Bin, or right-click it and select Delete from the context menu, or open the Organize menu and choose Delete. You can also select a file and press the Del key, or even Alt+F,D.
That's a lot of options, but one is conspicuous by its absence: What you can't do is what you have been doing since about 1985 -- select it in the file pane, and click a Delete button on the Explorer toolbar.
![Delete button added to Win7 Explorer toolbar]() It seems that this option was intentionally left out, though you can find the Delete button (perhaps as an oversight) in some "specialty" folders such as "Contacts". Win7 provides no user-friendly GUI way to customize the toolbar, so we need to monkey around a bit in the registry to get this done.
It seems that this option was intentionally left out, though you can find the Delete button (perhaps as an oversight) in some "specialty" folders such as "Contacts". Win7 provides no user-friendly GUI way to customize the toolbar, so we need to monkey around a bit in the registry to get this done.
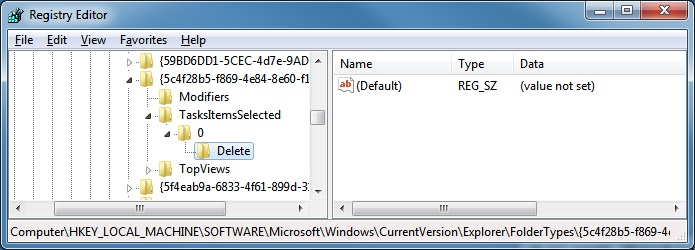
First, some background. You have likely noticed that the Win7 Explorer adjusts its toolbar to match the content that is being displayed. This is quite useful in some of the more exotic shell namespace folders, such as Control Panel, or Contacts or Recycle Bin. To keep track of what folder should be shown what way, Windows maintains a largish collection of items in a registry section:
HKLM\SOFTWARE\Microsoft\Windows\CurrentVersion\Explorer\FolderTypes
For instance:
![RegEdit under "FolderTypes" in the HKLM hive]() Each of these items is identified here only by a GUID, but if you look within, you'll see that there is a descriptive string associated with each and the GUID can also be found in different sections of the registry where more details are available. Anyway, once you have isolated which of the FolderTypes sub-keys you want to modify, you can add commands to the toolbar that is associated with that folder type. I could not find this documented anywhere, but some of the folder types provide enough of an example to figure out the basics.
Each of these items is identified here only by a GUID, but if you look within, you'll see that there is a descriptive string associated with each and the GUID can also be found in different sections of the registry where more details are available. Anyway, once you have isolated which of the FolderTypes sub-keys you want to modify, you can add commands to the toolbar that is associated with that folder type. I could not find this documented anywhere, but some of the folder types provide enough of an example to figure out the basics.
In this article, we'll "add-back" the standard button that Microsoft basically just hid from view. In the next part, part 2, we'll go much further and add a custom button that will do anything you want it to do.
Add a Delete Button to the Explorer Toolbar
For your protection, Microsoft has set much of the Windows 7 registry off-limits, even from administrators. Only "Trusted Installers" can change certain things, and it turns out that to accomplish our task today, we need to change one of those very things.
So, we'll be using RegEdit to change the permissions for the target registry keys. I'm told that there is a way to do this via command line and script, but for this article, we'll walk through the steps manually.
Notice: There are certain dangers in using RegEdit to modify the system registry. Be very careful.
I recommend that you make a backup of your registry before experimenting (I certainly did).
The screen goes dark, and you are prompted to OK the Administrative action. Make it so.
HKLM\SOFTWARE\Microsoft\Windows\CurrentVersion\Explorer\FolderTypes
Open that key to see all of the lovely GUIDs. On my computer they are in alphabetical order. Scroll down and click on:
{5c4f28b5-f869-4e84-8e60-f11db97c5cc7}
Verify that you have the right key: The value of CannonicalName is "Generic."
3a) Click the Advanced button.
3b) Click the Owner tab.
3c) Under Change Owner to: select Administrators.
Click Apply and verify that "Current Owner" is set to Administrators.
Click OK to save the change.
3d) Back in the Permissions dialog, click Administrators and then click (to put a checkmark in) Full Control
3e) Click OK to save the settings and close the dialog box.Having set the permissions to allow us (administrators) to make changes, we can proceed to the following steps that actually add the command to the toolbar.
Change the text, "New Key#1" to be TasksItemsSelected
Press Enter or click off of the key name to set the change.
Change the text, "New Key#1" to be 0 (the digit zero).
Press Enter or click off of the key name to set the change.
Change the text, "New Key#1" to be Delete
Press Enter or click off of the key name to set the change.You should now see this:
![After modifying the {5c4f28b5-... key]()
That's all there is to it: All we did was add the key ...
...\TasksItemsSelected\0\Delete
...to the desired GUID key -- no data values are needed. The existence of the key flips the switch.
The effect of this change is (nearly) immediate. Open a Windows Explorer, navigate to a disk directory, say, C:\temp, and as soon as you click on an item in the file panel on the right, the toolbar at the top will change to include the Delete button. It sports the correct tooltip and works just like the other deletion commands work; you can use the Undo function if you accidentally delete something important.
That change sets the Delete button to appear only on "Generic" folders. If you navigate to folders that are designated for "Documents" or "Photos" then the Delete button is not shown. To make that happen, you need to repeat steps 2-6 for two other registry keys. The three types of folder where you'll probably want this button are:
{5c4f28b5-f869-4e84-8e60-f11db97c5cc7} Generic
{7d49d726-3c21-4f05-99aa-fdc2c9474656} Documents
{b3690e58-e961-423b-b687-386ebfd83239} Pictures
Here's a registry script that will add the sub-keys:
[step="" title="PutDeleteOnToolbar.REG"]
But NOTE! That script will fail unless you first set the permissions for all three of the GUID keys (as in step 3, above).
If you ever want to undo the registry change, you need only use RegEdit remove the endpoint (Delete) key. Some of the Folder Types already contain items under the TasksItemsSelected key, so be careful about what you delete.
A late note:
If you right-click a folder and set Properties/Customize and change the Optimize this folder for: value, then the Delete button may disappear from the toolbar for that folder. The change we made in this article will apply only to specific folder types; steps 1-6 changed the settings for optimized type: "General Items" only. Also, the shell may change the "optimization" at whim... For instance, if it thinks that a folder holds primarily photos, then it will change the type. So consider all of that a "heads up"... If the new Delete button disappears, it's not a bug, it's a feature! Don't blame me :-) You may need to repeat the sequence on other FolderTypes subkeys (or set the folder optimization back to "General Items").
Summary
To "add-back" the familiar Delete button to the Win7 Explorer toolbar, we used RegEdit to add registry subkeys to several FolderTypes keys. In order to do that, we needed to first set the permissions so that RegEdit would let us. To set the permissions, we set the Owner of the key to "Administrators" and then we provided "Full Access" to the owner.
The affected part of the registry is still basically protected -- only a member of the Administrators group can change it. As such, rights-restricted users (and the malware they so often run) can't touch it.
What's Next?
In the second part of this series, we'll add a completely new custom command button to the Win7 Explorer toolbar. See:
Add a Custom Command Button to the Windows 7 Explorer Toolbar
=-=-=-=-=-=-=-=-=-=-=-=-=-=-=-=-=-=-=-=-=-=-=-=-=-=-=-=-=-=-=-=-=-=-=-=-=-=-=-=-=-=
If you liked this article and want to see more from this author, please click the Yes button near the:
Was this article helpful?
label that is just below and to the right of this text. Thanks!
=-=-=-=-=-=-=-=-=-=-=-=-=-=-=-=-=-=-=-=-=-=-=-=-=-=-=-=-=-=-=-=-=-=-=-=-=-=-=-=-=-=
With Win7, if you want to delete a file, you can drag it to the Recycle Bin, or right-click it and select Delete from the context menu, or open the Organize menu and choose Delete. You can also select a file and press the Del key, or even Alt+F,D.
That's a lot of options, but one is conspicuous by its absence: What you can't do is what you have been doing since about 1985 -- select it in the file pane, and click a Delete button on the Explorer toolbar.
 It seems that this option was intentionally left out, though you can find the Delete button (perhaps as an oversight) in some "specialty" folders such as "Contacts". Win7 provides no user-friendly GUI way to customize the toolbar, so we need to monkey around a bit in the registry to get this done.
First, some background. You have likely noticed that the Win7 Explorer adjusts its toolbar to match the content that is being displayed. This is quite useful in some of the more exotic shell namespace folders, such as Control Panel, or Contacts or Recycle Bin. To keep track of what folder should be shown what way, Windows maintains a largish collection of items in a registry section:
HKLM\SOFTWARE\Microsoft\Wi
For instance:
 Each of these items is identified here only by a GUID, but if you look within, you'll see that there is a descriptive string associated with each and the GUID can also be found in different sections of the registry where more details are available. Anyway, once you have isolated which of the FolderTypes sub-keys you want to modify, you can add commands to the toolbar that is associated with that folder type. I could not find this documented anywhere, but some of the folder types provide enough of an example to figure out the basics.
In this article, we'll "add-back" the standard button that Microsoft basically just hid from view. In the next part, part 2, we'll go much further and add a custom button that will do anything you want it to do.
Add a Delete Button to the Explorer Toolbar
For your protection, Microsoft has set much of the Windows 7 registry off-limits, even from administrators. Only "Trusted Installers" can change certain things, and it turns out that to accomplish our task today, we need to change one of those very things.
So, we'll be using RegEdit to change the permissions for the target registry keys. I'm told that there is a way to do this via command line and script, but for this article, we'll walk through the steps manually.
Notice: There are certain dangers in using RegEdit to modify the system registry. Be very careful.
I recommend that you make a backup of your registry before experimenting (I certainly did).
1. Start RegEdit
Use Start / Run (or get to a command prompt) and enter RegEditThe screen goes dark, and you are prompted to OK the Administrative action. Make it so.
2. Get to the registry key
Open HKEY_LOCAL_MACHINE and drill down to:HKLM\SOFTWARE\Microsoft\Wi
Open that key to see all of the lovely GUIDs. On my computer they are in alphabetical order. Scroll down and click on:
{5c4f28b5-f869-4e84-8e60-f
Verify that you have the right key: The value of CannonicalName is "Generic."
3. Set the Permissions
Right-click on that key and choose Permisssions...3a) Click the Advanced button.
3b) Click the Owner tab.
3c) Under Change Owner to: select Administrators.
Click Apply and verify that "Current Owner" is set to Administrators.
Click OK to save the change.
3d) Back in the Permissions dialog, click Administrators and then click (to put a checkmark in) Full Control
3e) Click OK to save the settings and close the dialog box.Having set the permissions to allow us (administrators) to make changes, we can proceed to the following steps that actually add the command to the toolbar.
4. Add a new key, TasksItemsSelected
Right-click on the GUID key ({5c4f28b5... etc.) and choose New... and KeyChange the text, "New Key#1" to be TasksItemsSelected
Press Enter or click off of the key name to set the change.
5. Add a new key, 0
Right-click on the newly-added TasksItemsSelected key and choose New... and KeyChange the text, "New Key#1" to be 0 (the digit zero).
Press Enter or click off of the key name to set the change.
6. Add a new key, Delete
Right-click on the newly-added 0 key and choose New... and KeyChange the text, "New Key#1" to be Delete
Press Enter or click off of the key name to set the change.You should now see this:
That's all there is to it: All we did was add the key ...
...\TasksItemsSelected\0\D
...to the desired GUID key -- no data values are needed. The existence of the key flips the switch.
The effect of this change is (nearly) immediate. Open a Windows Explorer, navigate to a disk directory, say, C:\temp, and as soon as you click on an item in the file panel on the right, the toolbar at the top will change to include the Delete button. It sports the correct tooltip and works just like the other deletion commands work; you can use the Undo function if you accidentally delete something important.
That change sets the Delete button to appear only on "Generic" folders. If you navigate to folders that are designated for "Documents" or "Photos" then the Delete button is not shown. To make that happen, you need to repeat steps 2-6 for two other registry keys. The three types of folder where you'll probably want this button are:
{5c4f28b5-f869-4e84-8e60-f
{7d49d726-3c21-4f05-99aa-f
{b3690e58-e961-423b-b687-3
Here's a registry script that will add the sub-keys:
[step="" title="PutDeleteOnToolbar.
Windows Registry Editor Version 5.00

                      [HKEY_LOCAL_MACHINE\SOFTWARE\Microsoft\Windows\CurrentVersion\Explorer\FolderTypes\{5c4f28b5-f869-4e84-8e60-f11db97c5cc7}\TasksItemsSelected\0\Delete]
                      [HKEY_LOCAL_MACHINE\SOFTWARE\Microsoft\Windows\CurrentVersion\Explorer\FolderTypes\{7d49d726-3c21-4f05-99aa-fdc2c9474656}\TasksItemsSelected\0\Delete]
[HKEY_LOCAL_MACHINE\SOFTWARE\Microsoft\Windows\CurrentVersion\Explorer\FolderTypes\{b3690e58-e961-423b-b687-386ebfd83239}\TasksItemsSelected\0\Delete]But NOTE! That script will fail unless you first set the permissions for all three of the GUID keys (as in step 3, above).
If you ever want to undo the registry change, you need only use RegEdit remove the endpoint (Delete) key. Some of the Folder Types already contain items under the TasksItemsSelected key, so be careful about what you delete.
A late note:
If you right-click a folder and set Properties/Customize and change the Optimize this folder for: value, then the Delete button may disappear from the toolbar for that folder. The change we made in this article will apply only to specific folder types; steps 1-6 changed the settings for optimized type: "General Items" only. Also, the shell may change the "optimization" at whim... For instance, if it thinks that a folder holds primarily photos, then it will change the type. So consider all of that a "heads up"... If the new Delete button disappears, it's not a bug, it's a feature! Don't blame me :-) You may need to repeat the sequence on other FolderTypes subkeys (or set the folder optimization back to "General Items").
Summary
To "add-back" the familiar Delete button to the Win7 Explorer toolbar, we used RegEdit to add registry subkeys to several FolderTypes keys. In order to do that, we needed to first set the permissions so that RegEdit would let us. To set the permissions, we set the Owner of the key to "Administrators" and then we provided "Full Access" to the owner.
The affected part of the registry is still basically protected -- only a member of the Administrators group can change it. As such, rights-restricted users (and the malware they so often run) can't touch it.
What's Next?
In the second part of this series, we'll add a completely new custom command button to the Win7 Explorer toolbar. See:
Add a Custom Command Button to the Windows 7 Explorer Toolbar
=-=-=-=-=-=-=-=-=-=-=-=-=-
If you liked this article and want to see more from this author, please click the Yes button near the:
Was this article helpful?
label that is just below and to the right of this text. Thanks!
=-=-=-=-=-=-=-=-=-=-=-=-=-
Have a question about something in this article? You can receive help directly from the article author. Sign up for a free trial to get started.
Comments (4)
Commented:
Thanks for this useful article. I was successful in doing the steps on one computer, but ran into problems with a second. I changed the permissions on the documents registry key and added the TaskItemsSelected key. Fine. When I added the subkey, I was unable to name it "0" and also unable to delete it and start over. The process worked fine on the other two folder types. Any suggestions?
Author
Commented:Commented:
Commented:
http://www.softpedia.com/get/System/OS-Enhancements/?utm_source=spd&utm_campaign=postdl_redir