

Browse All Articles > QuickLaunch Toolbar for Windows 7
Coming to Win7 from XP, you might wonder where the QuickLaunch toolbar went. This article describes how to get back that "QuickLaunch" functionality.
First, be aware of the Win7 idea of pinning programs to the Taskbar; that feature provides some important new capabilities. For instance, you can right-click a pinned item and see (and then open) documents that you have opened/edited recently with that pinned program. That's a handy feature and a big time saver.
But the familiar old XP QuickLaunch bar has always been a great place to park a pile of programs and documents, from often-accessed folders to seldom-used (but hard to locate) tools to ultra-favorite website links -- basically anything that you might want to Launch Quickly, with one click and no hassle.![Click the chevron to pop up a menu of QuickLaunch tools]() It turns out that Win7 has this capability, but it's not a separate item -- it's just a customization of the built-in Windows Explorer support for user-defined Explorer toolbars.
It turns out that Win7 has this capability, but it's not a separate item -- it's just a customization of the built-in Windows Explorer support for user-defined Explorer toolbars.
To create Your QuickLaunch Toolbar...
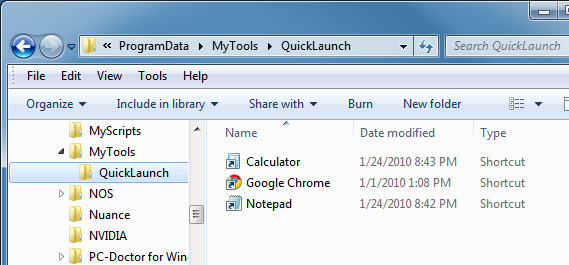
In previous articles, I've recommended creating a folder named MyTools in the C:\ProgramData folder -- that location is easy to find and accessible without UAC issues. In the MyTools folder, create a new folder named QuickLaunch
Drag a few items from the desktop into your QuickLaunch folder and/or right-click and choose New Shortcut. For instance, I created shortcuts to Notepad.Exe, Calc.Exe, and Google Chrome.
![Create a folder to hold the tools]()
Right-click the taskbar and select Toolbars > New Toolbar...
Browse to point to the new folder, or type in:
C:\ProgramData\MyTools\QuickLaunch
(or whatever location you chose for saving the tool folder).
Click OK. The new toolbar appears on the right-hand side, next to the notification area.
![Add Toolbar... (goes to right-hand side of taskbar)]()
Right-click on the drag handle and uncheck Show Text and uncheck Show Title
Right-click on the drag handle and choose View > Small Icons
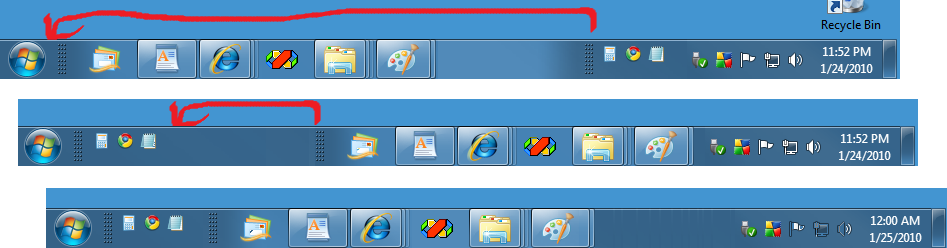
This is the only tricky bit... At least to me, it seemed like I had hopelessly screwed things up. As you drag the toolbar, the rest of the taskbar scrambles around wildly, but have courage! When you get to the "Windows Marble," release the mouse button. The QuickLaunch toolbar will stay positioned right there.
![Drag to the left ("normal" QuickLaunch location)]() Now just grab the drag handle of the main ("running programs") part of the task bar and move it toward the left, leaving the desired amount of room for your QuickLaunch toolbar.
Now just grab the drag handle of the main ("running programs") part of the task bar and move it toward the left, leaving the desired amount of room for your QuickLaunch toolbar.
Working with the QuickLaunch toolbar
Here are some tips and hints for getting the most out of your QuickLaunch toolbar:
=-=-=-=-=-=-=-=-=-=-=-=-=-=-=-=-=-=-=-=-=-=-=-=-=-=-=-=-=-=-=-=-=-=-=-=-=-=-=-=-=-=
If you liked this article and want to see more from this author, please click the Yes button near the:
Was this article helpful?
label that is just below and to the right of this text. Thanks!
=-=-=-=-=-=-=-=-=-=-=-=-=-=-=-=-=-=-=-=-=-=-=-=-=-=-=-=-=-=-=-=-=-=-=-=-=-=-=-=-=-=
First, be aware of the Win7 idea of pinning programs to the Taskbar; that feature provides some important new capabilities. For instance, you can right-click a pinned item and see (and then open) documents that you have opened/edited recently with that pinned program. That's a handy feature and a big time saver.
But the familiar old XP QuickLaunch bar has always been a great place to park a pile of programs and documents, from often-accessed folders to seldom-used (but hard to locate) tools to ultra-favorite website links -- basically anything that you might want to Launch Quickly, with one click and no hassle.
 It turns out that Win7 has this capability, but it's not a separate item -- it's just a customization of the built-in Windows Explorer support for user-defined Explorer toolbars.
To create Your QuickLaunch Toolbar...
1
Create a folder for your QuickLaunch tools.In previous articles, I've recommended creating a folder named MyTools in the C:\ProgramData folder -- that location is easy to find and accessible without UAC issues. In the MyTools folder, create a new folder named QuickLaunch
2
Populate the folder with a starter set of tools.Drag a few items from the desktop into your QuickLaunch folder and/or right-click and choose New Shortcut. For instance, I created shortcuts to Notepad.Exe, Calc.Exe, and Google Chrome.
3
Add the toolbar to the TaskbarRight-click the taskbar and select Toolbars > New Toolbar...
Browse to point to the new folder, or type in:
C:\ProgramData\MyTools\Qui
(or whatever location you chose for saving the tool folder).
Click OK. The new toolbar appears on the right-hand side, next to the notification area.

4
Set the Properties to match the familiar "QuickLaunch look."Right-click on the drag handle and uncheck Show Text and uncheck Show Title
Right-click on the drag handle and choose View > Small Icons
5
Drag the new toolbar to the accustomed position.This is the only tricky bit... At least to me, it seemed like I had hopelessly screwed things up. As you drag the toolbar, the rest of the taskbar scrambles around wildly, but have courage! When you get to the "Windows Marble," release the mouse button. The QuickLaunch toolbar will stay positioned right there.
 Now just grab the drag handle of the main ("running programs") part of the task bar and move it toward the left, leaving the desired amount of room for your QuickLaunch toolbar.
Working with the QuickLaunch toolbar
Here are some tips and hints for getting the most out of your QuickLaunch toolbar:
Reposition the tool icons: Just drag and release. Put things where you can find them easily.
Give yourself a good Tooltip. Right-click and select Rename. Since all you have is a naked icon, this is the only place you can label things. A good tooltip is especially important for folder icons and Internet shortcuts.
Access the folder: Right-click the drag handle and choose Open Folder. This simplifies operations such as adding a series of new shortcuts or other maintenance operations.
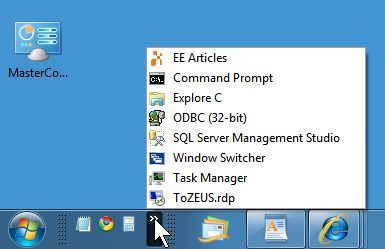
Shorten the QuickLaunch Toolbar and let it act as a popup menu. When there are more icons than can be displayed, a chevron appears and you can click it to view the rest of the items:
![Click the chevron to pop up a menu of QuickLaunch tools]() This is very convenient. You can put your most-often accessed items in the visible portion for one-click access and the rest will still be available with just two clicks -- all while using a minimum of taskbar space.
This is very convenient. You can put your most-often accessed items in the visible portion for one-click access and the rest will still be available with just two clicks -- all while using a minimum of taskbar space.
This is very convenient. You can put your most-often accessed items in the visible portion for one-click access and the rest will still be available with just two clicks -- all while using a minimum of taskbar space.
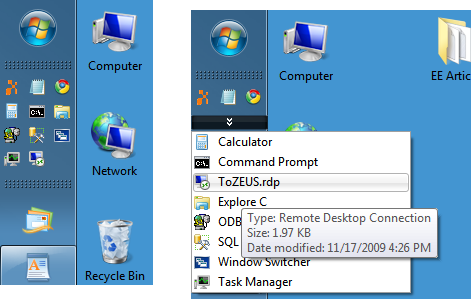
Turn the entire Taskbar on its edge. You can set the Taskbar to be on the left side of the screen rather than the bottom. This just makes good sense: With wide-screen monitors, there is plenty of screen-width to spare, but vertical space is still a precious commodity. Just right-click on the taskbar, select Properties and set Taskbar location on screen to Left (or just click on an empty part of the taskbar and drag it to the left).![Put the Taskbar on the left side of the screen. Be brave!]() It may take a while to get used to this layout, but I recommend that you give it a try. There are a number of small advantages that you may come to appreciate.
It may take a while to get used to this layout, but I recommend that you give it a try. There are a number of small advantages that you may come to appreciate.
 It may take a while to get used to this layout, but I recommend that you give it a try. There are a number of small advantages that you may come to appreciate.
=-=-=-=-=-=-=-=-=-=-=-=-=-
If you liked this article and want to see more from this author, please click the Yes button near the:
Was this article helpful?
label that is just below and to the right of this text. Thanks!
=-=-=-=-=-=-=-=-=-=-=-=-=-
Have a question about something in this article? You can receive help directly from the article author. Sign up for a free trial to get started.
Comments (11)
Commented:
It might be worthwhile pointing out that you should first unlock the taskbar before doing this so you get the drag handle.
Commented:
Toolbars are a handy way of grouping items together and arranging them in whatever order I want. So it is strange that Microsoft made them be temporary !!!
Commented:
What is great is that it takes only about 5 seconds to create a new quick launch entry this way. I simple drag the desired folder to the desired location in the quicklaunch while holding down ctrl shift. Then, I right click on the icon > properties> change icon >c:\ah.ico and I am done.
When I am done working with Hanover, I will right click on the "H" icon and delete it. Or, if I have a one week pause in activity, I will drag the H icon so that it hides under the chevron.
About two years ago, I created 26 icon files c:\aA.ico, aB.ico, ... aZ.ico. If anybody is interested, I will put them somewhere for EE folks to grab.
temp.jpg
Commented:
Commented:
View More