

Browse All Articles > How to Set Up a Survey with Google Forms
Whether you’re looking to gather data for research or gather feedback on an idea, being able to build and distribute your own online survey is not only cost-effective, but allows you to reach a larger audience and receive results in real-time. Google Forms is an easy platform to navigate through and build your own survey on for free.
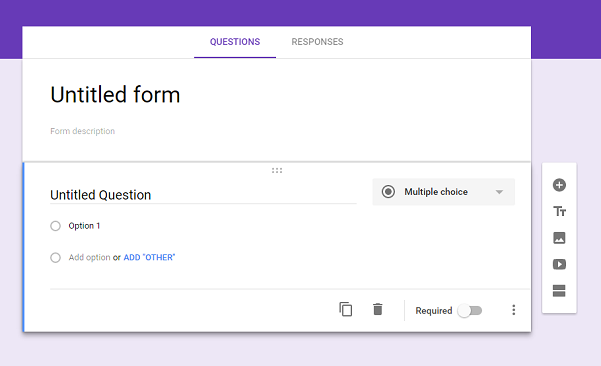
![Screenshot_22.png]() Once you select Forms, a new browser tab will open where your survey will be displayed. Continue by entering a title for your survey, along with a description to clearly state the purpose of the survey.
Once you select Forms, a new browser tab will open where your survey will be displayed. Continue by entering a title for your survey, along with a description to clearly state the purpose of the survey.
![Screenshot_6.1.png]()
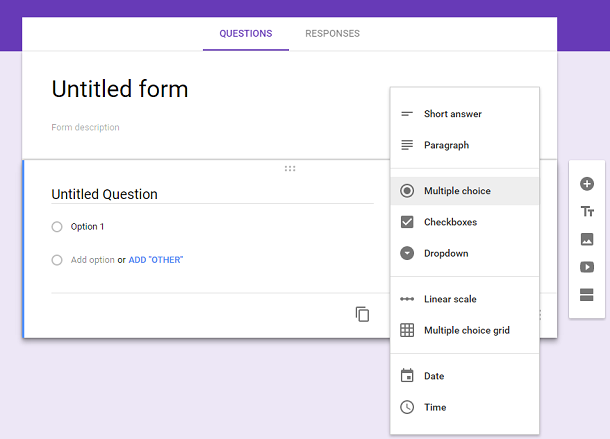
![Screenshot_9.1.png]() When creating a question, you are given a variety of question formats to choose from, such as short answer, paragraph, multiple choice, checkboxes, dropdown, linear scale, multiple choice grid, date and time
When creating a question, you are given a variety of question formats to choose from, such as short answer, paragraph, multiple choice, checkboxes, dropdown, linear scale, multiple choice grid, date and time
![Screenshot_7.1.png]() When adding questions, make sure to start with simple questions first so you can ease the respondent into the topic area. It is also important to pay attention to how you’re wording a question, because how the question is phrased can impact how someone will answer. An example of this would be asking a double-barreled question, which is asking about more than one topic and only allowing the respondent to answer one. To avoid any misunderstandings with your audience make sure to pretest your survey among a group of people before you distribute the survey to a larger audience.
When adding questions, make sure to start with simple questions first so you can ease the respondent into the topic area. It is also important to pay attention to how you’re wording a question, because how the question is phrased can impact how someone will answer. An example of this would be asking a double-barreled question, which is asking about more than one topic and only allowing the respondent to answer one. To avoid any misunderstandings with your audience make sure to pretest your survey among a group of people before you distribute the survey to a larger audience.
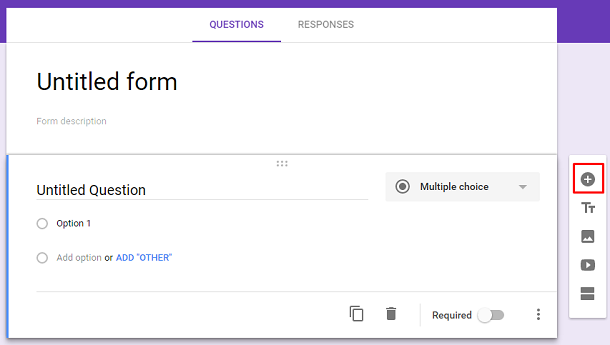
To add another question to your survey select the Plus sign that is located on the sidebar.
![Screenshot_11.1.png]() Along with adding more questions to your survey, you may have also noticed other tools on the sidebar that can be used to enhance your survey. These tools include adding:
Along with adding more questions to your survey, you may have also noticed other tools on the sidebar that can be used to enhance your survey. These tools include adding:
By designing your own survey you have the ability to make your survey as simple or complex as you like. If you plan on creating a survey that is more than ten questions, consider adding sections to keep the survey organized and easy to read. By adding sections you can also further examine other closely related topics based on the user’s response. To add a section to your survey select Add section, which is the last icon located on the sidebar.
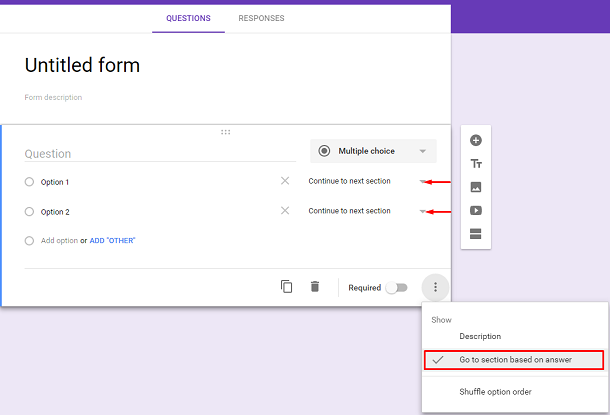
Depending on how the user answers a question you can redirect them to a section that features more questions similar to the topic to gather further insight, or send them to a different section if the topic doesn’t apply to them. This can be done by clicking More and selecting Go to section based on answer. This will allow drop boxes to appear next to your answer options. From there, you can choose whether the selected answer will send the user to the next section, to a specific section or submit form.
![Screenshot_16.1.png]()
![Screenshot_8.png]() Once your survey is complete and you are ready to go live, select Preview to see how others will view the survey and to catch any last minute mistakes. To edit the confirmation page or determine who can respond to the survey click Settings. When you’re ready for the survey to go live click Send, and you will be given the option to send the survey via email, link or embed hyperlink. You can also share the survey on social networks by clicking on the icons.
Once your survey is complete and you are ready to go live, select Preview to see how others will view the survey and to catch any last minute mistakes. To edit the confirmation page or determine who can respond to the survey click Settings. When you’re ready for the survey to go live click Send, and you will be given the option to send the survey via email, link or embed hyperlink. You can also share the survey on social networks by clicking on the icons.
![Screenshot_20.png]()
![Screenshot_21.png]()
Start creating your own surveys today to begin receiving instant data and feedback to use on current or future projects.
Get Started
To create your own survey, start by logging into your Google Drive account and locating New in the left-hand column of your screen. Once selected, hover over More and Google Forms will appear.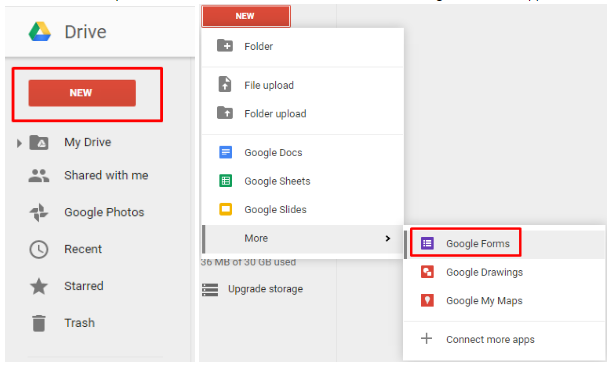 Once you select Forms, a new browser tab will open where your survey will be displayed. Continue by entering a title for your survey, along with a description to clearly state the purpose of the survey.
Add Questions
To enter a question and start filling out the answer options, click on the question area to enter Editing mode. Your question format will automatically be set to multiple choice by default. To view other question formats, select the Multiple choice dropdown box.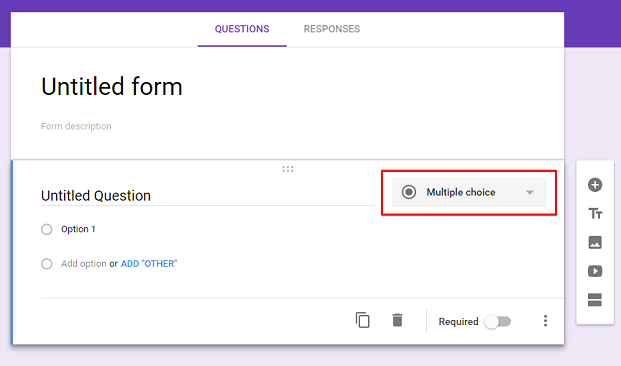 When creating a question, you are given a variety of question formats to choose from, such as short answer, paragraph, multiple choice, checkboxes, dropdown, linear scale, multiple choice grid, date and time
 When adding questions, make sure to start with simple questions first so you can ease the respondent into the topic area. It is also important to pay attention to how you’re wording a question, because how the question is phrased can impact how someone will answer. An example of this would be asking a double-barreled question, which is asking about more than one topic and only allowing the respondent to answer one. To avoid any misunderstandings with your audience make sure to pretest your survey among a group of people before you distribute the survey to a larger audience.
To add another question to your survey select the Plus sign that is located on the sidebar.
 Along with adding more questions to your survey, you may have also noticed other tools on the sidebar that can be used to enhance your survey. These tools include adding:
- Title and description
- Image
- Video
- Section
By designing your own survey you have the ability to make your survey as simple or complex as you like. If you plan on creating a survey that is more than ten questions, consider adding sections to keep the survey organized and easy to read. By adding sections you can also further examine other closely related topics based on the user’s response. To add a section to your survey select Add section, which is the last icon located on the sidebar.
Depending on how the user answers a question you can redirect them to a section that features more questions similar to the topic to gather further insight, or send them to a different section if the topic doesn’t apply to them. This can be done by clicking More and selecting Go to section based on answer. This will allow drop boxes to appear next to your answer options. From there, you can choose whether the selected answer will send the user to the next section, to a specific section or submit form.
Customize
Personalize your survey by changing the color or theme. By clicking the Color palette in the top right-hand corner of your screen, you can find a selection of colors to choose from. To add a company logo, select the Image icon that can also be found on the color palette. From this same action you will also find a variety of themes to choose from.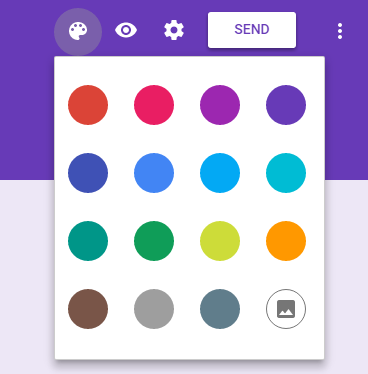 Once your survey is complete and you are ready to go live, select Preview to see how others will view the survey and to catch any last minute mistakes. To edit the confirmation page or determine who can respond to the survey click Settings. When you’re ready for the survey to go live click Send, and you will be given the option to send the survey via email, link or embed hyperlink. You can also share the survey on social networks by clicking on the icons.

View Responses
To view responses, Google Forms allows to view your responses in different formats. You can view your responses directly in the survey or in Google Sheets. To view your survey results directly in the form select the Responses tab. From there, you have the option to select Summary, which shows you the overall results of the survey visually through charts, or select Individual to see the results of each respondent. To view the survey results in a spreadsheet select the Google Sheets icon and a new tab will open displaying your results.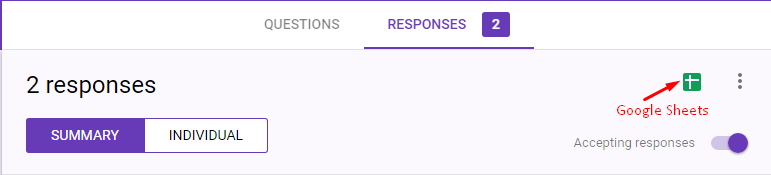
Start creating your own surveys today to begin receiving instant data and feedback to use on current or future projects.
Have a question about something in this article? You can receive help directly from the article author. Sign up for a free trial to get started.
Comments (1)
Commented: