How to move your VMs from a dead ESXi host


vExpert vSAN, NSX, Cloud Provider, Veeam Vanguard, Virtual Backups, and Storage design, and an active blogger.
Published:
Browse All Articles > How to move your VMs from a dead ESXi host
When we have a dead host and we lose all connections to the ESXi, and we need to find a way to move all VMs from that dead ESXi host.
This is an example of when we loose a ESXi 6.0 host from a Cluster (with shared Storage between them). This is a ESXi host/Cluster, since HA is not enabled and vMotion between hosts is not possible since the VMs needs to run in a particular host and local network. There is also some VMs that have share disks.
There was no backup of the ESXi host configurations, so this means that we need to do all from scratch and exactly like the default ESXi host so that VMs could start and using some networks(vSwitch or vDS).
So after a dead SDD Card(where the ESXi host is installed) all VMs were not accessible trough vCenter (but you could browse the VMs and their folders). So we could browse and choose one of the VMs and then add to inventory. But when you have hundreds of VMs and many Datastores it's a pain to find the VMs and also the Datastore where was allocated in the beginning.
We can check this information in same places and SQL DB (searching VM information) is one of those, but the fastest way is to search manually in the /vmfs/volumes folder with the command find . -name VMName.vmx, then you just need to register manually the VM again.
How to:
First we need to add a new host to Cluster, or we can use a existing one. But like I said this is a special ESXi that needs VMs allocated to particularly hosts to run special VMs, so moving VMs to other hosts is not possible. So I need to install from scratch a new ESXi for this case(but in your case the same tasks can be done in host that already exists).
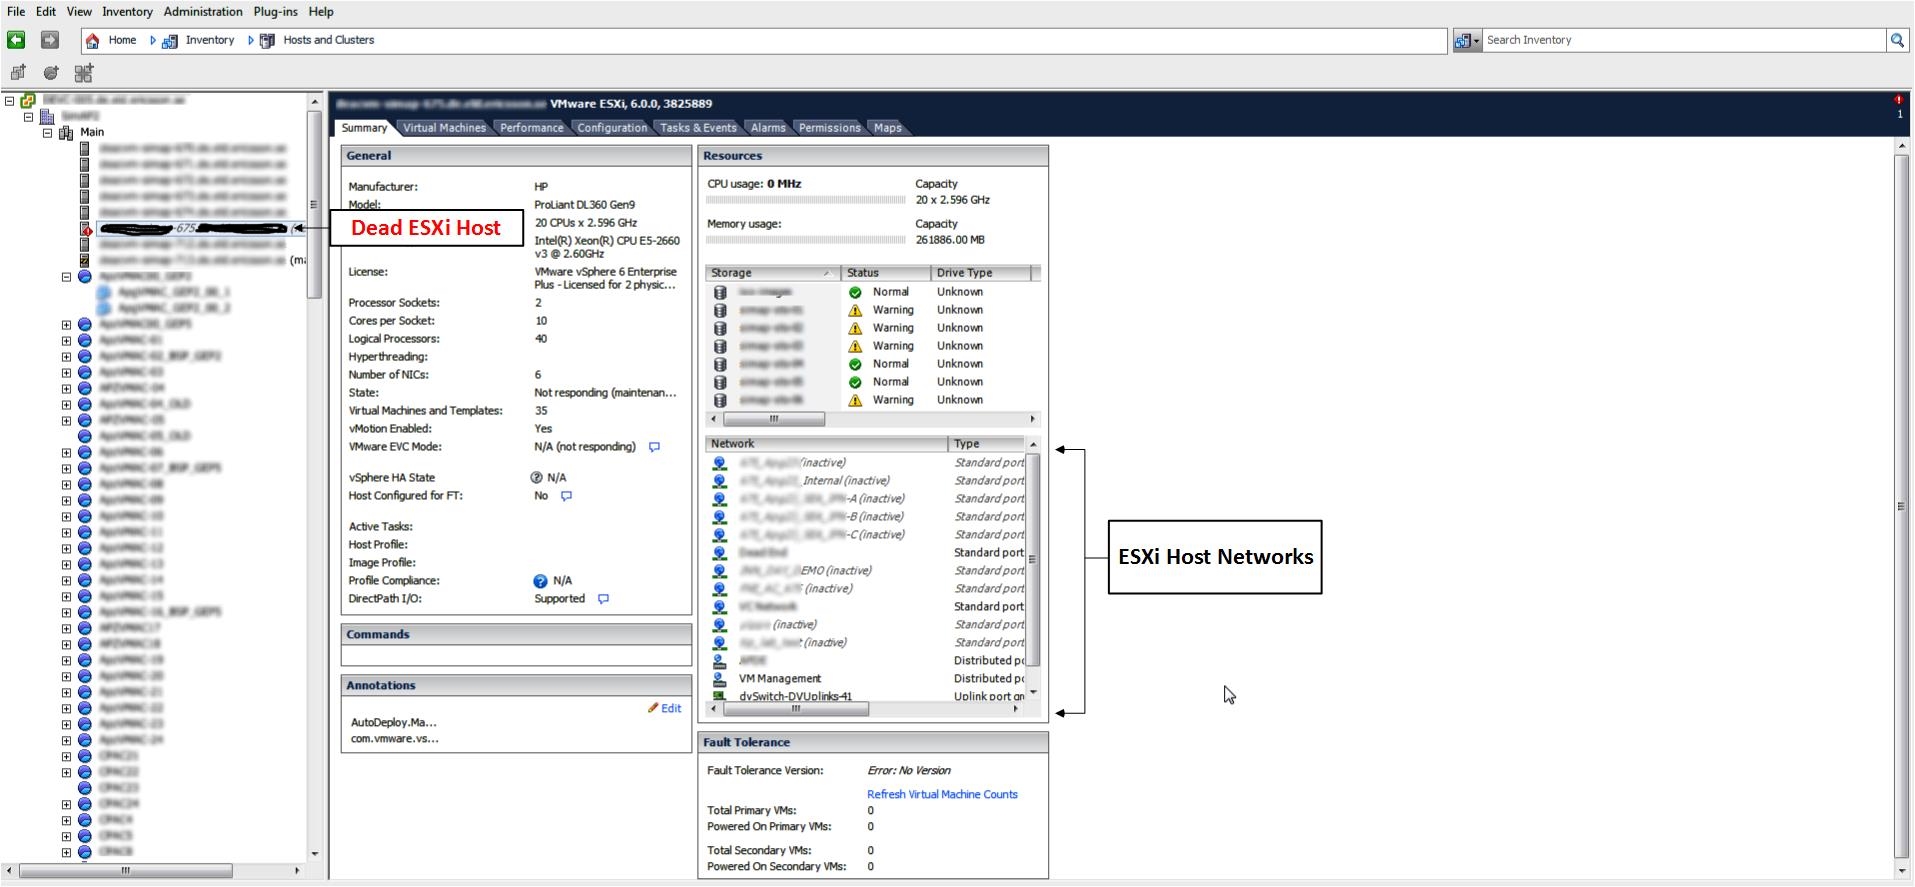
One of the problems when you need to install an ESXi host from scratch to replace a dead one that had lot of Local Networks (vSwitch) is to identify which ESXi it had. The easiest and fastest way is before we remove the dead host from the vCenter is to click in the ESXi and wait a couple of minutes so that vCenter check the host is down, but will display the old information and then you can see the local network in the network board.
![001.jpg]() After we check witch Standard Switch(vSwitch) were in the previous ESXi host, we can then create in the new host.
After we check witch Standard Switch(vSwitch) were in the previous ESXi host, we can then create in the new host.
Note: Another alternative is to go to Home -> Inventory -> Network and then check all vSwtich one by one and at the same time in each one click in the Hosts tab and we can double check if this network was from the default ESXi. But if you have too many vSwitch, this will take is more work. So if the above solution shows you the information that you need, use it.
After we have our new host with all the needed networks(also don't forget to add the host to any vDS that the fault host was in) we can start the work to recover all VMs and register them in the new host.
Login to the new ESXi host shell console and do next tasks.
Using the command find . -name and the VM name we will find the VM location and then we can use the command vim-cmd solo/registervm to register the VM in the ESXi host that we are in.
Option 1: Use Find command to find where you VMs are located
To check the VMs name list, you can do the same you did to check the Networks, but click in the dead host and then in the tab "Virtual Machines". See next image.
![002.jpg]()
Just go to the /vmfs/volumes folder(so that will be faster your search), but you can search from the root also.
You will get the full path of the VM in the Datastore. If you using this step, jump option 2 and go to the register VM step.
Option 2: Find all VMs bound to a specific host.
In this case you can use the vCenter DB and run the following SQL query. This will list you all VMs that was register in the dead ESXi host.
Note: If you are not sure of your ESXi host DNS Name do a nslookup with the IP Address to get the ESXi Host Full DNS Name.
We will get also the column name VMS.CONFIGFILENAME that shows in witch Datastore the VM is allocated.
After you have you VMs full list, or just one by one, you can do the above commands to register the VM in the new ESXi host.
Note: If you have a VM Template don't forget that the configuration file is not .vmx, but .vmtx. So your search and register need to use the proper VM configuration file extension.
Do the above tasks for all VMs that you have in the list above. After this all VMs will ready to power on in the new host.
But since we have change host, and force a VM move, sometimes we can see some issues in the VMs when we power up.
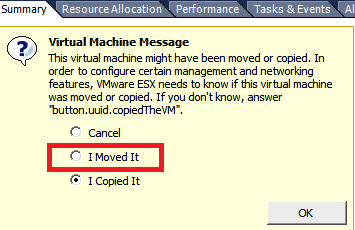
First: Since we move a VM without a vCenter, the vCenter did not had a registry of that move, so you can have the following question:
![Screen-Shot-08-27-16-at-08.34-PM.PNG]()
Since this was a move, we will choose the "I Moved It" option. With this no changes in the settings and VM UUID. You can read more about this HERE
Second: The VM Virtual Network interface may not be enabled and if we try to enabled we get a an error(something similar to Invalid configuration for device '0'). You can check this issue HERE. In the VM log(vmware.log) we will something like "Virtual device Ethernet0 will start disconnected".
This only happen to Virtual Interfaces connected to vDS. But the easy way to fixed the issue, is just to change the Network to another vDS or Local Network, enable the Interface and power up. After you power on the VM, you can now change back to the original vDS Portgoup.
After all this changes and tasks all VMs are working properly and in register in the new host.
Hope this can help bypass this error in the future.
This is the part of my "TIP Articles". So, please vote "Helpful" on this Article. And I encourage your comments and feedback.
There was no backup of the ESXi host configurations, so this means that we need to do all from scratch and exactly like the default ESXi host so that VMs could start and using some networks(vSwitch or vDS).
So after a dead SDD Card(where the ESXi host is installed) all VMs were not accessible trough vCenter (but you could browse the VMs and their folders). So we could browse and choose one of the VMs and then add to inventory. But when you have hundreds of VMs and many Datastores it's a pain to find the VMs and also the Datastore where was allocated in the beginning.
We can check this information in same places and SQL DB (searching VM information) is one of those, but the fastest way is to search manually in the /vmfs/volumes folder with the command find . -name VMName.vmx, then you just need to register manually the VM again.
How to:
First we need to add a new host to Cluster, or we can use a existing one. But like I said this is a special ESXi that needs VMs allocated to particularly hosts to run special VMs, so moving VMs to other hosts is not possible. So I need to install from scratch a new ESXi for this case(but in your case the same tasks can be done in host that already exists).
One of the problems when you need to install an ESXi host from scratch to replace a dead one that had lot of Local Networks (vSwitch) is to identify which ESXi it had. The easiest and fastest way is before we remove the dead host from the vCenter is to click in the ESXi and wait a couple of minutes so that vCenter check the host is down, but will display the old information and then you can see the local network in the network board.
 After we check witch Standard Switch(vSwitch) were in the previous ESXi host, we can then create in the new host.
Note: Another alternative is to go to Home -> Inventory -> Network and then check all vSwtich one by one and at the same time in each one click in the Hosts tab and we can double check if this network was from the default ESXi. But if you have too many vSwitch, this will take is more work. So if the above solution shows you the information that you need, use it.
After we have our new host with all the needed networks(also don't forget to add the host to any vDS that the fault host was in) we can start the work to recover all VMs and register them in the new host.
Login to the new ESXi host shell console and do next tasks.
Using the command find . -name and the VM name we will find the VM location and then we can use the command vim-cmd solo/registervm to register the VM in the ESXi host that we are in.
Option 1: Use Find command to find where you VMs are located
To check the VMs name list, you can do the same you did to check the Networks, but click in the dead host and then in the tab "Virtual Machines". See next image.

Just go to the /vmfs/volumes folder(so that will be faster your search), but you can search from the root also.
[root@localhost:/vmfs/volumes] find . -name VMName.vmx
./9a21a847-635042f7/VMName/VMName.vmxYou will get the full path of the VM in the Datastore. If you using this step, jump option 2 and go to the register VM step.
Option 2: Find all VMs bound to a specific host.
In this case you can use the vCenter DB and run the following SQL query. This will list you all VMs that was register in the dead ESXi host.
"SELECT vpxv_vms.NAME, vpxv_vms.hostid, vpxv_hosts.NAME, VPXV_VMS.CONFIGFILENAME, vpxv_hosts.DNS_NAME FROM vpxv_vms
JOIN vpxv_hosts on VPXV_VMS.HOSTID = VPXV_HOSTS.HOSTID
WHERE vpxv_hosts.DNS_NAME = 'host DNS NAME'
and ((vpxv_hosts.hostid = vpxv_vms.hostid))"
Note: If you are not sure of your ESXi host DNS Name do a nslookup with the IP Address to get the ESXi Host Full DNS Name.
We will get also the column name VMS.CONFIGFILENAME that shows in witch Datastore the VM is allocated.
After you have you VMs full list, or just one by one, you can do the above commands to register the VM in the new ESXi host.
[root@localhost:/vmfs/volumes] vim-cmd solo/registervm /vmfs/volumes/9a21a847-635042f7/VMName/VMName.vmx
                      10
[root@localhost:/vmfs/volumes]Note: If you have a VM Template don't forget that the configuration file is not .vmx, but .vmtx. So your search and register need to use the proper VM configuration file extension.
Do the above tasks for all VMs that you have in the list above. After this all VMs will ready to power on in the new host.
But since we have change host, and force a VM move, sometimes we can see some issues in the VMs when we power up.
First: Since we move a VM without a vCenter, the vCenter did not had a registry of that move, so you can have the following question:
Since this was a move, we will choose the "I Moved It" option. With this no changes in the settings and VM UUID. You can read more about this HERE
Second: The VM Virtual Network interface may not be enabled and if we try to enabled we get a an error(something similar to Invalid configuration for device '0'). You can check this issue HERE. In the VM log(vmware.log) we will something like "Virtual device Ethernet0 will start disconnected".
This only happen to Virtual Interfaces connected to vDS. But the easy way to fixed the issue, is just to change the Network to another vDS or Local Network, enable the Interface and power up. After you power on the VM, you can now change back to the original vDS Portgoup.
After all this changes and tasks all VMs are working properly and in register in the new host.
Hope this can help bypass this error in the future.
This is the part of my "TIP Articles". So, please vote "Helpful" on this Article. And I encourage your comments and feedback.
vExpert vSAN, NSX, Cloud Provider, Veeam Vanguard, Virtual Backups, and Storage design, and an active blogger.
Have a question about something in this article? You can receive help directly from the article author. Sign up for a free trial to get started.
Comments (0)