Export Office 365 Mailboxes to PST format using eDiscovery


Experienced Software Developer with having vast knowledge of Exchange Server and Outlook.
Published:
Browse All Articles > Export Office 365 Mailboxes to PST format using eDiscovery
This is my first article on Expert Exchange on the Manual Method of Exporting Office 365 Mailboxes to PST format by using the eDiscovery mechanism of Office. Hope you will enjoy the article.
In this article I am going to explain the simplest way of exporting the Office 365 mailboxes to Outlook PST file format that will utilize the in-place eDiscovery mechanism of Office 365.
Apart from this method, Microsoft has not given any dedicated tool for this specific purpose as that was in on-premises using New-MailboxExportRequest command of PowerShell. The only option to migrate the data to PST file is eDiscovery mechanism.
You can use the same solution in Exchange Server 2013 and 2016 to migrate the mailboxes to PST format.
Step by Step procedure to Export Office 365 Mailboxes to PST format
1. Login to Office 365 portal and access Office 365 Admin Center
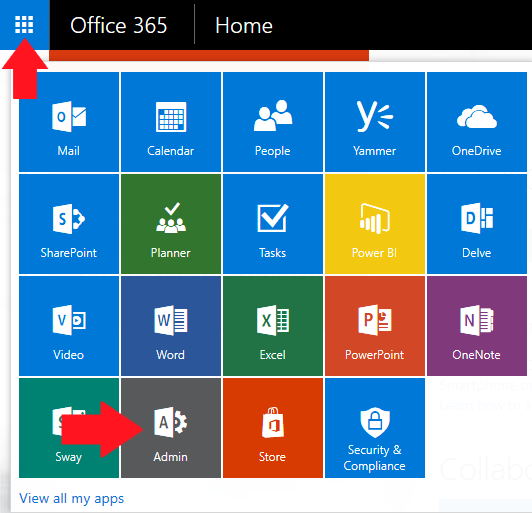
![1.png]() 2. Expand Admins center from Office 365 admin center and click on Exchange
2. Expand Admins center from Office 365 admin center and click on Exchange
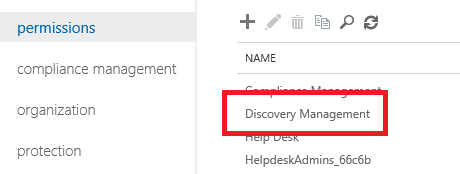
![2.png]() 3. Now go to permissions and double click o Discovery Manager
3. Now go to permissions and double click o Discovery Manager
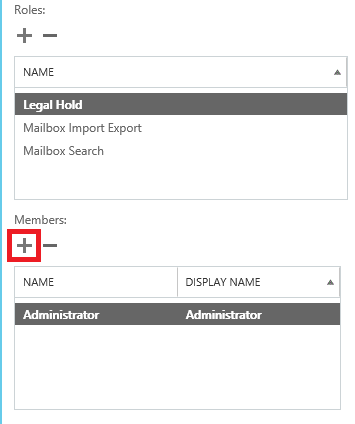
![3.png]() 4. Add your account to Members list in the Discovery Management role group properties by using the plus icon and click on save button.
4. Add your account to Members list in the Discovery Management role group properties by using the plus icon and click on save button.
Also ensure that Mailbox Import Export, Legal Hold & Mailbox search are also added in the roles section. In case if not added, please add this roles by using the plus icon.
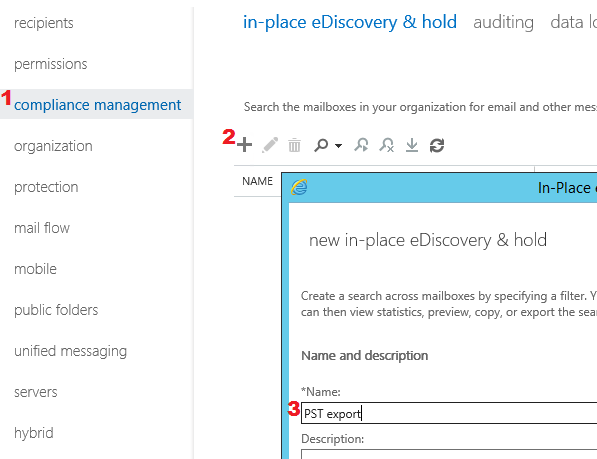
![4.png]() 5. Now go to compliance management and click on plus button to start new in-place eDiscovery & hold wizard, type a name and click on next button.
5. Now go to compliance management and click on plus button to start new in-place eDiscovery & hold wizard, type a name and click on next button.
![5.png]() 6. Select Search all mailboxes if you want to export data from all mailboxes. You can also search the specific mailboxes by using the Specific mailboxes to search option and after that click on plus icon. In the next window select the mailbox that you want to export in PST, click on add and then OK.
6. Select Search all mailboxes if you want to export data from all mailboxes. You can also search the specific mailboxes by using the Specific mailboxes to search option and after that click on plus icon. In the next window select the mailbox that you want to export in PST, click on add and then OK.
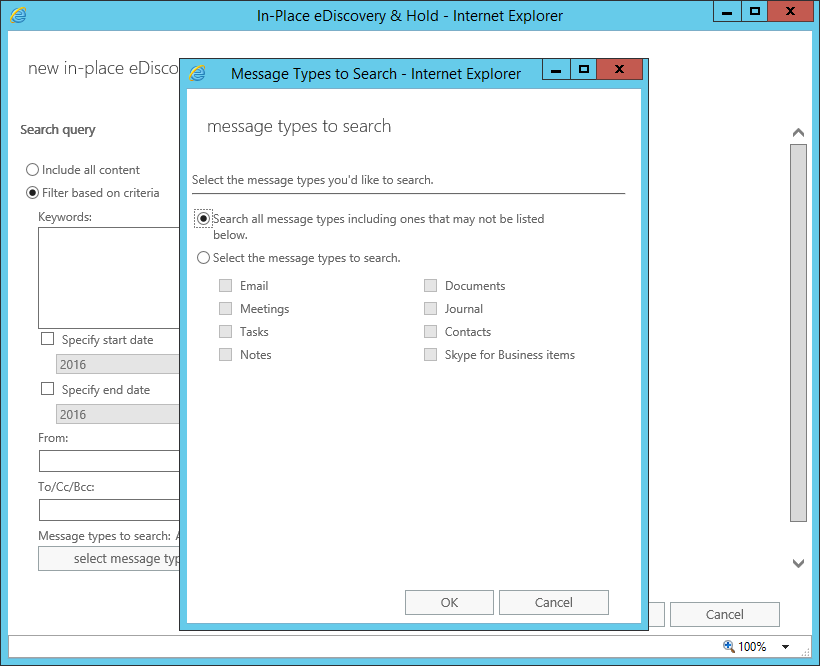
![6.png]() 7. In the next step you will see several filtering options. If you want to export all data then select Include all content. You can also export select data by applying the filters like:
7. In the next step you will see several filtering options. If you want to export all data then select Include all content. You can also export select data by applying the filters like:
![7.png]() 8. In the last step of this wizard you will see in-place hold settings which are not useful in this scenario. After clicking on the Finish you will see the dialog box that will show the progress of settings that are being saved. Click close once this is done
8. In the last step of this wizard you will see in-place hold settings which are not useful in this scenario. After clicking on the Finish you will see the dialog box that will show the progress of settings that are being saved. Click close once this is done
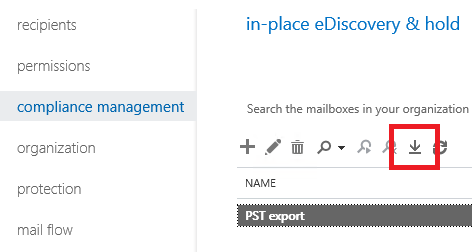
9. Now click on downward arrow button to export the data to PST
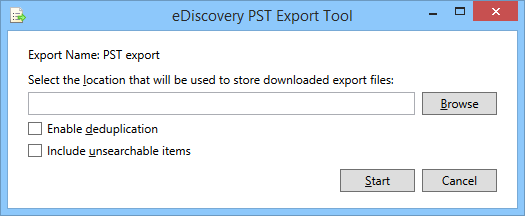
![8.png]() 10. Browse the location where you want to save the PST files and click on Start button
10. Browse the location where you want to save the PST files and click on Start button
![9.png]() And that’s all
And that’s all
Conclusion:
Thanks for reading my first article on Expert Exchange. I was enjoying and learning several things on this website. Hope this article will work for you. Please comment if you have any suggestion or any other idea related to it.
Apart from this method, Microsoft has not given any dedicated tool for this specific purpose as that was in on-premises using New-MailboxExportRequest command of PowerShell. The only option to migrate the data to PST file is eDiscovery mechanism.
You can use the same solution in Exchange Server 2013 and 2016 to migrate the mailboxes to PST format.
Step by Step procedure to Export Office 365 Mailboxes to PST format
1. Login to Office 365 portal and access Office 365 Admin Center
 2. Expand Admins center from Office 365 admin center and click on Exchange
 3. Now go to permissions and double click o Discovery Manager
 4. Add your account to Members list in the Discovery Management role group properties by using the plus icon and click on save button.
Also ensure that Mailbox Import Export, Legal Hold & Mailbox search are also added in the roles section. In case if not added, please add this roles by using the plus icon.
 5. Now go to compliance management and click on plus button to start new in-place eDiscovery & hold wizard, type a name and click on next button.
 6. Select Search all mailboxes if you want to export data from all mailboxes. You can also search the specific mailboxes by using the Specific mailboxes to search option and after that click on plus icon. In the next window select the mailbox that you want to export in PST, click on add and then OK.
 7. In the next step you will see several filtering options. If you want to export all data then select Include all content. You can also export select data by applying the filters like:
- Keywords/Phases
- Time ranges
- From/To/Bcc
- Message types
 8. In the last step of this wizard you will see in-place hold settings which are not useful in this scenario. After clicking on the Finish you will see the dialog box that will show the progress of settings that are being saved. Click close once this is done
9. Now click on downward arrow button to export the data to PST
 10. Browse the location where you want to save the PST files and click on Start button
 And that’s all
Conclusion:
Thanks for reading my first article on Expert Exchange. I was enjoying and learning several things on this website. Hope this article will work for you. Please comment if you have any suggestion or any other idea related to it.
Experienced Software Developer with having vast knowledge of Exchange Server and Outlook.
Have a question about something in this article? You can receive help directly from the article author. Sign up for a free trial to get started.
Comments (2)
Commented:
Commented: