How to Create a Greeting Card from a Frame Image and a Photo


My areas of expertise include:
- system and database architecture
- IT auditing
- ITS (or Intelligent Transport Systems) for the highway
- system and database architecture
- IT auditing
- ITS (or Intelligent Transport Systems) for the highway
Published:
Browse All Articles > How to Create a Greeting Card from a Frame Image and a Photo
This tutorial shows how to create a greeting card by combining two image layers and a text layer on a PC using a free image editing app.
This tutorial shows how to create a greeting card by combining two image layers and a text layer on a PC using a free image editing app. What you end up with is graphics ‘sandwich’ that you can print in as many copies as you desire. These can be holiday cards, birthday cards, invitations and anything else with graphics/text mix requirement.
What you need is:
I discuss free image editing apps in this article rather than paid ones like Photoshop.
If you are familiar with image editors, like Microsoft Paint or Microsoft Photo Gallery, you will find the step up to a more sophisticated editor like Paint.NET or GIMP a little less intimidating than if you have never used this type of app.
Both Paint.NET and the GIMP support layers and editable text. While Paint.NET is easier to learn and use, GIMP is much more versatile. So if you are learning how to use a new text editor, why not learn to use GIMP, the more versatile of the two?
First things first: download and install GIMP from their main site: www.gimp.org/downloads/. Although GIMP 2.9 is available in beta-test version, I am using GIMP 2.8 for the purpose if illustrating “How to create a greeting card”. Be sure to choose the correct operating system (OS): GNU/Linux, OS X or Microsoft Windows.
If you do not want to download GIMP 2.8.18 via BitTorrent, use the direct download link.
“These links download the official GIMP installer for Windows (~100MB). The installer contains both 32-bit and 64-bit versions of GIMP, and will automatically use the appropriate one.”
Or, if you do not want to use GIMP at all, then you can download Paint.NET here: www.getpaint.net/download.html#download
And here is the link to the Editable Text plug-in: www.isimonbrown.co.uk/editable-text/
If you have a digital camera, a tablet device or a cell phone, then you probably have plenty if photos you can use. If not, you can always go to www.flickr.com and use photos which are shared there.
Here is a site (and there are many others) where you can find frames for photos: http://www.freepik.com
If you do not plan to post these images publically (Twitter, Facebook, etc.) and only to create a card to print, then you can download freely from there. Otherwise, you will have to post the author’s credits as shown below.
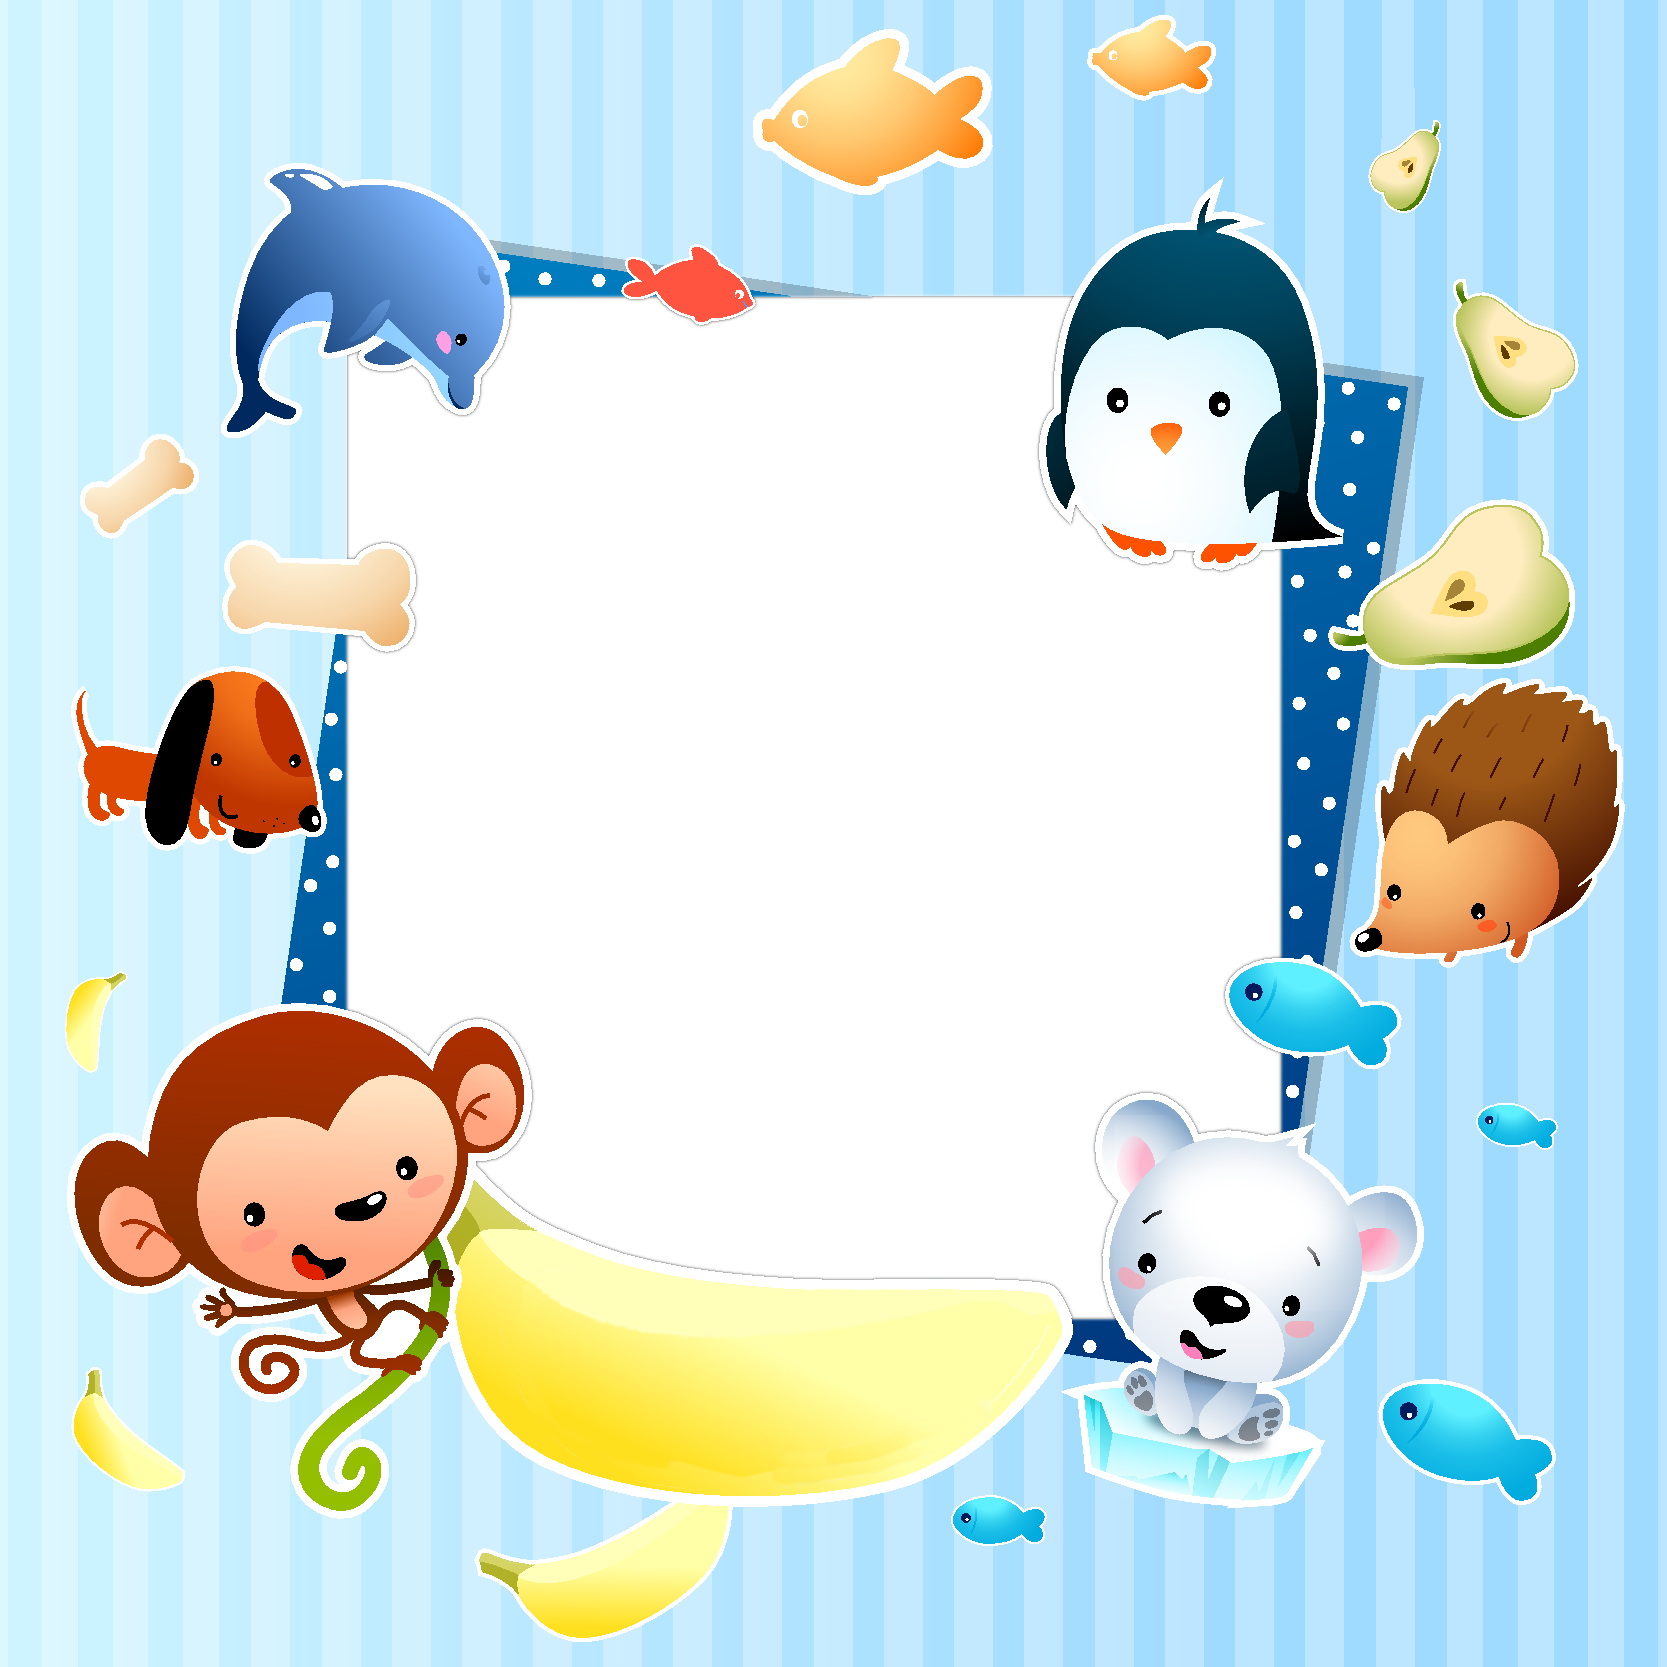
![Party.png]()
<a href='http://www.freepik.com/free-vector/funny-animals-on-a-frame_957625.htm' >Designed by Freepik</a>
How to credit the author?
Using a full-blown image editing app when all you have ever used before is MS Paint or MS Photo Gallery is quite a step up and can be intimidating without any help or tutorials, especially one with a multitude of new features which you never knew existed.
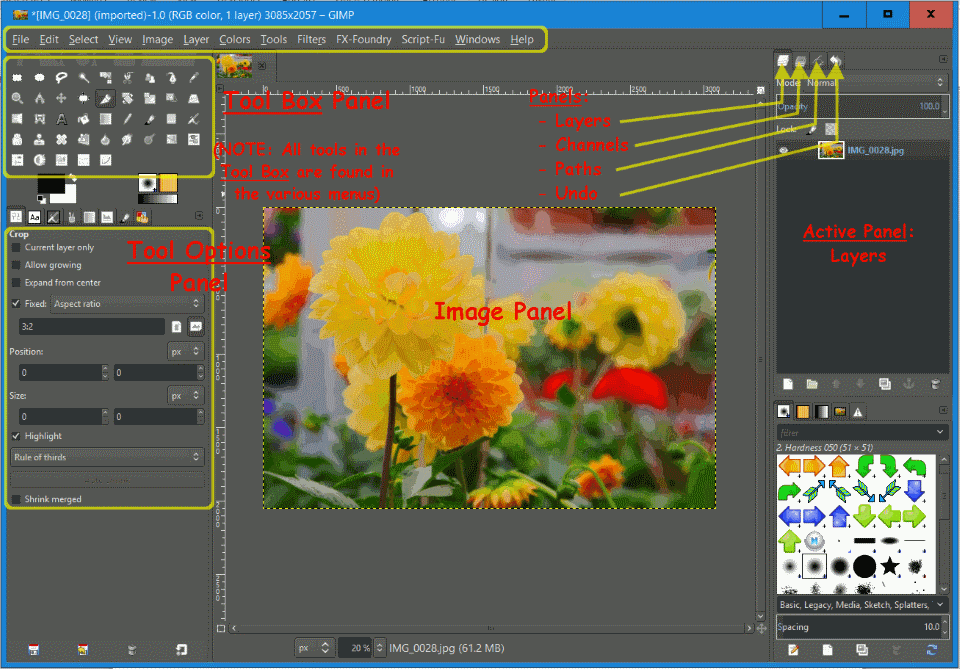
I learned GIMP using Google searches and several sites with good tutorials. So, before we start, I’ll show you the tools I used to create the greeting card.
![Overview.png]()
Overview of GIMP layout
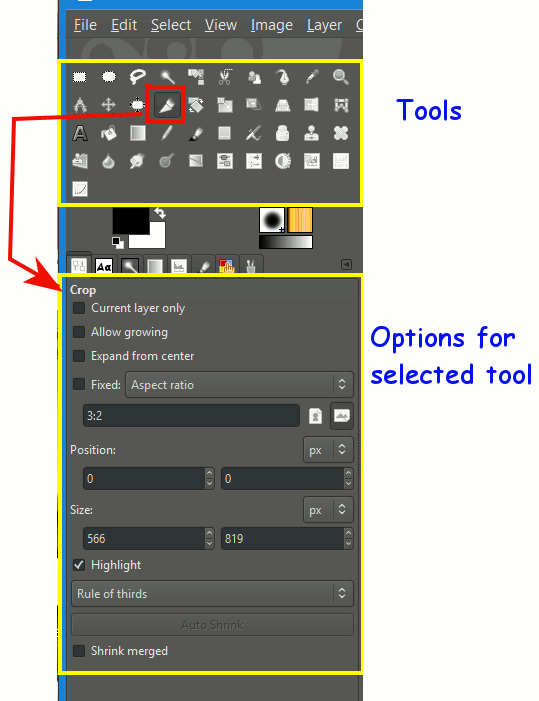
![tools-used-Tool-Options.png]()
Tool Box
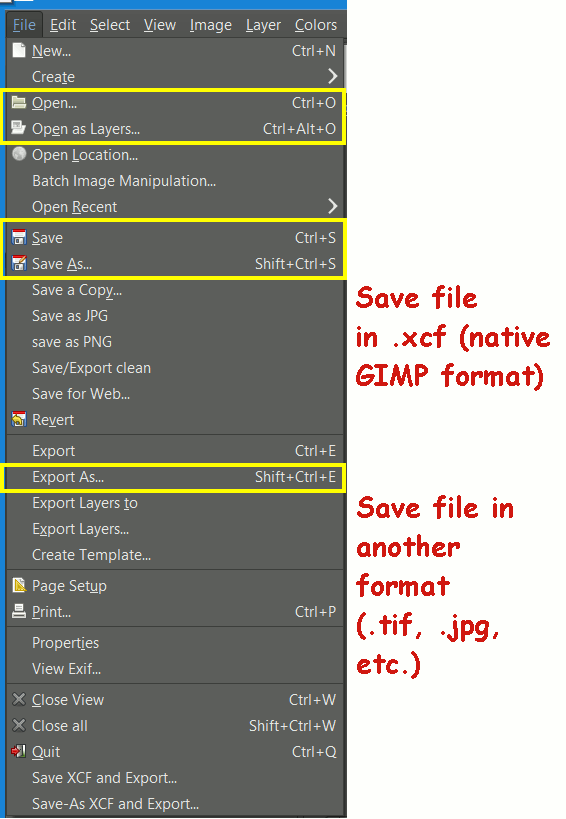
![tools-used-File-menu.png]()
Tools used in the FILE menu
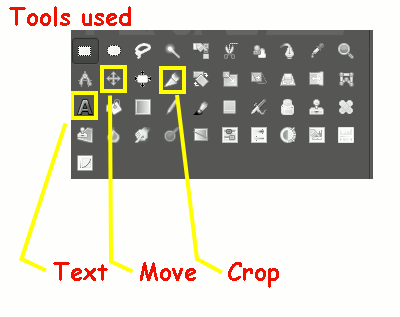
![tools-used-Tool-box.png]()
Tools used from the Tool Box
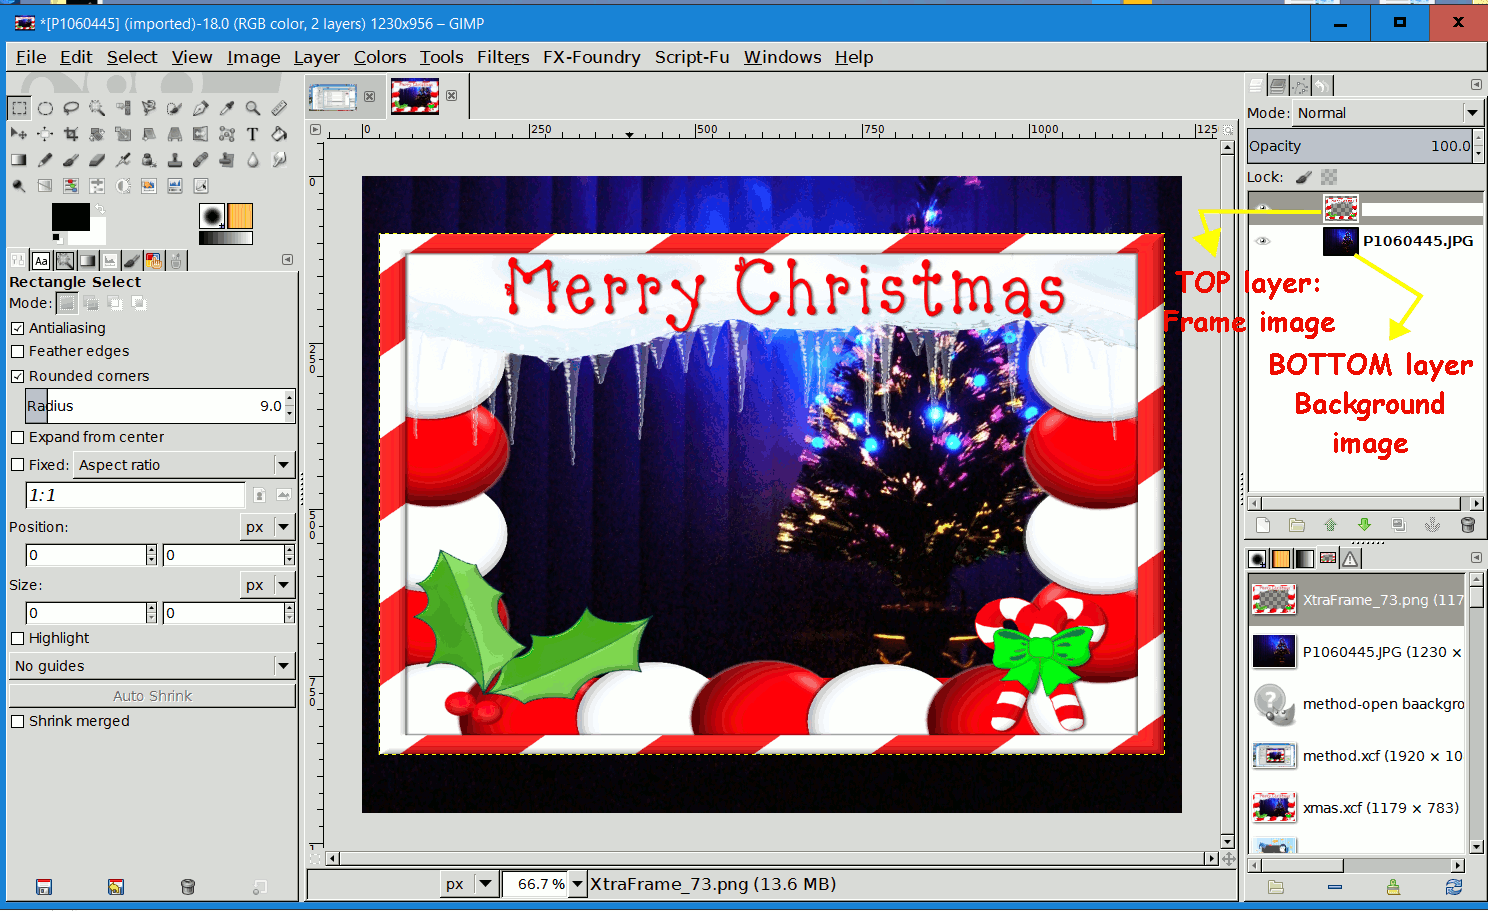
Steps to Create Greeting Card Start GIMP and open the image/photo that you want to use as the background, the bottom-most layer of the composite image of the card:
![Method-1.open.png]()
![Method-2.navigate.png]()
File ―> Open; navigate to folder with image, select image, click Open
![Method-3.open-as-layer.png]()
![Method-4.navigate-to-layer.png]()
File ―> Open as Layers…; navigate to folder with image of frame, select image, click Open
You will note that the center of the image has a black & white checkerboard pattern. This is the part of the frame image that is transparent in order to see both the frame and the image in the background layer.
ALSO: jpg files do NOT support transparency; the transparent part of the image becomes white when saved.
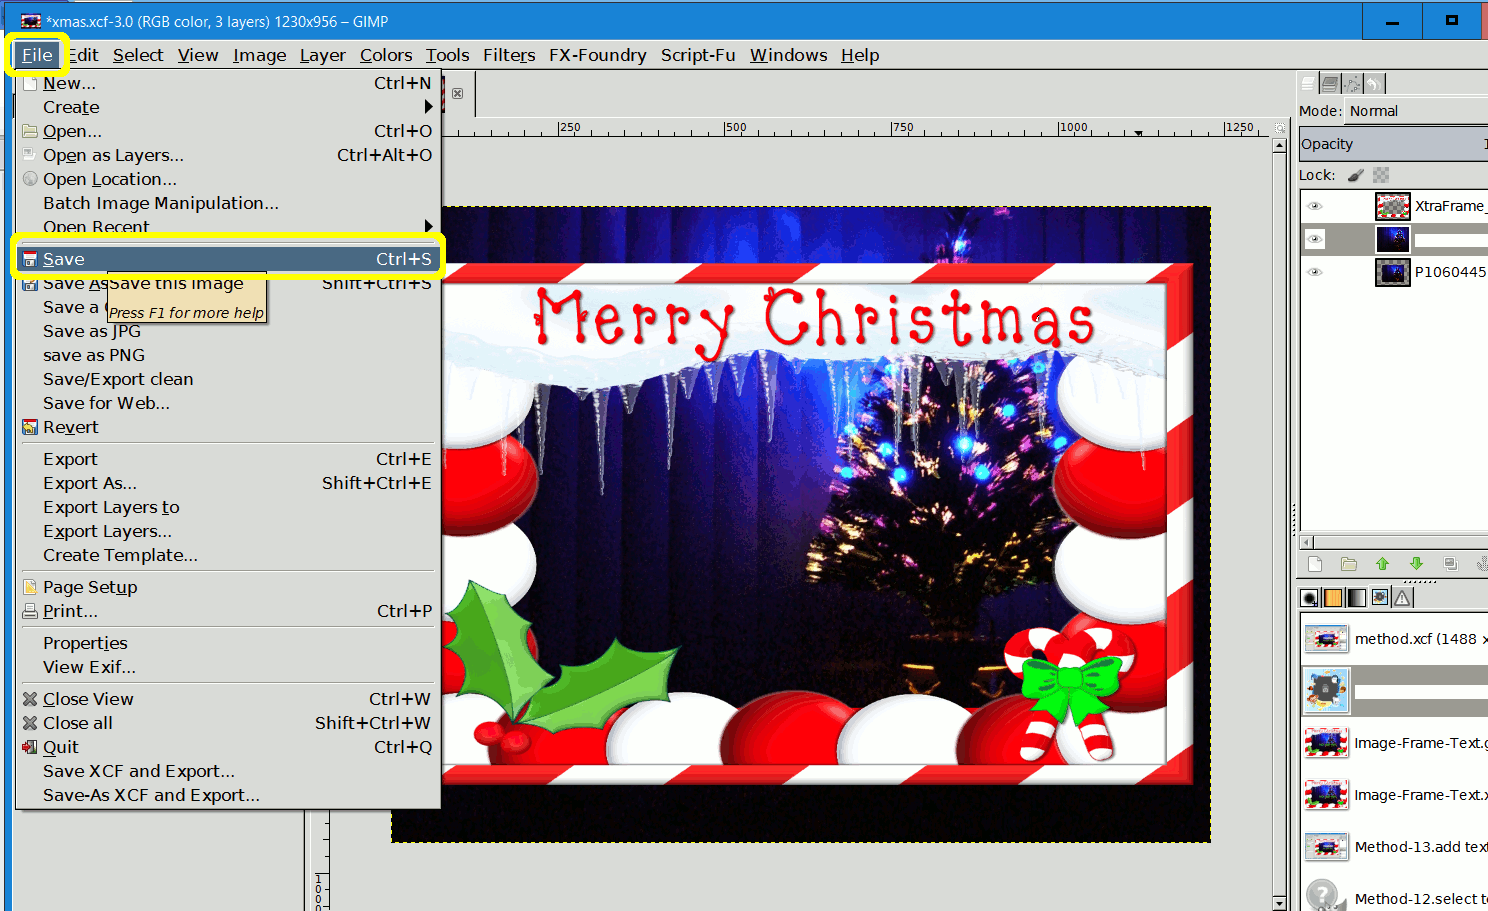
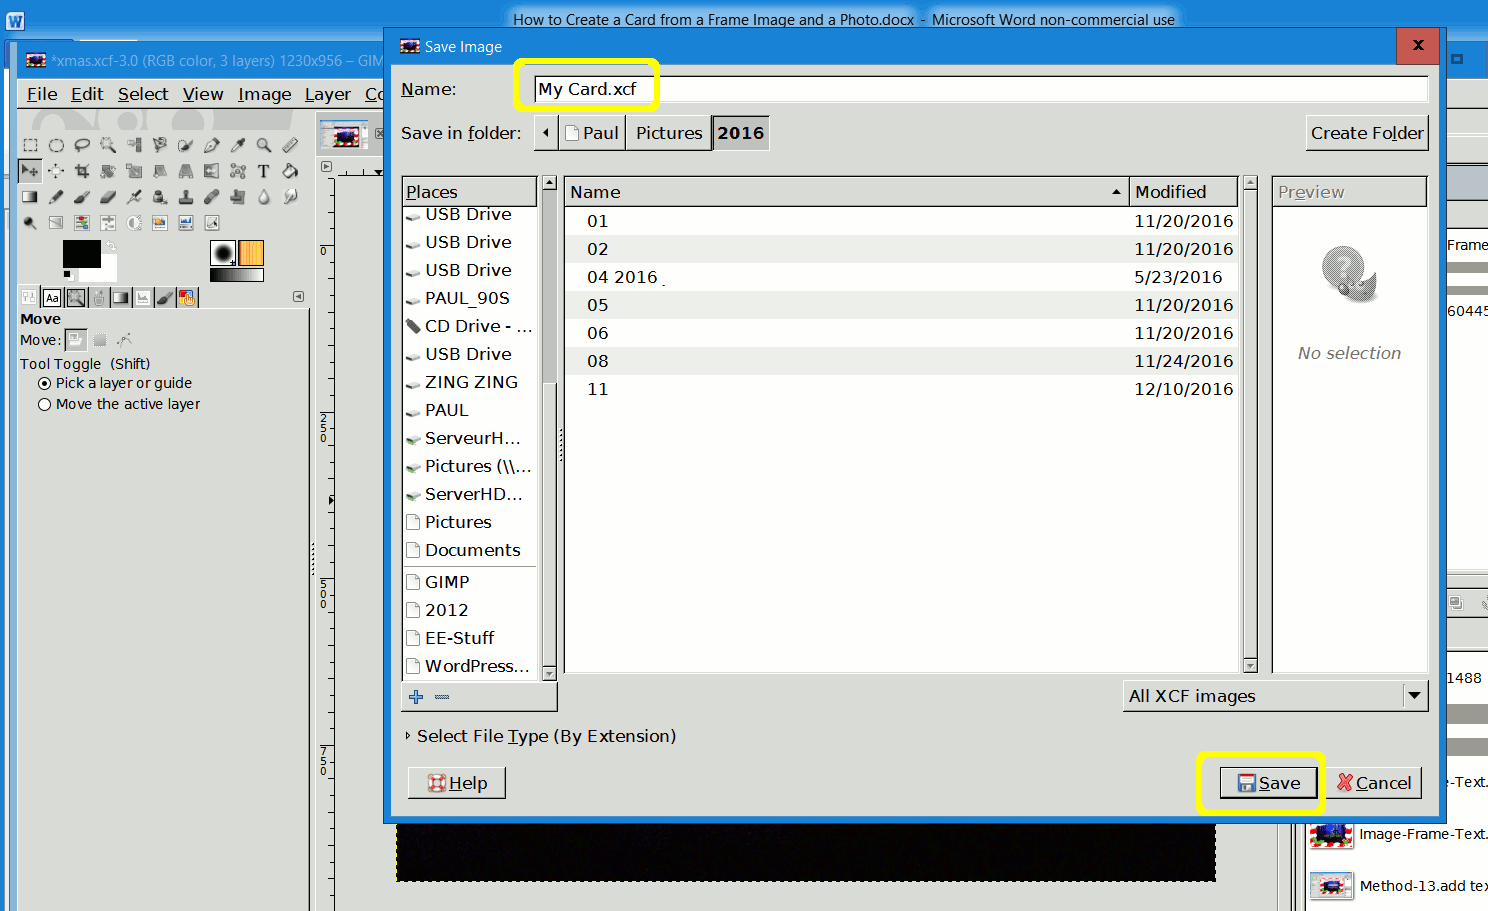
At this point, you should SAVE this file:
File menu ―> Save ―> Enter a filename (ex. My Card.xcf) ―> click on Save.
It is always a good idea to save your work every 30 minutes or so. S*@t happens, so don’t get caught short.
The extension .xcf is the native file type for all GIMP images. This will conserve all the layers, including those with transparency and allow you to reopen the file.
To save as any other file type, use the option:
File menu ―> Export As… ―> Enter a filename (ex. My Card.jpg) ―> click on Save. Generally, this will NOT conserve layers, transparency, etc. So Export As… should only be used for the final result.![Save-1.png]()
![Save-2.png]()
![Method-5.image-frame.gif]() This is the result of the superimposed layers
This is the result of the superimposed layers
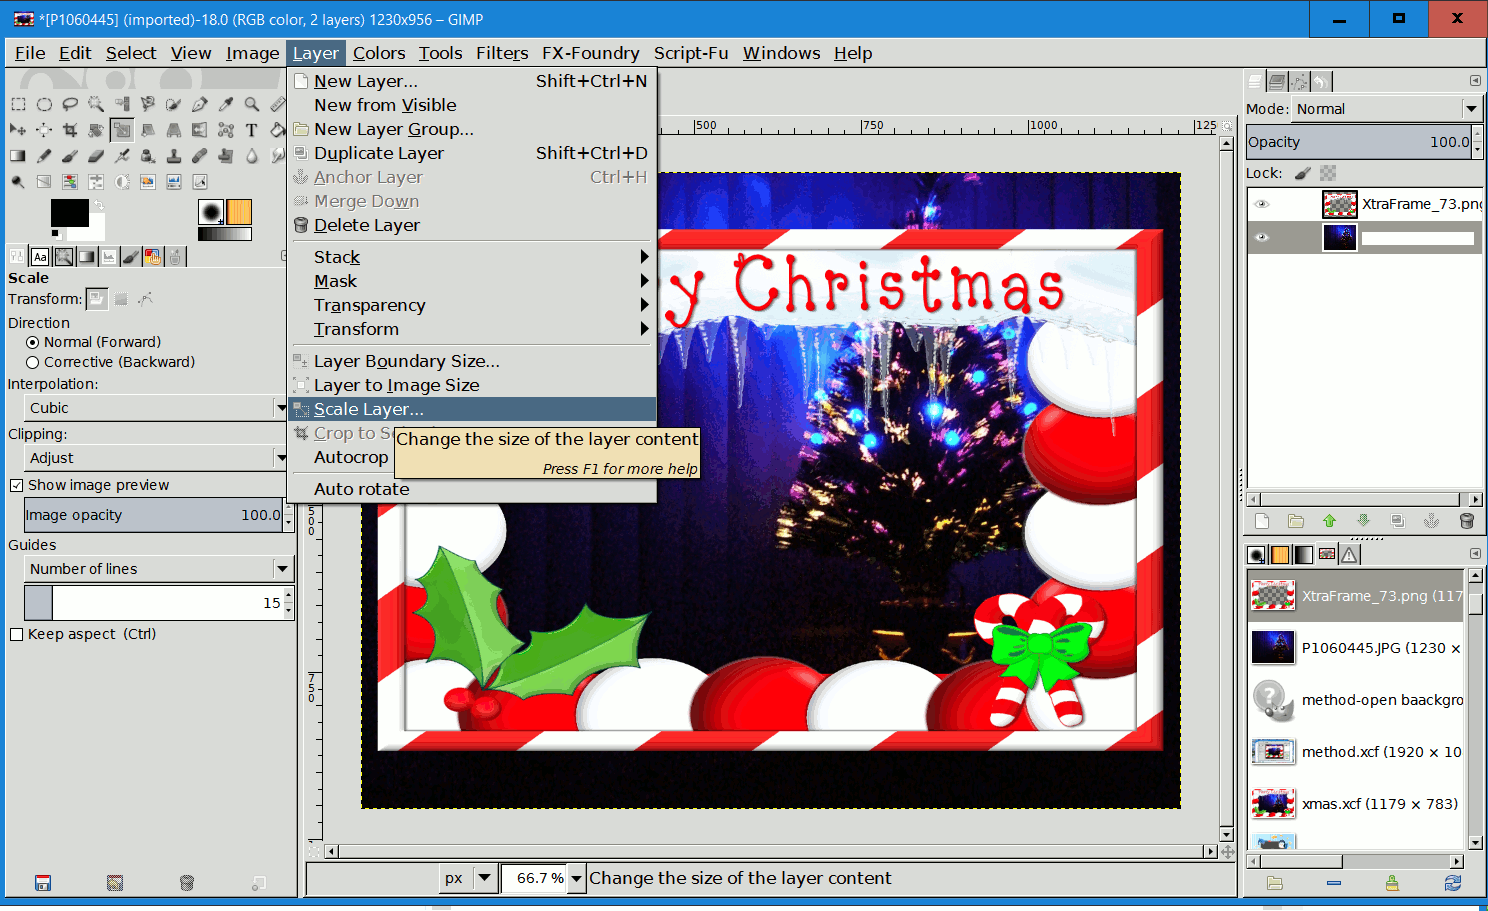
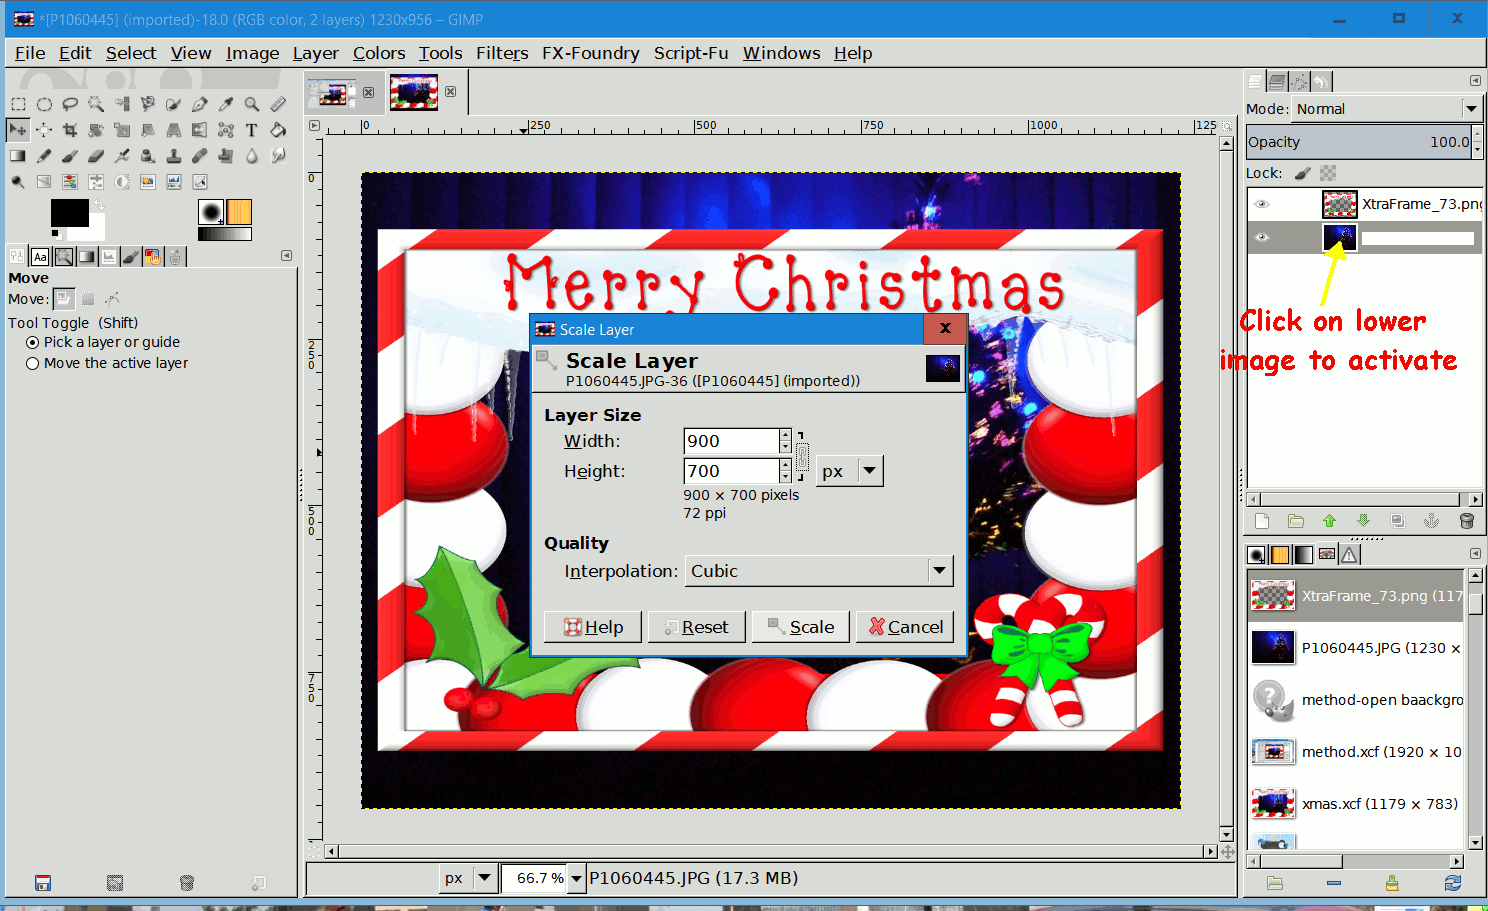
![Method-6.scale-tool.png]()
![Method-7.scale-layer.png]()
Layer menu ―> Scale Layer… Before scaling, make sure that the background layer is selected by clicking on it in the Layer panel.
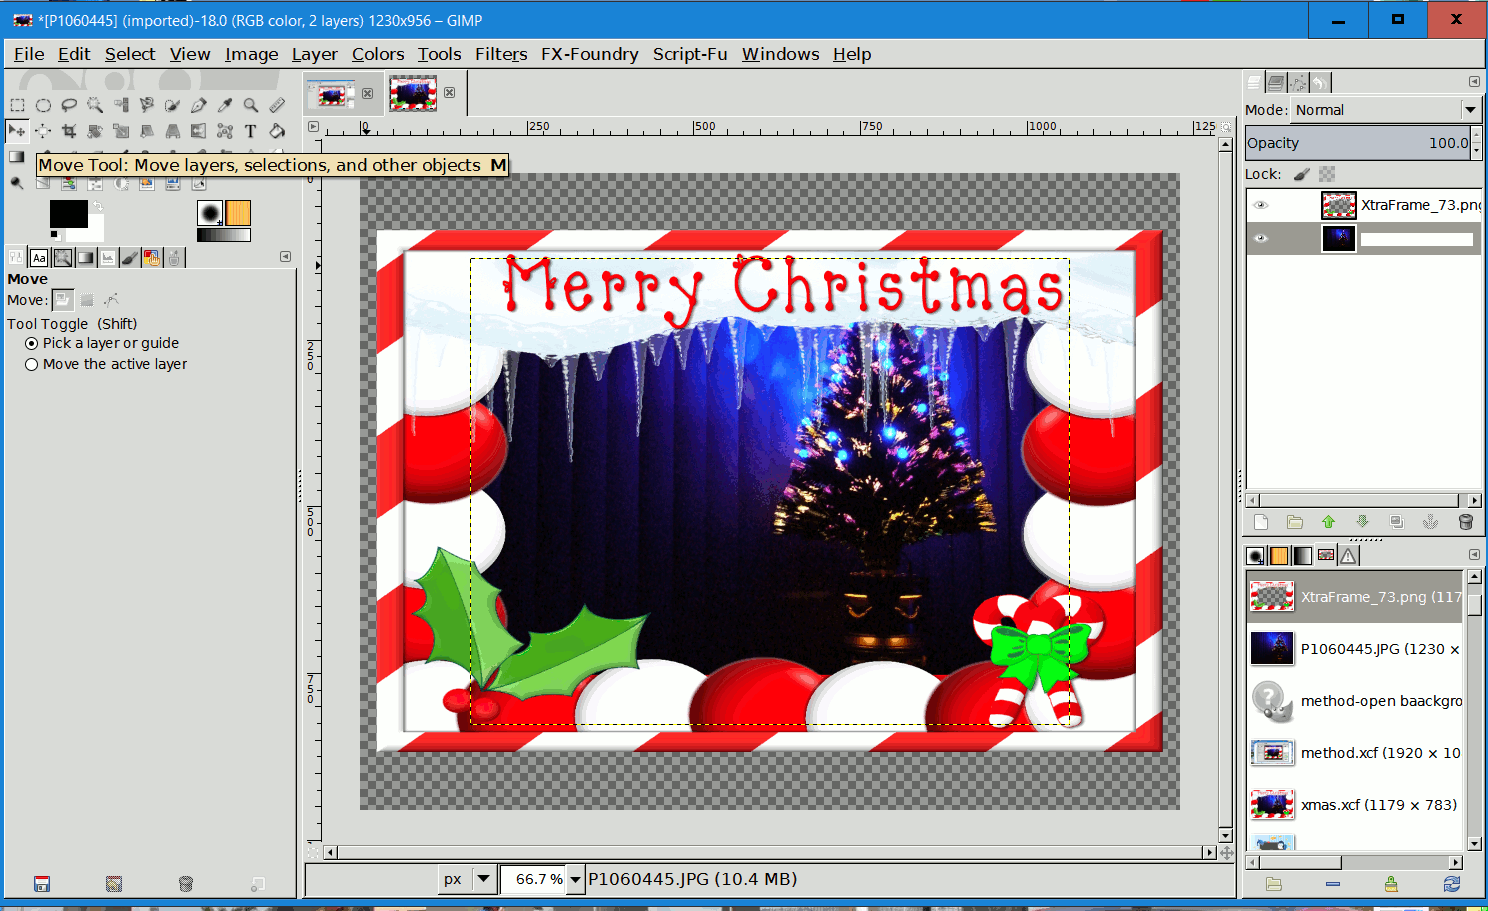
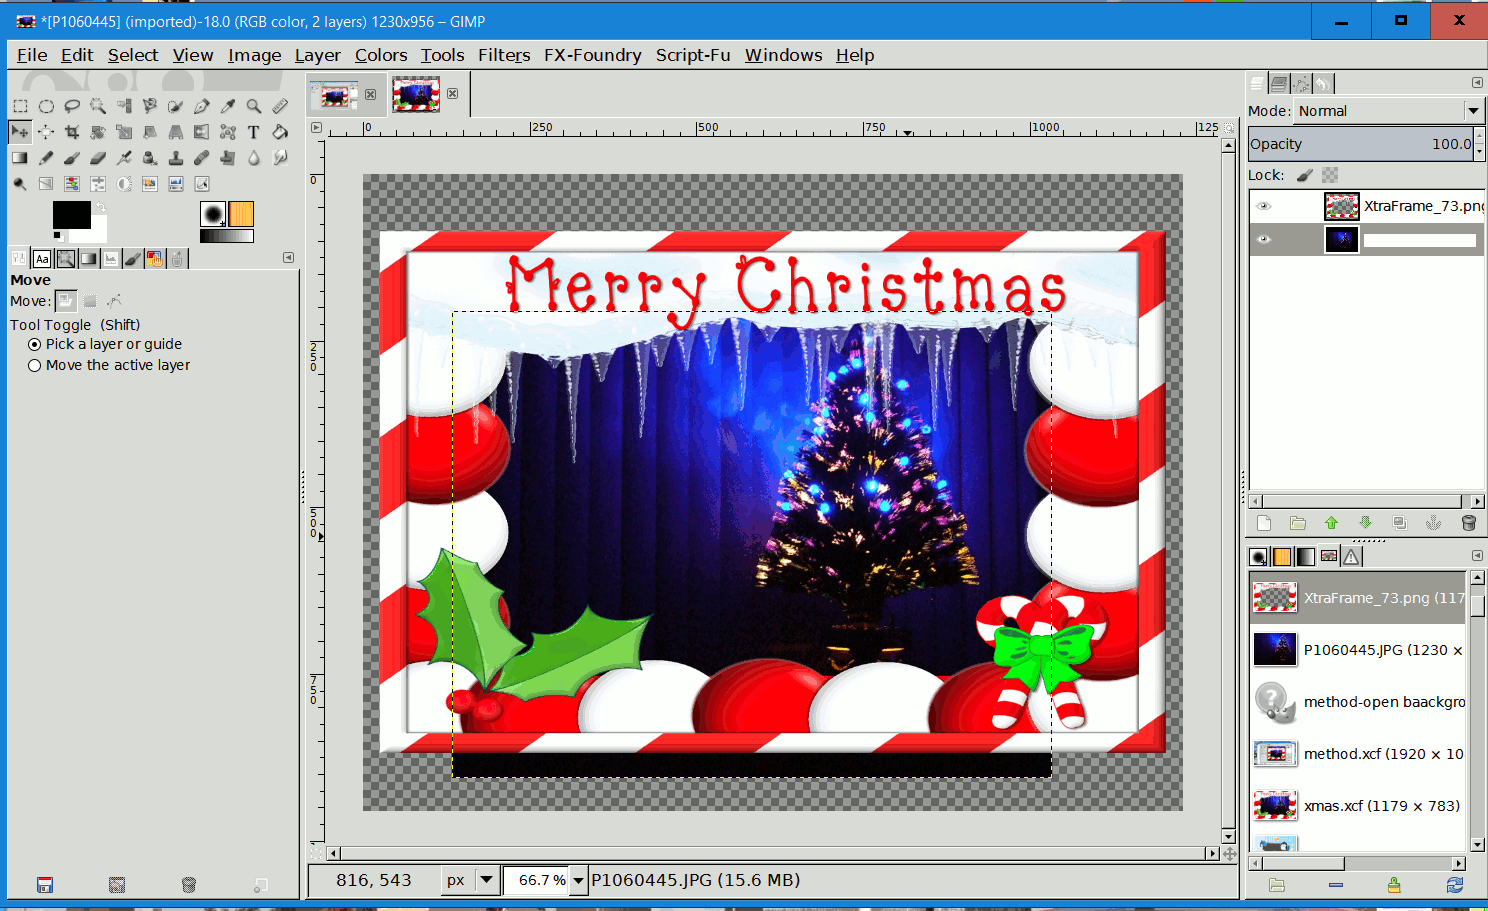
![Method-8.move-tool.png]()
![Method-9.move-adjusted.png]()
After moving the image with the Move tool, part of the background image may be outside of the Frame image.
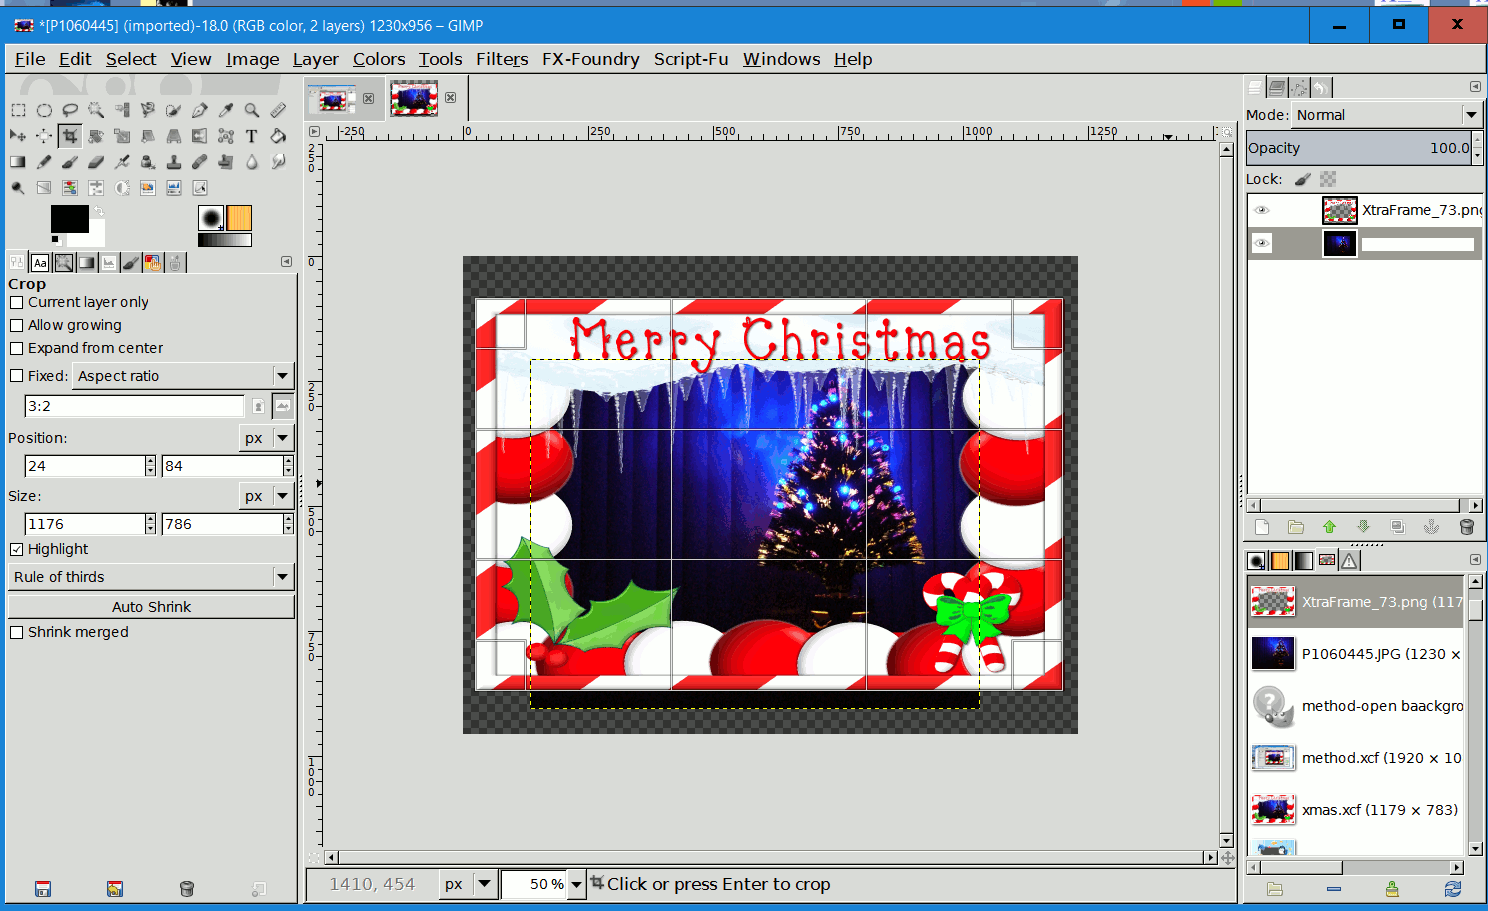
![Method-10.crop-tool.png]()
![Method-11.select-crop.png]()
![result-wo-text.png]()
This is what the final result looks like without added text.
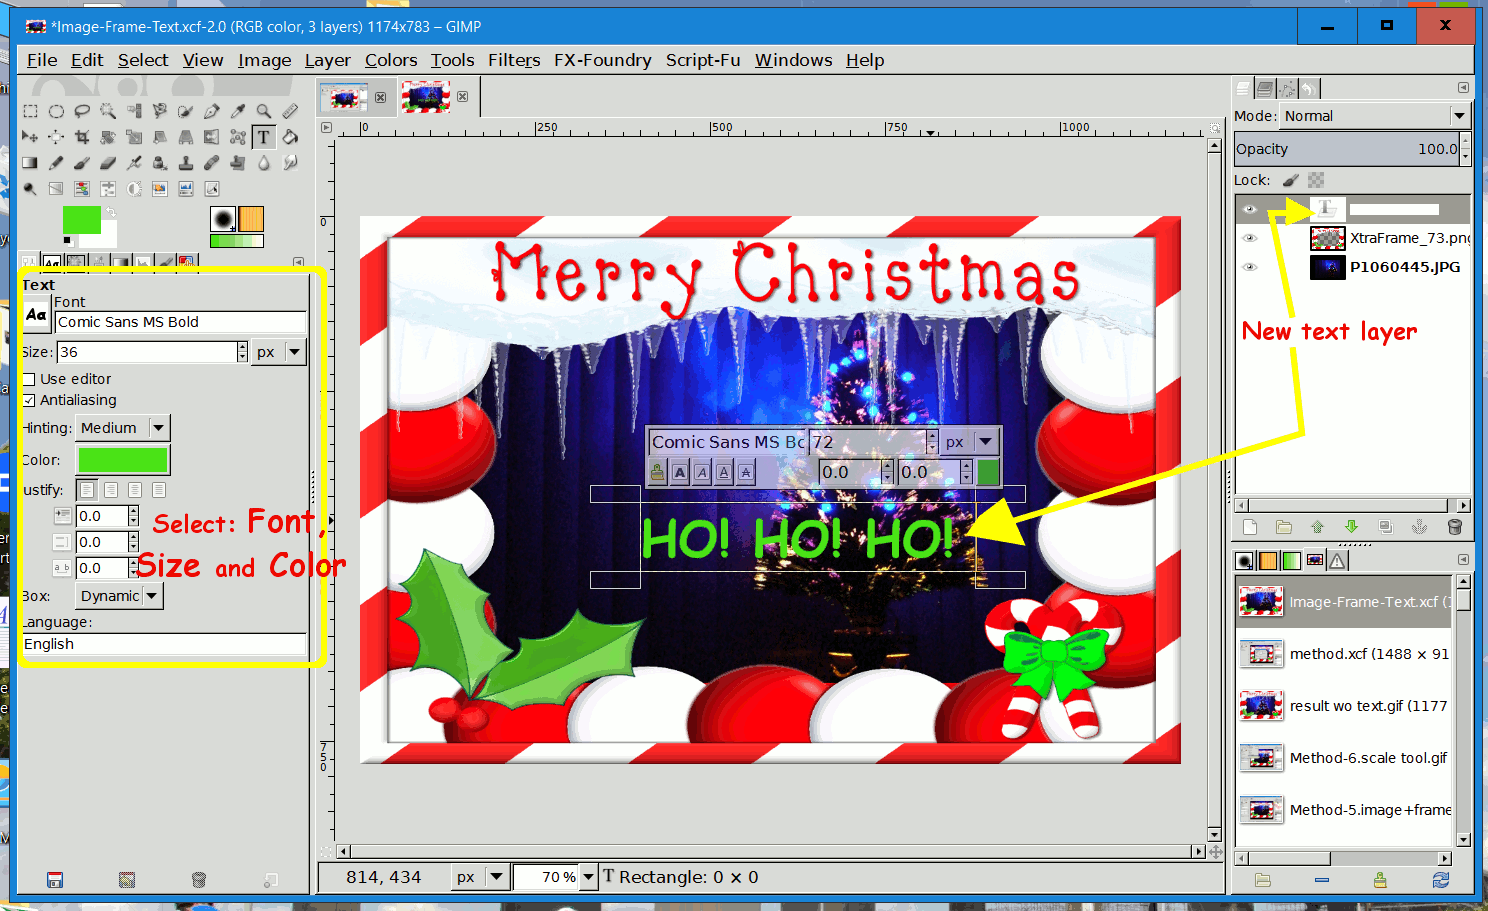
![Method-12.select-text.png]()
![Method-13.add-text.png]()
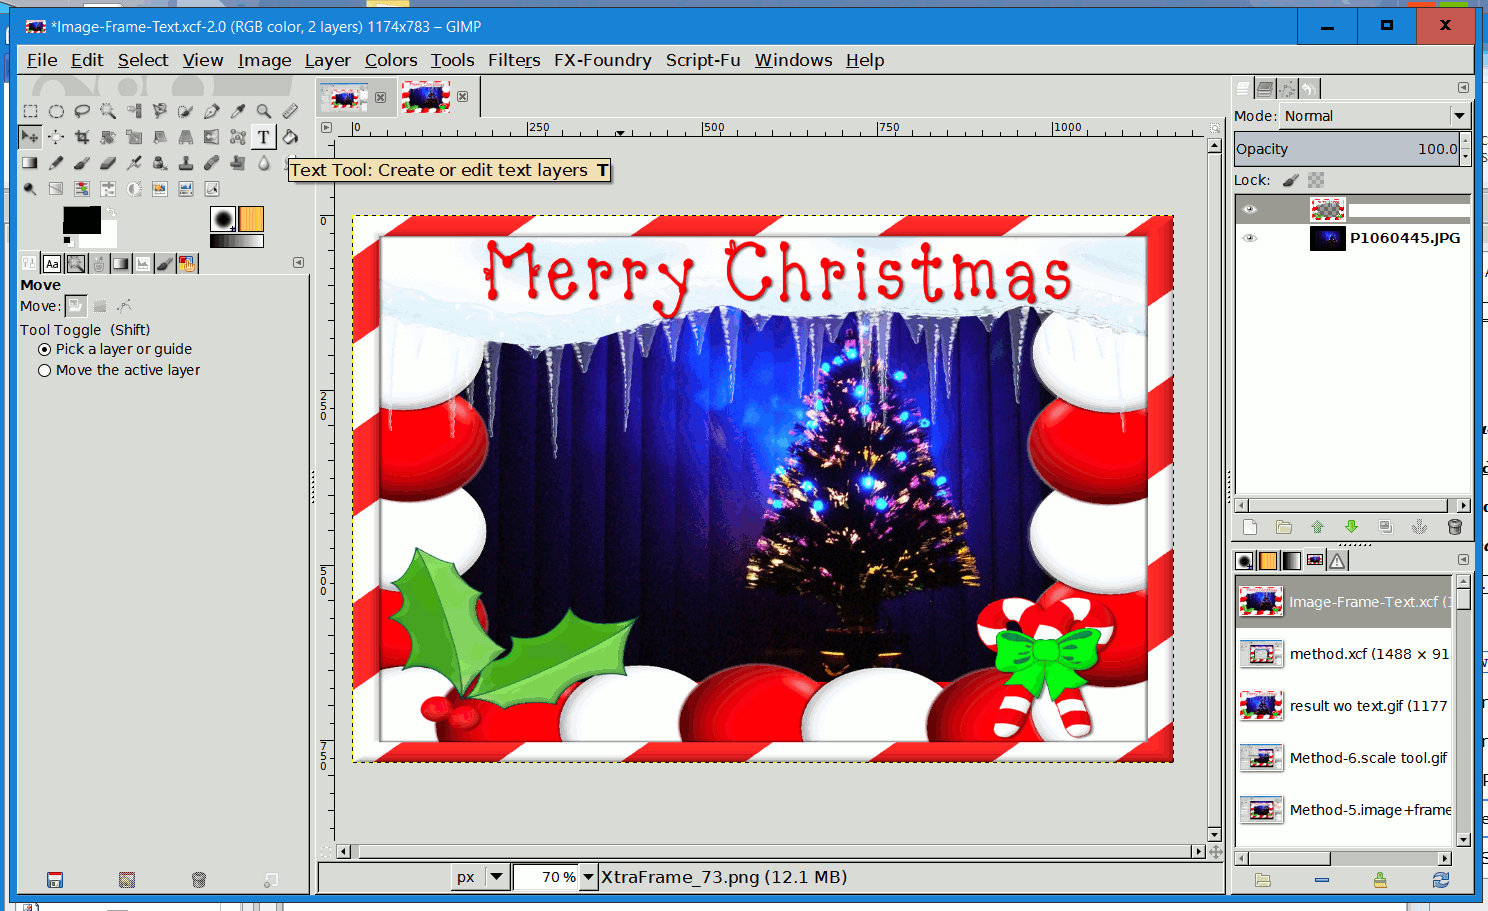
The text can be used using the Move tool. The final result: Image, Frame and Text
![Image-Frame-Text.png]()
What you need is:
- some creative imagination to get the desired results
- image editing app with layers and text features
- the digital photos you want to use to create your greeting card
- some good images downloaded from the internet to use as frames, free with restrictions
- the knowledge, where required, of how to credit the author of images you have downloaded from the internet (more about this later)
Image Editing App with Layers and Text Features
I discuss free image editing apps in this article rather than paid ones like Photoshop.
If you are familiar with image editors, like Microsoft Paint or Microsoft Photo Gallery, you will find the step up to a more sophisticated editor like Paint.NET or GIMP a little less intimidating than if you have never used this type of app.
Both Paint.NET and the GIMP support layers and editable text. While Paint.NET is easier to learn and use, GIMP is much more versatile. So if you are learning how to use a new text editor, why not learn to use GIMP, the more versatile of the two?
First things first: download and install GIMP from their main site: www.gimp.org/downloads/. Although GIMP 2.9 is available in beta-test version, I am using GIMP 2.8 for the purpose if illustrating “How to create a greeting card”. Be sure to choose the correct operating system (OS): GNU/Linux, OS X or Microsoft Windows.
If you do not want to download GIMP 2.8.18 via BitTorrent, use the direct download link.
“These links download the official GIMP installer for Windows (~100MB). The installer contains both 32-bit and 64-bit versions of GIMP, and will automatically use the appropriate one.”
Or, if you do not want to use GIMP at all, then you can download Paint.NET here: www.getpaint.net/download.
And here is the link to the Editable Text plug-in: www.isimonbrown.co.uk/edit
The Digital Photos You Want to Use to Create Your Greeting Card
If you have a digital camera, a tablet device or a cell phone, then you probably have plenty if photos you can use. If not, you can always go to www.flickr.com and use photos which are shared there.
Images Downloaded from the Internet to Use as Frames, Free (With Some Restrictions)
Here is a site (and there are many others) where you can find frames for photos: http://www.freepik.com
If you do not plan to post these images publically (Twitter, Facebook, etc.) and only to create a card to print, then you can download freely from there. Otherwise, you will have to post the author’s credits as shown below.
<a href='http://www.freepik.com/fre
How to credit the author?
Steps to create a Greeting Card
Using a full-blown image editing app when all you have ever used before is MS Paint or MS Photo Gallery is quite a step up and can be intimidating without any help or tutorials, especially one with a multitude of new features which you never knew existed.
I learned GIMP using Google searches and several sites with good tutorials. So, before we start, I’ll show you the tools I used to create the greeting card.
Overview of GIMP layout
Tool Box
Tools used in the FILE menu
Tools used from the Tool Box
Steps to Create Greeting Card Start GIMP and open the image/photo that you want to use as the background, the bottom-most layer of the composite image of the card:
- open the image as background layer
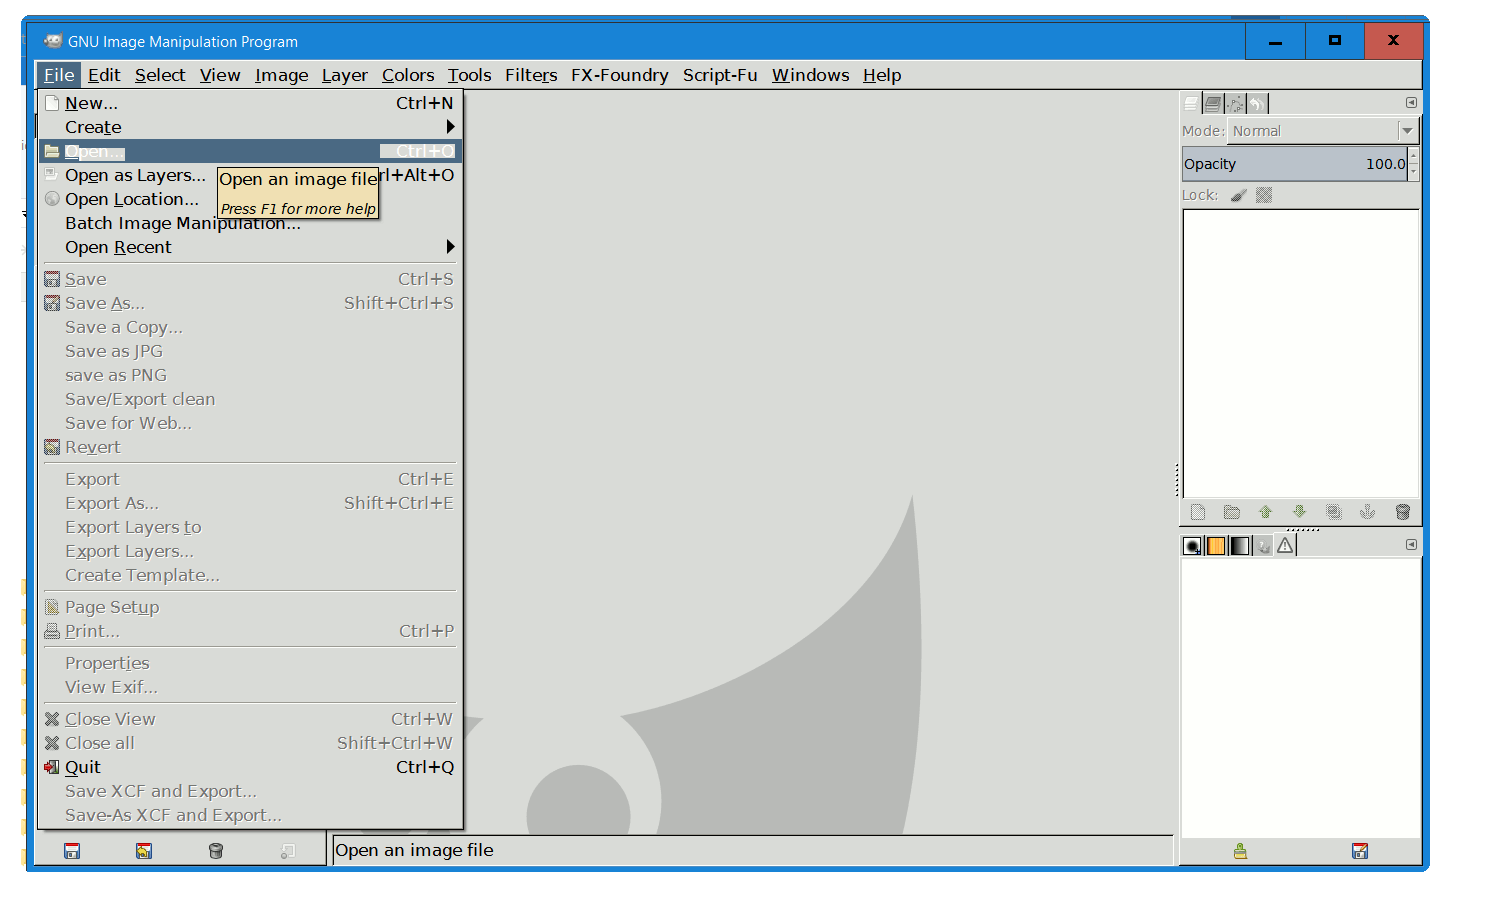
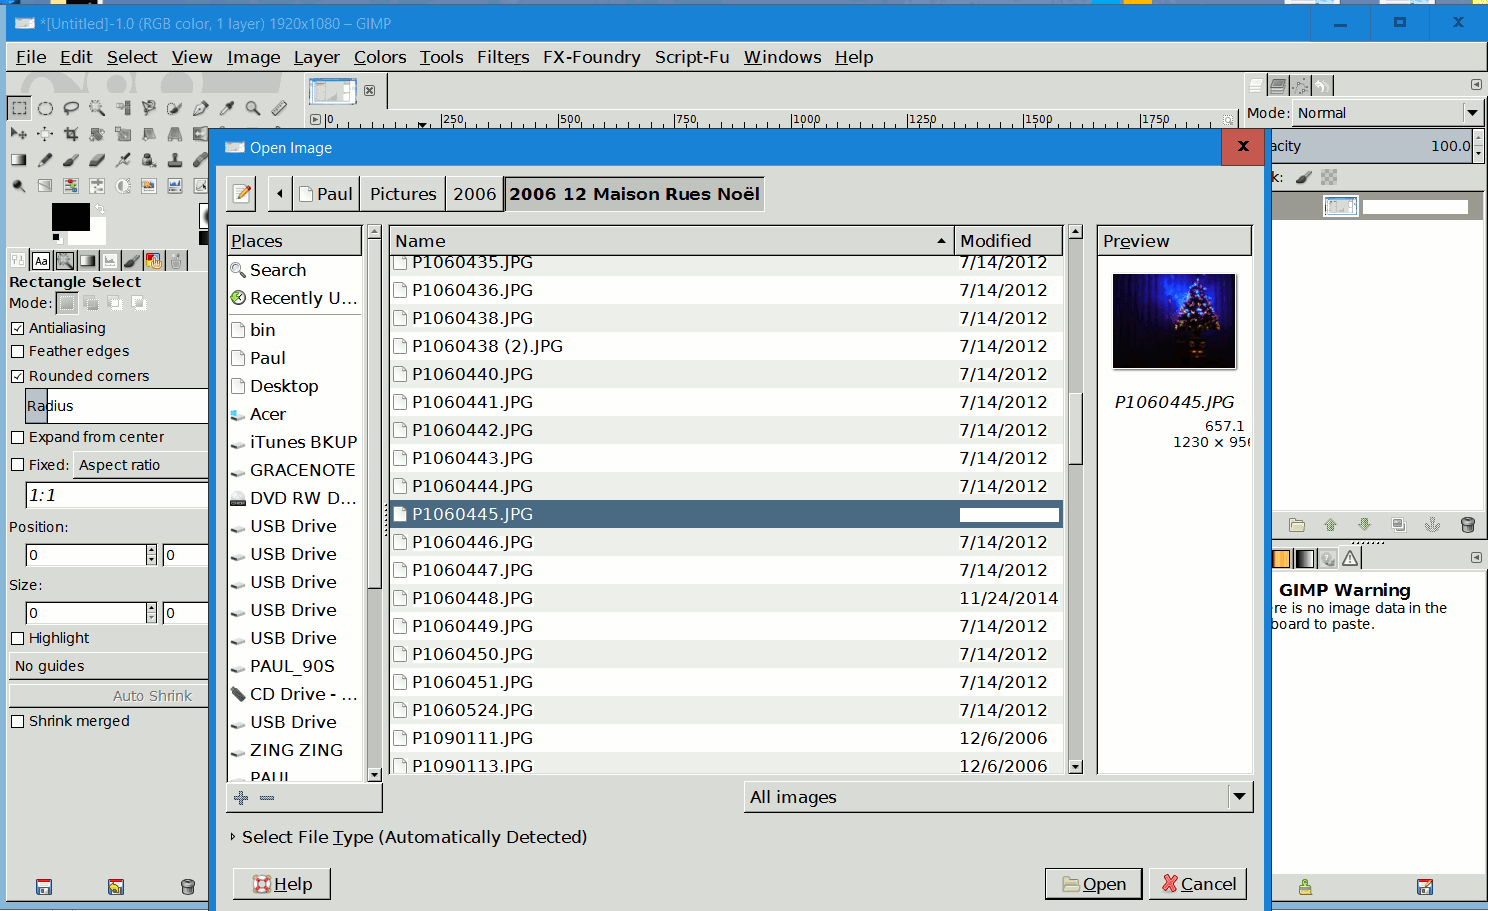
File ―> Open; navigate to folder with image, select image, click Open
- open the frame image

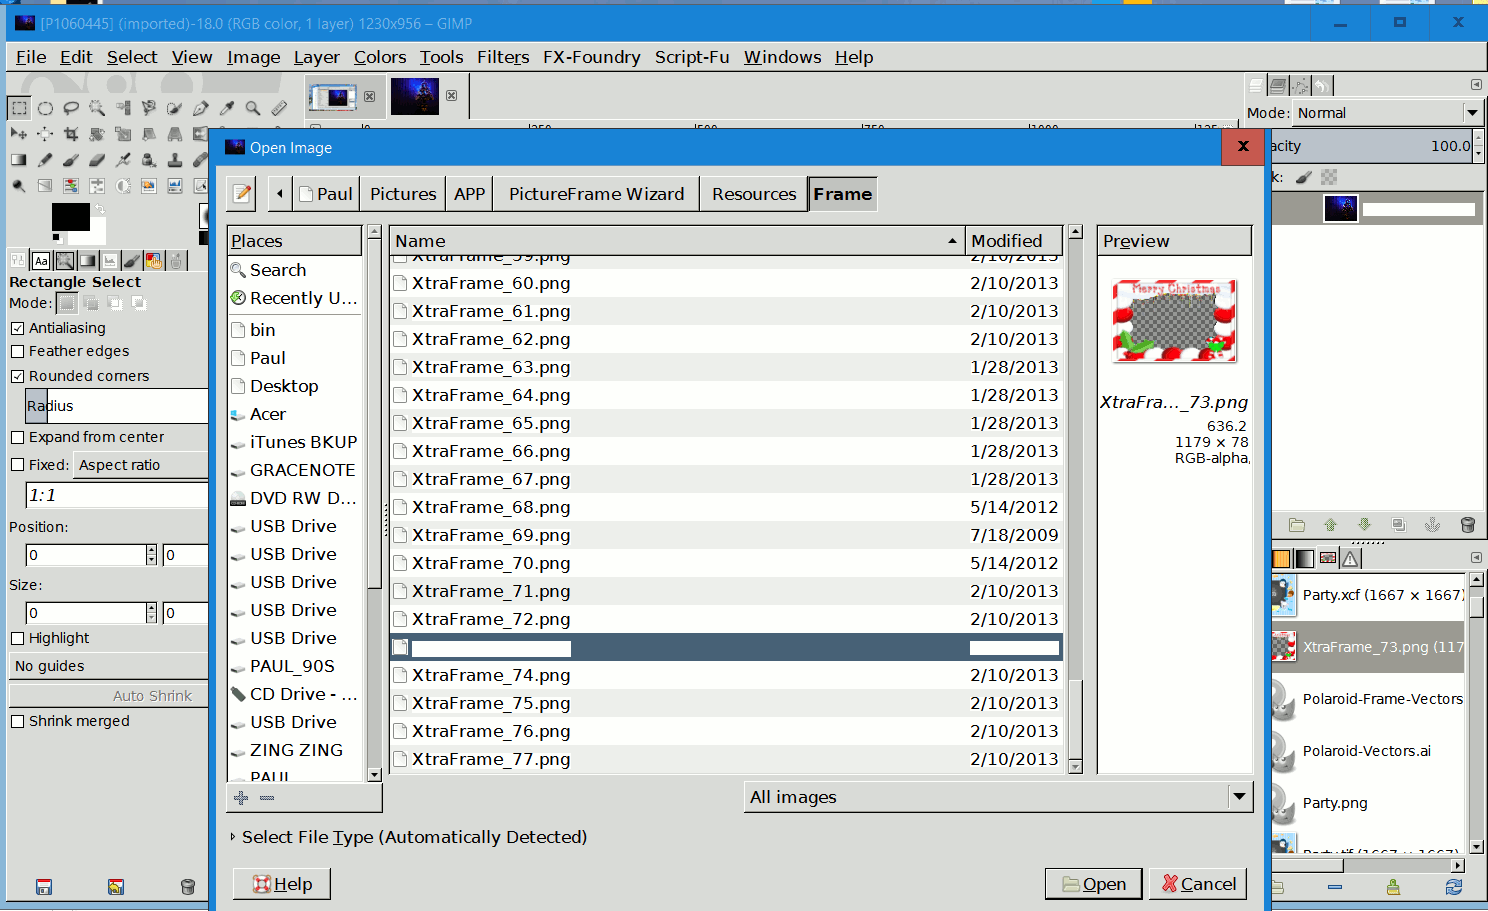
File ―> Open as Layers…; navigate to folder with image of frame, select image, click Open
You will note that the center of the image has a black & white checkerboard pattern. This is the part of the frame image that is transparent in order to see both the frame and the image in the background layer.
ALSO: jpg files do NOT support transparency; the transparent part of the image becomes white when saved.
At this point, you should SAVE this file:
File menu ―> Save ―> Enter a filename (ex. My Card.xcf) ―> click on Save.
It is always a good idea to save your work every 30 minutes or so. S*@t happens, so don’t get caught short.
The extension .xcf is the native file type for all GIMP images. This will conserve all the layers, including those with transparency and allow you to reopen the file.
To save as any other file type, use the option:
File menu ―> Export As… ―> Enter a filename (ex. My Card.jpg) ―> click on Save. Generally, this will NOT conserve layers, transparency, etc. So Export As… should only be used for the final result.
 This is the result of the superimposed layers
- resize (Scale) the background image to fit in the frame
Layer menu ―> Scale Layer… Before scaling, make sure that the background layer is selected by clicking on it in the Layer panel.
- Use the Move tool to make any final adjustment to the image so it fits correctly in the transparent part of the frame
After moving the image with the Move tool, part of the background image may be outside of the Frame image.
- Crop the image with the Crop tool


This is what the final result looks like without added text.
- Final step, add text
The text can be used using the Move tool. The final result: Image, Frame and Text
- Save the file as before.
- Export as ‘My first Card.jpg’
- This is the final result:

My areas of expertise include:
- system and database architecture
- IT auditing
- ITS (or Intelligent Transport Systems) for the highway
- system and database architecture
- IT auditing
- ITS (or Intelligent Transport Systems) for the highway
Have a question about something in this article? You can receive help directly from the article author. Sign up for a free trial to get started.
Comments (0)