How to use ESXTOP access with read-only account


vExpert vSAN, NSX, Cloud Provider, Veeam Vanguard, Virtual Backups, and Storage design, and an active blogger.
Published:
Browse All Articles > How to use ESXTOP access with read-only account
Giving access to ESXi shell console is always an issue for IT departments to other Teams, or Projects. We need to find a way so that teams can use ESXTOP for their POCs, or tests without giving them the access to ESXi host shell console with a root account.
There are some 3rd party tools that you can use, without the need to access the ESXi host shell console (using ssh). Normally these type of tools needs root permissions.
To find a solution for a read-only user (or minimum non-root), first is to identify what are the permissions that a user needs to access the esxtop.
I found a good article from William Lam regarding this esxtop and user permissions.
You need to create a role (in the ESXi hosts) with these permissions: Global - Service Managers
![esxtop-04.jpg]() You need to ensure that you create the same user in all ESXi hosts and associate the user with this role created in the previous step.
You need to ensure that you create the same user in all ESXi hosts and associate the user with this role created in the previous step.
After you have your user and roles created in all ESXi hosts, you can now start to test some of the tools.
The tools that I tested are:
Option 1: visualextop
You can download and read about this Fling tool in VMware labs: https://labs.vmware.com/flings/visualesxtop
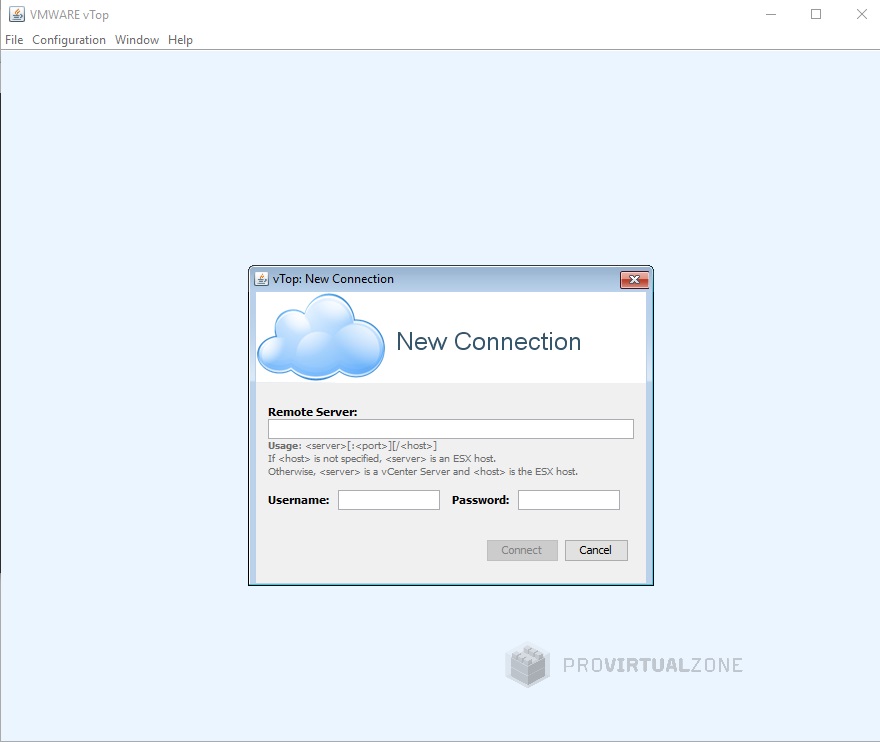
This tool runs locally as a java application on your laptop, or server and you can check your esxtop statistics like in the Windows Performance Monitor (perfmon).
Just run the tool (the vtop.bat file) and add your ESXi host credentials (for read-only users, use the user created in the previous step).
![esxtop-01.jpg]()
![esxtop-02.jpg]() I think this is a good tool. The only problem is that doesn't display VMs names, only World ID. World ID is an ID set in the ESXi host process for running VMs. For a user to identify which VM belongs to, it needs to login to ESXi shell console and checks VMs and their World ID (using esxcli vm process list command you get VMs World ID), or you can create a small PowerCli script to provide that list.
I think this is a good tool. The only problem is that doesn't display VMs names, only World ID. World ID is an ID set in the ESXi host process for running VMs. For a user to identify which VM belongs to, it needs to login to ESXi shell console and checks VMs and their World ID (using esxcli vm process list command you get VMs World ID), or you can create a small PowerCli script to provide that list.
In the second tool, you do not need to use a read-only user since you can run the tool in the vSphere Web Client directly.
Option 2: ESXtopNGC
You can download and read about this Fling tool in VMware labs: https://labs.vmware.com/flings/esxtopngc-plugin
Note: This tool is only supported for vCenter 5.5 and above (I only tested in 5.5 and 6.0).
This tool is installed in the vCenter Web Client (for VCSA and Windows vCenter).
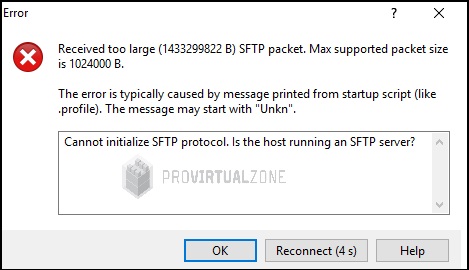
Note: When you try to connect to your VCSA using WinSCP you could get a message similar to this one:
![esxtop-03.jpg]() ##Connect to your VCSA shell console, if bash shell is not enabled, you need to enable.
##Connect to your VCSA shell console, if bash shell is not enabled, you need to enable.
In the VCSA Bash shell, run this command to change the default shell to Bash: chsh -s /bin/bash root
After you should be able to connect to VCSA and upload the plugin file to /root
##unzip the file ESXtopNGCPlugin-01.zip
Run the following commands:
After the plugin installation is finished for VCSA.
Depending your Windows version, browse to C:\Program Files\VMware\Infrastructure\vSphereWebClient\plugin-packages or C:\Program Files\VMware\vCenter Server\WebClient\plugin-packages
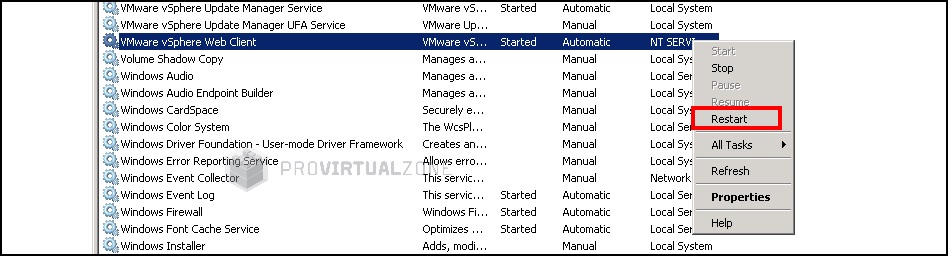
After restart your vSphere Web Client service
![esxtop-05.jpg]() Now let's check the ESXtop plugin. Login to your vCenter with vSphere Web Client.
Now let's check the ESXtop plugin. Login to your vCenter with vSphere Web Client.
If you get:
The vSphere Client web server is initializing
The vSphere Client web server is still initializing. Please try again shortly.
VMware vSphere Documentation and Support
Wait 1 or 2 minutes, Web Client is still restarting.
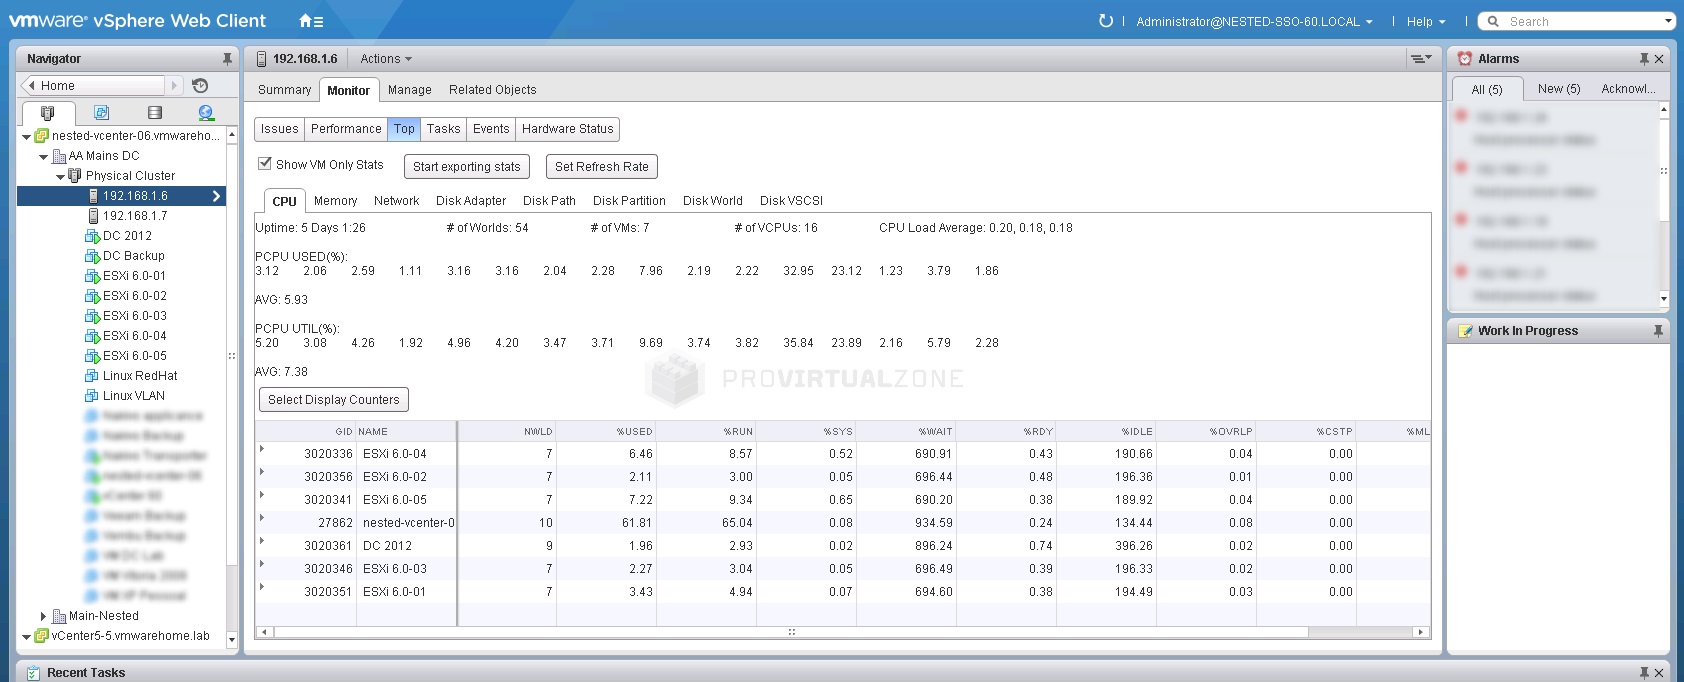
After successful login: Select Hosts and Clusters select one ESXi host click Monitor tab and then you should see the plugin tab with the name TOP.
![esxtop-06.jpg]()
As you can see in the above image, the plugin have all the options from the esxtop. You can export the data by clicking the button "Start exporting stats", and you can change the refresh rate clicking on the button "Set Refresh Rate". The default is 15 seconds.
Important note: Some users complain that after installing this plugin, the VDP plugin disappears, or stop working (or even other plugins). Using Windows vCenter 6.0 and VCSA, I was not able to test this scenario, so test this plugin in a non-Production environment before you install this in Production vCenters.
Last option to use a user without the need to root access to our ESXi hosts shell console to use esxtop.
Option 3 (this was the option I used for our Project request): Create a user in ESXi host with admin permissions
Note: This solution needs to be applied to all ESXi hosts you want to give access to ESXTOP.
First, you need to login to ESXi host and create the user:
Click users tab and click right mouse button and choose add.
![esxtop-03-01.jpg]()
![esxtop-03-02.jpg]() After you create the user you will see the user in the ESXi host user list.
After you create the user you will see the user in the ESXi host user list.
![esxtop-03-03.jpg]()
Next click on the Permissions tab.
Again, click right mouse button and choose add option.
![esxtop-03-04.jpg]()
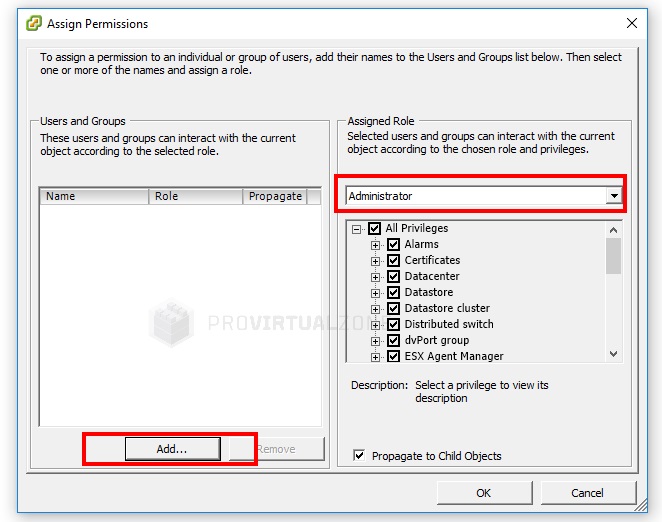
Now let's add administrator permissions to the user you created above.
![esxtop-03-05.jpg]()
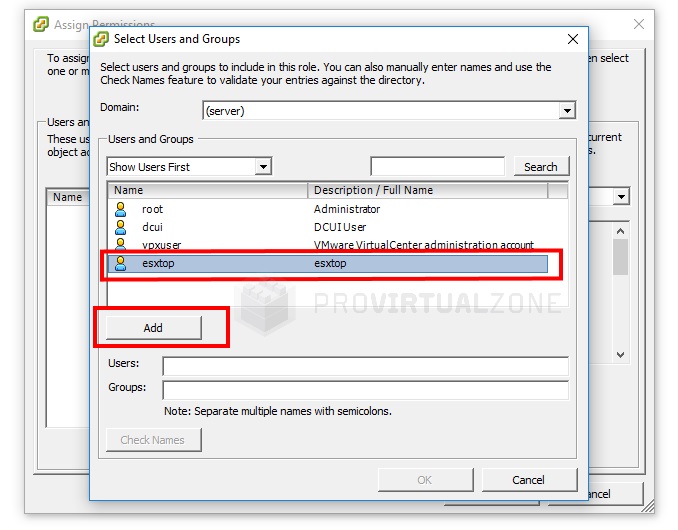
Add the user to the administrator permissions.
![esxtop-03-06.jpg]()
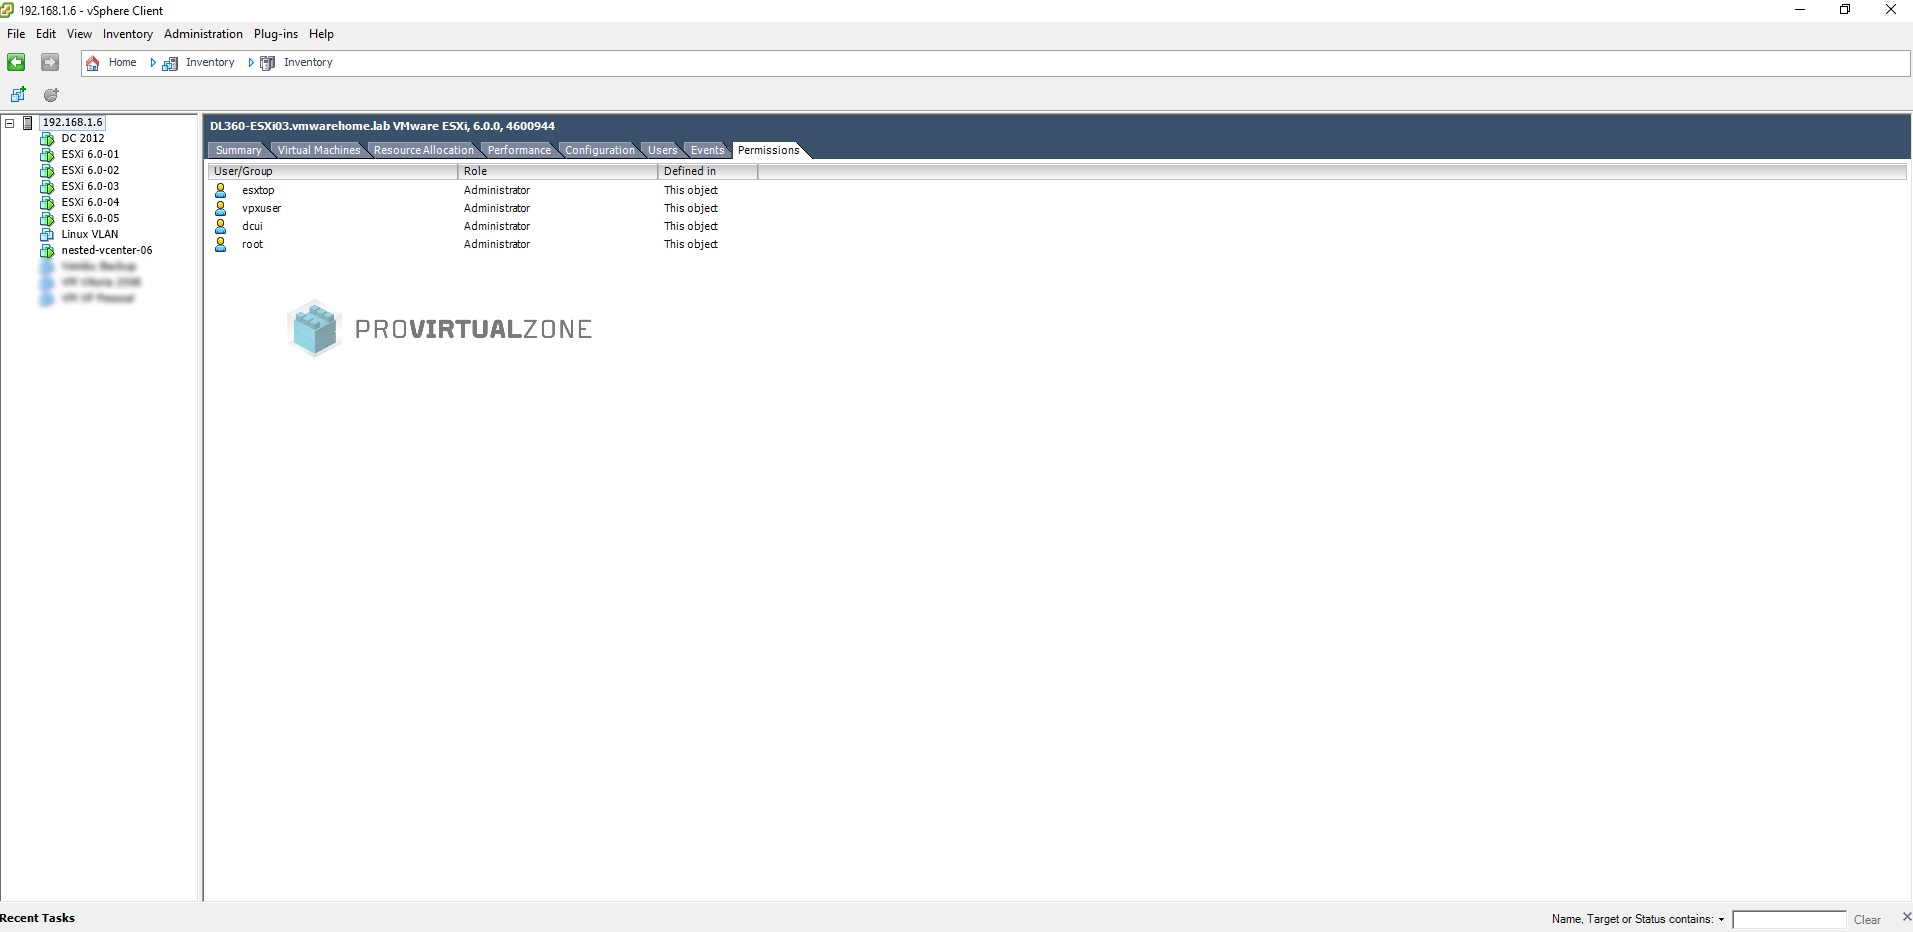
![esxtop-03-07.jpg]() Now you have the user with administrator permissions.
Now you have the user with administrator permissions.
![esxtop-03-08.jpg]()
After you have the user with the proper permissions. You now need to login to the ESXi host shell console with that user and change the user shell to only run esxtop for this specific user.
Shell user is in /etc/passwd file, so you need to change this file.
The default is esxtop:x:1000:1000:esxtop:/:/bin/sh and you need to change to esxtop:x:1000:1000:esxtop:/:/bin/esxtop
Now every time this user esxtop log in to the ESXi host using ssh automatically the ESXTOP will run. The user can now work with the tool with all permissions, but after exit, the ESXTOP ESXi host shell console will close. Therefore this user will never have direct access to the shell console itself.
Hope this information was useful.
This article is the part of my "TIP Articles". So, please vote "Helpful" on this Article. And I encourage your comments and feedback.
To find a solution for a read-only user (or minimum non-root), first is to identify what are the permissions that a user needs to access the esxtop.
I found a good article from William Lam regarding this esxtop and user permissions.
You need to create a role (in the ESXi hosts) with these permissions: Global - Service Managers
 You need to ensure that you create the same user in all ESXi hosts and associate the user with this role created in the previous step.
After you have your user and roles created in all ESXi hosts, you can now start to test some of the tools.
The tools that I tested are:
Option 1: visualextop
You can download and read about this Fling tool in VMware labs: https://labs.vmware.com/fl
This tool runs locally as a java application on your laptop, or server and you can check your esxtop statistics like in the Windows Performance Monitor (perfmon).
Just run the tool (the vtop.bat file) and add your ESXi host credentials (for read-only users, use the user created in the previous step).
 I think this is a good tool. The only problem is that doesn't display VMs names, only World ID. World ID is an ID set in the ESXi host process for running VMs. For a user to identify which VM belongs to, it needs to login to ESXi shell console and checks VMs and their World ID (using esxcli vm process list command you get VMs World ID), or you can create a small PowerCli script to provide that list.
In the second tool, you do not need to use a read-only user since you can run the tool in the vSphere Web Client directly.
Option 2: ESXtopNGC
You can download and read about this Fling tool in VMware labs: https://labs.vmware.com/fl
Note: This tool is only supported for vCenter 5.5 and above (I only tested in 5.5 and 6.0).
This tool is installed in the vCenter Web Client (for VCSA and Windows vCenter).
- vCenter Appliance
Note: When you try to connect to your VCSA using WinSCP you could get a message similar to this one:
 ##Connect to your VCSA shell console, if bash shell is not enabled, you need to enable.
Using username "root".

                      VMware vCenter Server Appliance 6.0.0.20100

                      Type: vCenter Server with an embedded Platform Services Controller

                      Last login: Sun Mar  5 15:26:58 2017 from unknown705a0f80b103.domain_not_set.invalid
                      Connected to service

                          * List APIs: "help api list"
                          * List Plugins: "help pi list"
                          * Enable BASH access: "shell.set --enabled True"
                          * Launch BASH: "shell"

                      Command> shell.set --enable True
                      Command> shell
                          ---------- !!!! WARNING WARNING WARNING !!!! ----------

                      Your use of "pi shell" has been logged!

                      The "pi shell" is intended for advanced troubleshooting operations and while
                      supported in this release, is a deprecated interface, and may be removed in a
                      future version of the product.  For alternative commands, exit the "pi shell"
                      and run the "help" command.

                      The "pi shell" command launches a root bash shell.  Commands within the shell
                      are not audited, and improper use of this command can severely harm the
                      system.

                      Help us improve the product!  If your scenario requires "pi shell," please
                      submit a Service Request, or post your scenario to the
                      https://communities.vmware.com/community/vmtn/vcenter/vc forum and add
                      "appliance" tag.

nested-vcenter-06:~ #In the VCSA Bash shell, run this command to change the default shell to Bash: chsh -s /bin/bash root
nested-vcenter-06:~ # chsh -s /bin/bash root
                      Changing login shell for root.
                      Shell changed.
nested-vcenter-06:~ #After you should be able to connect to VCSA and upload the plugin file to /root
##unzip the file ESXtopNGCPlugin-01.zip
Run the following commands:
nested-vcenter-06:/ # unzip ESXtopNGCPlugin-01.zip -d /usr/lib/vmware-vsphere-client/plugin-packages/esxtop-plugin
                      Archive:  ESXtopNGCPlugin-01.zip
                        inflating: /usr/lib/vmware-vsphere-client/plugin-packages/esxtop-plugin/plugin-package.xml
                        inflating: /usr/lib/vmware-vsphere-client/plugin-packages/esxtop-plugin/plugins/10-org.apache.servicemix.bundles.commons-lang-2.4_6.jar
                        inflating: /usr/lib/vmware-vsphere-client/plugin-packages/esxtop-plugin/plugins/1-org.apache.servicemix.bundles.xmlpull-1.1.3.1_2.jar
                        inflating: /usr/lib/vmware-vsphere-client/plugin-packages/esxtop-plugin/plugins/2-org.apache.servicemix.bundles.xstream-1.4.7_1.jar
                        inflating: /usr/lib/vmware-vsphere-client/plugin-packages/esxtop-plugin/plugins/3-commons-cli-1.2.jar
                        inflating: /usr/lib/vmware-vsphere-client/plugin-packages/esxtop-plugin/plugins/4-javax.servlet-api-3.0.1.jar
                        inflating: /usr/lib/vmware-vsphere-client/plugin-packages/esxtop-plugin/plugins/5-org.apache.servicemix.bundles.junit-4.11_2.jar
                        inflating: /usr/lib/vmware-vsphere-client/plugin-packages/esxtop-plugin/plugins/6-org.apache.servicemix.bundles.spring-core-4.0.5.RELEASE_1.jar
                        inflating: /usr/lib/vmware-vsphere-client/plugin-packages/esxtop-plugin/plugins/7-org.apache.servicemix.bundles.spring-beans-4.0.5.RELEASE_1.jar
                        inflating: /usr/lib/vmware-vsphere-client/plugin-packages/esxtop-plugin/plugins/8-org.apache.servicemix.bundles.spring-context-4.0.5.RELEASE_1.jar
                        inflating: /usr/lib/vmware-vsphere-client/plugin-packages/esxtop-plugin/plugins/9-org.apache.servicemix.bundles.commons-jexl-1.1_5.jar
                        inflating: /usr/lib/vmware-vsphere-client/plugin-packages/esxtop-plugin/plugins/esxtop-ngc-svc-1.0.0.jar
                        inflating: /usr/lib/vmware-vsphere-client/plugin-packages/esxtop-plugin/plugins/esxtop-ngc-ui-war-1.0.0.war
                      nested-vcenter-06:/ # chmod -R 777 /usr/lib/vmware-vsphere-client/plugin-packages/esxtop-plugin/
                      ## restart vSphere Client
                      nested-vcenter-06:/ # etc/init.d/vsphere-client restart
                      Last login: Sun Mar  5 10:53:13 UTC 2017 on console
                      Stopping VMware vSphere Web Client...
                      Stopped VMware vSphere Web Client.
                      Starting VMware vSphere Web Client...
                      Waiting for VMware vSphere Web Client......
                      running: PID:16853
                      ## To return to the Appliance Shell, run this command:
                      nested-vcenter-06:/ # chsh -s /bin/appliancesh root
                      Changing login shell for root.
                      Shell changed.
nested-vcenter-06:/ #After the plugin installation is finished for VCSA.
- Windows vCenter
Depending your Windows version, browse to C:\Program Files\VMware\Infrastructur
After restart your vSphere Web Client service
 Now let's check the ESXtop plugin. Login to your vCenter with vSphere Web Client.
If you get:
The vSphere Client web server is initializing
The vSphere Client web server is still initializing. Please try again shortly.
VMware vSphere Documentation and Support
Wait 1 or 2 minutes, Web Client is still restarting.
After successful login: Select Hosts and Clusters select one ESXi host click Monitor tab and then you should see the plugin tab with the name TOP.
As you can see in the above image, the plugin have all the options from the esxtop. You can export the data by clicking the button "Start exporting stats", and you can change the refresh rate clicking on the button "Set Refresh Rate". The default is 15 seconds.
Important note: Some users complain that after installing this plugin, the VDP plugin disappears, or stop working (or even other plugins). Using Windows vCenter 6.0 and VCSA, I was not able to test this scenario, so test this plugin in a non-Production environment before you install this in Production vCenters.
Last option to use a user without the need to root access to our ESXi hosts shell console to use esxtop.
Option 3 (this was the option I used for our Project request): Create a user in ESXi host with admin permissions
Note: This solution needs to be applied to all ESXi hosts you want to give access to ESXTOP.
First, you need to login to ESXi host and create the user:
Click users tab and click right mouse button and choose add.
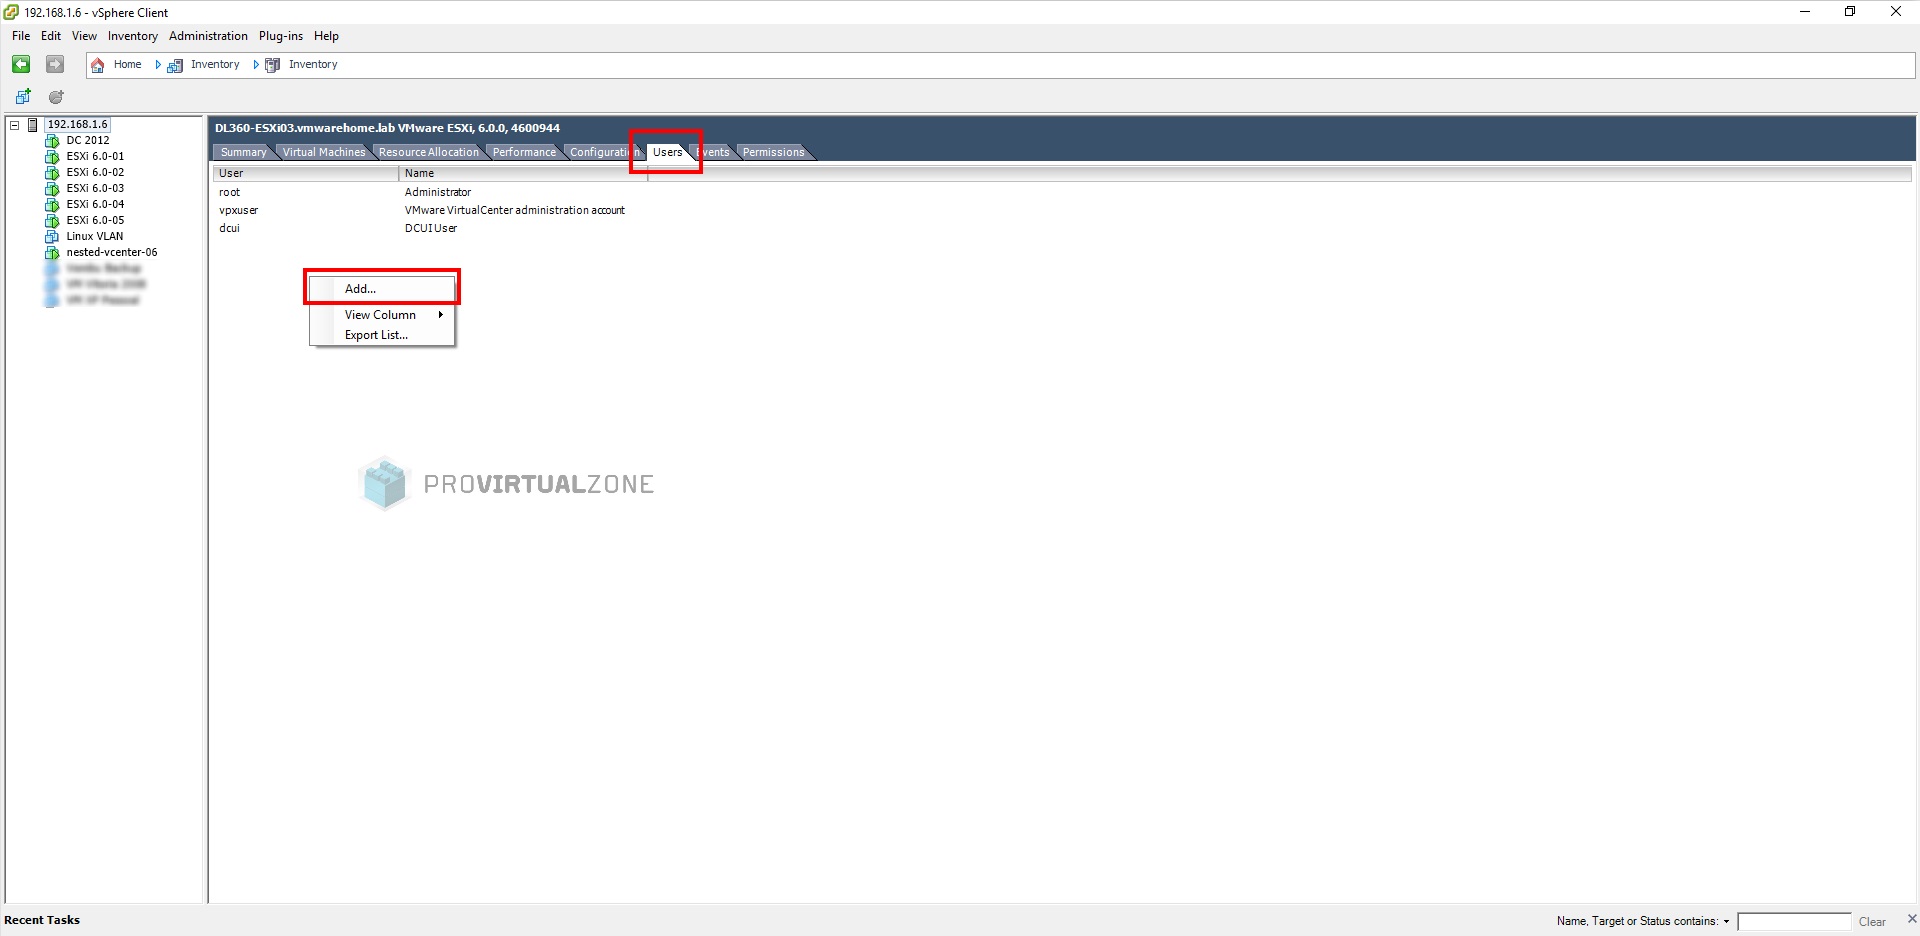
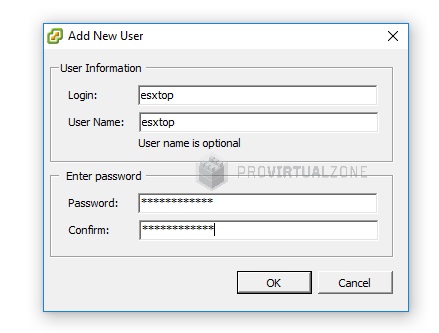
- Add login name and user name (optional).
- Add and confirm user password (ESXi uses complex passwords).
- Weak password: not enough different characters or classes.
- Weak password: too short.
- Weak password: based on a dictionary word and not a passphrase.
- User name or password has an invalid format
- The user name can be invalid if it contains a special character.
- The password can be invalid if it does not contain a letter, a number, and a special character.
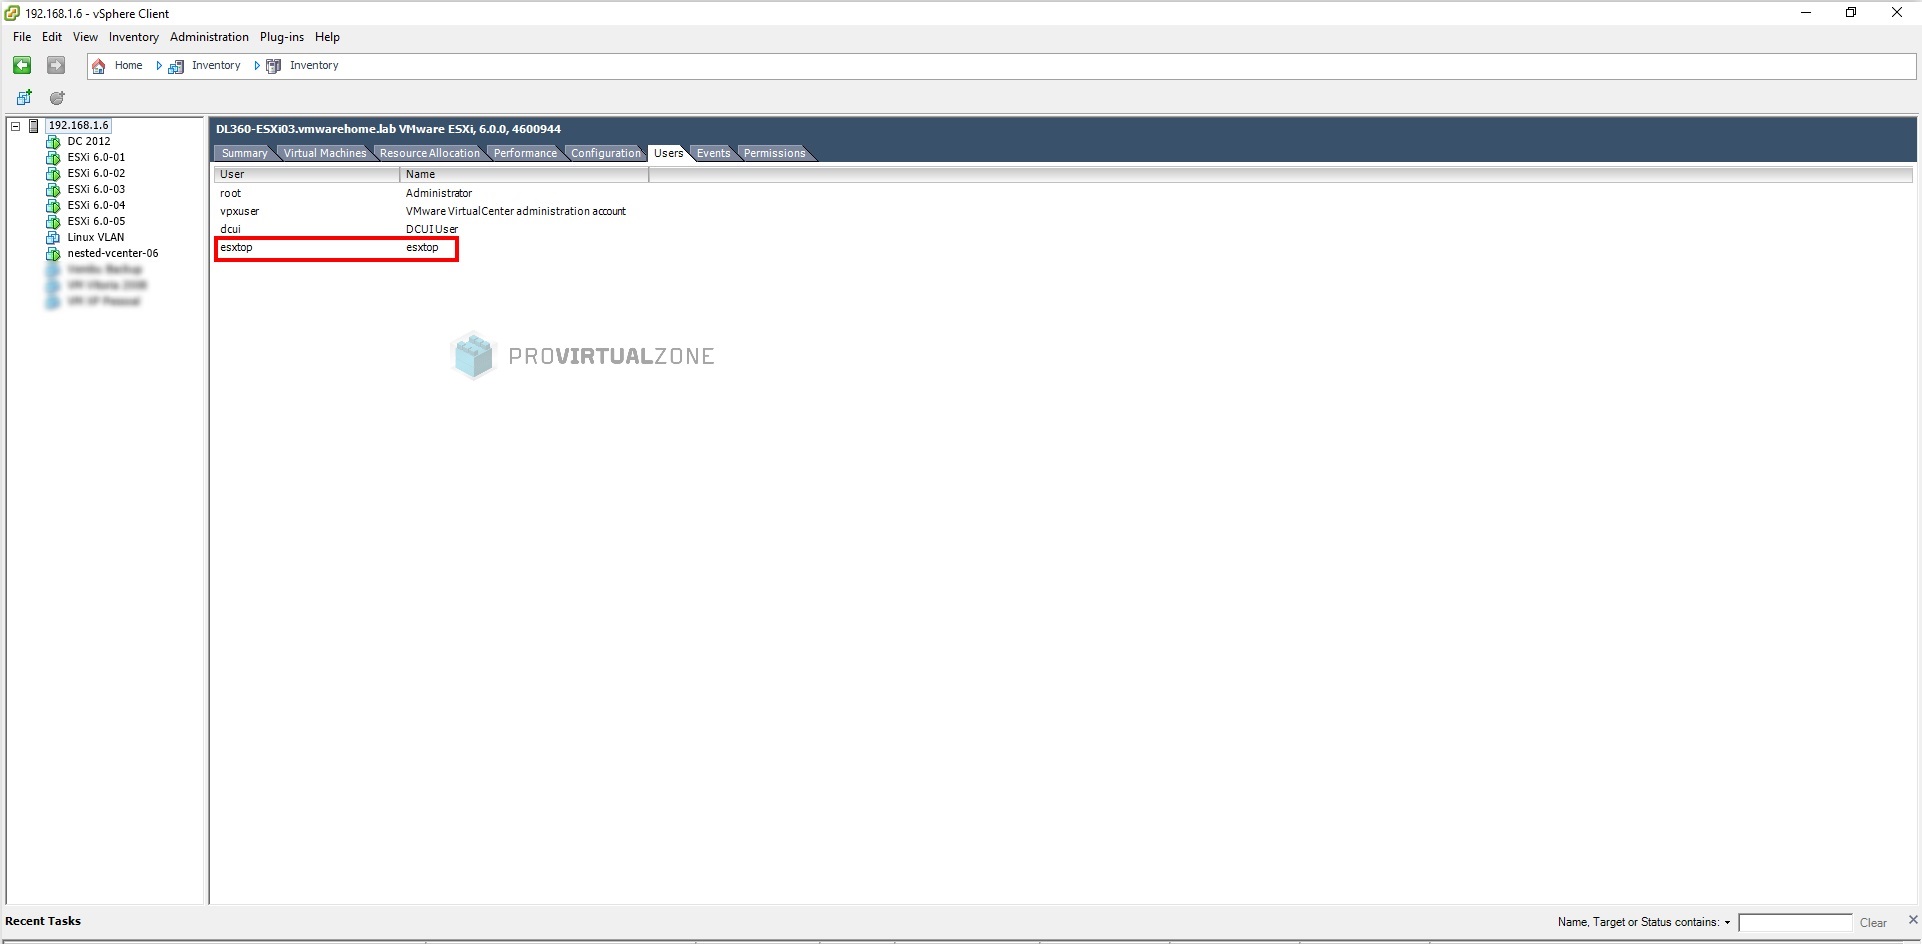
 After you create the user you will see the user in the ESXi host user list.
Next click on the Permissions tab.
Again, click right mouse button and choose add option.
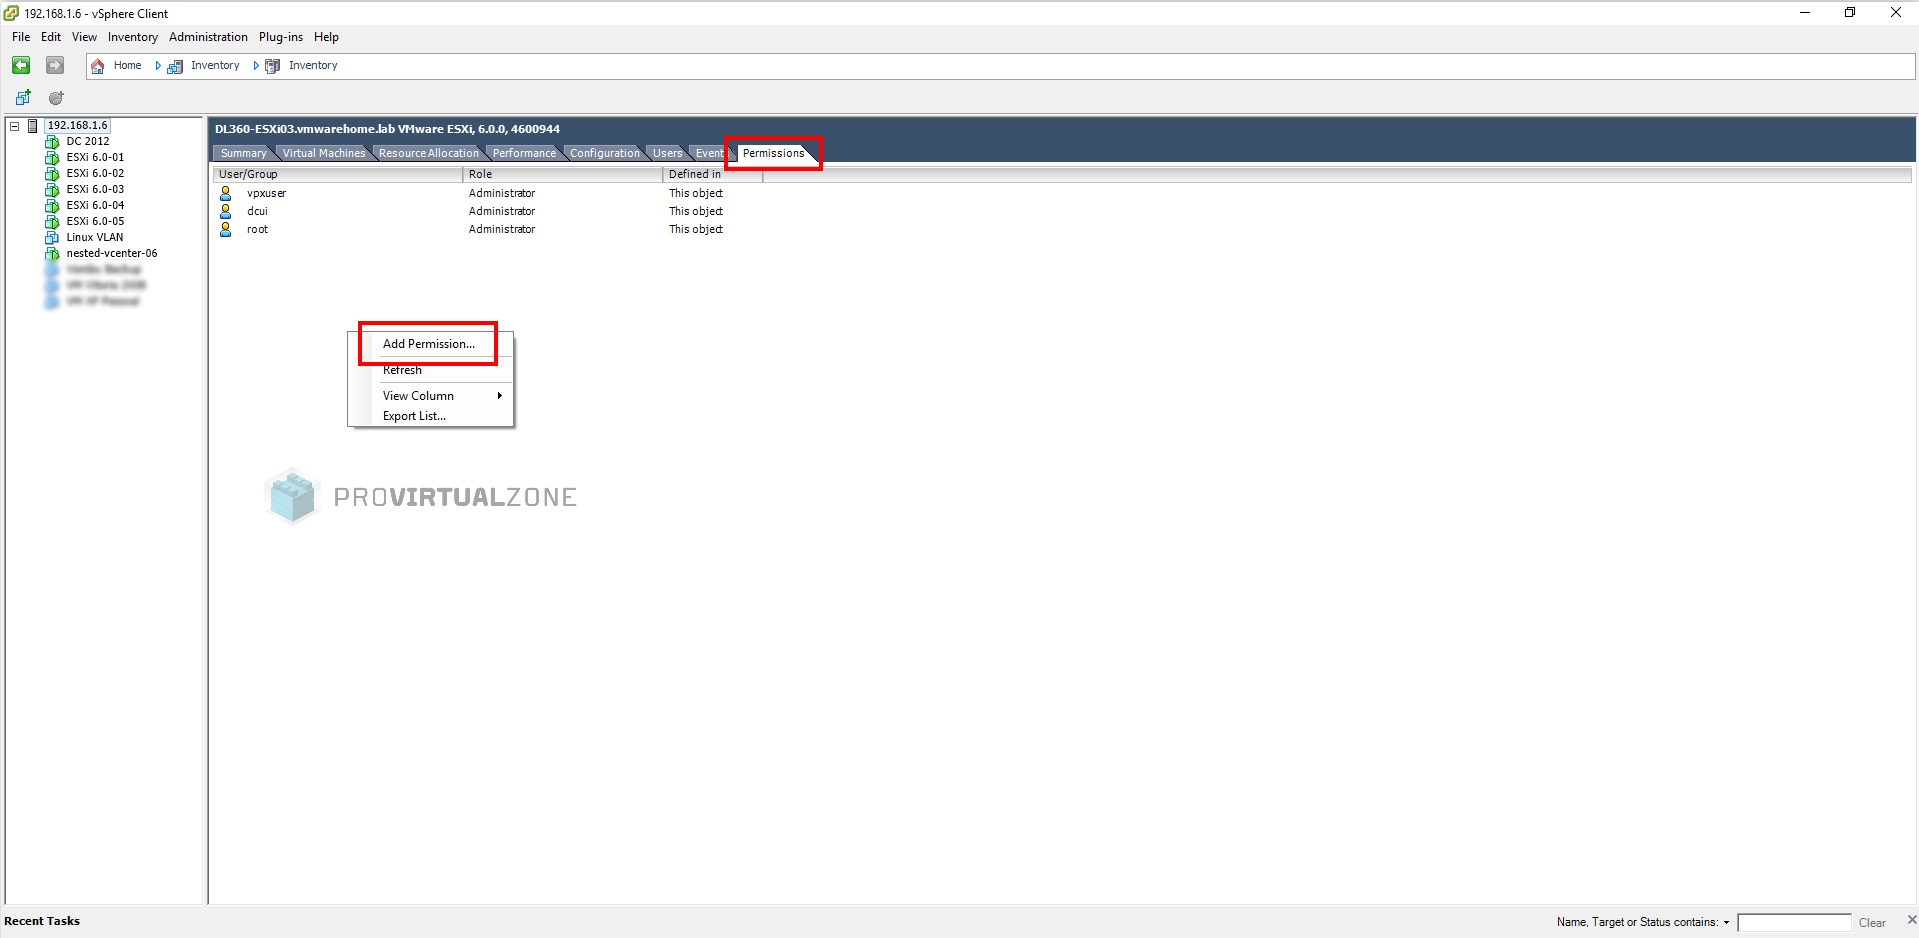
Now let's add administrator permissions to the user you created above.
Add the user to the administrator permissions.
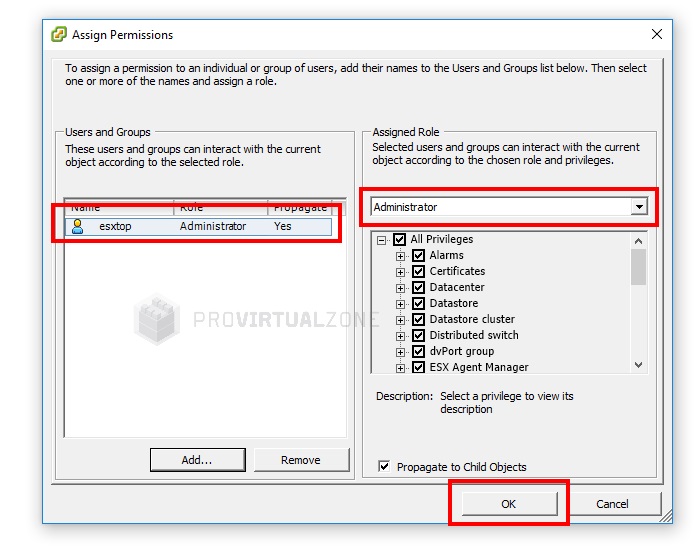 Now you have the user with administrator permissions.
After you have the user with the proper permissions. You now need to login to the ESXi host shell console with that user and change the user shell to only run esxtop for this specific user.
Shell user is in /etc/passwd file, so you need to change this file.
The default is esxtop:x:1000:1000:esxtop:
[esxtop@DL360-ESXi03:~] vi /etc/passwd

                      root:x:0:0:Administrator:/:/bin/sh
                      daemon:x:2:2:System daemons:/:/sbin/nologin
                      nfsnobody:x:65534:65534:Anonymous NFS User:/:/sbin/nologin
                      dcui:x:100:100:DCUI User:/:/sbin/nologin
                      vpxuser:x:500:100:VMware VirtualCenter administration account:/:/bin/sh
                      esxtop:x:1000:1000:esxtop:/:/bin/esxtop

[esxtop@DL360-ESXi03:~]Now every time this user esxtop log in to the ESXi host using ssh automatically the ESXTOP will run. The user can now work with the tool with all permissions, but after exit, the ESXTOP ESXi host shell console will close. Therefore this user will never have direct access to the shell console itself.
Hope this information was useful.
This article is the part of my "TIP Articles". So, please vote "Helpful" on this Article. And I encourage your comments and feedback.
vExpert vSAN, NSX, Cloud Provider, Veeam Vanguard, Virtual Backups, and Storage design, and an active blogger.
Have a question about something in this article? You can receive help directly from the article author. Sign up for a free trial to get started.
Comments (0)