Exchange 2010: Fix for an Invalid certificate and related issues


O365, Exchange Server,Windows Server, Active Directory, Virtualization, Teams and Email Migration Expert.
I. Out Of office not working
II. Certificate error "name on the security certificate is invalid or does not match the name of the site"
III. Make Internal URLs and External URLs the same.
IV. Addressbook download issue.
Most administrators don't check the complete URLs which Exchange uses for serving MAPI clients or miss URLs to set and add certificate names after installing Exchange server. Below are fixes for those errors.
1. First make sure you have a Forward lookup zone named "externaldomain.com" in your internal DNS server (as in the screenshot).

2. Then create the below A record in the newly created zone which points to exchange CAS/HUB server IP or load balancer IP if you have one (as in screeshot).
a) autodiscover.domain.com
b) mail.domain.com (common name)

3. Then make sure you have all the required names added as SANs in your SSL Certificate. The below names should be present for a single domain exchange.
a) mail.domain.com (common name)
b) autodiscover.domain.com
Please use this command to list you SANs/names in the certificate.
Get-ExchangeCertificate | fl Issuer,CertificateDomains
3.1 If you have multiple domains you have to add below SANs in your SSL Certificate.
a) mail.domain1.com (common name1)
b) autodiscover.domain1.com
c) autodiscover.domain2.com
d) autodiscover.domain3.com
OR
3.1.1 You can have one common name and one autodiscover name in certificate and redirect all autodiscover to autodiscover.domain1.com as below.
a) mail.domain1.com (common name1) ----> A record points to Exchange server IP
b) autodiscover.domain1.com ------> A record points to Exchange server IP
c) autodiscover.domain2.com SRV record to redirect to autodiscover.domain1.com as below
Name: @
Service: _autodiscover Do not for to add "_" at the beginning.
Protocol: _tcp Do not for to add "_" at the beginning.
Target: autodiscover.domain1.com Outlook will be redirected to this name.
Priority: 10
Weight: 10
Port: 443
Name: All you need here is the @ symbol. This will default the record to the parent domain. In our case it will append domain2.com creating a complete record of _autodiscover._tcp.domain2.com.
Service: Enter _autodiscover. Be sure to include a single underscore in front of it. By design this is one of the names the Outlook client looks for.
Protocol: Enter _tcp. Be sure to include a single underscore in front of it. By design autodiscover requests are performed over TCP connections.
Target: This is where we want our Outlook clients redirected. This has to be a name that exists on our SSL certificate. In our case autodiscover.domain1.com
Priority: If you only have one autodiscover SRV record then it really doesn’t matter what you enter here. This is for high availability. The lowest priority number will always be used first. If it is unavailable the next lowest number will be used and so on. In our case we only have one record, so we just went with 10. But we could just have easily made it 0 or 100.
Weight: Weight is used for load balancing multiple SRV records. Should you have two SRV records with the same priority, then weight is factored in. A higher value in weight means it is preferred and more connections are sent to it. In our case we only have a single SRV record so it does not matter what we enter here. We went with 10 again.
Port: All connections will be over HTTPS. This is port 443.
4. Make sure IIS is enabled on the installed certificate.
Type "Get-ExchangeCertificate" in Exchange Management Shell and see IIS enabled or no.
Exchange 2010 Shell
Before services enabled


Use the command shown below to enable the services. You can change the services according to your requirement. but IIS is mandatory.
Enable-ExchangeCertificate -Services IMAP, IIS, SMTP -thumbprint 896B74B25F7EBF330C93E56DA2A76CFC6A7
Exchange 2010
You can assign/enable services certificate in Exchange 2010 from the MMC. Below is the steps with screenshot showing how you can enable/assign services.
I. Right click on the imported certificate and click on "Assign services to certificate"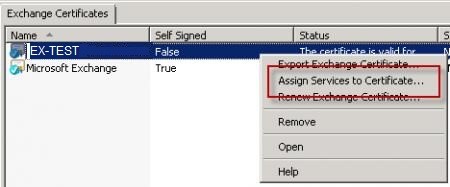
II. Click server name and click next.
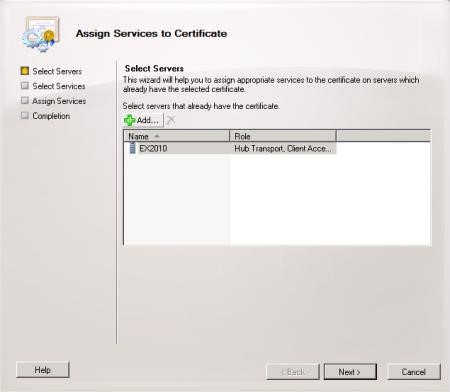
III. Tick the services to assign and click "Next". Click YES when you get a prompt to overwrite the existing certificate(self-signed) for SMTP. Select POP and IMAP if required, IIS and SMTP is required.

You can read this TechNet article for more information on how to assign services to certificate in Exchange2010.
5. Enter the below command in Exchange Management Shell and see the Autodicover URLs are set.
Get-clientAccessServer | fl Name,AutoDiscoverServiceInternalUri 
If you see the default URLs set by exchange installation (as above) use the below command to set it to the same as external.
Set-ClientAccessServer -Identity server1 -AutoDiscoverServiceInternalUri "https://mail.exchange.online/autodiscover/autodiscover.xml"You should see the following after running the command.

6. Enter the below command in Exchange Management Shell and see the offline address book URLs are set.
Get-OabVirtualDirectory | fl Server,Name,internalurl,externalurl
If you see the default URLs set by exchange installation use the below command to set it to the same as external.
Set-OabVirtualDirectory -Identity "server1\oab (default web site)" -InternalUrl https://mail.domain.com/oab -ExternalUrl https://mail.domain.com/oabYou should see the following after running the command.

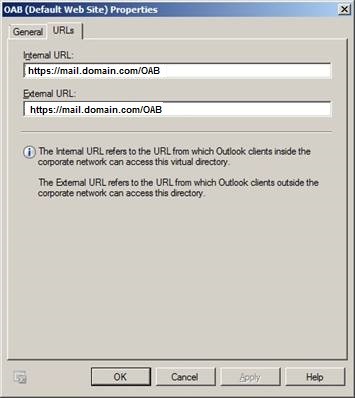
I. In Exchange 2010 OAB URLs can be set from the EMC. Right Click on "OAB(Default Web site)" and click Properties (as in the screenshot).

II.Type the URLs here and click "Apply" and "OK"

7. Enter the below command in Exchange Management Shell and see the exchange web services URLs are set.
Get-WebServicesVirtualDirectory | fl Server,Identity,internalurl,externalurlIf you see the default URLs set by exchange installation use the below command to set it to the same as external.
set-WebservicesVirtualDirectory -Identity "server1\EWS (default web site)" -InternalUrl https://mail.exchange.online/EWS/Exchange.asmx -ExternalUrl https://mail.exchange.online/EWS/Exchange.asmxYou should see the following after running the command.

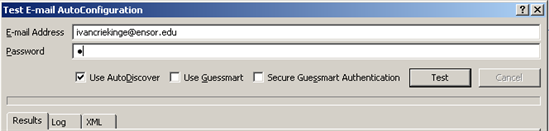
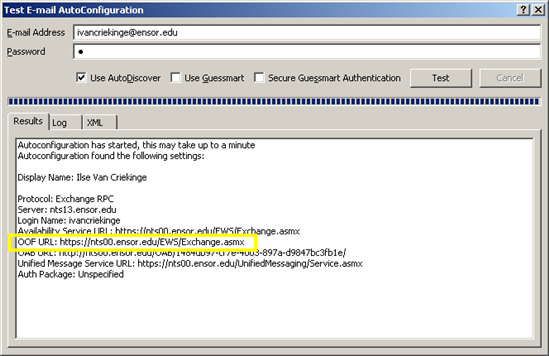
8.On a client workstation; Check to see that the Out of Office URL is correct in a client's Outlook.
Press Ctrl and right-click on the Outlook icon located in your system tray, you can select Test E-mail AutoConfiguration.

Enter the email address of the mailbox you have opened and the password. Since we are not using POP3 or IMAP, there is no reason to leave the GuessSmart checkboxes checked.
bb
After clicking Test, you will get the URL used to configure OOF.
Please reset IIS using the command below (Optional but recommended).
iisreset /noforceNow you should have all your errors cleared.
To clear certificate error and set URLs in Exchange2007. Please check follow this.
To clear certificate error and set URLs in Exchange2013. Please check follow this.
To clear certificate error and set URLs in Exchange2016. Please check follow this.
Have a question about something in this article? You can receive help directly from the article author. Sign up for a free trial to get started.
Comments (0)