Preparing, Migrating users and Handling contacts between two forests in Microsoft Exchange Cross Forest migration


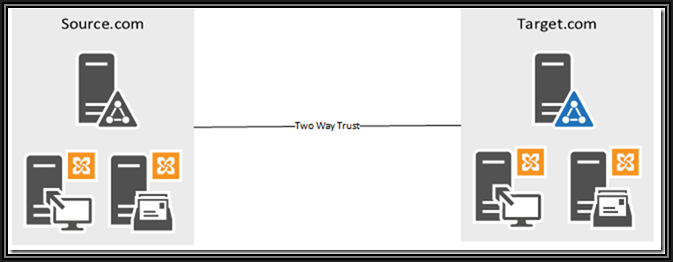
This article presumes that you have set up all the initial steps for the Cross Forest migration to work:
– Configure DNS resolution and trust between two AD forests.
– Create and configure Send connector between Source.com and Target.com
– Create and configure Availability service between Source.com and Target.com
– Configure Source.com as an accepted domain in Target.com
– Install and configure ADMT server at the target domain Target.com
– Install and configure Password Encryption Server (PES) on the source domain Source.com
– Configure MRSProxy on Source and Target CAS Servers (Enabling MRSProxy, Increase limits..etc.).
– Configured Public Certificates between both CAS Servers or installed self-signed CA certs.
In order for two Cross Forest Exchange users to send an E-mail to one another before or during Cross forest migration; Each forest has to have the other forest’s users as external contacts on their Exchange environment to ease the finding of any particular user in that other organization and avoid X500 errors after the migration. During the migration, this process is critical and very important to be up to date in order to not mess users included in distribution groups before, during and after user migration from source to target forests.
For Cross Forest user migration, User has to be prepared via Microsoft’s own prepare-moverequest Powershell which is included in the $Exscript directory that prepares the target user’s attributes (Before or after ADMT copy) for the migration using the Powershell script new-moverequest.
However, before that user is migrated and before doing the prepare move request the user must have their user object mail user enabled in order to get all the proper attributes for the move request to work which means the Contact has to either be deleted or lose the SMTP which is going to be enabled on the mail-enabled user.
For this process and in a big environment a tool, 3rd party or a script must be used to hasten the migration of users otherwise it would take ages and would be a very problematic process.
User Creation
Using ADMT then Prepare-Moverequest script
Starting with the creation of target user using ADMT or by Prepare-MoveRequest Script, If ADMT is used prior to PrepareMoveRequest. The target user will have exchange attributes migrated and mail-user enabled by default but due to some incomplete or incorrect attributes, the user will most probably have a corrupted mail user object that needs to be disabled and re-enabled with the proper mail address.
Using Prepare-MoveRequest before ADMT
In the case of using Prepare-Moverequest the user will be created in the target forest properly without any issue but will not have their SIDHistory copied so after the creation of the user account ADMT must be used to copy user’s SIDHistory with Exchange attributes excluded.
Note:
– This method has an advantage over using ADMT first, Users don’t have to create a new outlook profile in order to use their target mailbox after migration.
– You don’t have to mail-enable the user.
Mail-Enabling User
The first step for the migration to work is to Mail enable the user in the target forest. Assuming you have a user called tim@source.com the user gets his AD Object copied to the target forest with ADMT and user gets his UPN changed from tim@source.com to tim@target.local automatically, still the user will get his SIDhistory and the Groups he’s in if groups are migrated prior to that, however, in some rare cases that I have seen while doing this kind of project the SIDHistory might not get copied and you might not notice that unless you take a very close look at the log that ADMT is generating for you.
In the script I am attaching below and prior to preparing the user for migration, I added a script to bulk check user list for SIDHistory. The script below will disable mailuser that’s migrated with ADMT and show you their SIDHistory attribute in order to double check before you migrate their mailbox.
$Users = import-csv -path “C:\List\List1.csv”
foreach ($User in $Users)
{
$Identity = $User.Alias
$UIdentity = $User.Sam
$Mail = $User.Proxy
$NProxy = $User.NewProxy
#Before Migration, Show if user has SIDHistory or Not, If not don’t migrate User
$UserSID = dsquery * -filter “&(objectcategory=user)(samaccountname=$Identity)” -attr objectsid sIDHistory
Write-host User $User.Alias has $UserSID -ForegroundColor Green -BackgroundColor Black
The CSV file format for this powershell should be as following, I will explain why in detail below
Alias,Proxy,NewProxy,NewIdentity
Alias,MailAddress@domain.com,MailAddress@domain.local,NewIdentity

In order for the Prepare-Moverequest to work, we will have to MailUser enable this user by using the following script
Enable-Mailuser –Identity SamAccountName –ExternalAddress PrimarySMTPAddress
Enable-Mailuser –Identity Tim –ExternalAddresstim@domain.com
In this case, the user will be ready for the prepare moverequest script to work and get his source Exchange attributes to be copied to the target one.
Prepare-MoveRequest for Single mailbox
The Prepare-Moverequest Powershell is pretty easy to use for a single user and all you need is to enter target and Remote credentials in a variable to use it with the command.
Once you use the script it’ll copy the source user and their Exchange attributes including Proxy Addresses, it’ll convert the LegacyExchangeDN into X500 address in the target user’s mailbox object so users in the source forest won't get any caching issue reaching to the migrated user and will set other attributes like Displayname, MailNickName..etc like in the screenshot below.
The script is as the follows
$TargetCredentials = Get-Credential
$RemoteCredentials = Get-Credential
.\Prepare-MoveRequest.Ps1 -Identity UPN@targetdomain.com -RemoteForestDomainController “SourceDCHostname.SourceDC.local” -RemoteForestCredential $RemoteCredentials -LocalForestDomainController “TargetDCHostname.TargetDC.local” -LocalForestCredential $TargetCredentials -TargetMailUserOU “OU=DestinationOU,DC=TargetDC,DC=local” -UseLocalObject -OverwriteLocalObject –Verbose

Prepare-MoveRequest for Bulk mailboxes
For bulk users, the script is simpler but for it to work you’ll need to prepare a CSV file that meets the requirements of the Powershell script.
Bulk Users Script:
cd $exscripts
Write-Host “Starting to Prepare-MoveRequest for users in your CSV List….” -ForegroundColor Green -BackgroundColor Black
Import-Csv C:\Identity\Identity_1.csv | .\Prepare-MoveRequest.ps1 -RemoteForestDomainController “SourceDCHost.SourceDC.local” -RemoteForestCredential $RemoteCredentials -UseLocalObject -OverwriteLocalObject –Verbose
CSV Example:
Alias,Proxy,NewProxy,NewIdentity
Alias,MailAddress@domain.com,MailAddress@domain.local,NewIdentity

–Moving Users
Moving Single Mailbox
After preparing the Move request, The only thing left to do is to move users. This process is pretty easy and only one script line is used.
[PS] C:\Exchange 2010\scripts>New-MoveRequest -Identity “outlook.test@SourceSMTPDomain.com” -RemoteHostName “webmail.SourceOwaUrl.com” -Remote -RemoteCredential $RemoteCredentials -TargetDatabase DestinationDB1 –TargetDeliveryDomain SourceSMTPAcceptedDomain.com

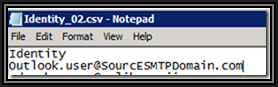
Moving Multiple Mailboxes:
Import-Csv C:\Identity\Identity_15.csv | New-MoveRequest -RemoteHostName “webmail.calikenerji.com” -Remote -RemoteCredential $RemoteCredentials -TargetDatabase CEDB12 -TargetDeliveryDomain calikenerji.com
CSV Example:
Identity
Outlook.user@SourceSMTPDomain.com
Outlook.user2@SourceSMTPDomain.com
Outlook.user3@SourceSMTPDomain.com
Once the list is ready and you run the Powershell script the target CAS server would connect to the source CAS and start migration as in the following screenshot.

Once users migration is finished, On the source forest user will be converted to MailUser so non-migrated users in the source forest will still be able to send emails to this user, however, the Groups on target forest must be manually maintained and updated with users that are being migrated.
– Contacts Issue
In the target forest those two migrated users were already contacts there prior to migrating them and thus Target Forest users who have sent those two users email have the LegacyExchangeDN Address of those contacts cached in their Outlook in X500 format which will create an issue if those contacts are deleted without exporting their LegacyExchangeDN and add it to the migrated users’s ProxyAddress Attributes.
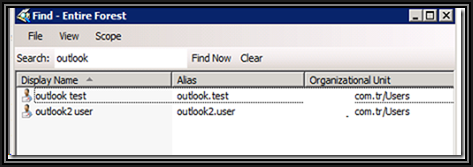
Prior to deleting those contacts, From the Target Forest, I have exported their info to CSV with the following attributes.
Name, Alias, PrimarySMTPAddress and LegacyExchangeDN Attribute using the following Powershell script
Get-MailContact -result unlimited | where {$_.PrimarySmtpAddress -like*@TargetSMTPDomain.com} | select Name,Alias,Primarysmtpaddress,legacyExchangeDN | Export-Csv c:\TargetContacts.csv -notypeinfo -encoding utf8
The PowerShell will export contacts in the following format and in order to import them you’ll need to bulk edit the file using Notepad or Notepad++

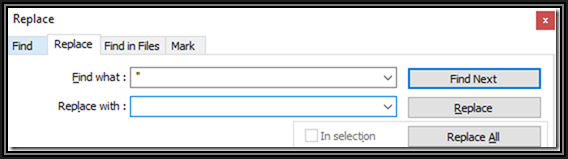
In notepad replace “/o= with X500:/o=
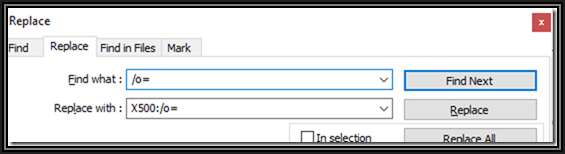
and Replace all “ with nothing
After you save the file in the target forest, Only in the condition of migrating Source users to the target forest use the following script to Import those users’ LegacyExchangeDN as X500 to their migrated Mailbox objects.
Import-CSV “C:\TargetContacts.csv” | foreach{Set-Mailbox -identity $_.Name -EmailAddresses @{add=$_.LegacyExchangeDN}}
Hope this helps and if you have any questions in mind please don’t hesitate to contact me.
Have a question about something in this article? You can receive help directly from the article author. Sign up for a free trial to get started.
Comments (0)