How to Upload OST to Office 365- A Step-by-Step Guide


Cloud-based applications offer more services to its users as compared to the desktop-based clients. In a similar way, having exchange mailbox data on Office 365 has many advantages. The data saved in O365 such as emails are universally accessible if there is internet connectivity.
Therefore, users are like to keep a copy of their Exchange mailboxes in Office 365. To facilitate this easily, users can upload OST to Office 365 domain. Therefore, in this article, we will discuss the most suitable manual approaches in an efficient manner.
Manual Approach to Upload OST to Office 365
There is no direct utility available to export OST files to Office 365. However, the users can convert OST to PST using SysTools OST to PST Converter, and then upload the PST file to Office 365.
Step 1: Convert Outlook OST file to PST
There are following three suitable manual solutions to transfer Outlook data file from OST to PST:
Using Export Feature of MS Outlook
Go through the following set of instructions carefully to convert OST to Outlook PST.
- Launch Microsoft Outlook application.
- Click on File tab >>Export to a file >>Next.
- After that, select Personal File Folder (.pst) and then click on Next button.
- Now, select the folder that you want to export and check Include subfolders.
- Select the desired location to store the resultant file and click on Finish button.
Note: For the above-described method, users must be connected to the Exchange Server.
Using Archive Feature of Microsoft Outlook
This solution helps to migrate data from mailbox items to Outlook .pst file. Follow the mentioned steps for this conversion:
- Launch Microsoft Outlook application.
- Now, go to File tab >> Archive.
- From the new window, select the file or folder for archiving.
- After that, select the location for the archived Outlook PST file.
- Click on OK button.
Note: This method allows to convert entire OST file data except the Outlook contacts.
Move Outlook Data to New PST File
This technique is used to migrate mailbox items of Exchange Offline OST to new Outlook supported PST file.
- Start Microsoft Outlook on your system
- Create a new PST file in MS Outlook Profile.
- After that, select the desired folder that you want to transfer in .pst file.
Note: This method does not allow to drag Inbox, Calendars, Contacts, etc. Default folder to PST file. It just copies the folder from OST to PST file.
Step 2: Transfer PST File to Office 365
After the conversion of Outlook OST to PST file, next step is to upload the resultant PST file to Exchange Online. There are two possible ways to move PST file into Microsoft Office 365. The methods are as shown below:
1. Using Drive Shipping: On a fundamental level, Drive Shipping means to copy the PST files to a hard drive and then physically ship the drive to the Microsoft data center. In addition, it is an effective way to migrate the bulk amount of email to Office 365. It also imports large amounts of the archive mailbox to the organization.
2. Using Network Upload: This method helps to copy PST into Exchange online in an efficient manner. It also takes less time to migrate PST to Office 365.
Follow the following procedure carefully as shown below:
- Copy the SAS URL and install Azure AzCopy
- Upload PST file into Microsoft Office 365
- View the uploaded PST files to Office 365 (Optional)
- Make the PST Import mapping file
- Create a PST Import job in MS Office 365
- Filter PST data and start the Import process
Note: Step 1 performed only once to migrate PST to Exchange Online mailboxes. Then follow Step 2 to Step 6 to transfer bulk or batch of Outlook PST files to Office 365.
Shortcomings of Manual Approach
The user must know about the limitations of above-described methods before adopting the manual approaches. Below, some of its major disadvantages are shown:
- The manual method comprises lots of steps that are time-consuming.
- The uploading of large-sized PST file consumes a lot of time
- A user must have technical knowledge in order to understand the method
- Any mishandling of the steps may lead to Outlook data file corruption or deletion.
Automated Approach to Upload OST to Office 365
To overcome the drawbacks of the manual solution, it is highly suggested to go for a reliable software that is Microsoft OST to PST Converter tool. It is certainly an adept software for those who want to move their OST data to Office 365. Apart from this, it also migrates the OST file into PST, MSG, EML also.
Moreover, the software has self- explanatory user interface that makes the whole export process facile and easy for the users. Besides this, it recovers the damaged OST file, retrieves permanently deleted messages, split resultant PST file, offers email filter and many more features. By using this tool, no mailbox data will be lost during the export process.
Method to Upload Outlook OST to Office 365 via OST Recovery Utility
- Install and Open the OST Recovery software on your local System.
- A welcome window will appear on the screen. This screen comprises a number of relevant options. From that options, select Add File button.

- The selected desired file will be added to the software panel.

- Now, Click on Export button to transfer the selected items from the Outlook OST file.

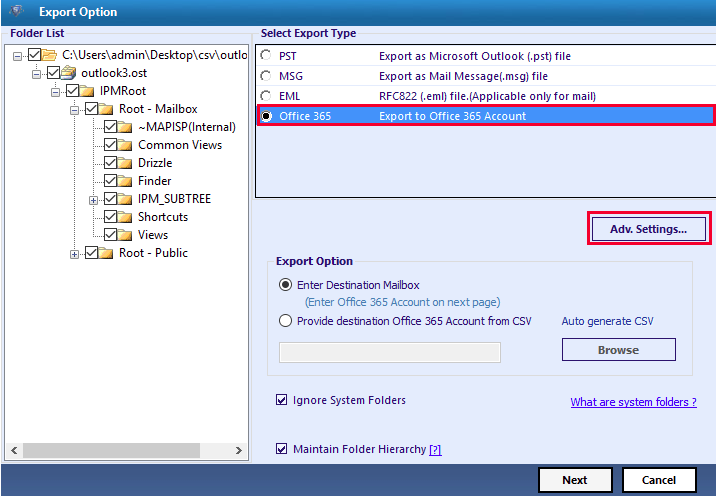
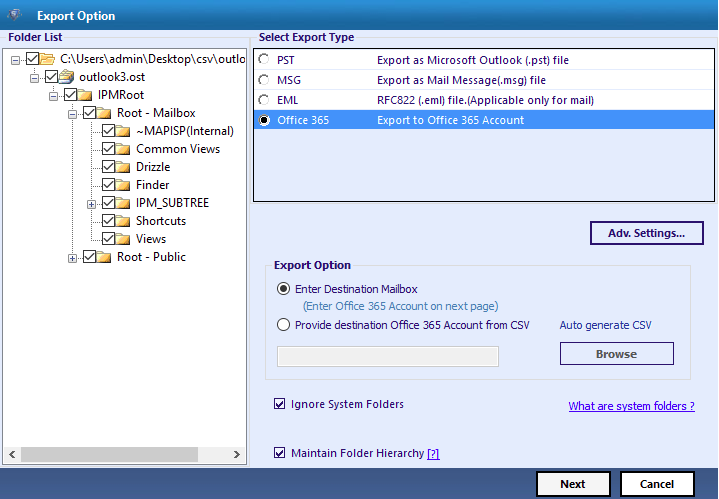
- Select the Export type of recovered OST file. There are four options mentioned, select Office 365 radio button. Now, click on to configure Office 365 settings.
- Now, provide the username and password to the admin account.
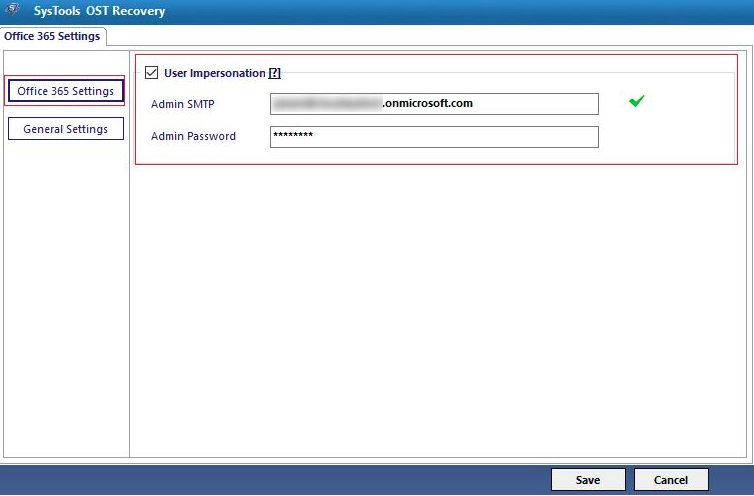
Note:- Admin account of O365 must have Office 365 license account.
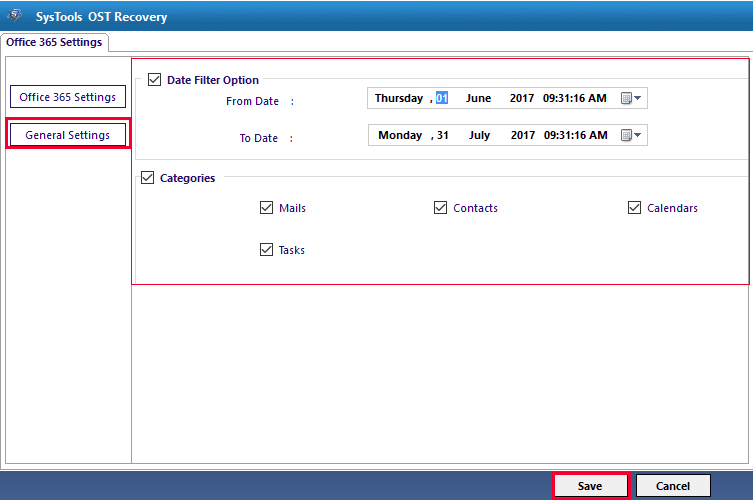
- Apply the date and time filter option to retrieve only data within the specified range. Also, select the desired mailbox items under the Categories. After selecting both, click on Save option.
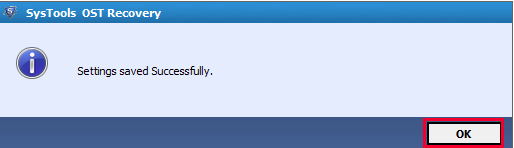
- A dialog box will appear on the screen. It shows the successful status of the saved settings. Then, click on OK button to proceed the further process.
- Now, there are two ways to export OST mailboxes to Office 365 i.e., Enter Destination Mailbox directly and Provide Destination Mailbox from CSV. Using this two option either, you can provide username and password for each mailbox or directly upload a CSV by clicking on Browse.
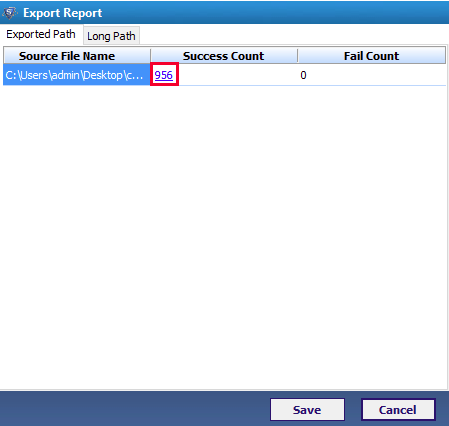
- After that, click on Next and export process begin. It will generate an Export Report comprises all details of the migration process. You can save it in CSV format for the future use.
Conclusion
Migrate the data file from one application to the other program is quite the challenging task. So, after considering the challenges faced by the user during the export process of OST to Office 365. Therefore, in this article, we have covered the possible manual approaches along with its limitations. To overcome these limitations, it is always suggested to opt reliable and secure application. The Software ensures the process of upload OST to Office 365 without any loss of data.
Have a question about something in this article? You can receive help directly from the article author. Sign up for a free trial to get started.
Comments (0)