How to isolate a guest network or Wi-Fi network on an Edge Router

When you have a Wi-Fi, you might want to isolate the untrusted network from your network, since Wi-Fi is more vulnerable to attacks, as is a guest network. You will still be able to manage guest/Wi-Fi from your network. This is possible to do with an Edge router. There are a few steps to follow but at the end, you will accomplish this. You will also be able to restrict access guest/Wi-Fi to manage the router.
When you use the standard wizard WAN+2LAN to set up the router, [Note: We will not be covering how to set up the router in this article] it creates one interface for the WAN and groups all other interfaces under a name call switch. If you use other wizard options, for example, load balancing it will create two interfaces for WAN and groups all other interfaces under a switch. We are going to remove one interface from the switch and use it for the guest/Wi-Fi network.
Login to your edge router
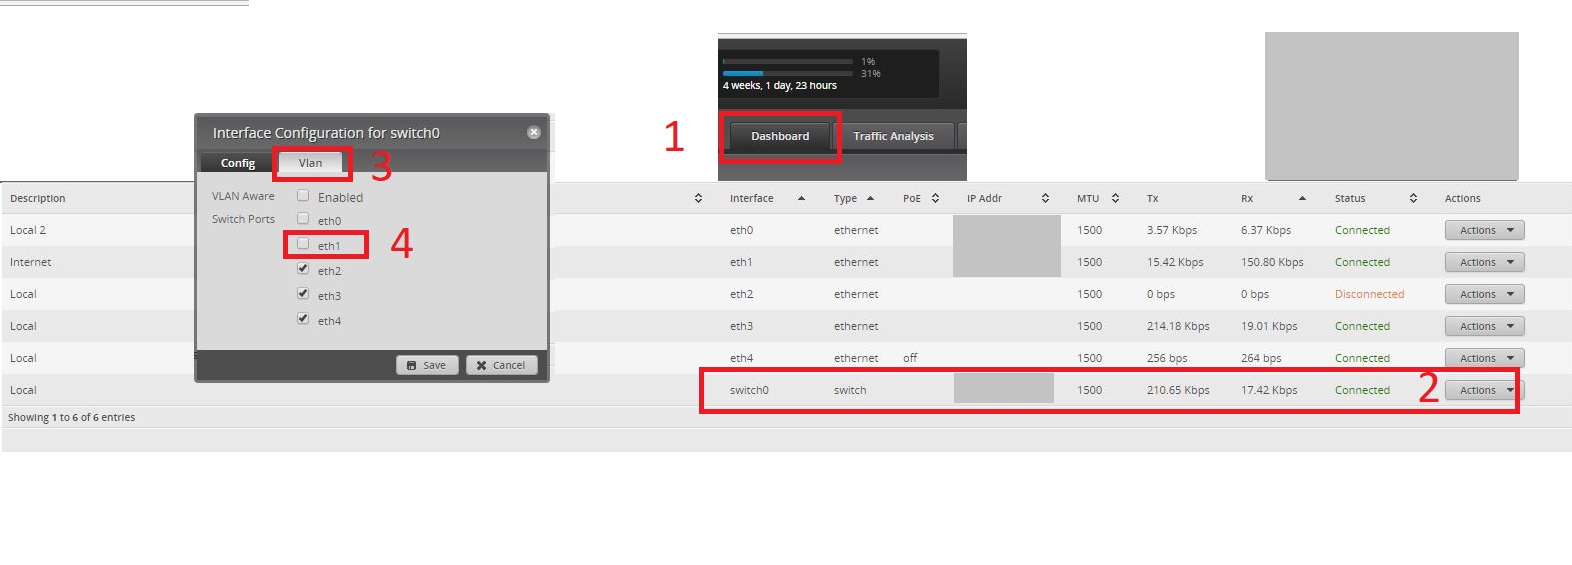
Click on the Dashboard tab and scroll down to where your interfaces are listed. Click on Action, at the switch interface, click on Config and then on Vlan tab. uncheck the interface we are going to use and save. In this interface, plug-in your Wi-Fi access point or guest switch.
Back to the Dashboard tab, scroll down to where your interfaces are listed, click on Actions at the interface you just unchecked. This will open a window to configure the interface, where it says Address. From the drop-down box, select Manually define IP address, enter the IP address you want to use for the guest/Wi-Fi network. Make sure it is something different than you use for your network [like if your network is 192.168.1.0/24 make this 192.168.10.0/24], and then Save.

Now, move on to the Services tab. Then, on the DHCP Server tab, click on Add DHCP Server and enter a description for the subnet. For the example above, it would be 192.168.10.0/24, optional a start and stop [end] range [recommended] then your DNS information. Save.

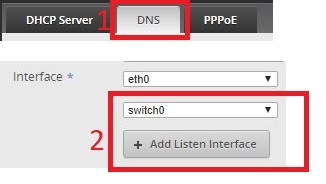
Now, we move to the DNS tab. Make sure you see that the interface we are using for the guest/Wi-Fi is listed there; if not just add it.
Now, we will start with the firewall policies.
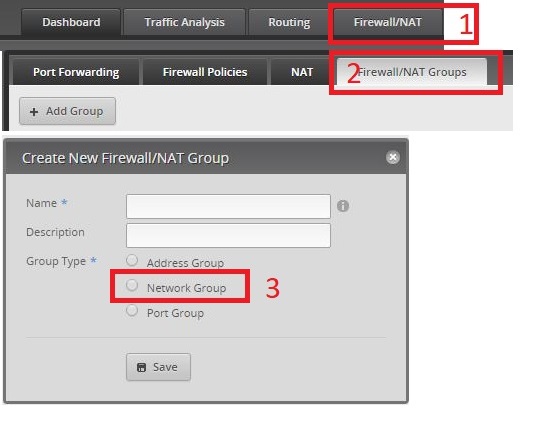
Create a Network Group. This could be found under the Firewall/NAT Groups tab, then go to the Create Firewall/NAT Group tab and click on + Add Group.
Name it [PROTECT_NETWORK], select network group, and save.
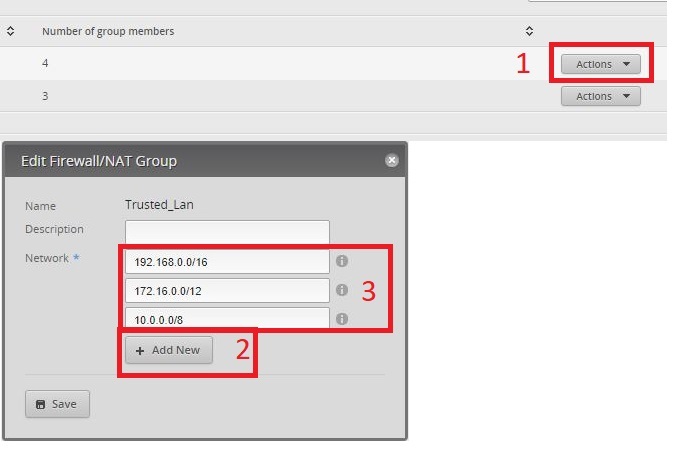
Click on Actions at the newly created group and from the drop-down menu, click on config. Click 2 times to add new so you have 3 fields and add the following ones in each field
192.168.0.0/16
172.16.0.0/12
10.0.0.0/8
Name it [PROTECT_NETWORK], Save.
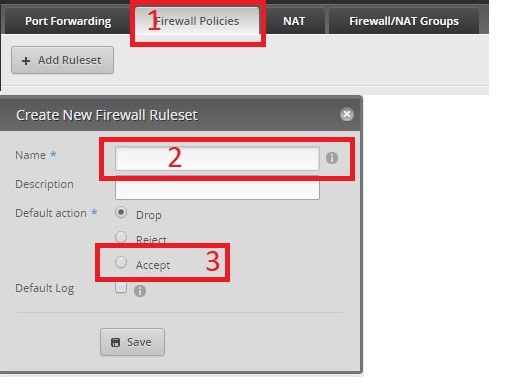
Now, let’s proceed to the Firewall Policies tab, add a ruleset, name it [PROTECT_NETWORK], default action Accept.
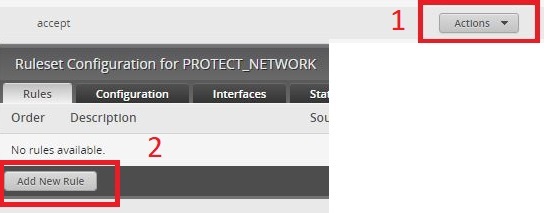
Click on Actions in the newly created ruleset. From the drop-down menu, click on the Rules tab and then click Add New Rule
On the Basic tab, Name the Description [ACCESS_FROM_LAN], action Accept, move on to the Advanced tab and tick Established and Related, then click Save.

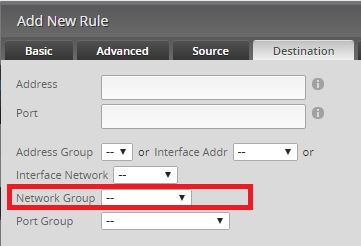
Add another rule, name it [PROTECT_NETWORK], action drop, move on the Destination tab and from the drop-down at Network Group select the network group you created [PROTECT_NETWORK], and click Save.
We need one more firewall ruleset. Add New Rule, Basic, add a ruleset, name it [ALLOW_DNS_DHCP], default action drop.
Click on Actions at the newly created ruleset from the drop-down menu and click on Edit ruleset. Now add New Rule, name it [DNS], action accept, TCP UDP. Move on to the Destination tab and enter in the port field 53, then click Save.

We need one more rule to complete, so create one, name it [DHCP], action accept, UDP, move on to the Destination tab and enter in the port field 67, then click Save.
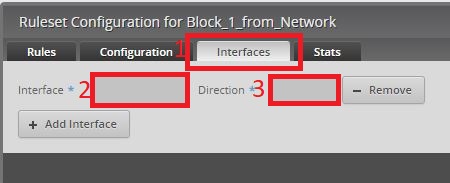
Now, what is left is to assign to the interface, the first ruleset [PROTECT_NETWORK]. Select Interface * on the Interfaces tab of the guest/Wi-Fi network and in the Direction * of IN, and the second policy [ALLOW_DNS_DHCP] also select the interface of the guest/Wi-Fi network and in the direction of LOCAL.
Done.
I hope you found this helpful. I invite you to leave any questions or comments below.
Have a question about something in this article? You can receive help directly from the article author. Sign up for a free trial to get started.
Comments (0)