Learn to use the POWER of Mailwasher Pro Part-4


Pre-Ramble: If you've not yet read Part-1, Part-2, and Part-3 of this series about learning to use the power of Mailwasher, I'd urge you to do so before continuing to read this article, otherwise some of the things covered here may not make sense to you.
Quick "Jump to" Links:
- Problem: Mailwasher still shows messages after downloading them into Outlook
- How to set up an IMAP Account in Mailwasher
- How to Set Up your Gmail IMAP account in Outlook
- Other settings to take note of and change in Outlook to suit yourself!
Use the above "Jump to" links to go straight to the topic you're particularly interested in!
Before I deal with the queries listed below (and more), I'd just like to remind everyone with regards to contacting me via email for additional help. Whilst I truly appreciate all the mail I've been sent and I'm more than happy and willing to answer questions about Mailwasher, please understand that I can't do this via Email due to my other commitments and time restrictions.
I again strongly encourage all readers to post their questions in the comments section below these articles or even better, use the FREE "Ask a Question" feature at Experts Exchange.
Experts Exchange has "many" highly talented expert members that are ready and willing to help you with any questions that you may have and it need not cost you a cent to get that help. I also monitor questions asked at the EE forum and will be more than happy to assist you via that medium when time permits me to do so.
With the above said and out of the way, let's get on with the show...
First some basic terminology:
What is POP / POP3? - "POP" stands for "Post Office Protocol" and is an older version of this protocol. POP3, on the other hand, is what is widely used by ISP email servers all around the world today. POP3 is generally faster than IMAP and it allows you to keep a copy of all your email messages in an email client like Outlook. It's not designed to keep very large amounts of email on the server for long periods of time.
What is IMAP? - "IMAP" stands for "Internet Message Access Protocol" and is generally considered by most to be the preferred way to access your email from an email service that supports the IMAP protocol. It has the benefit of allowing you to access your email from any device you own, whether that be a computer, iPad, smartphone or tablet. The main difference between POP3 and IMAP is that when you access your email server using IMAP, then you are actually reading your mail on the email server itself. This is generally done with the use of a web browser.
Reader Questions
(Reader names withheld by request)
Reader 1 - Via Email: Andrew, thanks for your great articles, but I have a problem! I've turned off automatic checking for email in my Outlook but after I wash mail with Mailwasher, it still shows me the messages I already downloaded. Why does it do that??
Reader 2 - Via Email: I've been using the trial version of Mailwasher for a week or so but it confused me, so thanks for writing your article on it as it taught me a lot. What you didn't cover though was how to setup an IMAP connection in Mailwasher and what the difference is between IMAP and POP?? Can you email me back and explain this to me? Thanks in advance.
These are excellent questions so I'll do my best to explain what's going on.
Problem: Mailwasher still shows messages after downloading them into Outlook
All email clients, including Microsoft Outlook, have a feature known as "leave messages on the server" - by default, the Mailwasher installation routine will turn this off, but if you happen to take the tick off on this option during the installation process, then you're going to run into this problem. Why?
When Mailwasher washes any waiting email for you and Outlook then downloads all the rest into your inbox, then Mailwasher expects that the emails that were downloaded have been removed from your email server because you've already received them. This is particularly true when we're talking about POP type email accounts. If they're not deleted from the Mail Server, then Mailwasher will continue to see them. Here's how to stop the behavior from happening.
Tip! - Click on any image to get a full-sized view!
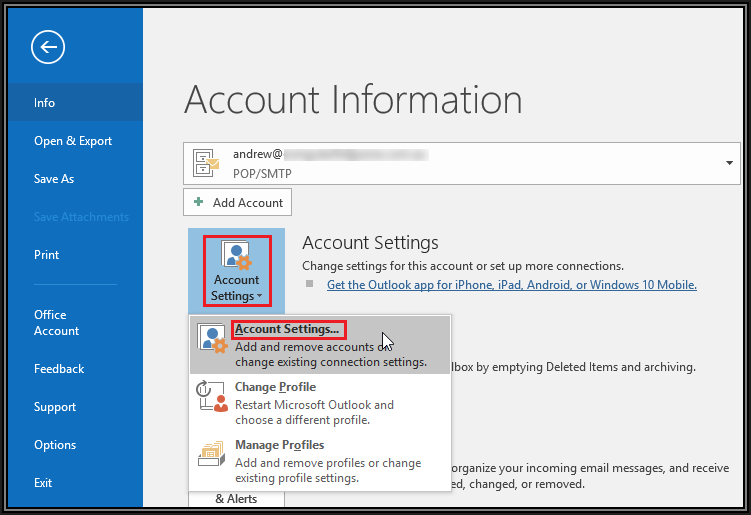
Step 1. In Outlook, click on File and then Account Settings > Account Settings...
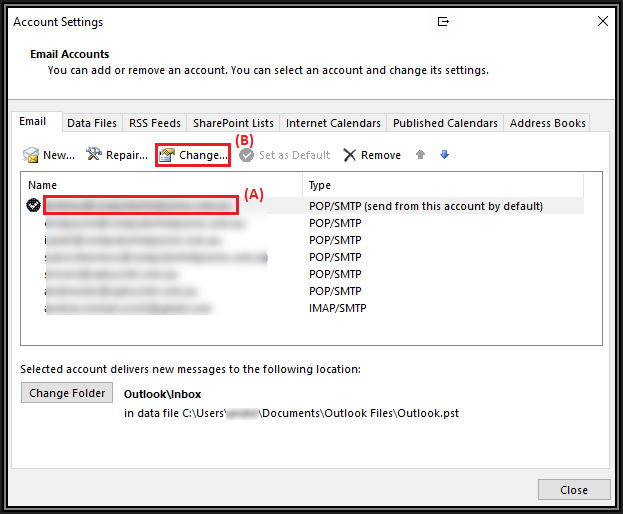
Step 2. In the "Account Settings" box that pops up, select the "Email" tab if not already selected and now (A) select the email account that is giving you problems and (B) click on the Change... button as shown below.
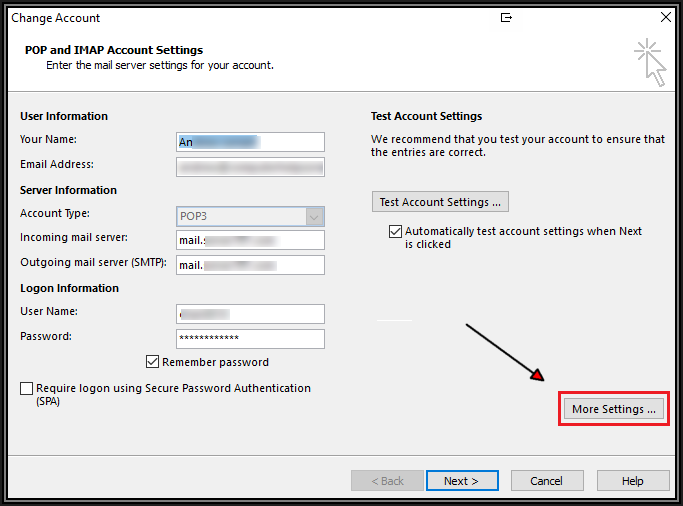
Step 3. A "Change Account" box will open. This gives you the opportunity to manipulate your email account. At this point, click the More Settings ... button as shown below.
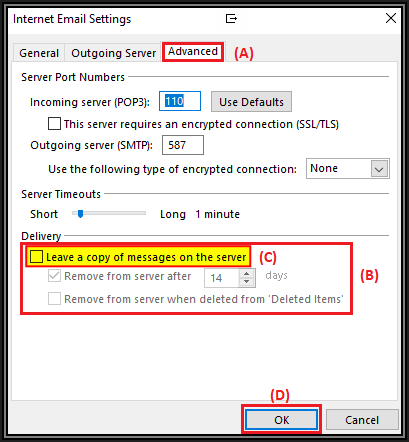
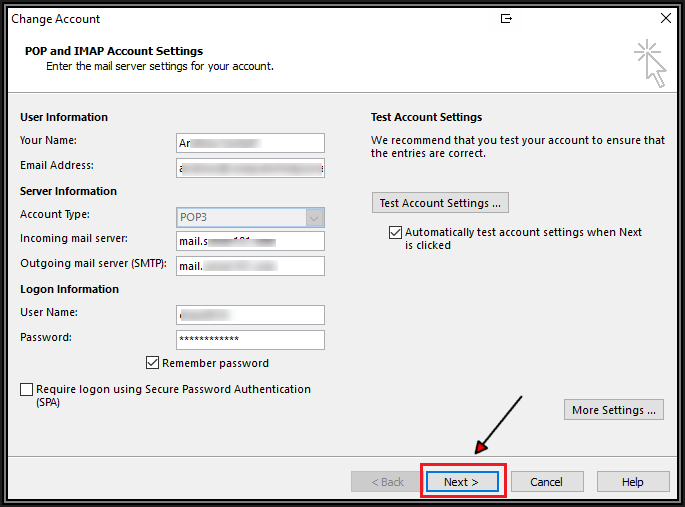
Step 4. After clicking More Settings ... the "Internet Email Settings" box will open for the email account you're editing. It will default to opening on the "General" tab, so click on the (A) Advanced tab, and in the (B) Delivery section. By default, Outlook sets up email accounts with that option ticked and set to remove from server after 14 days. Change that to ensure that the (C) "Leave a copy of messages on the server" is NOT ticked as shown below and then click the (D) OK button.
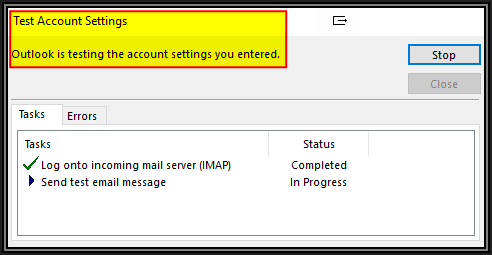
Step 5. Clicking OK above takes us back to the "Change Account" box. From here click the Next button as shown below and Outlook will check to make sure that all is still well

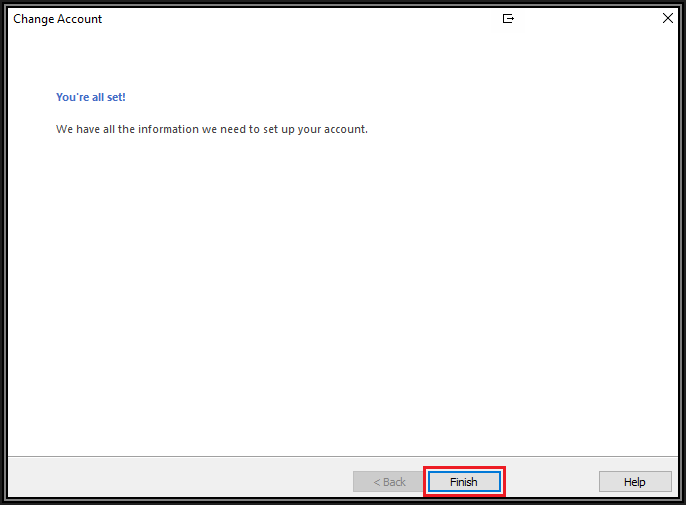
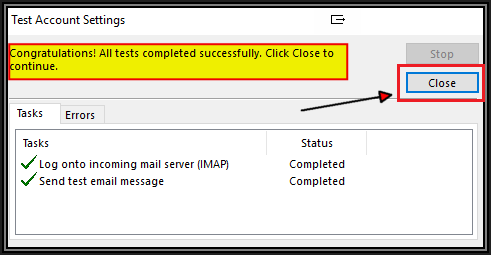
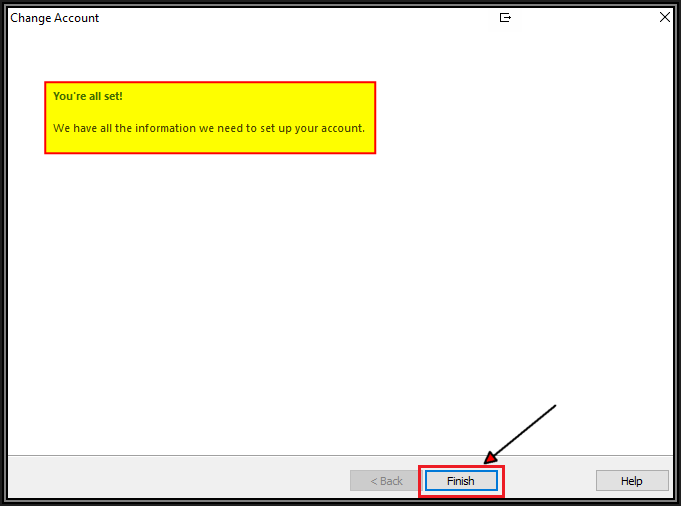
Step 6. Two ticks indicate that all is still working as expected so you can now click the Close button as shown in the above screenshot, as well as close the next window below by clicking the Finish button as shown below
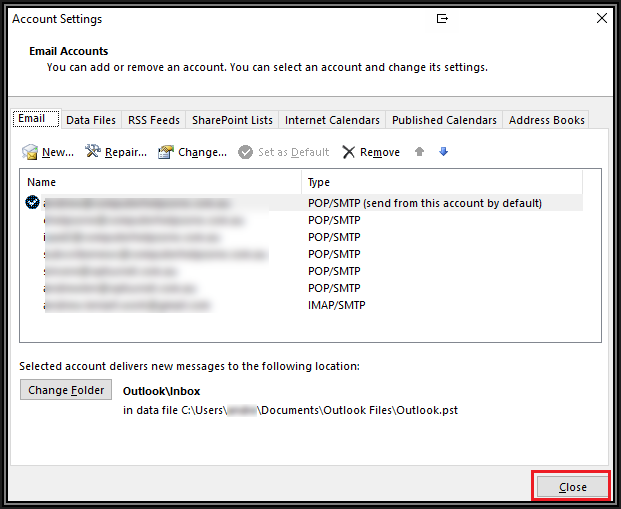
Step 7. Finally, click the Close button on the "Account Settings" box that we opened earlier as shown below
Step 8. That's it. You're all done!
Now simply repeat the above process for every POP/POP3 account that you've configured into Mailwasher and it will stop showing you messages that it's already processed.
What have you achieved?
What you've done by following the steps above is told Outlook that when it downloads your POP account email, to remove the email from the email server because you've successfully already downloaded it and have a copy of it in your Outlook PST storage file. By doing this, the next time Mailwasher checks your mail server for any emails, it will no longer see the mail as it's no longer there and thus the problem has been solved.
One more thing to note before I move on to explaining how to configure and use an IMAP server account.
Whilst IMAP gives you the ability to obtain mail on multiple devices, POP and POP3 does not - IF - you elect to delete mail from your POP email server. You "can" use POP on multiple devices, but that requires setting all devices to leave all mail on the mail server which is not recommended, as the mail server will soon fill up with old stored messages and your mail account will likely be locked once you reach a pre-defined storage limit that all ISP's have enabled.
This lock happens automatically at almost ever ISP mail server and will result in your not being able to receive any new mail once it does because emails sent to you would start to bounce back to the sender(s).
How to set up an IMAP Account in Mailwasher
Setting up an IMAP account in Mailwasher is a bit different to configuring a POP3 account. I'm going to base the example on how to do it assuming you are using Gmail as almost everybody has a Gmail account in one form or another. The same process is pretty much the same for any IMAP server though.
For the benefit of those of you who don't yet use an IMAP connection with Gmail, let's set one up from scratch in Mailwasher.
Important note for GMAIL Users: If you have 2FA (Two-factor Authentication) setup on your Gmail account, you will need to first create App passwords for both Mailwasher and Outlook in your Gmail account. To learn how to do this, please read this article I wrote first, follow the steps describing how to create App passwords there, and then come back and continue with the steps below.
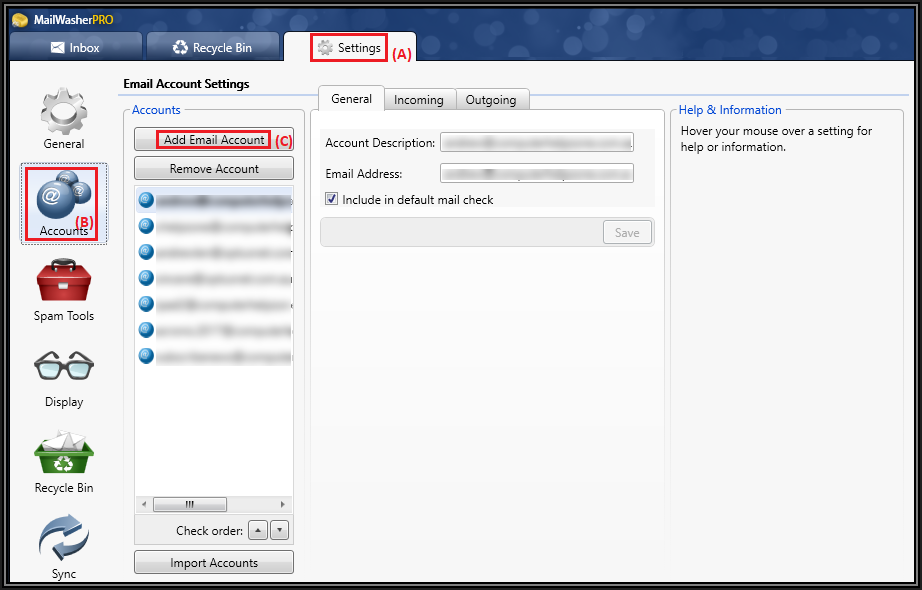
Step 1. Open Mailwasher and click on (A) Settings >> (B) Accounts >> (C) Add Email Account
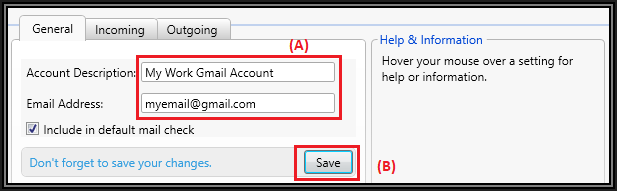
Step 2. Enter an (A) Account Description and your Gmail Email Address and then click the (B) Save button
Step 3. After you click the Save button above, Mailwasher will present you with the Incoming tab. Follow the steps below to configure Mailwasher correctly.
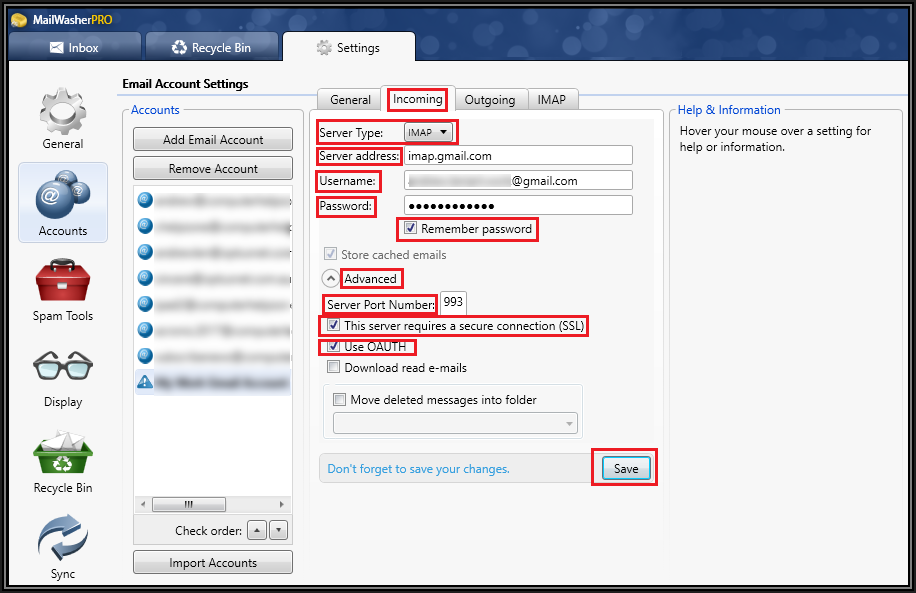
- Use the drop arrow to change the Server Type: from POP to IMAP
- Ensure that the Server address: is imap.gmail.com
- The Username: field should be your full Gmail email address
- The password is your Gmail account password (or App password if using 2FA)
- Ensure Remember Password is ticked on
- Under the Advanced setting, ensure the Server Port Number is set to 993
- Place a tick in This server requires a secure connection (SSL)
- Place a tick in Use OAUTH
- Click the Save button to save your changes
Step 4. If you've entered all the information correctly, Mailwasher will verify the connection and then take you to the Outgoing tab.
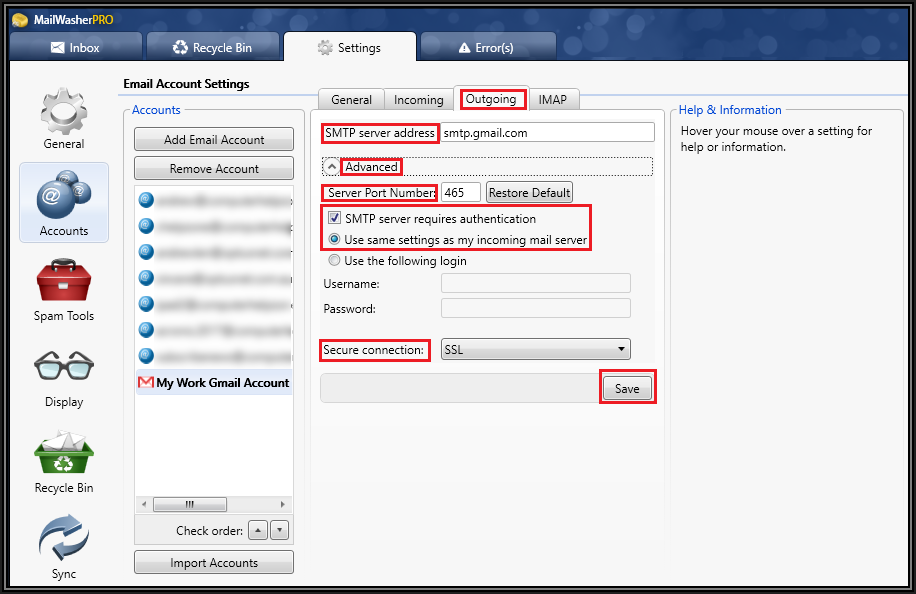
Step 5. On the Outgoing Tab, continue with setting up the following steps
- Ensure the SMTP server address: is set to smtp.gmail.com
- Under the Advanced option, ensure the Server Port Number is set to 465
- Place a tick in SMTP server requires authentication and that "Use same settings as my incoming mail server" is selected
- Select SSL for the Secure connection: option
- Click the Save button to save your changes
Step 6. Mailwasher will now present you with the IMAP tab.
From here, you get a list of folders you may have created in your Gmail account that Mailwasher can see. You can now select which folders you want Mailwasher to check for Spam and which ones to ignore. Note that your Gmail "Inbox" will be selected by default. Ticking a folder will tell Mailwasher to check that folder for spam. Leaving a folder unticked tells Mailwasher to ignore the contents of that folder. See below:
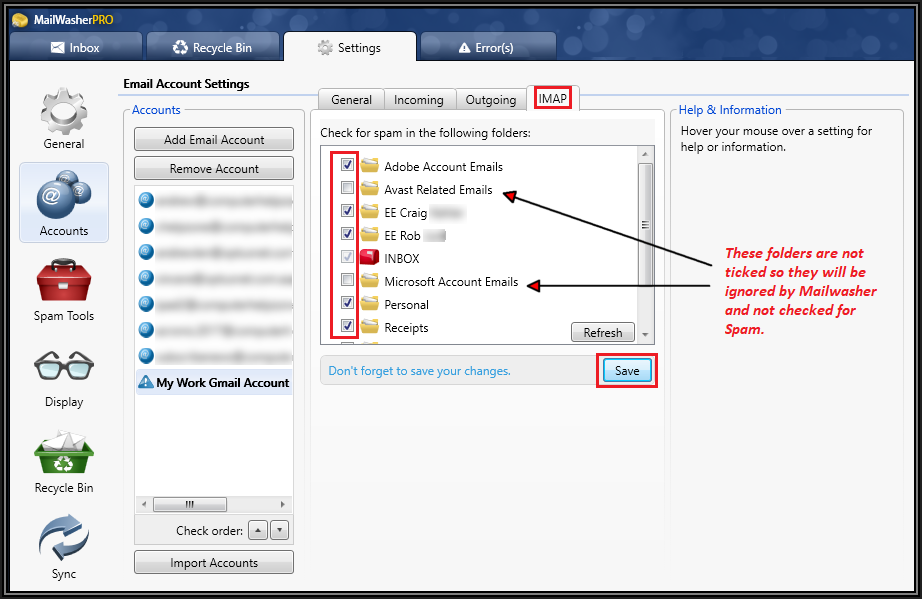
- On the above IMAP Tab, tick the folders that you want Mailwasher to check for any SPAM content
- The INBOX folder is selected by default
- Leave any folders you want Mailwasher to ignore un-ticked!
- Click the Save button to save your changes
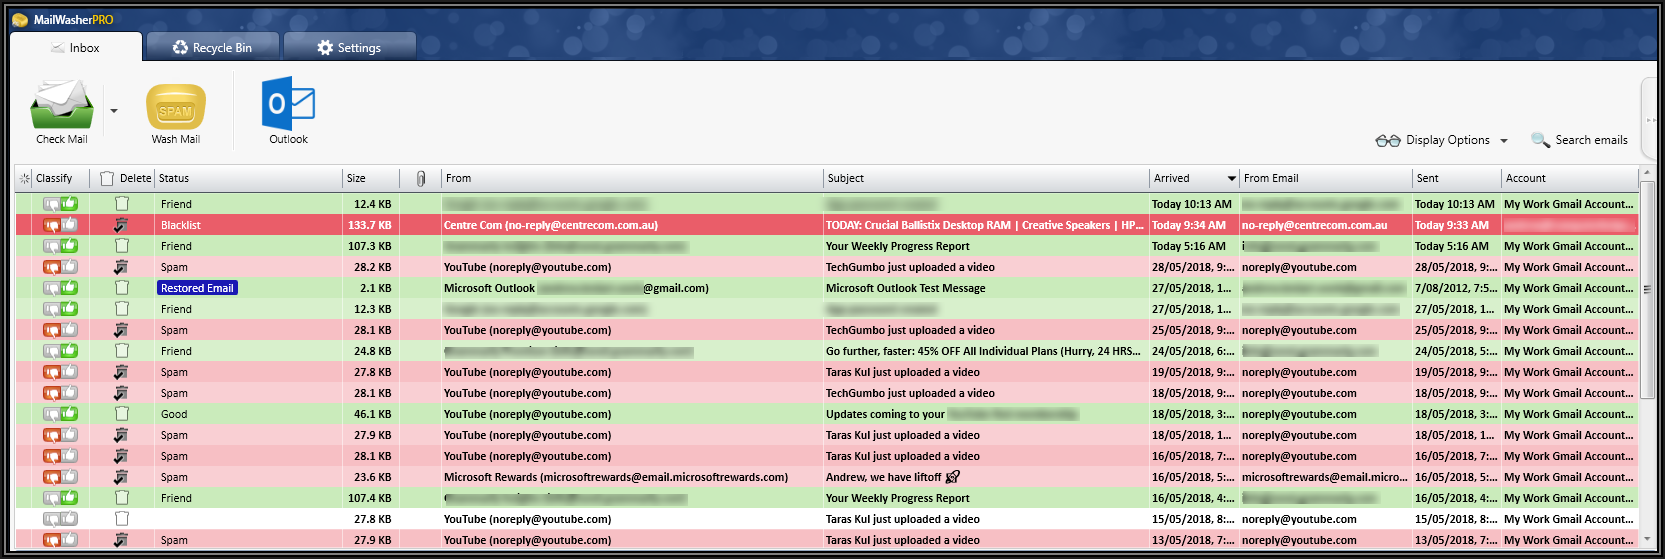
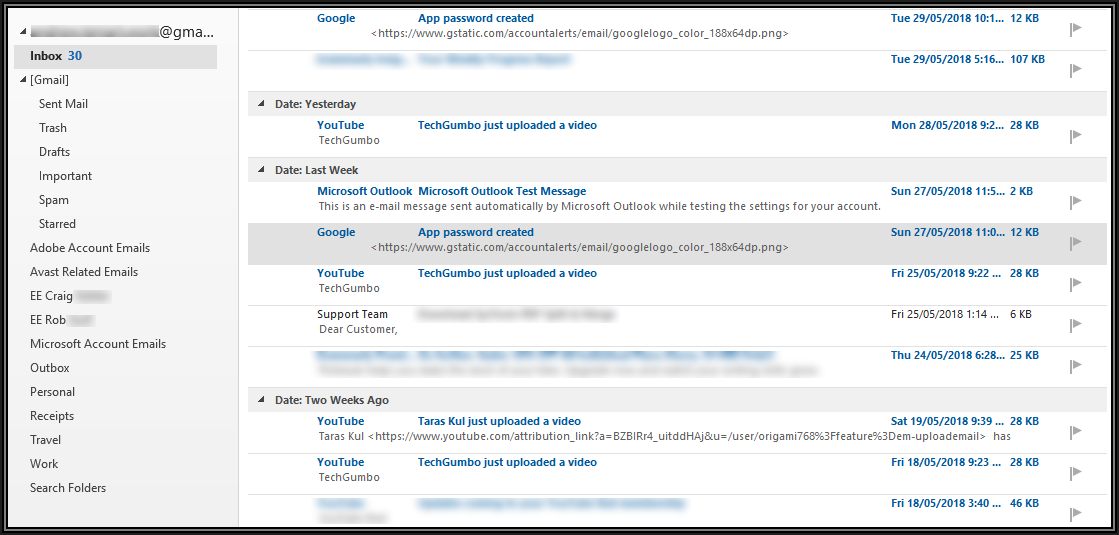
Step 7. That's all there is to do to set up an IMAP connection in Mailwasher so you're all done! Now just hit the Check Mail button in Mailwasher to get a list of everything that is on your Gmail server.
Here's a snapshot of my own Gmail IMAP account after I did the above setup for the purpose of this exercise. (Some sensitive info has been blurred out)
How to Set Up your Gmail IMAP account in Outlook
Now that you've got your Gmail IMAP account working in Mailwasher, you'll need to set up an IMAP connection in Outlook. Here's how to do it.
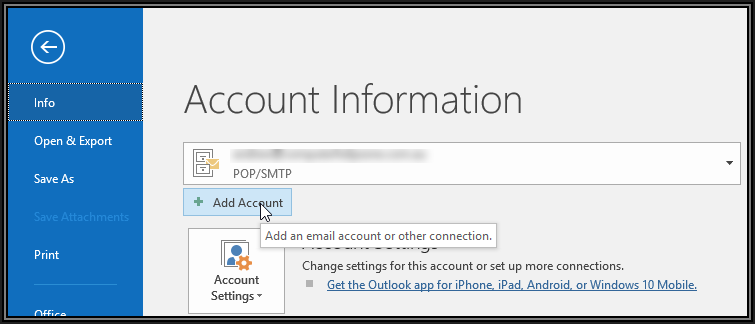
Step 1. In Outlook, click File > + Add Account
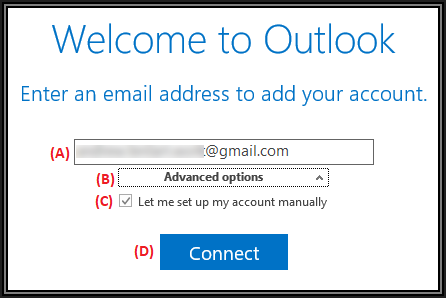
A "Welcome to Outlook" window pops up. (A) Enter your Gmail email address, (B) Click the Advanced options drop-down arrow and place a tick in (C) Let me set up my account manually and then click the (D) Connect button as shown below
Step 2. On the next window, select IMAP as the account type you want to add

Step 3. Outlook will then present you with the following screen. Ensure your settings are as shown below
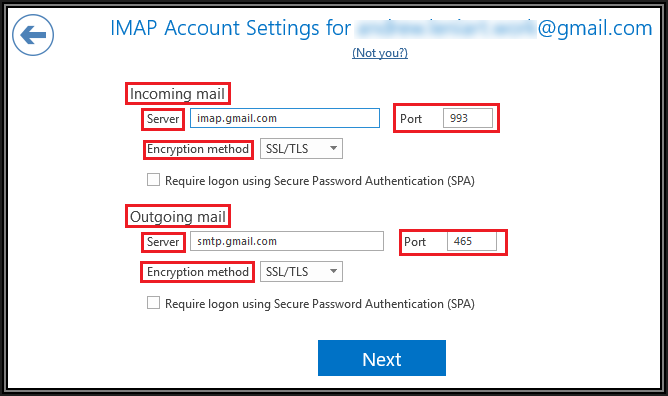
- For Incoming mail, ensure that the Server is set to imap.gmail.com, the Port is set to 993 and the Encryption method is selected as SSL/TLS
- Leave "Require logon using Secure Password Authentication (SPA)" un-ticked
- For Outgoing mail, ensure that the Server is set to smtp.gmail.com, the Port is set to 465 and the Encryption method is set to SSL/TLS
- Again, leave "Require logon using Secure Password Authentication (SPA) un-ticked
- Now click the Next button
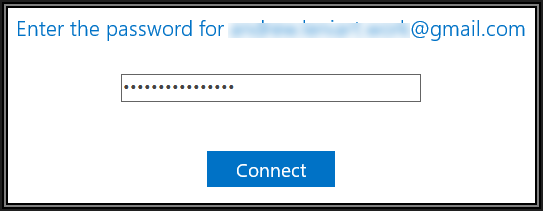
Step 4. The next window Outlook presents you with requires you to enter your Gmail account password.
! Reminder: For those of you that have Two-Factor authentication turned on in your Gmail account, you will need to enter the App password that you generated for Outlook!
Type in (or paste) your Gmail account password in the box and then click the Connect button
You'll get a "We're getting things ready" box for a few seconds and then end up with the following "Account setup is complete" window
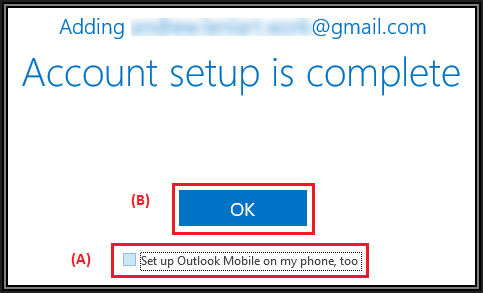
- By default, the (A) Set up Outlook Mobile on my phone too option will be ticked. I personally don't doing that at this point, so I've un-ticked that option as shown above. You may prefer to leave it ticked and follow the required steps and that's fine too.
- When you're ready for Outlook to set up your IMAP account, then click the (B) OK button to continue
Step 5. Outlook now creates your IMAP account as well as an OST (Offline Storage Table) file and populates your new IMAP account with all of the email content of your Gmail account. Here's a quick look at mine...
Other settings to take note of and change in Outlook to suit yourself!
Now that you've successfully set up an IMAP account in Outlook, let's take a look at some of the settings you need to be aware of and can change to suit yourself.
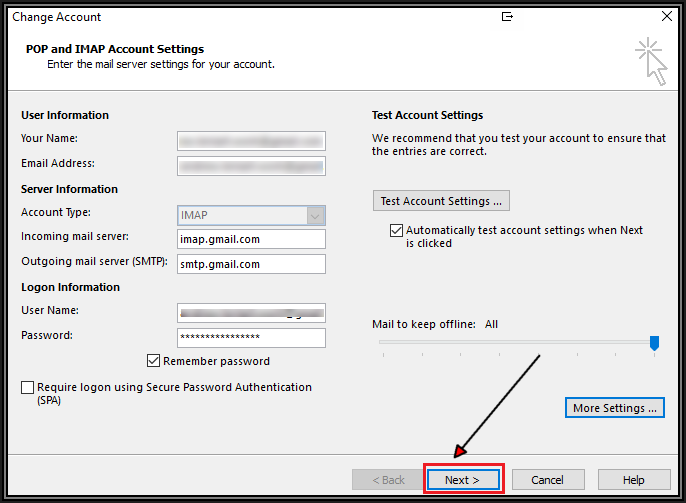
1. Firstly, follow Steps 1, 2, and 3 at the start of this article to edit your new IMAP account in Outlook. Once you've clicked on your IMAP account and clicked the "Change" button, you'll end up with the following screen
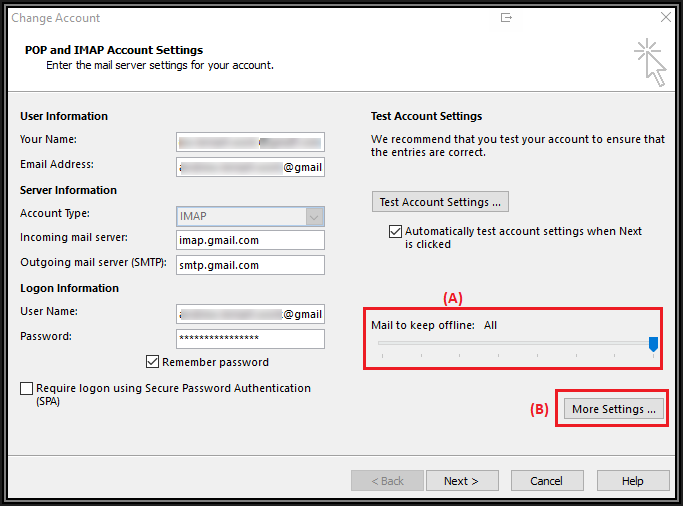
- Note that we have a new option to configure in an IMAP account in Outlook.
- Use the slider in (A) Mail to keep offline: to how much mail you want Outlook to keep offline for when it's not connected to the Gmail server. You can set this to anything you like. I prefer to keep ALL mail available to me when Outlook isn't connected to the Gmail server, so I've set the slider all the way to the right as shown above
- Once you've configured the offline settings to your liking, click (B) More Settings for more configuration options
2. The Internet Email Settings box will pop up. The fields in the General tab of the Internet Email Settings are optional, but I recommend that you fill them out with relevant information about yourself
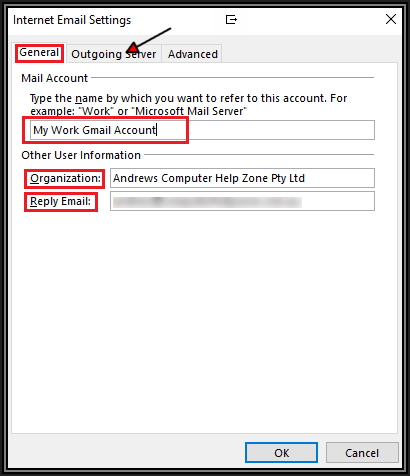
- On the General Tab, type a name that you want to refer to this account - in my case, I've just used "My Work Gmail Account"
- Type some information about your Organisation. If you're not a company, this can be anything you like, like your first and last name
- Type a Reply Email that you want replies to go to when people read your emails and hit "Reply"
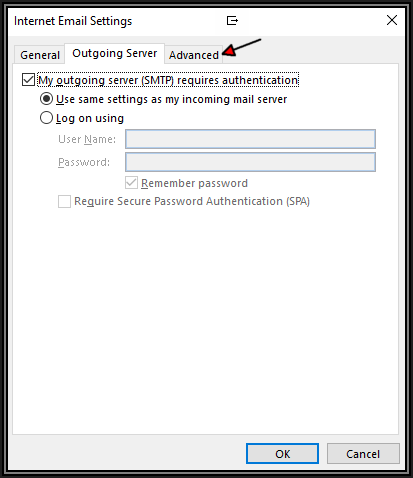
- Once done with the General tab, click the Outgoing Server tab and make sure yours looks like as shown below unless you're having problems and need to use the "Log on using" fields
- Now click the "Advanced" tab as shown below
3. On the Advanced tab, you can configure various items to do with the way you want Outlook to behave when it's connected to your Gmail server. An explanation of the available options are given below
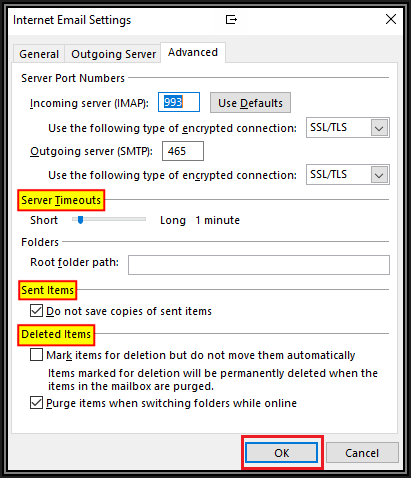
- Leave the Incoming and Outgoing server settings alone unless you made a mistake and need to correct the port numbers
- The Server Timeouts value defaults to 1 minute. You can increase this value by dragging the slider to the right if your Internet connection isn't very reliable and the server times out a lot for you while connected to Gmail
- Sent Items tells Outlook whether or not you want a copy of any email you send to be saved in the Sent Items folder
- Deleted Items tells Outlook what to do when an email message is deleted
- Once you're done configuring everything to your liking, click the OK button
4. Now click the Next button and Outlook will test your connection to make sure that all is good
5. If all is well, you'll get the screen below. Click the Close button
6. And that's it. You're all done!
Click the Finish button and then close the Account Settings box in Outlook
How Mailwasher affects Gmail Server Content
It's worth explaining exactly happens on the Gmail server when you Wash Mail using Mailwasher on an IMAP account.
After you click the Wash Mail button in Mailwasher, it deletes the mail you've marked for deletion on your Gmail account and only the good mail is imported into your Outlook account. You can change this behavior by configuring the deleted items option in Step 3 above. Emails are always stored on the Gmail server, however, this is kind of nice for backups and beneficial if you get your emails on other devices. Hope that makes sense!
Conclusion
That takes us to the end of Learn to use the POWER of Mailwasher Pro Part-4 - Links to the previous editions of this series are listed below:
- Learn to use the POWER of Mailwasher Pro Part-1
- Learn to use the POWER of Mailwasher Pro Part-2
- Learn to use the POWER of Mailwasher Pro Part-3
- Power of Mailwasher Pro - Part 5 - Defeat spammers tricks easily [Series Final]
I've also created a couple of videos on this topic. View them here:
If you want a particular feature about Mailwasher Pro covered in a future edition, please do leave a comment in the comments section below this article at Experts Exchange.
If you think this article will be helpful to others, please do click the Thumbs Up icon to the bottom left of this text. It helps me out and lets me know the direction I should take for future articles that I write. Thanks very much.
Regards, Andrew Leniart

Have a question about something in this article? You can receive help directly from the article author. Sign up for a free trial to get started.
Comments (3)
Commented:
Author
Commented:Regards, Andrew
Commented:
Thank you for the 4th installment of Mail Washer Pro. I greatly appreciate all your work. An A+++ rated material!
Basem Khawaja