Resolve Chrome Issues 99% of the time using this method!


I often come across people having issues with Google Chrome such as this question at Experts Exchange.
One of the first things most people try (or are suggested to try) in order to fix their problem is to uninstall and then reinstall Chrome. However, rarely will that solve the problem.
Why? Because standard uninstalls and reinstalls don't really remove everything associated with Chrome. The Chrome profiles are left intact, so when it's reinstalled, the problems which may have been causing a slow performance or other unwanted behavior by Google's Chrome browser just get imported back into the reinstalled copy.
Other solutions suggested are often to disable all Extensions in Chrome, and while this does often work, frequently people find that it doesn't. The reason for this is that Chrome's "profile settings" may be corrupted in some way. So this article offers a solution which I have found will both fix and determine the causes of Chrome's unwanted behavior 99% of the time that I've used it to solve users problems.
This article is based on the following at the time of writing:
- The latest version of Windows 10 Pro - Version 10.0.17134 (Build 17134)
- The current version of Google Chrome - Version 68.0.3440.106 (Official Build) (64-bit)
That said, the instructions should also apply to earlier versions of Chrome and earlier builds of Windows 10 (as well as Windows 7).
Here's how to "completely" uninstall and reinstall the Chrome browser.
Prepare First
There are a few things you may want to do first for convenience sake if you don't log into a Google account and synchronize your bookmarks anywhere:
(A) Backup your BookMarks - While in Chrome, press Ctrl + Shift + O on your keyboard and Chrome's Bookmarks manager will open. Alternatively, just type chrome://bookmarks/ into Chrome's address bar. Either will open the Bookmarks manager.
(B) Click on the 3 dots at the top right of the Chrome window that just opened: 
(C) Click on Export bookmarks as shown below

(D) Chrome will create an HTML file called "bookmarks_xx_xx_xxxx.html" where the "x"s represent the current date and year. Save this on your hard drive somewhere for later (I'd suggest your Documents folder)
(E) You may also want to make a note of which Extensions you are using so you can reinstall them later, only in the manner suggested further down in this tutorial. To see all your Extensions, simply type chrome://extensions/ into Chrome's address bar and hit your Enter key. Make a note of all the Extensions that are important to you that you may want to reinstall later.
Now let's uninstall and reinstall Chrome completely.
Uninstalling Chrome Completely
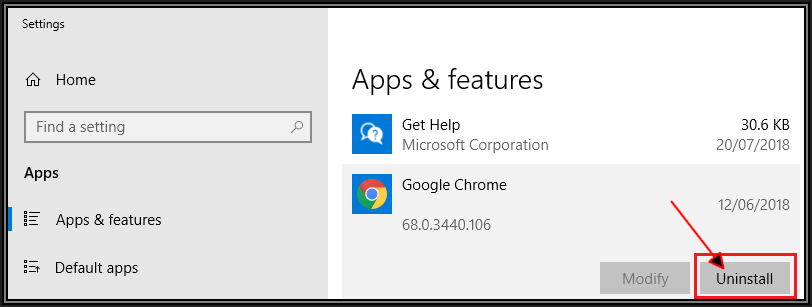
Step 1. Uninstall Chrome the regular way.
Press your Windows Key and type Add or remove programs and hit your enter key. The following window pops up. Scroll down until you see Google Chrome and click the Uninstall button and follow the prompts to allow Windows to do its normal uninstall routine.
Despite many telling you to restart at this point, there is really no need to. Just continue to Step 2 unless you can't perform the next instruction because Windows gives an error, in which case, ok, reboot Windows and then move on.
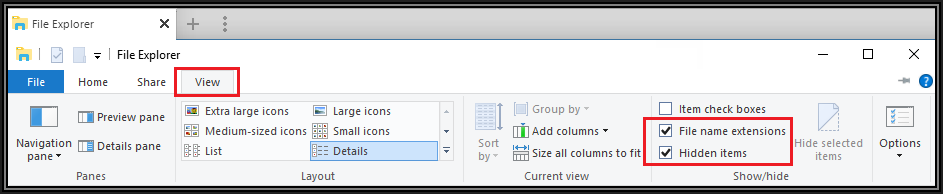
Step 2. Rename Google Chrome's Profile Folders
First, ensure you have Hidden Items and File Name Extensions ticked on the View Tab in Windows File Explorer as shown below. (Note that the only necessary item to have checked here is Hidden Items, but I always suggest to have File Name Extensions enabled as well).
That done, browse to the following folders using Windows File Explorer. Your_Profile_Name below represents your Windows login user profile name.
Note: If you don't know what your user profile name is, just bring up a CMD prompt and it will show C:\Users\YourProfileName>
It is important to perform the following A and B steps below:
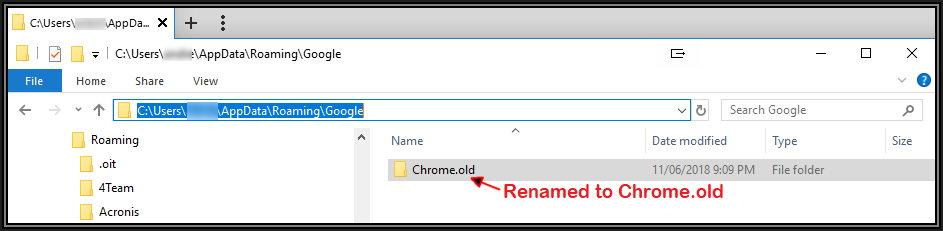
A. Navigate to: C:\Users\YOUR_PROFILE_NAME\AppData\Roaming\Google\
Rename the "Chrome" folder you will see in the above path to "Chrome.old"
B. Navigate to C:\Users\YOUR_PROFILE_NAME\AppData\Local\Google\
Rename the "Chrome" folder you will see in the above path to "Chrome.old"
Example File Explorer Screenshot of "A" above
At this point, Google Chrome has been completely uninstalled and a copy (or backup) of its profiles have been kept as ".old" just in case we want to revert back to before we started this entire process.
Now Reinstall Chrome
As you've already installed Google Chrome once, I don't think there's any need to go into detailed instructions on how to do that, except to say that I recommend you install it (using any browser) from the following web address: https://www.google.com/chrome/
Now that you have a totally fresh copy of Google Chrome on your computer, check to see if the problem you were experiencing has been resolved. If it's now working as expected, (it should be) then do the following, in the order suggested.
1. Restore your bookmarks. Remember that "bookmarks_xx_xx_xxxx.html" file you saved earlier? Use the same process now to Import all of your Bookmarks back, using Import bookmarks instead of Export bookmarks.
Once your bookmarks are back, check Chrome's performance again. If the problem has recurred, then you now know it's something to do with your bookmarks. Perhaps you have too many or there are corrupt links in there causing a problem. If Chrome is still operating as it should, it's time to start reinstalling your favorite Chrome Extensions.
Troubleshooting your New Chrome Install
Important: For this troubleshooting process to work, all Chrome Extensions must be installed one at a time, and then Chrome tested again after the extension has been installed and enabled. It's the best way to eliminate if it was an extension that was causing your problem.
- Install the first Extension and test Chrome. All ok?
- Install the next Extension and retest Chrome. All ok?
- Install the third one and so on. You get the idea. If the problem you were having recurs, then you've found your culprit - uninstall the problematic extension and test again.
If everything is still working correctly in Chrome after you've reinstalled all of your Extensions, then the profiles we renamed above had a corruption. Feel free to now go back and delete the "Chrome.old" folders you renamed if you want to.
Conclusion
I have found that in most cases, following the processes described in this article will almost always resolve any issues you are having with the Google Chrome browser.
Should you need further help, please use the free Ask a Question feature at Experts Exchange. I and many other highly experienced experts monitor questions asked and will be happy to further assist you.
Finally, If you found this article to be helpful, please click the Thumbs-Up icon below. This lets me know what is valuable for EE members and provides direction for future articles. Thank you very much! Regards, Andrew
Have a question about something in this article? You can receive help directly from the article author. Sign up for a free trial to get started.
Comments (4)
Commented:
Author
Commented:Commented:
Author
Commented:Thank you for endorsing the article and also for your very useful addition to the information I wrote in the article.
Yes, there are so many different reasons people strike it. I've been able to resolve it before, but I hesitate to give instructions because where a particular solution may work on one installation, does nothing on another. A very tricky error to troubleshoot indeed.