Microsoft Intune Windows Information Protection (WIP) for Windows 10 - Part II


This is all about Windows 10 BYOD device enrollment with device management support (With Enrollment - MDM)
In the 1st part, we have checked how we can register Windows 10 BYOD devices with Azure AD and encrypt corporate data with WIP policy (Without Enrollment - MAM Only)
With this part, we will check how to join a Windows 10 BYOD (workgroup) device with Azure AD and control application installation / execution along with device management in addition to work data encryption. Joining and registering Windows 10 devices with Azure AD are two different processes and devices joined needing admin access on the machine.
The device Join process will add Azure AD user to local administrators group on the device (Windows 10) and we can log in locally to the device with an Azure AD account.
For this scenario to work we need a few more policies in addition to WIP policy. Most of the prerequisites are same as mentioned in the 1st part, with few changes.
Prerequisites:
- Windows 10 1703 and above (Pro / Enterprise / Education) editions in workgroup
- An open internet is requested on Windows 10 machine to avoid issues
- Custom domain verified and registered with Azure AD – We already have registered custom domain exchangelabs.in
- EMS licenses (At least Azure AD premium and Intune licenses)
- Intune must be enabled as MDM authority at the Azure Tenant level
- Cloud only users or users synced to Azure AD from an on-premise active directory and licensed with EMS
Once the above prerequisites are ready, we can configure WIP policy to define protected apps, data encryption options, and device configuration policies to control application execution and Compliance Policy for Windows 10 devices.
We have also created a group in Azure AD named WithEnrollment and added few Azure AD user accounts to that group for our testing.
This group will be mapped with WIP Policy so that policy will be applied on group members.
WIP Policy Configuration - With Enrollment (MDM)
The 1st step is to enable MDM URLs and finalize user scope as shown below
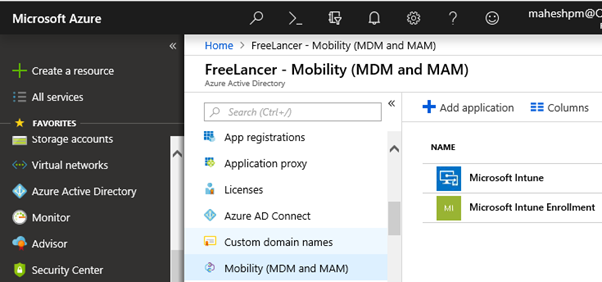
In the Azure portal, navigate to Azure active directory \ Mobility (MDM and MAM) and click on Microsoft Intune as shown above
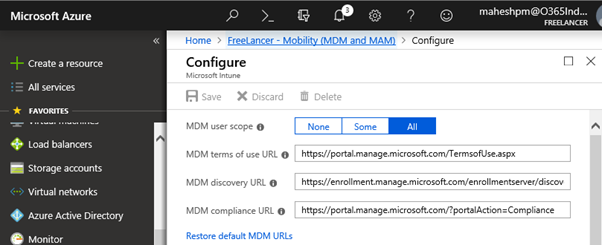
Click on Restore default MDM URLs, select All as user scope and click Save
Next, we need to add a new WIP policy with device management option selected
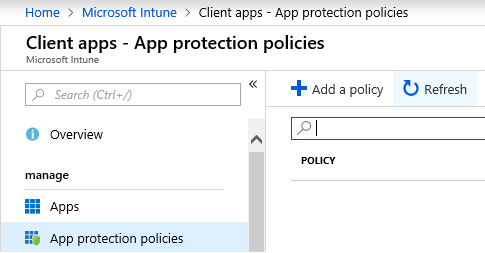
Navigate to Intune App protection policies and click Add a Policy
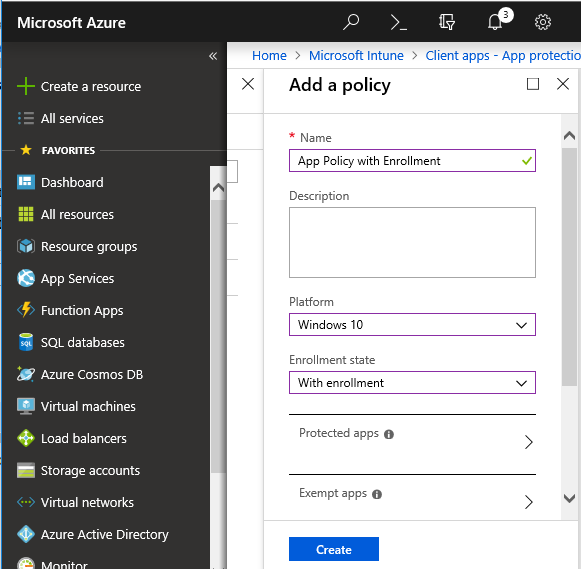
Give the Policy a suitable Name, select Windows 10 as the Platform, and select With Enrollment as enrollment state
Rest of the policy settings are similar to WIP policy (Without Enrollment) configured in the 1st part of this series, hence not repeating here.
Compliance Policy
The next part is to configure Device compliance policy. Settings mentioned in policy must be configured on an Azure AD joined machine and the machine should be able to comply with all requirements mentioned in compliance policy.
The purpose of compliance policy is to put restrictions on the machine as per corporate requirements such as having an antivirus installed, OS version should not exceed xxxx number, user needs to set a PIN upon device registration, Windows Firewall must be turned ON and so on.
If the device is not compliant with policy, its gets notified to Azure portal and we can set non-compliance action such as trigger emails to top management including user and / or lock his device until the user fulfils policy requirements.
Compliance policies are applicable to device enrollment with the join method (With Enrollment - MDM) only.
For testing purpose, I have created a compliance policy in Intune blade and configured a single setting. The Windows 10 OS allowed for enrollment should not exceed version 1803.

Under Microsoft Intune \ Device Compliance \ Policies click Create Policy
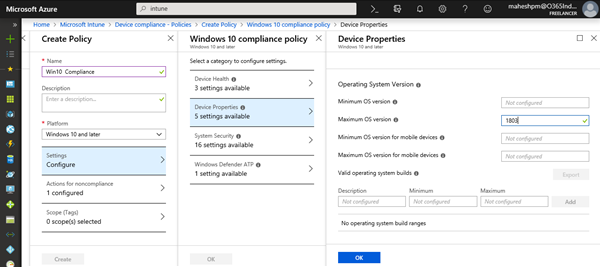
Give the policy suitable name, select Windows 10 and later as the device platform, under settings select maximum version as 1803 and click OK

Select Action for noncompliance (Mark device noncompliant) immediately and click Create. This is the default action and already configured. There are two more options available as shown below;
Lock the device after xx days of noncompliance and/or send email to the affected user and additional recipients (For ex. top management people), all 3 options can be configured simultaneously. For our testing purposes, we have kept the default option only.

Now assign this policy to the already created Azure AD group named WithEnrollment and click Save. All member users of this group will be affected by this policy.

The resulting policy status is as shown above.
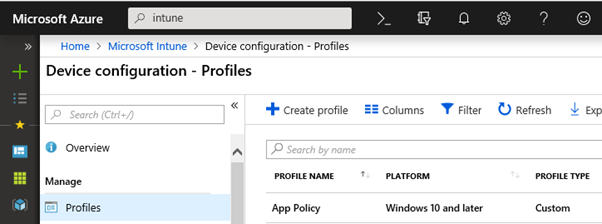
Device Configuration - Profiles
Now the next step is to configure device configuration profiles where you can add various device configurations and put restrictions on the device. There are multiple types of restrictions we can put through the OMA interface but for our purposes, we are looking at restrictions in terms of what applications can be installed/executed on devices.
We can create application restrictions through OMA-URI configuration profiles. OMA URI understands Applocker files and operates with the same principals as the Applocker policy. By default when Applocker enforcement is triggered, it blocks everything except allowed applications. It is kind of application white listing.
Microsoft introduced Applocker policy with Windows 7 on-wards and continues to work with the Windows 10 platform as well. Applocker policies are designed for Enterprise customers and can only be enforced on Enterprise editions. With cloud advances, Microsoft has allowed enforcement for Intune enrolled Windows 10 Professional and educational edition devices in addition to enterprise editions.
Before we create a device configuration profile, we need to create an Applocker policy on any Windows 10 Enterprise/Pro machine with the required allowed settings and we need to export same. Once exported, we need to import it within the Intune device configuration profile.
In the 1st part of this series, I have already demonstrated step by step how to allow files and folders with Applocker and export those rules under heading Applocker Rules

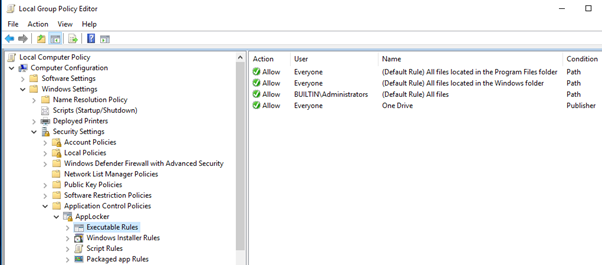
We need a total of 3 rules under Executable Rules node.
The 1st rule would be path rule to allow %PROGRAMFILES%\* for the everyone group, this rule will allow the running of all files present in Program Files and Program files (X86) folders
The 2nd rule would be a path rule to allow %WINDIR%\* for the everyone group, this rule will allow the running of all files present in Systemroot (Windows) folder
The 3rd rule would be a publisher rule to allow the OneDrive Sync client (For corporate data) for the everyone group, since the OneDrive client location is different from the above two path rules, hence this rule is required else its configuration will get blocked.
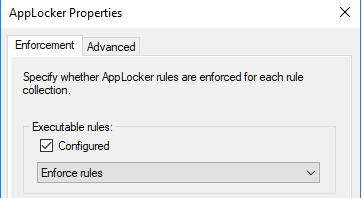
Now navigate to Application Control Policies, right click Applocker and select the Executable Rules (Configured) checkbox as shown below.
Now navigate to Applocker folder in gpedit.msc, right click it and export the policy in XML format. The exported output of rule is given below.
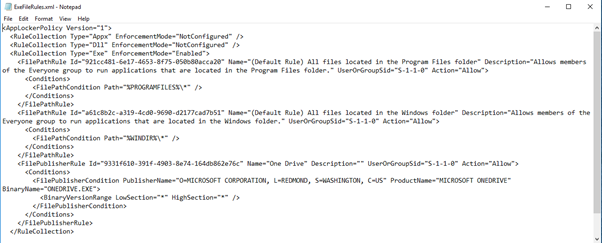
The above output needs to be modified by removing "RuleCollection type" not configured, in short, we only need the configured RuleCollection
The resulting code will look as shown below
<RuleCollection Type="Exe" EnforcementMode="Enabled">
<FilePathRule Id="921cc481-6e17-4653-8f75-050b80acca20" Name="(Default Rule) All files located in the Program Files folder" Description="Allows members of the Everyone group to run applications that are located in the Program Files folder." UserOrGroupSid="S-1-1-0" Action="Allow">
<Conditions>
<FilePathCondition Path="%PROGRAMFILES%\*" />
</Conditions>
</FilePathRule>
<FilePathRule Id="a61c8b2c-a319-4cd0-9690-d2177cad7b51" Name="(Default Rule) All files located in the Windows folder" Description="Allows members of the Everyone group to run applications that are located in the Windows folder." UserOrGroupSid="S-1-1-0" Action="Allow">
<Conditions>
<FilePathCondition Path="%WINDIR%\*" />
</Conditions>
</FilePathRule>
<FilePublisherRule Id="9331f610-391f-4903-8e74-164db862e76c" Name="One Drive" Description="" UserOrGroupSid="S-1-1-0" Action="Allow">
<Conditions>
<FilePublisherCondition PublisherName="O=MICROSOFT CORPORATION, L=REDMOND, S=WASHINGTON, C=US" ProductName="MICROSOFT ONEDRIVE" BinaryName="ONEDRIVE.EXE">
<BinaryVersionRange LowSection="*" HighSection="*" />
</FilePublisherCondition>
</Conditions>
</FilePublisherRule>
</RuleCollection>
Now its time to create a new device configuration profile for Windows 10 devices
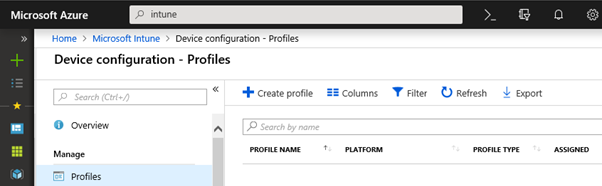
Navigate to Microsoft Intune \ Device Configuration \ Profiles and click Create Profile

Give an appropriate name, select Windows 10 and Later as the device platform, select Custom as the profile type and click Settings (Configure) and click Add underneath OMA-URI settings
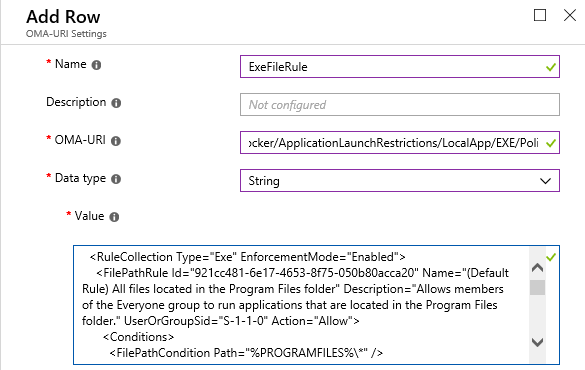
Above, Provide a suitable name (ExeFileRule) for the rule.
Enter ./Vendor/MSFT/AppLocker/ApplicationLaunchRestrictions/LocalApp/EXE/Policy as the OMA-URI string, select data type as String from the drop-down and add the resulting XML code generated earlier and click OK at the bottom of the page.
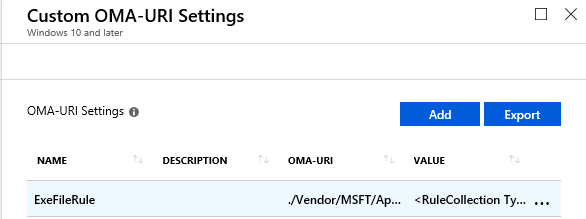
The 1st rule added.
Now we need to create and add a 2nd rule for packaged Microsoft store apps under Applocker and export it, and then import it with Intune OMA-URI rules as a 2nd row.
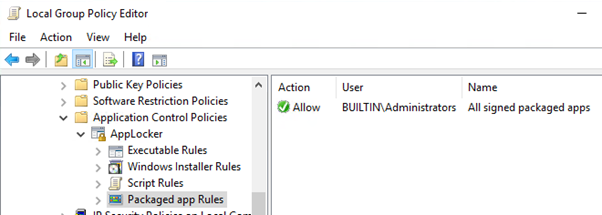
The rule can be created by creating default rules by right clicking Packaged App Rules, the rule is generated for the everyone group. We need to change it for administrators from rule properties as shown above. Also, we need to enforce the rule as shown below.
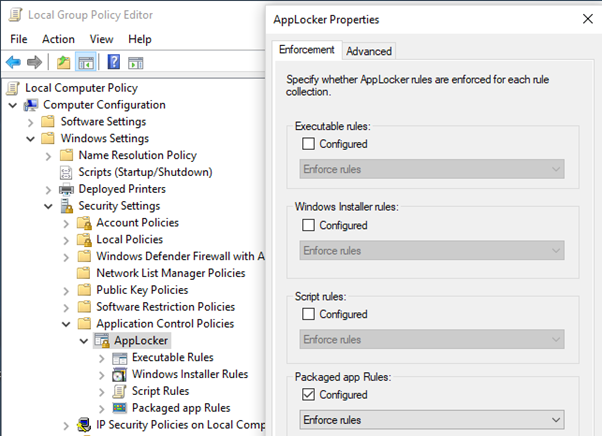
Right click the Applocker container and go to properties. Select the Package app rule checkbox with Enforce rules as the action and click OK.
Now right click the Applocker container and export the policy in XML format. The exported rule will look as shown below.
Note - Before exporting policy, delete any rules configured under Executable rules
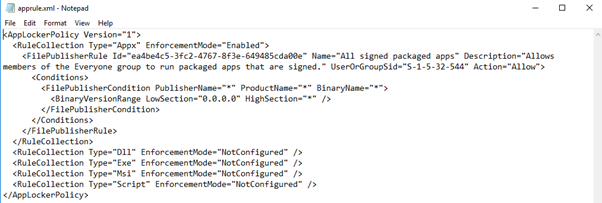
The above output needs to be modified by removing "RuleCollection type" not configured. In short, we only need to configure RuleCollection
The resulting code will look as shown below.
<RuleCollection Type="Appx" EnforcementMode="Enabled">
<FilePublisherRule Id="ea4be4c5-3fc2-4767-8f3e-649485cda00e" Name="All signed packaged apps" Description="Allows members of the Administrators group to run packaged apps that are signed." UserOrGroupSid="S-1-5-32-544" Action="Allow">
<Conditions>
<FilePublisherCondition PublisherName="*" ProductName="*" BinaryName="*">
<BinaryVersionRange LowSection="0.0.0.0" HighSection="*" />
</FilePublisherCondition>
</Conditions>
</FilePublisherRule>
</RuleCollection>
Now to add the 2nd row, click Add on profile page under Custom OMA-URI settings
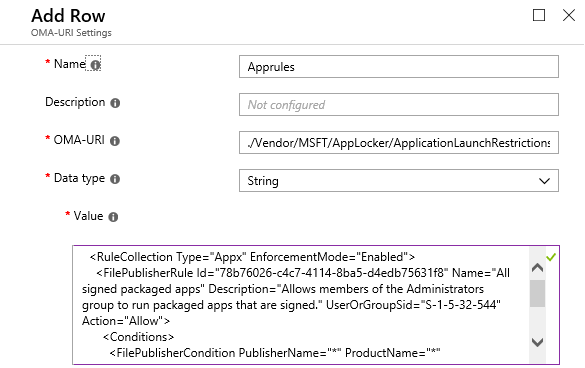
Give Apprules as the rule name.
Now Enter ./Vendor/MSFT/AppLocker/ApplicationLaunchRestrictions/WinStoreApp/StoreApps/Policy as OMA-URI, select String as the data type from the drop-down and add resulting XML output as the value and click OK at the bottom of the page

Two rules created now, click Create at bottom of the page to create a new device profile
Profile created. Click on the new profile created
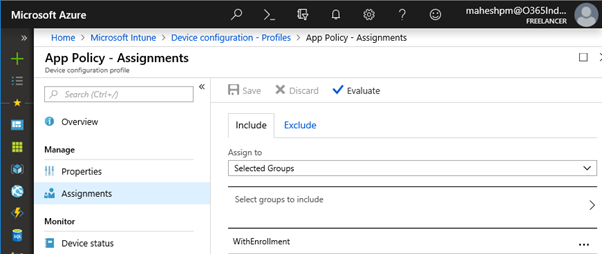
Assign new profile to the pre-created Azure AD group named WithEnrollment and save the settings.
We now have a ready with compliance policy, WIP policy, and device profile for application restrictions / control. Now we are ready to join Windows 10 devices with the Azure AD and test the functionality
Windows 10 Device Join Process
- On the Windows 10 workgroup machines, log on with local administrator, right click the Start button and click Settings
- On the Settings page, click on Accounts
- On the Accounts page, click Access work or school
- Under Access work or school click Connect
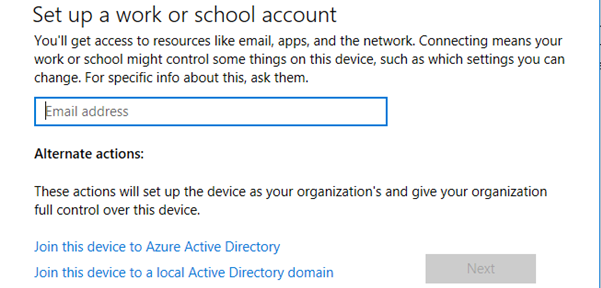
On this page, click Join this device to Azure Active Directory

Enter the Azure AD user principal name here and click Next
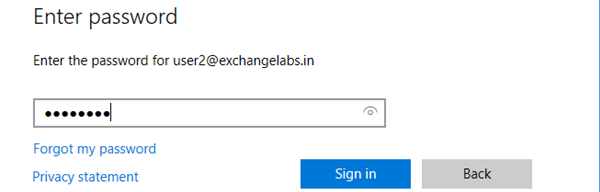
Enter the password and click Sign in
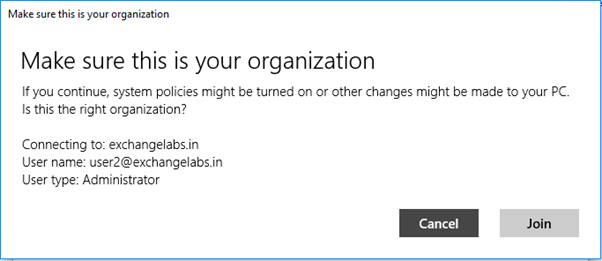
Click Join
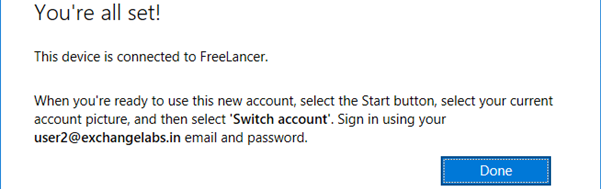
Device joined to Azure AD. Click Done

Now that the account is showing as connected to the Azure AD organization, click Info
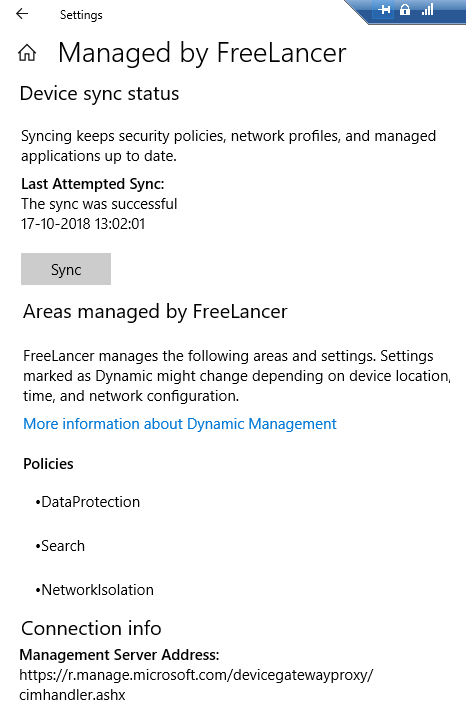
Here we can get a bunch of info such as sync status, connection info and policies etc.
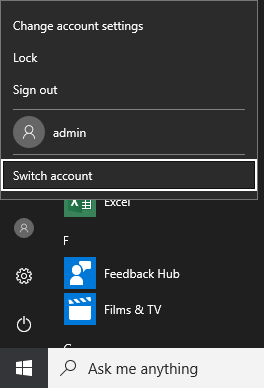
Now we can either logoff the local account or use Switch Account functionality to logon with the Azure AD account (User2@exchangelabs.in)

Enter user ID and password and start sign in process.

Account password accepted, as part of Hello for Business, setup forces us to set a PIN, click Set up PIN.
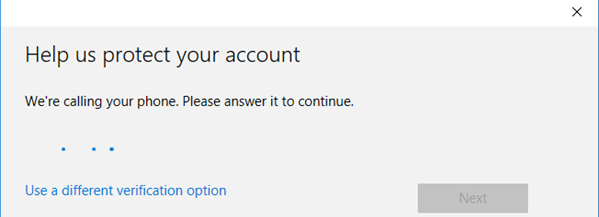
The system will ask for the verification method to be used if already not entered in Azure AD identity properties since we have selected phone call method, we have entered a cell number with ISD code, Azure AD triggers verification phone call as the 2nd factor, please wait
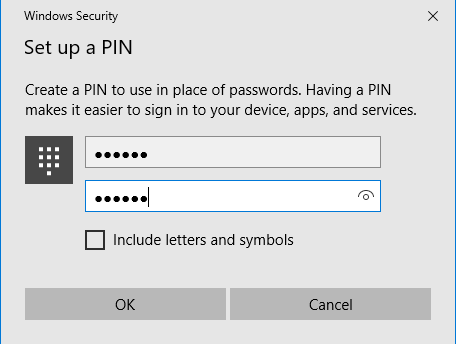
Call verification is successful, setup asked to set up a PIN, setup 6 digit PIN and click OK

The PIN is set up and successfully saved with Azure AD account properties. Click OK
Now we have successfully logged on to the Windows 10 device with user2@exchangelabs.in
user2@exchangelabs.in and Azure AD global administrator are now added to the local Administrators group of this machine as shown below.
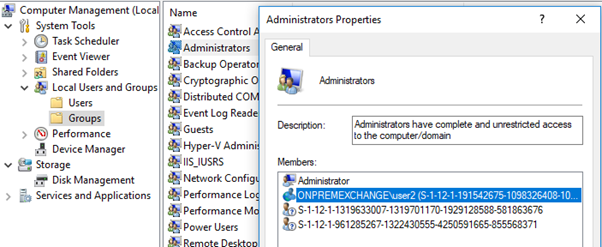
Its showing ONPREMEXCHANGE\user2(GUID) because its synced from the on premise active directory domain named onpremexchange.com with ONPREMEXCHANGE as NetBIOS name.
We need to ensure from Azure AD portal if all required polices are applied on the joined device
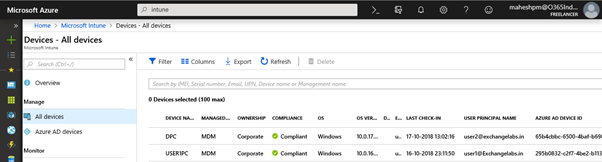
Locate Microsoft Intune \ All devices and find details. We can export information from the portal, a few columns are added below to get the idea. Click on the 1st device in the list to open the device overview page

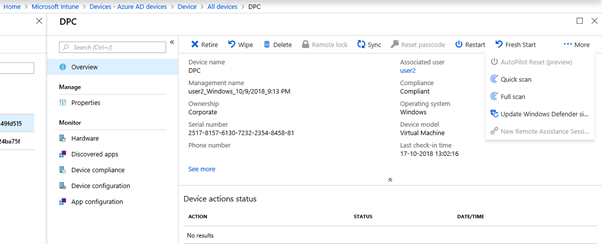
This is the device overview page. Here we can do the number of management functions on the device such as Retire, Wipe, Delete, Sync, restart and so on.
You can click each option and it will provide a brief description of what it will do.
- Retire option will remove the device from Azure AD, remove all applied policies and the device is no longer managed by Intune MDM, however, personal / company data will not be deleted
- Wipe option is nothing but Factory reset and remove all personal and company data and settings from this device. We get an option to keep the device enrolled with the user account
- Delete option will delete this device and we will no longer be able to manage the device from the Intune portal. The device cannot access corporate resources. Company data may be wiped from the device if the device tries to check-in after it is deleted.
- Sync option will sync any MDM/Intune policies forcefully set to the device in the portal
- Restart option will restart device forcefully
- Fresh Start option will Clean device by removing all preloaded Win32 apps and update the device for free to the current version of Windows 10. We get an option to retain user data
Under the Hardware tab, we can see the devices OS details, storage details, and conditional access policy details if any
Under the Discovered Apps we can see installed Microsoft store apps and net framework versions etc
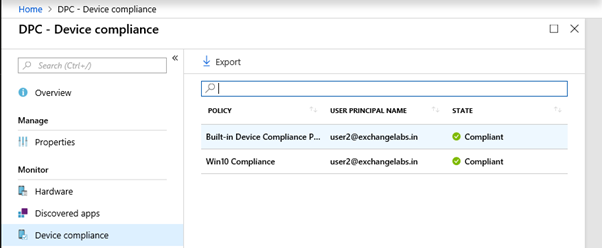
Under Device Compliance, we can see the device compliance status against compliance policies set in the Azure portal as shown below. If this status is shown as Non-Compliant, we need to check if the settings mentioned in the compliance policy are configured on the device or not
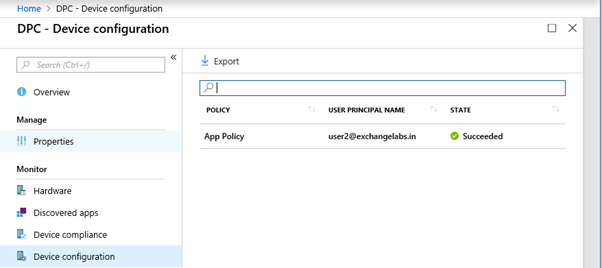
Under Device Configuration, we can see that application control policy is applied successfully
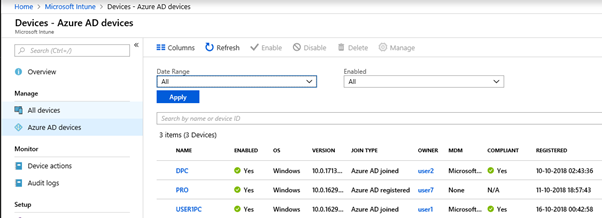
Under Microsoft Intune\Azure AD devices we can see Join Types, Compliance status, MDM status etc. The devices having a join type of Azure AD registered cannot be managed by Intune and they are MAM only (Without Enrollment) devices, hence their MDM status is showing as None.
Click on the 1st device (DPC) which has a join type as Azure AD Joined in the list. It will open the Device properties page as shown below.

Here we can Delete\Disable or manage this device.
Test if the various policies functionality is working
WIP Policy Enforcement Testing
- WIP data encryption functionality along with protected apps is working similarly like MAM only devices without enrollment - WIP encryption is explained in detail in the 1st part of this series, hence not repeating here
Blocking Microsoft Store Apps
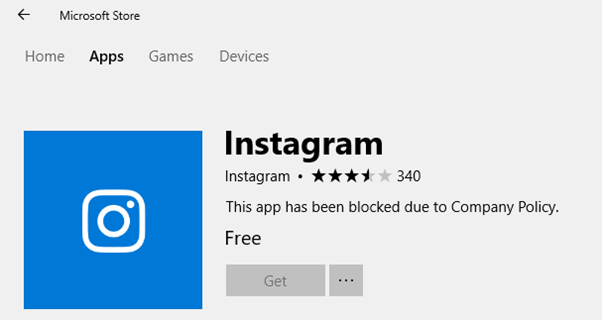

Since we have only allowed Microsoft store apps installation to the built-in Administrators group, if the Azure AD user tries to install any store apps, he will be blocked by policy
Though the Azure AD user (user2@exchangelabs.in) is part of the built-in Administrators group on the machine, Only the built-in administrator or another local user which is part of administrators group can log in and install these store apps
Blocking new application installation / execution - Option 1
Further, we have blocked any file execution outside Program Files and Windows folder
Any existing installed software under windows and Program files \ Program Files (X86) will continue to work for the logged on user. The policy will apply to all users on the machine including built-in administrators and the Azure AD user
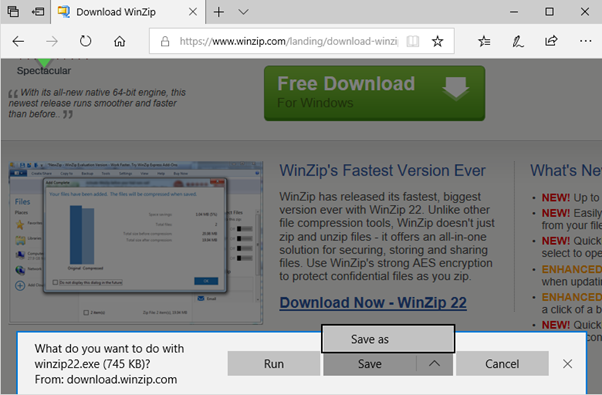
Now one might try to download any software / utility from the Internet directly to the Program Files or Windows folder, access is getting denied.
Since Windows UAC blocks the saving of files within the Program Files or Windows folder directly from internet as shown below
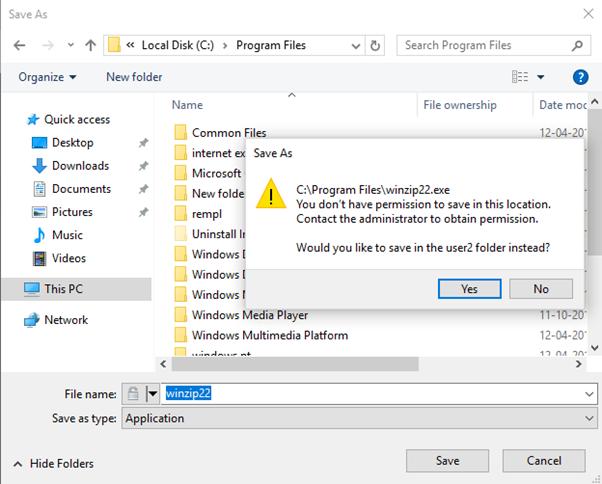
Instead, it allows download files under the User Profile folder.
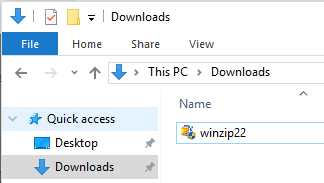
The file downloaded successfully and is now under the User Profile folder.
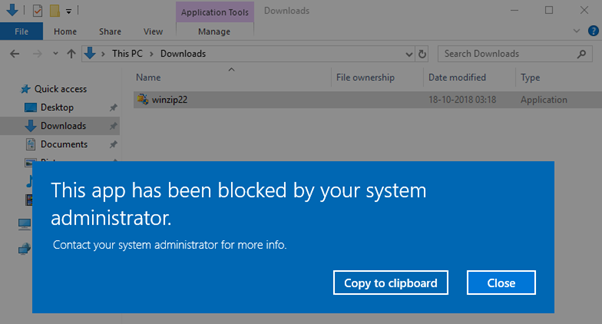
When we try to execute it, now AppLocker policy will block the execution of software as it is not located under the policy scope location (i.e. Windows or Program Files folder)
The Device restriction Policy gives us a message that the application has been blocked by the system administrator, even though user2 is a member of the local administrators group. Application installation will remain blocked for all users on the system, including built-in system administrators.
This could be a problematic situation for BYOD devices as the user is the owner of the system and he doesn't want to lose the ability to install software. In that case, we may add administrators group in AppLocker policy as allowed to execute / install all files and import that policy with an Intune device restriction policy (If management and user both agrees)
OR
We could create separate Azure AD groups for WIP and Device Restriction policies. Now we can for the time being remove the user from the group mapped with device restrictions policy and sync policy updates on the machine. Once changes are synced, we can install any new/required applications on the device and then add the user back to the device restriction group and force a sync. The device restrictions policy will get reapplied and enforced.
Note - Since an Azure AD user has admin rights on the machine, he can download software / utilities from the Internet in his profile and then forcefully copy them to Program Files or the Windows Folder as being administrator with elevated privileges, and then can execute those. However if the application did not support / understand WIP encryption, software execution may fail or produce unpredictable results. WIP policy is configured to protect windows and Program files folders, refer part 1 of series for same.
For Example:
User gets succeeded in copying software binaries under program files with elevated privileges, however, it did not support or understand WIP encryption and failed to execute the application. You can notice the work file icon in the above error screenshot.
Blocking new application installation / execution - Option 2
One more option could be having Device restrictions policy that should be configured with one more rule in addition to the current rules, in order to allow the built-in administrators group to install software at any location under the AppLocker executable rules.
For example:
Now, this policy should be exported from AppLocker console and imported with Device restrictions policy rules after device joined to Azure AD, allow the user to log on to the device with Azure AD identity and check all functionality. Device join process will add Azure AD user to the local administrators group. Now Azure AD user can install any software etc. Once done, ask the user to log off.
Now we have an option to remove the user from local administrators group on the machine from computer management and at the same time we can change local administrator (built-in administrator) password and keep it in a safe place, if there are any additional local users with administrative rights on the machine, they must be disabled
Once Azure AD user is removed from the local administrators group, the user can logon with Azure AD identity but cannot install any software because of lack of admin rights and he also can't unroll the device from Azure AD, since enroll \ unenroll operations also need admin rights. Further, he does not have the local administrator password.
If you need to add the Azure AD user back to the local administrators group, we can do that any time. Logon to machine with the built-in administrator account and run the commands below in an elevated cmd window.
net localgroup administrators "OnpremExchange\user2" /add  ..... If user is synced from on premise active directory, "OnpremExchange" is on premise Active Directory NetBIOS name

OR

net localgroup administrators "AzureAD\user2@exchangelabs.in" /add ..... if user is cloud only user
Once the Azure AD user is added to the local administrators group, he can log on to the machine locally and install software. After that, again remove the user from the local administrators group.
Note - In case you want to install 3rd party applications, ensure from application vendors that application if it is enlighted application OR it can understand WIP encryption and work smoothly at least as unenlightened application
Revoking Encryption Keys
WIP policy contains settings:
- Can revoke device encryption key upon device unenrollment if wanted to.
- If the device is upgraded from MAM to MDM, a setting is available to revoke access to encryption keys and subsequent protected data if wanted to.
Under device management, there are options to Wipe a device which deletes encryption keys along with a factory reset
In Part I, we have already discussed the recovery of encrypted files / data in case of unenrollment or loss of encryption keys
WIP policies and Device Configuration policies (Applocker in our case) would only work if the device is Azure AD joined. The device joins - enrollment is a manual process suitable for workgroup machines. Only a single Azure AD user is recommended per device, meaning multiple users should not be allowed to logon to Azure AD joined devices as the results may be unpredictable.
The WIP's responsibility would be to stop / warn data sharing to unauthorized destinations / recipients. Once a device is joined to the Azure AD, Azure AD provides more safeguard measures such as the Azure Conditional access policy, Azure Information Protection (AIP) to protect data.
It might be painful for organizations to block users local admin rights on Windows 10 BYOD workgroup devices. There may be more sophisticated ways available with Intune and SCCM integration, but SCCM is not factored in for this series.
This technology is evolving day by day and more improvement is expected with Microsoft Intune MDM functionality in near future to provide more precise controls with BYOD scenarios than on-premise infrastructure to motivate work from anywhere scenarios.
I hope this article has been informative. If you found it useful, please click Thumbs-up icon below.
Have a question about something in this article? You can receive help directly from the article author. Sign up for a free trial to get started.
Comments (0)