Improve website response times easily with DNS Settings


Introduction
Not long ago, I discovered an excellent tool called DNS Benchmark, which can help you get much quicker response times from the websites you regularly visit. Authored by Steve Gibson at Gibson Research Corporation, DNS Benchmark improved my website visit response times by about 20-25% so I decided to spread the word a little so that others might also benefit.
Read on to learn how...
Introducing and Using the DNS Benchmarking Tool
DNS (Domain Name System) servers translate Domain names into IP addresses. Like most other things on the Internet, DNS settings can be optimized for better performance, but in order to do that, you first need the means to be able to measure performance. That's where this tool comes into play.
DNS Benchmark is a Precision Freeware tool produced by Steve Gibson. A utility which gives unique, comprehensive, accurate & free Windows (and Linux/Wine) systems the ability to determine the exact performance of local and remote DNS nameservers. It's a standalone tool, which requires no installation.
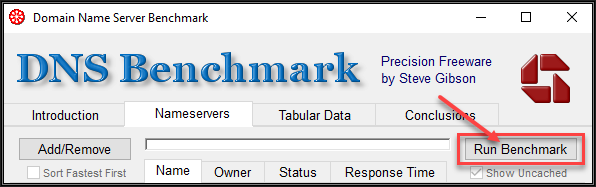
Download the Zip file and extract its contents to any folder on your computer or to your desktop. Now run the DNSBench.exe file and you'll get the Window shown below.
Use of the utility is simplicity itself, so no special IT skills are needed.
Tip! - Click any image to enlarge to full size!

The tool comes with a list of hundreds of publicly available DNS servers to get you started, so click the Nameserver tab as shown in the screenshot above to start a scan and assessment of your current DNS configuration, along with suggestions on a variety of improvements that you can make.
Click the Run Benchmark button to begin a scan and the tool will start scanning and analyzing the best performing DNS servers for "you."
I say for you because what may be ideal for one person, may not be suitable for someone else. That's an excellent feature of this utility because it analyzes "your" particular Internet connection and location and makes suggestions based on what is best under "your" circumstances.
Here's a snapshot of the scan in progress.
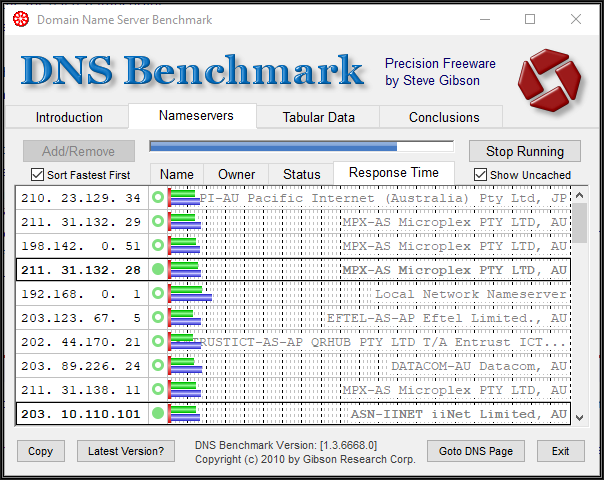
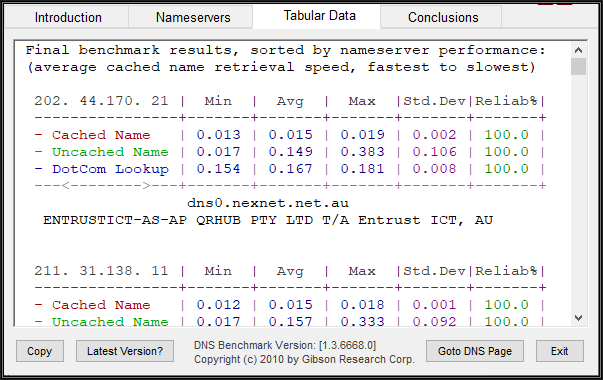
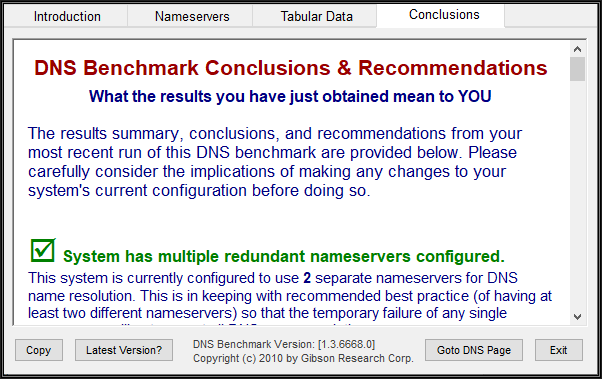
On completion of the scan, a large variety of information and recommendations are available to you. See below for a sample of some of the information given in the Tabular Data and Conclusions tabs.
 |
 |
Most surprising for me was that despite using my ISPs DNS servers, I found a very noticeable improvement in speeds after switching over to other reputable public DNS server providers for no cost. That made the exercise very worthwhile indeed and in my view, speaks volumes about the poor quality of some ISP supplied DNS nameservers.
One thing to keep in mind is that DNS server performance can differ depending on the time of day that you're on the Internet, so it's worthwhile re-running the scan at different times to find the best all-around servers to use.
Note also that you can have the utility build a custom nameserver list of your preferred DNS servers to test against.
Caution: One thing to be wary of when selecting public DNS servers to use, however, is the reputation of the servers that report being the fastest for you. Some servers may cause unwanted re-directions if a web address is entered incorrectly into a browser, so read the documentation that is available with the utility on the GRC Website and/or the statements about redirections on the DNS server provider's website.
All of that and more is explained in the available documentation for DNS Benchmark, so give DNS Benchmark a try - like me; you may be pleasantly surprised at the results and improvements you can make to your overall Internet performance experience.
Changing your DNS Servers in Windows 10
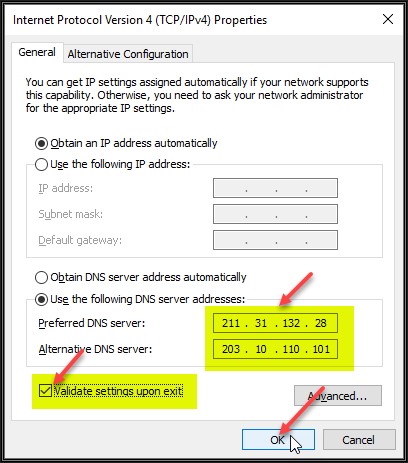
This isn't as difficult as it may sound. Let's assume that the two fastest DNS Servers the tool found have the following IP addresses.
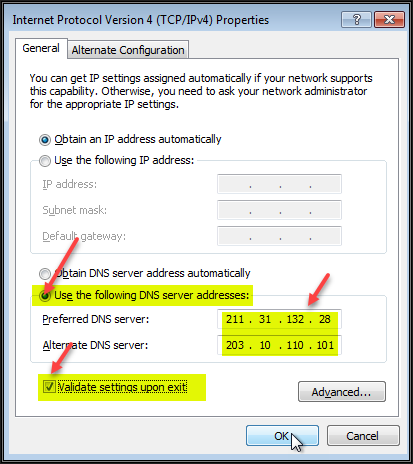
- 211.31.132.28 (Optusnet DNS Server)
- 203.10.110.101 (Netspace DNS Server)
To force Windows 10 to use those DNS servers as primary and secondary, perform the following steps:
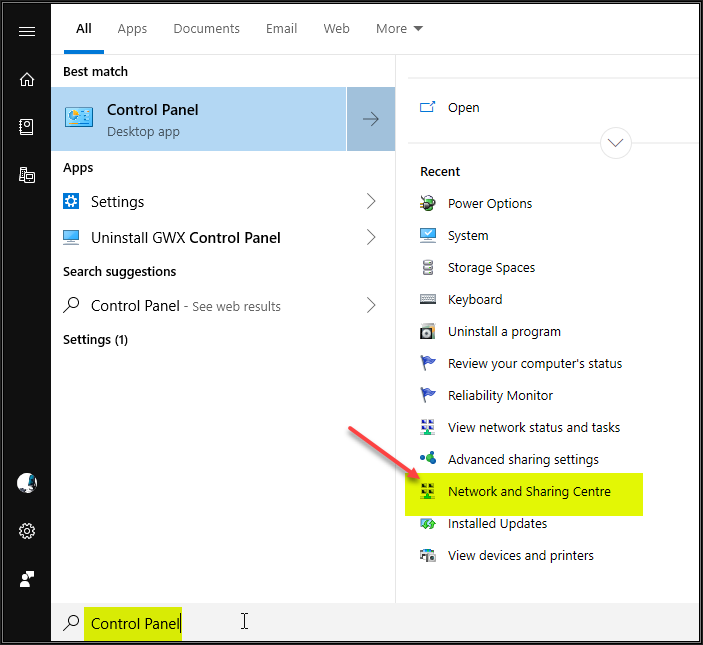
Step 1: Press your Windows Key and type Control Panel > then click the Network and Sharing Centre result in the right-hand pane
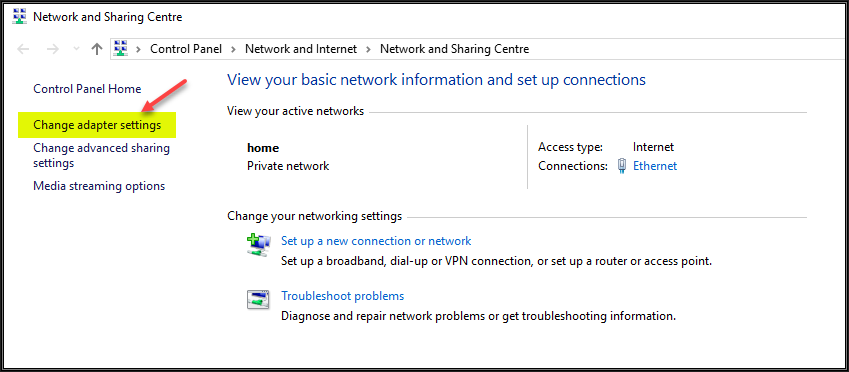
Step 2: In the Network and Sharing Centre window, click on Change adapter settings
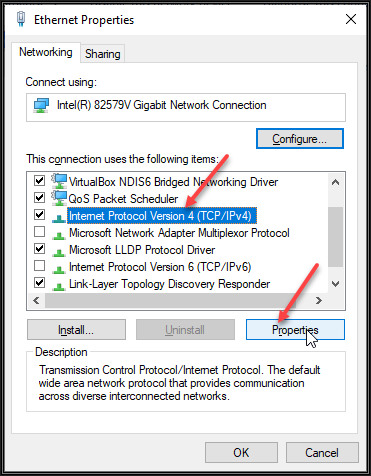
Step 3: In your Network Connections window, right-click your LAN adapter and select Properties

Step 4: The properties window for your LAN adapter will appear. Scroll down until you see Internet Protocol Version 4 (TCP/IPv4) - click it once and then click the Properties button
Step 5: Select the Use the following DNS server addresses: radio button

Step 6: Enter the IP addresses of the Preferred and Alternate DNS servers you want Windows to use. For best results, enter the fastest performing DNS server as "Preferred" and the second fastest as "Alternate"
Once you've populated the IP Settings window with your best DNS options as shown below, place a tick in the Validate settings upon exit box and then click the OK button.
Step 7: Now close the Ethernet Properties window you were at in Step 4 above by clicking the OK button, and you're done.
Close all remaining Windows. If you don't see a noticeable difference with your browsing speeds right away, restart Windows and check again. As mentioned earlier, mine improved substantially.
You can use this process at any time you like to switch which DNS servers Windows will use.
Reversing the above process is just as easy - simply go back to Step 1 above, and when you get to Step 5, select the Obtain DNS server address automatically radio button and continue with Step 6 to click the OK button again.
Changing your DNS Servers in Windows 7
The process to do the same thing with Windows 7 is very similar. It is shown below for the sake of completeness.
Step 1: Click the Start ORB in Windows 7, now right-click Network and select Properties
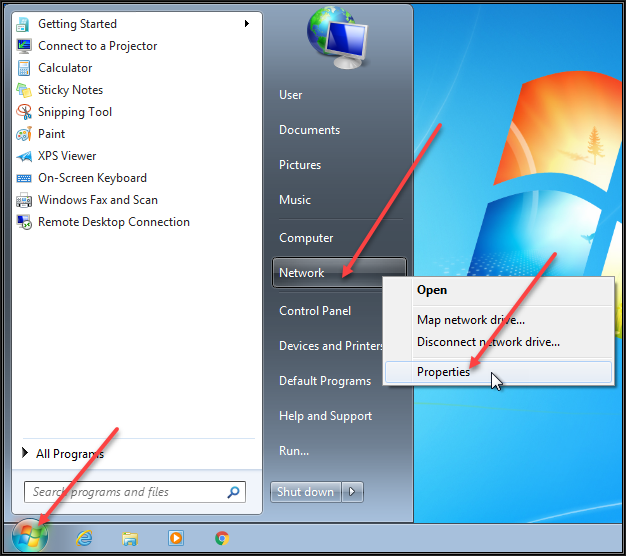
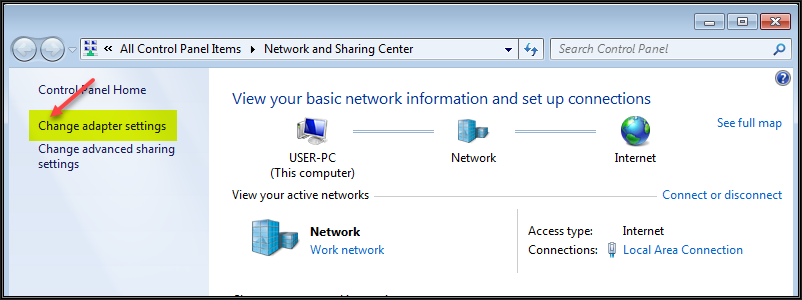
Step 2: Click the Change adapter settings link in the Network and Sharing Center window
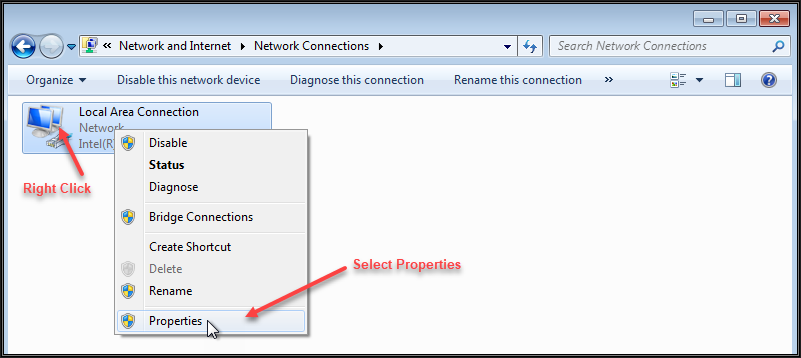
Step 3: Right-click your Local Area network adapter and then select Properties
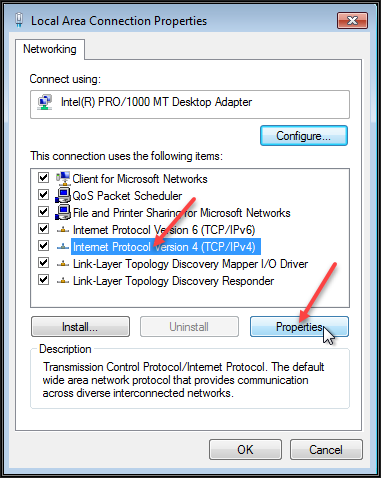
Step 4: Scroll down until you see Internet Protocol Version 4 (TCP/IPv4) - click it once and then click the Properties button
Step 5: Select the Use the following DNS server addresses: radio button and enter the desired DNS server's IP information into the Preferred and Alternate DNS server boxes. Place a tick in the Validate settings upon exit box and then click the OK button
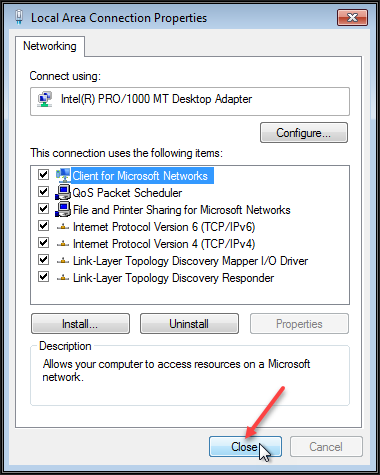
Step 6: Click the Close button as shown below, then close any remaining open windows and you're done.
If you don't see a noticeable difference with your browsing speeds right away, restart Windows and check again. As mentioned earlier, mine improved substantially.
You can use this process at any time you like to switch which DNS servers Windows will use.
Reversing the above process is just as easy - simply go back to Step 1 above, and when you get to Step 5, select the Obtain DNS server address automatically radio button and continue with Step 6 to click the OK button again.
Concluding
I hope you get as much value out of using this tool as I did. Thanks to Steve Gibson for making such a useful little utility freely available to everyone.
Finally, If you think this article will be helpful to others, please do click the Thumbs Up icon to the bottom left of this text. It helps me out and lets me know the direction I should take for future articles that I write. Thanks very much.
Regards, Andrew Leniart

Have a question about something in this article? You can receive help directly from the article author. Sign up for a free trial to get started.
Comments (3)
Author
Commented:Please do share your experiences in the comments section here.
I would love to know if the use of this tool resulted in making as noticeable a difference in response times for you as it did for me when you switched to alternate DNS servers.
Thanks, Andrew
Commented:
Author
Commented:If you wouldn't mind endorsing the article by clicking the Thumbs Up icon at the end of the article (just below the "red arrow pointing downwards to the Thumbs Up icon" above in the article itself) I'd really appreciate it!
Regards, Andrew