

Without getting technical, this process means “turning on bitlocker before anything else”.
Pre-provisioning is something that usually only system admins who create larger deployments will use as part of their task sequences. The process is documented and any admin eager to learn it will be able to quickly google it.
This small article, however, is meant for the experienced end user who would like to do it without task sequences (which he would not have the tools for, anyway). It is also meant for those of you, who run a small pc shop, that have to manually install machines from time to time, and who would like to place the important step of device encryption way up on the to-do list from now on.
Let me tell you why we would even want it this way. Why not instead just install windows and then at some point when you feel like it, for example at night, turn on encryption and let windows do its job?
Good question. Please consider how a normal end-user setup would look like. They would install the machine, it boots up for the first time, then they install the drivers, then start worrying how to migrate data, browser favorites, emails, install a lot of software and then, at the very end, people will remember “oh yes, and I have to turn on encryption again!”, which might take hours after you migrated all the data to your aged HDD.
And maybe, because of some 3rd party software interference, for some odd reason, bitlocker will not even start and leave you with a cryptic error message now that all the software is installed – what then? Use a different product? Start over?
My advice is: if you plan to encrypt, make it your 1st step from now on. Yes, the first thing you do, even before you install windows.
So this small tutorial starts right before we start setup – we have booted setup media and we have the choice to partition the hard drive. The only pre-requisite is to have a ready-for-use TPM module, which we will utilize (TPM being the only protector, no PIN set). In this example, I will use a single partition for windows and data. The partitioning routine of setup will create additional partitions due to how UEFI partitioning works. See these two screenshots:
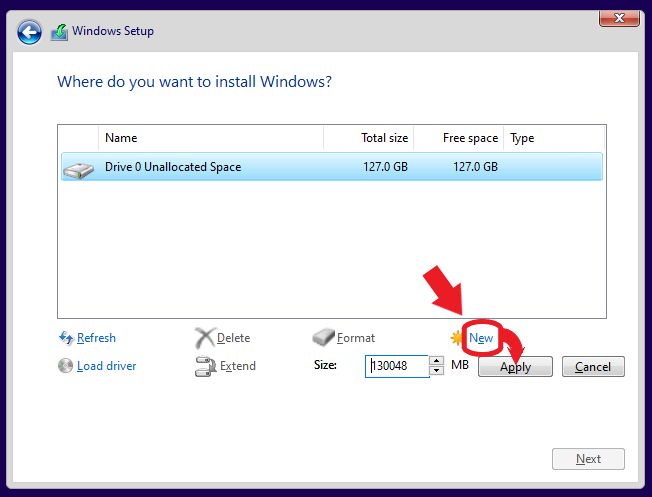
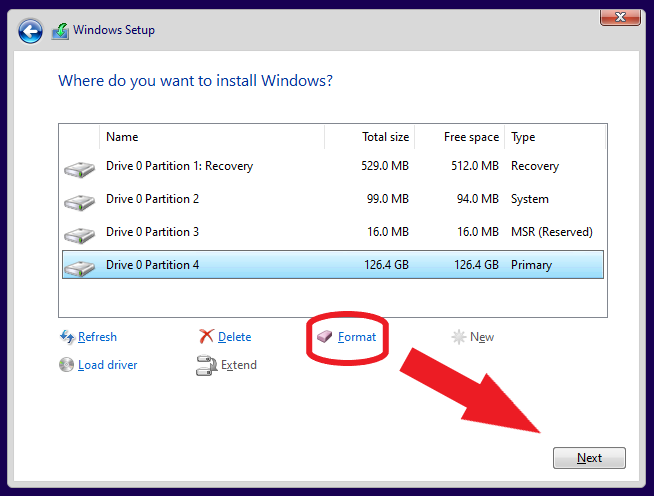
You have to click on format now, with the largest partition (it is already selected) having the focus.
After that, now that you see how large the partition is going to be, it will be possible to identify its drive letter on the command line. To do that, press Shift together with F10 now, so that a command line appears and launch, one after the other, the two commands:
diskpart
list volume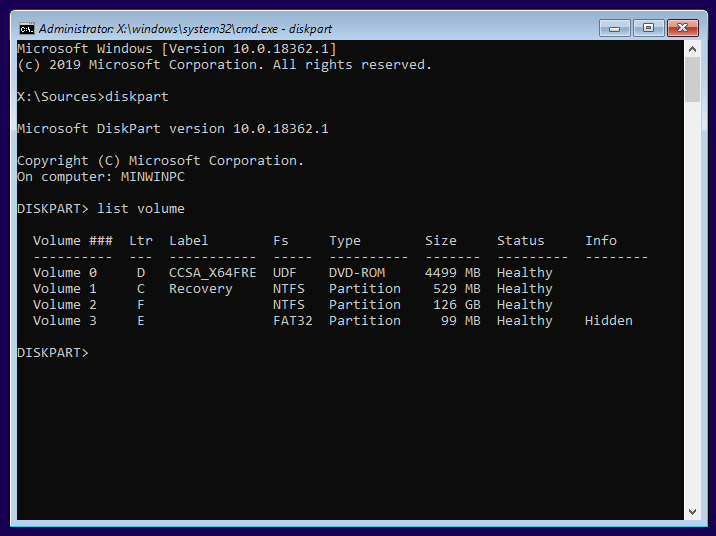
You will see that the volume where windows should be installed is seen as drive F: by setup.
Now let’s pre-encrypt it on the command line. To do that, type “exit” to leave diskpart and use this command to start encryption:
manage-bde -on f: -used[...possibly now an error appears saying you don’t have a TPM. As I told you before, I will assume you have a modern computer, equipped with an active TPM in front of you that you can’t do without]
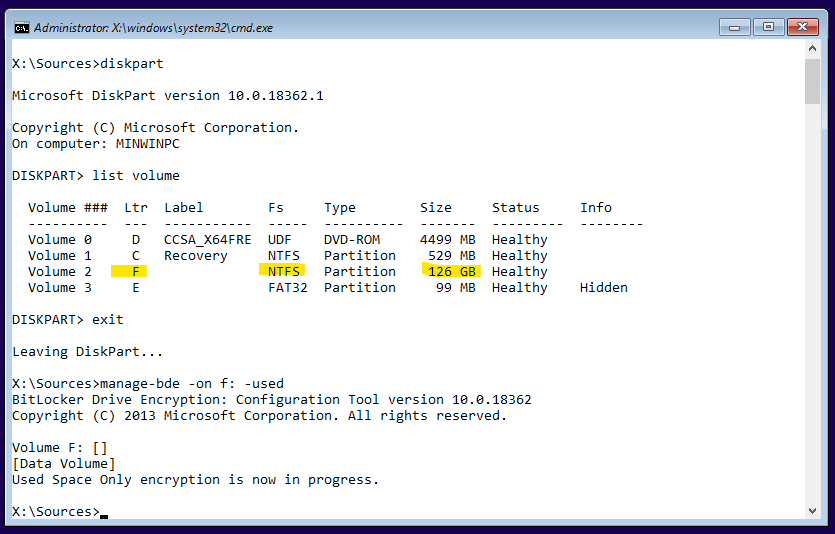
What you should see, is a message that indicates that encryption is in progress. “Great, when will it finish?” you might ask. Good news: Only one second later, IT IS ALREADY DONE, since we utilized the used-space-only option on this empty drive. If you don’t believe that, launch the command:
manage-bde -status f:and see it confirmed: 100% encrypted!
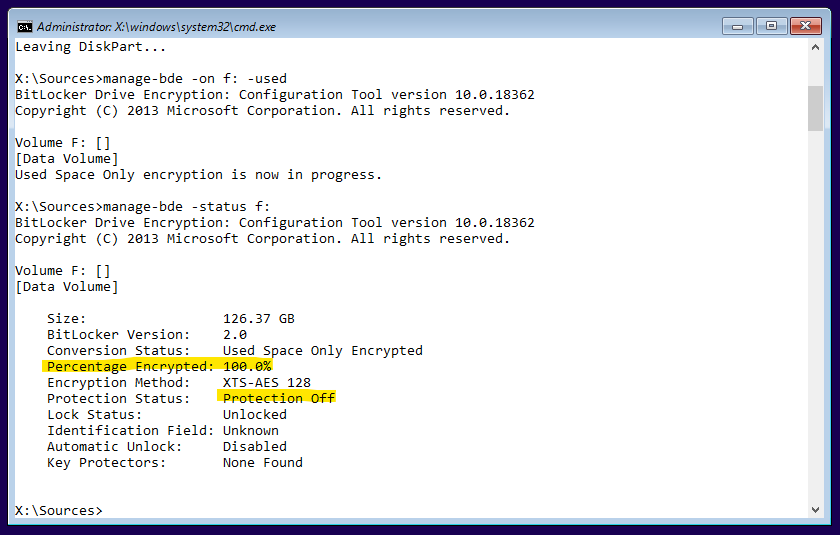
You will also note, that I have marked the words “Protection off”. That means, it is encrypted, but still, the key that protects it is not set. At this point, we cannot set the key – windows needs to be installed, first. So let’s install it now, and keep in mind, what our first action on the new OS will be: we will turn on that protection.
So you just close the command prompt and install windows as usual. After booting and logging on for the first time with an administrative account, we will finish like this:
First, remove the setup DVD or setup USB stick - believe me, that is very important, because of how TPM protectors work. Then, open an elevated command prompt by right-clicking cmd.exe and selecting “run as administrator”. There, launch the command:
manage-bde -protectors -add c: -rp -tpmFine, now before we do the final step, we will save the recovery key to a text file, so that we can print it:
manage-bde -protectors -get c:>%userprofile%\desktop\Recoverykey.txtThat command has created a text file on your desktop which you ought to print out soon and then move it to a backup drive. It holds the recovery key to your encrypted system drive.
The last command will finally enable the protection:
manage-bde -protectors -enable c: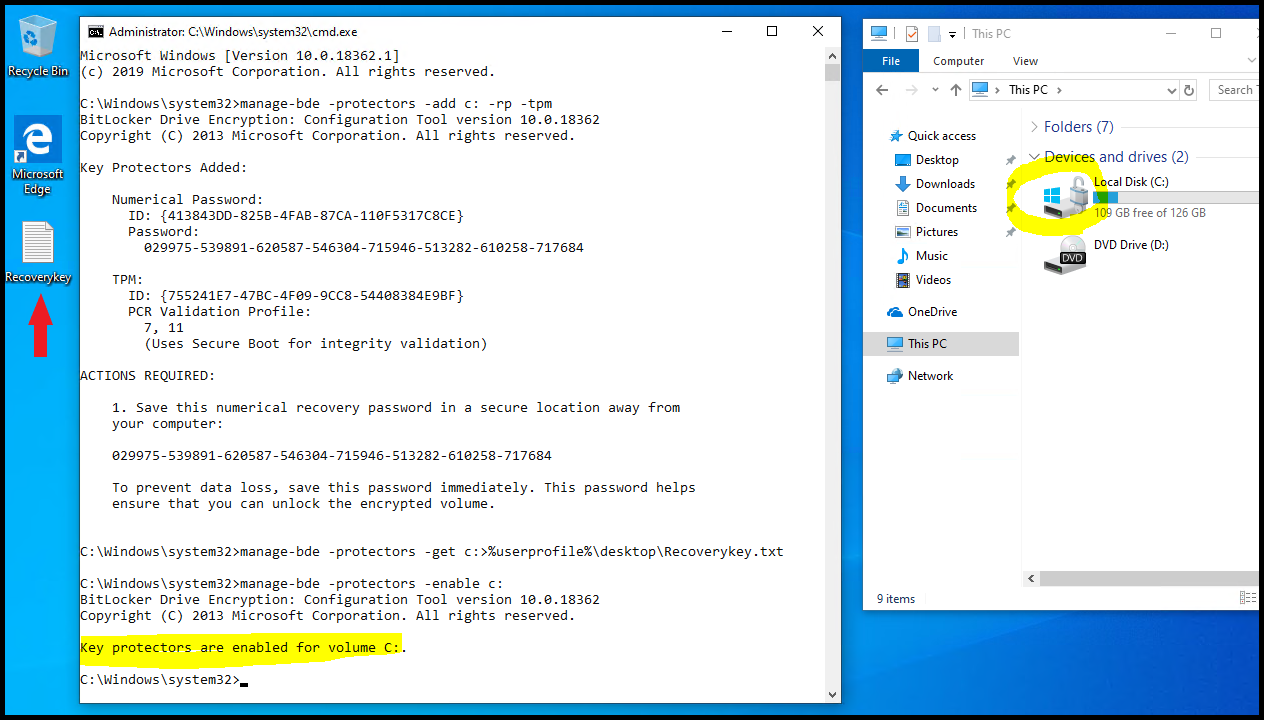
In explorer, you can verify that the lock icon can be seen next to the c: drive now. Feel free to add a PIN for pre-boot authentication, now, if needed.
That’s it. If you have questions, feel free to ask a related question in the forum.
Have a question about something in this article? You can receive help directly from the article author. Sign up for a free trial to get started.
Comments (1)
Commented: