The Best Part About Waking Up, Is Your Own Roasted Coffee In Your Cup.


Coffee is one of the most widely consumed beverages on earth and I think it is safe to say that our group of tech professionals index high in the consumption of coffee . We start off remembering that aroma as a child, and at some point in life, take our first sip, probably lots of cream and sugar or some form of a specialty drink. About 35% of us go on to drink it straight black.
Coffee makes us feel so good because it is able to tap into virtually every reward system our brain has evolved. Hidden within that hot elixir is a chemical that takes over your brain by mimicking the actions of cocaine and marijuana. Psychologytoday.com
However you take it, we can agree that it wakes us up and keeps us going. I know I have spent many nights trying to make a deadline or chasing that bug down with the boost coffee provides.
Today, I enjoy drinking good coffee for pleasure and to relax and take in the flavor. At least in the U.S., it is sad to see the coffee isle transform from selling beans you can grind at the store to mostly K-Cups, burnt flavor Starbucks or cheap ground coffee brands like Folgers. The choices are going down in the name of convenience. Do you like the flavor of stale or burnt grounds that you have to hide by adding cream, sugar, and other flavors?
There are better options. You can enjoy good tasting coffee without dousing it with the chemical-induced creamers. You could just experiment with the higher-priced beans and grind them yourself and throw that Krueg in the trash. The best option I found is roasting your own.
If you have never tried freshly roasted coffee, you are missing out on something special. I have been roasting my own coffee for the past few years, and it is a lot easier than you would think or were led to believe.
Just like there are many factors that go into speeding up your database, there are even more factors that go into the taste of your coffee. It starts with the region where the coffee plants are grown and that season's weather. Followed by how the coffee is processed once it is harvested. Then all the nuances of the roasting process, including time and temperature, where slight variances in either can change the taste profile.
The water you use is also a factor (Use filtered water), how the coffee is ground (fine or coarse), and the process used for brewing. All the options are mind-blowing if you go down that rabbit hole. If you enjoy being scientific and are very meticulous, that option is open for you. If you want to see some good geeky options, check out coffeelabequipment.com
I really went deep into coffee about eight years ago as a friend of mine was working on an app to help coffee geeks figure out exact measurements, timing, and grind size. He was a scientist and spent a lot of time experimenting with every option from types of water to grind size. It was more information than I could handle, but I did take in some good nuggets. If you look up some youtube videos on brewing coffee, you will see folks with $5,000 of equipment that takes 15 minutes to brew one cup. That is not for the average person and just pushes you to the dark side of the Krueg.
I am here to tell you while you can make the process of roasting your coffee complex and use expensive gadgets, it can also be inexpensive and easy which is the route I take. I am going to provide the process I use to roast my own and create the best-tasting coffee.
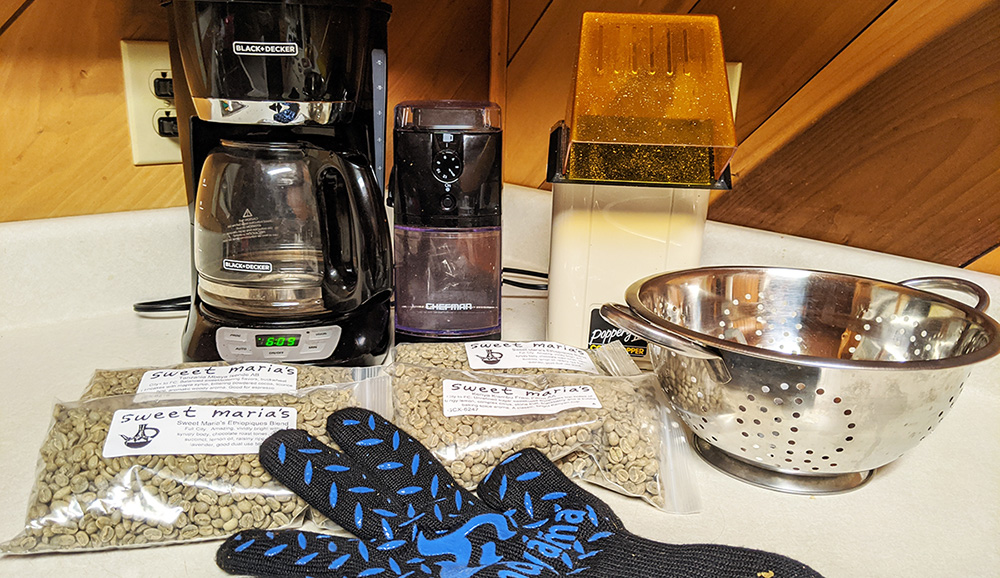
Above is a picture of my entire set up with a combined cost less than a Keurig. An inexpensive Black and Decker drip coffee maker, about $20. A lower end burr grinder, about $30 and finally, my current roaster, an air popper I found at a thrift store for $3. I do have a $600 Gene Cafe roaster that works nicely although it has been down and have not used it in a while. The air popper is an appropriate replacement. I have tried other methods and of the alternatives, such as using a cast iron over an open fire, which looked cool, but didn’t work out as well.
Before we roast, we need to get some green coffee beans. I source mine from Sweet Maria's Green Coffee. There is a lot to choose from and it is worth the time to review the expected flavor profiles that are described. I start my choices by filtering for “Good for Espresso” “Dark Chocolate” and “Brown/Burnt Sugar” flavor profiles. I have tried multiple beans and those options have always been good for my pallet. The beans go for about $5.50 to $6.50 per pound. I try several varieties at a time.
One that turned out extremely well is Tanzania Mbeya Isende AB. The cupping notes read, “elements of buckwheat pancakes with maple syrup, bittering powdered cocoa, licorice hint, and an aromatic woody aroma”. My own experience was dark chocolate with buttery overtone and I guess that is where the “pancake” comes in. Very smooth and enjoyable.
Getting to the roasting, I am going to explain in simple terms what I do. Keep in mind I have already done a lot of research and study on all of this. I understand the complexities that are involved. I choose to ignore most of that because I found this works for me and I am also not prepared to spend thousands of dollars on top of the line consumer equipment or get so detailed in the minutia it takes away from the experience. The Sweet Maria’s site has some great information and videos on roasting and roasting levels. I highly recommend reviewing the site and internal links at Sweet Maria's Roasting.
The equipment you will need are your green coffee beans, an air popper, a couple of bowls (metal colanders preferable), some heatproof gloves and something to store your roasted coffee in (I use glass mason jars) and a timer is nice to have (I use my phone). I also keep something to take notes on handy.
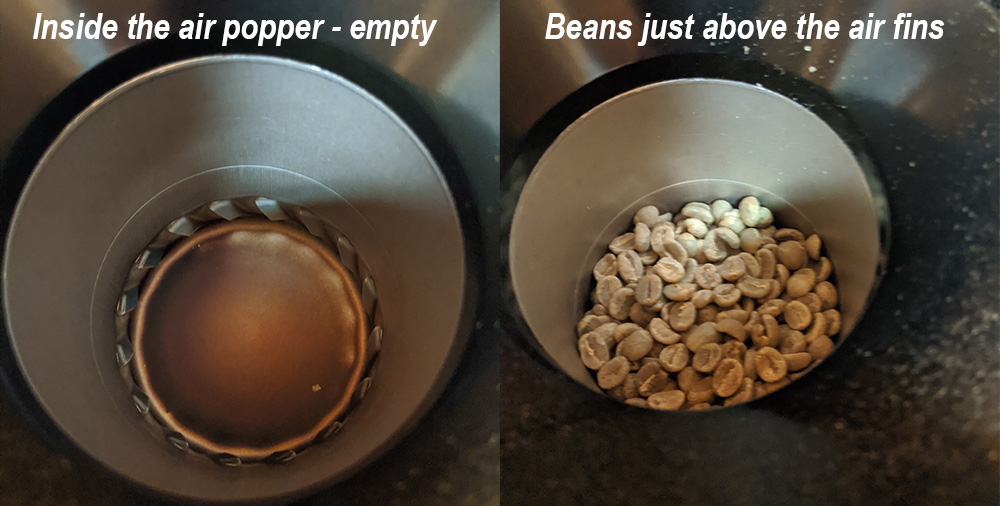
I start off by putting at most an 8oz cup of green beans in the air popper. The amount will depend on your popper. I try not to go too much over the inside fins.
Put on your heatproof gloves and start the popper, then start your timer. I hold on to the popper and lean it back slightly to prevent beans from flying out. Every 15 seconds give it several small shakes to make sure the beans are getting air circulated.
Within the first minute or so, you will start to see the skin of the bean flying out. This is called chaffe. Which reminds me, do this outside or in the garage as the flying chaffe can get messy. Also, at this time, the smell is not what you expect. That good smell comes tomorrow.
Sometime between 1.5 and 3 minutes you will start to hear a popcorn sound. This is the bean going through “first crack”. It is just after this time that you can start using the bean for coffee if you were to stop the roasting process, but let’s take it deeper. Make sure to make a mental note on your timer when you first start hearing the popcorn sound and when it ends.
Probably within the 5 and 7 minute mark (Your mileage may vary), the beans will turn from tan to dark brown, you will start to see some smoke and at some point hear a different type of cracking sound. It will be faster cracking in a higher pitch. Almost like the snap, crackle, pop of Rice Krispies. This is called the second crack. It is just as the second crack is starting when I pour the beans to the metal colander then unplug/turn off the popper. Make sure to note the time you heard the second crack and when you poured the beans.
Like any type of cooking, the beans are coasting and still cooking. We need to cool them down to stop. Do this by twirling them around a little in the metal colander and pour the beans from one colander to the other. As the beans hit the colander, twirl them around some more. This action helps to cool the beans.
As the beans cool down and are just warm to the touch, they can go into the glass mason jar. Then repeat the process 2 or 3 more times. 30 to 40 minutes' time roasting like this will give you a week's worth of coffee.
There are a lot of words here, so to simplify:
- About 1 cup of green beans into the popper
- Turn the popper on and about every 15 seconds give the popper some shakes keeping it tilted back in order to keep the beans in.
- Probably between the 1.5 and 3 minute mark you will hear a deep popcorn sound. This is known as first crack. After the cracking stops, you could stop the process and use the beans for coffee.
- Within the 5 to 7 minute mark, you should notice the beans turn a dark brown, and then will see some smoke and eventually hear a higher-pitched crack like Rice Krispies. This is called second crack. Just as second crack starts, pour the beans into one of the colanders and cool the beans by pouring them from one colander to the other.
- As the beans cool to warm, pour them into your mason jar and repeat 2 or 3 more times.
As you repeat, keep a mental note of the time. The second round will go faster than the first and subsequent rounds will be about the same as far as timing. Keeping time helps in consistency. Weather will affect roasting time too. It will take longer in colder weather.
The air popper method goes fast and different brands will go faster than others. The more expensive roasters are controlled where you can set the temperature to extend the roast time closer to 15 minutes which of course gives you more fine control over the process. I have been happy with my popper method though.
Now that your beans are in the mason jar, put the cap on but do not screw the top on tight at this time to allow for gas build-up. Keep the beans in the jar for 12 to 24 hours. During this time the flavor fully develops... After about 8 to 12 hours, take the top off the jar to allow the built-up gas to escape and take a moment to enjoy that fresh coffee smell. Now you can screw the top on tight.
As you become more aware of the roasting time, you can experiment taking the beans out midway between first and second crack, just at second crack and just as second crack is ending. You can use this experiment to see which gives the best flavor for you. You can also blend these together. Your first time may take a little longer as you become comfortable.
I am confident anybody reading here will do a good job with roasting. Look at how many people we help fix their computers. Many of those fixes are not that complicated and our friends, family, and clients come to us because they just lack confidence or willingness to experiment. This group is a fine bunch of tinkerers that are not afraid to try, fail and try again until it’s right. Roasting is just like that and the outcome is a truly enjoyable cup of coffee, especially because you did it!
I dedicate this article to a friend, Greg Mayworm. Greg was an inventor and coffee connoisseur. He spent the past decade roasting coffee and studying coffee flavor analysis, ultimately developing an app and patented grind analysis process to improve coffee flavor accuracy. I worked with him a little on his project that opened up my eyes to how complex and interesting this process can be.
Have a question about something in this article? You can receive help directly from the article author. Sign up for a free trial to get started.
Comments (1)
Commented: