

Migrating email to Exchange Online
These years, many small organisations move their email services from some hosted email service to Exchange Online. The reasons can be many:
- cost
- the provider closes down
- limited storage
- better integration with Microsoft Office
- consolidating subscriptions
- better web interface
If you use Outlook for the desktop, users will have their mailbox saved locally, and moving email services to another provider could simply be to export the pst file to the new provider. However, for more than a couple of users, this will be a lengthy procedure and hard to verify, not to mention that the users' machines must be online during the export which can take many hours, a night, or even one or more full days.
Thus, facing a handful or more mailboxes to migrate, you quickly realize that some other method must be chosen.
The migration tool
Searching for such a migration tool reveals many offerings. Some "priceless" (for large corporations) or just very expensive, but some seem fairly priced, and one of these is KernelApps' Kernel Migrator for Exchange - Express Edition.
For the rest of the article, this will labeled the tool.
When launched, the tool runs in a wizard style that focuses on the three main steps:
- setting the source
- setting the target
- run the migration
Could it be that simple, there would be no article here, so I'll list some traps and tips that could save you some time.
Steps to consider
1. Bulk migration
Bulk migration of mailboxes would be nice and the tool supports this. However, while you in most cases will have full administration privileges for users and mailboxes, you most likely will have no control over a hosted Exchange service because many other clients are sharing this. If so, you can't run, say, PowerShell scripts or take other administrative steps on the server to prepare for a bulk migration.
So, in many cases you cannot get access to all mailboxes simultaneously. Thus, you may be left with migrating a single mailbox at a time. Fortunately, the tool can be launched multiple times, allowing you to run, say, six instances, that each migrates one out of six mailboxes.
In the following, only migration of a single mailbox is explained.
2. Administrator account required
For some reason, the tool insists on running in Windows with an administrator account. I have yet to figure out why, as the tool doesn't write anything to the Windows workstation apart from saving some log files as CSV files.
3. Localisation must be English
This is an important step.
The tool expects both the source mailbox and the target mailbox to "speak English", meaning that the default and mandatory email folders like Inbox and Junk must be named as such. If not, the tool will not find these in the source and/or will create them with the default English names in the target, which may not be so easy to alter later.
To modify the localisation, open the user's mailbox via Outlook Web Access (WOA) and adjust the language.
4. Setting the source mailbox and the target mailbox
Several sources and targets may be set, which can be useful for migrating shared email accounts. However, start with a single mailbox:
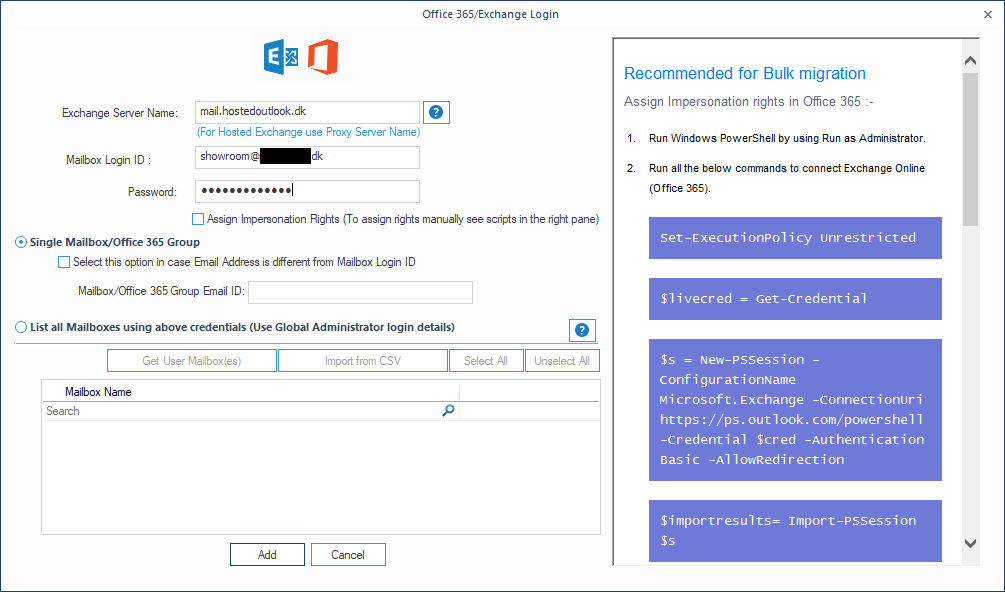
This seems simple and fast to do, and it is if you have all exact details and credentials. However, if you don't and have pressed Add, there is no way back other than to start from scratch. For some reason, you cannot edit the settings, and as these can be hard to remember, and some errors first will show up when attempting the actual migration, you should write down the details before pressing Add or take a screenshot as done here.
The settings for the target is similar:
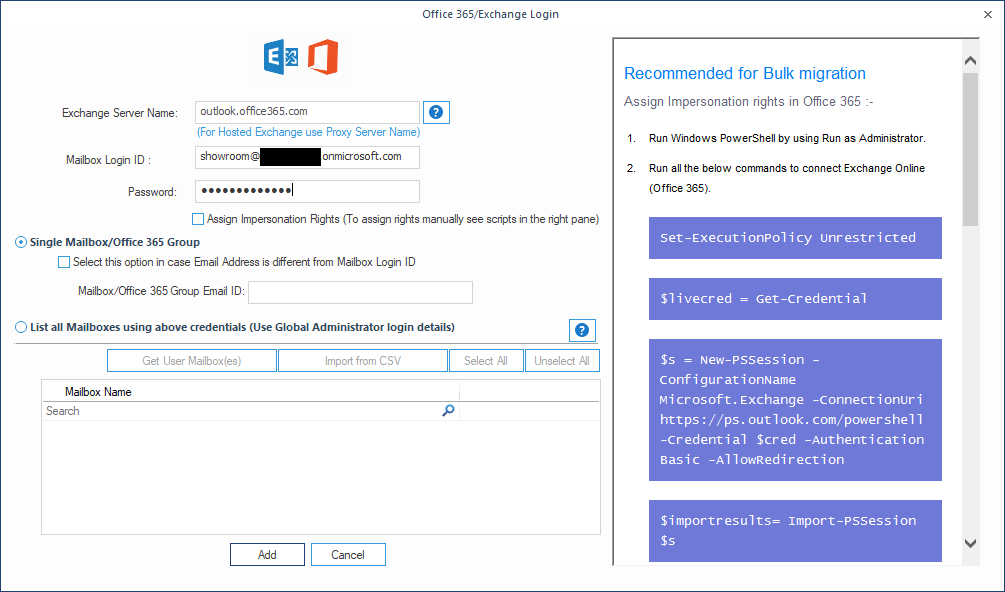
Again, do take a screenshot in case you are unsure about some setting or may have misspelled something.
5. Migrate
When ready, initiate the migration. It will start at once, displaying successful progress in green and errors in red.
In case of errors, remember that you can't modify the settings for the source or target; if that is what you need, delete the setting and recreate it.
Most often, the only thing to modify on the servers themselves is - as mentioned above - the localisation via WOA.
The migration will take some time. If you are on a 100mb/s fiber, a small mailbox will migrate in minutes while a larger - above 10GB - will require some hours. If the source server is slow, be prepared for longer times. Likewise, if you are on a slow to medium speed line like an xDSL connection, a large mailbox may take a day to migrate.
In case of an interruption (loss of power or connection), don't panic; the tool has a default setting that skips duplicates, so just start the migration again, and the tool will skip those mails and calendar entries already migrated.
6. Documentation
When the migration has run to end, a CSV file can be created, and that is highly recommended. In case of errors, it may show important information.
If successful, it will serve as documentation for the process. Here is an example:
"Mailbox","Folder","Status","Item Count","Error Details"
"showroom@eksempel.dk","Arkiv","Success","0",""
"showroom@eksempel.dk","Indbakke","Success","38",""
"showroom@eksempel.dk","Indbakke\Fagligt","Success","8",""
"showroom@eksempel.dk","Info til lager","Success","0",""
"showroom@eksempel.dk","Journal","Success","0",""
"showroom@eksempel.dk","Kalender","Success","1232",""
"showroom@eksempel.dk","Kalender\Fødselsdage","Success","0",""
"showroom@eksempel.dk","Kalender\Helligdage i Danmark","Success","115",""
"showroom@eksempel.dk","Kladder","Success","0",""
"showroom@eksempel.dk","Kontakter","Success","0",""
"showroom@eksempel.dk","Kontaktpersoner","Success","0",""
"showroom@eksempel.dk","Noter","Success","0",""
"showroom@eksempel.dk","Opgaver","Success","0",""
"showroom@eksempel.dk","RSS-kilder","Success","0",""
"showroom@eksempel.dk","Samtalehistorik","Success","0",""
"showroom@eksempel.dk","Sendt post","Success","19",""
"showroom@eksempel.dk","Synkroniseringsfejl","Success","0",""
"showroom@eksempel.dk","Synkroniseringsfejl\Konflikter","Success","0",""
"showroom@eksempel.dk","Synkroniseringsfejl\Lokale fejl","Success","0",""
"showroom@eksempel.dk","Synkroniseringsfejl\Serverfejl","Success","0",""
"showroom@eksempel.dk","Udbakke","Success","0",""
"showroom@eksempel.dk","Uønsket mail","Success","0",""
Summary
If you are facing a migration task to Exchange Online for more than very few mailboxes, do consider using a tool for the purpose. It will save you much time, streamline the process, and - important if the task has been delegated to you for a client - provide documentation for the result. Features and options varies between the offerings, but the tool described here, Kernel Migrator for Exchange - Express Edition, has all what it takes without being flooded with useless features.
Please do not forget to press the "Thumbs Up" button if you think this article was helpful and valuable for EE members.

Have a question about something in this article? You can receive help directly from the article author. Sign up for a free trial to get started.
Comments (0)