Using an old Apple Time Capsule for high-capacity Time Machine storage


Published:
Edited by: Andrew Leniart
Browse All Articles > Using an old Apple Time Capsule for high-capacity Time Machine storage
Turn an old Apple Time Capsule into a large-volume RAID network backup server.
If you have an older Apple Time Capsule lying around, chances are it's stuck in a drawer somewhere, maybe with a dead power supply. The entire Time Capsule product line is an example of good overall design being killed by aesthetic modifications. They just run too hot, every last one of them, and for no good reason. But their greatest shortcoming is the internal hard drive. The largest drive Apple ever put into a Time Capsule was 3TB. We're going to blow that out of the water, using a 1st-gen Time Capsule that originally shipped with a 500GB internal HD.
Google around, and you'll find that LaPastenague and others have good how-tos for outfitting that dead TC with an external power supply:
https://sites.google.com/site/lapastenague/time-capsule-power-supply-repair-kits
My advice here is to go with an external 5VDC power supply, and remove the internal hard drive. We're going to fool the TC into using a large external RAID as if it were the TC's internal HD.
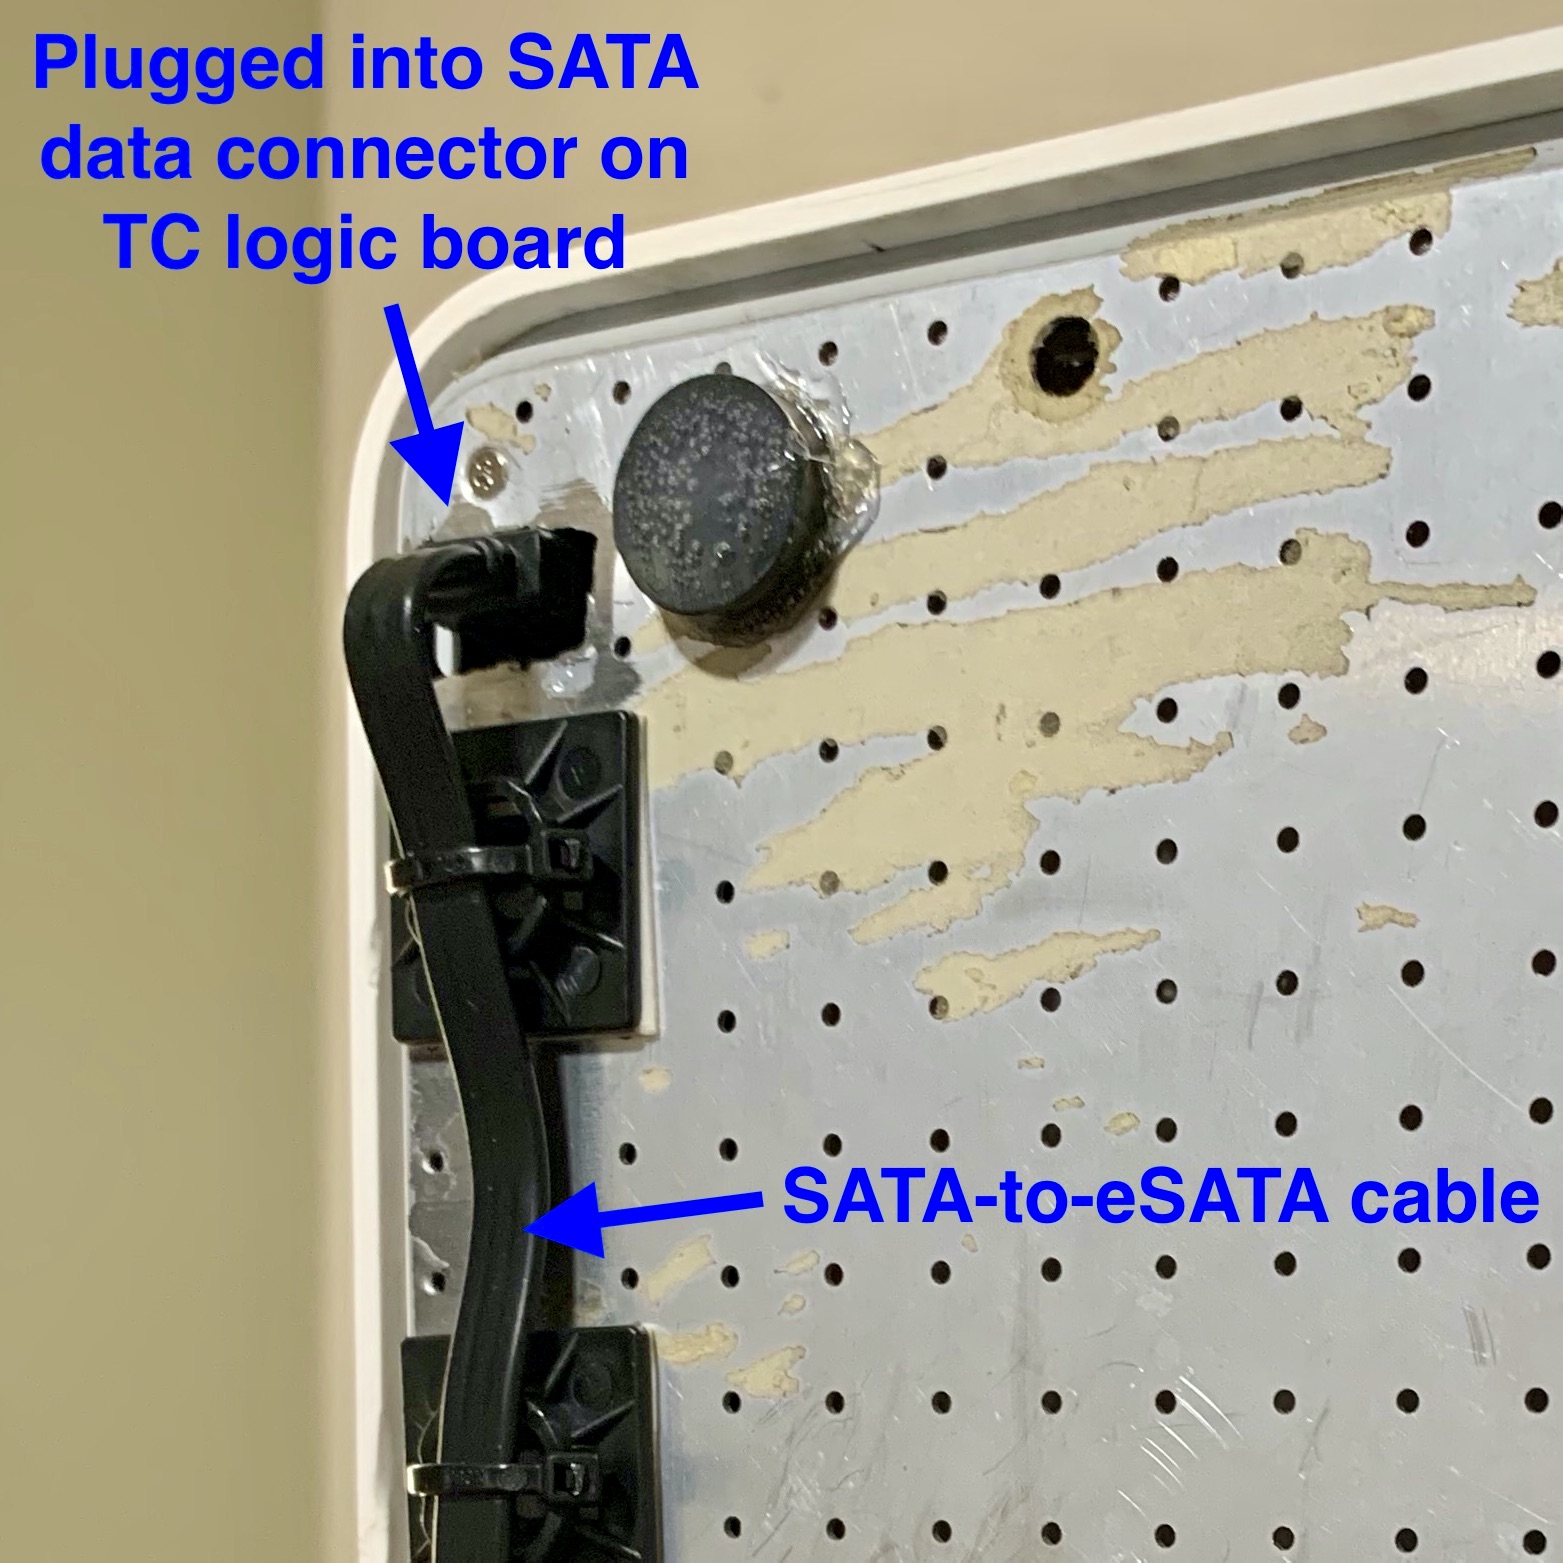
While you're drilling ventilation holes in the aluminum base plate, drill out a hole that allows access to the SATA data connector on the TC logic board. It's on the underside of the board, near the front corner opposite the status light.
Get yourself a hardware RAID enclosure with an eSATA interface (should have USB as well). I used this one:
SANS DIGITAL TowerRAID TR4UTBPN 4-Bay 3.5" SATA to USB 3.0 / eSATA Hardware RAID-5 Storage Tower
Get some decent hard drives, depending on how much space you want (I used 6TB drives), and a SATA-to-eSATA cable, something like this:
Rosewill RC-3.28-SATA-MM-BK - 3.3-Foot Black Flat eSATA to SATA Cable
Get the RAID set up in whatever disk configuration you prefer. I like RAID 5, but suit yourself. Once your RAID is running, connect it to your Mac and open Disk Utility. Your RAID should appear as an external device. Select the RAID in Disk Utility, and look to the bottom right to find the "Device:" designation. Should be something like "disk2" or "disk3" depending on how many drives are connected to your Mac. That number -- 2 or 3 or whatever -- is "X" in the command below.
Open Terminal, and type the following command:
This will format your RAID as one large non-journaled HFS+ partition. Trust me, this is the way. Once this is done, eject the RAID from your Mac and connect up the SATA-to-eSATA cable between the RAID and the TC.
Power up the TC. The first thing it will do, once it finds that single large non-journaled HFS+ drive, is repartition it into three journaled HFS+ volumes -- APconfig (1.07GB), APswap (1.07GB), and a third volume comprised of the remainder of the RAID. This will be the data volume once you format it using AirPort Utility (edit the TC in AirPort Utility, then click the Disks tab, then select Erase...). You can now point your Time Machine backups to the Time Capsule, and it will happily store them on the RAID.
For best performance, disable WiFi and routing on the TC, allowing it to focus all its CPU toward being a hard-wired network Time Machine server.
So...why not just buy a new NAS? One, because nothing "just works" for Time Machine network backups like a Time Capsule. It's stupid easy. Two, because it's relatively low-cost. Most of the less expensive NAS units out there only have a couple of drive bays. If you want to run a RAID 5, and/or want a really large backup volume, you really need at least four drive bays, not just two or three. This solution cost me $785 for an 18TB RAID 5 using five 6TB drives (four in the enclosure, plus a cold spare because yes you should). A similar-capacity QNAP or Synology is 2-3x more.
Three, bragging rights. This is an 18TB first-gen Time Capsule, for crying out loud. Put it on your coffee table and impress your friends.
Google around, and you'll find that LaPastenague and others have good how-tos for outfitting that dead TC with an external power supply:
https://sites.google.com/site/lapastenague/time-capsule-power-supply-repair-kits
My advice here is to go with an external 5VDC power supply, and remove the internal hard drive. We're going to fool the TC into using a large external RAID as if it were the TC's internal HD.
While you're drilling ventilation holes in the aluminum base plate, drill out a hole that allows access to the SATA data connector on the TC logic board. It's on the underside of the board, near the front corner opposite the status light.
Get yourself a hardware RAID enclosure with an eSATA interface (should have USB as well). I used this one:
SANS DIGITAL TowerRAID TR4UTBPN 4-Bay 3.5" SATA to USB 3.0 / eSATA Hardware RAID-5 Storage Tower
Get some decent hard drives, depending on how much space you want (I used 6TB drives), and a SATA-to-eSATA cable, something like this:
Rosewill RC-3.28-SATA-MM-BK - 3.3-Foot Black Flat eSATA to SATA Cable
Get the RAID set up in whatever disk configuration you prefer. I like RAID 5, but suit yourself. Once your RAID is running, connect it to your Mac and open Disk Utility. Your RAID should appear as an external device. Select the RAID in Disk Utility, and look to the bottom right to find the "Device:" designation. Should be something like "disk2" or "disk3" depending on how many drives are connected to your Mac. That number -- 2 or 3 or whatever -- is "X" in the command below.
Open Terminal, and type the following command:
diskutil eraseDisk HFS+ RAID /dev/diskX
This will format your RAID as one large non-journaled HFS+ partition. Trust me, this is the way. Once this is done, eject the RAID from your Mac and connect up the SATA-to-eSATA cable between the RAID and the TC.
Power up the TC. The first thing it will do, once it finds that single large non-journaled HFS+ drive, is repartition it into three journaled HFS+ volumes -- APconfig (1.07GB), APswap (1.07GB), and a third volume comprised of the remainder of the RAID. This will be the data volume once you format it using AirPort Utility (edit the TC in AirPort Utility, then click the Disks tab, then select Erase...). You can now point your Time Machine backups to the Time Capsule, and it will happily store them on the RAID.
For best performance, disable WiFi and routing on the TC, allowing it to focus all its CPU toward being a hard-wired network Time Machine server.
So...why not just buy a new NAS? One, because nothing "just works" for Time Machine network backups like a Time Capsule. It's stupid easy. Two, because it's relatively low-cost. Most of the less expensive NAS units out there only have a couple of drive bays. If you want to run a RAID 5, and/or want a really large backup volume, you really need at least four drive bays, not just two or three. This solution cost me $785 for an 18TB RAID 5 using five 6TB drives (four in the enclosure, plus a cold spare because yes you should). A similar-capacity QNAP or Synology is 2-3x more.
Three, bragging rights. This is an 18TB first-gen Time Capsule, for crying out loud. Put it on your coffee table and impress your friends.
Have a question about something in this article? You can receive help directly from the article author. Sign up for a free trial to get started.
Comments (0)