Turn an old laptop into pH measurement of a fish tank station by arduino and visual studio code

Nadir ALTINBAS![]() GSM Mainten. &Commis. Engr BS.,A. Ec., Professional | IBM z/OS Mainframe Practitioner
GSM Mainten. &Commis. Engr BS.,A. Ec., Professional | IBM z/OS Mainframe Practitioner
 GSM Mainten. &Commis. Engr BS.,A. Ec., Professional | IBM z/OS Mainframe Practitioner
CERTIFIED EXPERT
Published:
Edited by: Andrew Leniart
Browse All Articles > Turn an old laptop into pH measurement of a fish tank station by arduino and visual studio code
Turn an old laptop into a pH measuring station, such as under the structure of a fish tank controller, by Arduino and Visual Studio code.
Turn an old laptop into pH measuring station by Arduino and Visual Studio Code.
Instead of disposing of an old laptop that's not suitable for upgrading to a current operating system, consider modifying it to be reused as a Chemical pH measurement system with the code blocks we'll discuss here.
Here's a list of hardware that will be needed:
Here's how the kit would be assembled:
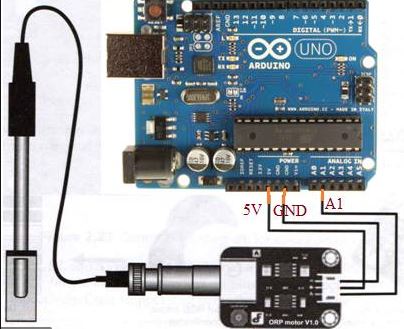
Figure 1 shows the component connections
As a first step, we must determine how often you will be reading the pH data from the station. If it's going to be rare, then you may prefer a Visual Studio coded user form that can be used to read data from the sensor. (See Figure 2).
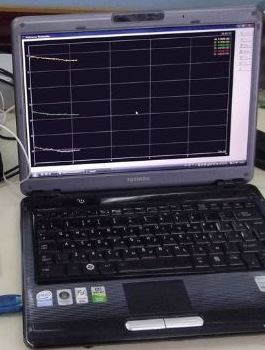
If you expect to get scrolling data output of Arduino serial monitor (Below Figure 3; Arduino Emulator Coding Interface from Tools menu of Arduino Emulator), then installing Arduino emulator to the laptop is a better choice. The code is available at the following link;
Reference link
https://create.arduino.cc/projecthub/atlasscientific/arduino-ph-sensor-calibration-ea1b65
The Arduino code is as follows;
Figure2; The VCS User Form for serial data monitor;
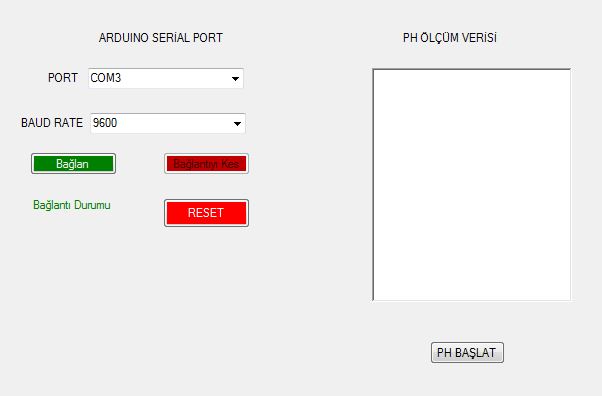 Figure 2
(Optional)Visual Studio Code for Arduino serial read.
To code the VCS User Form for serial data monitor is mentioned below as a tutorial. The thumb of hand and user form should at least consist of port and baud rate, list box, connection, close connection button, pH data box, and measuring start button.
You may be want to add combo boxes by the more extra HW function features like use by connecting dc servo motor or more other sensors to hardware list on user form of our project. Only here main beginner level specification is explained. MS Visual Studio code files you'll create are not given here due to this reason.
Double click the Baudrate Combobox write the code shown below;
The last code is as follows;
 Figure 3; Arduino Emulator Coding Interface
You may read the pH data from the VCS user form by connecting a pH probe with a sensor while connected to an Arduino mega 2560 board. You must define laptop COM ports and baud rate as appropriate.
Note: The Arduino code should be modified as the serial monitor will print serial data on the user form of visual code studio. It is not explained here because every laptop user has different OS's (such as Windows XP 32-bit) and cannot run visual studio code. The VCS file can run when compiled for 64-bit, and you may check these out as referenced at the Arduino forum for the following lines to improve;
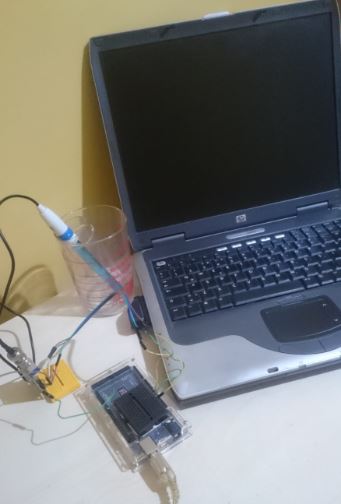
So, with the use of three components and a little code, an Arduino board, sensor and pH probe adapted to an old laptop by a USB cable, measuring the data of any chemical compound is made possible.
Reusing your laptop and creating a new test and measure station prevents you from falling down on the budget. The mentioned DIY project is a better way to far more expensive systems. Whilst, you may have continuously been spending on pH bandages, there are disadvantages with pH test kits. The main advantages of the probe system are more accurate and precise than others.
Fish Tank hobbyists know well that in a definite time interval, the controlling of pH tank water is needed, otherwise, water quality damage occurs. This recommendation is a concept that is an understructure of the hardware of an aquarium controller.
The implementation shows that measuring the pH value of any chemical substances such as honey, aquarium water (fish tank), coke, and liquid from water is possible. Be sure to select an appropriate pH probe suitable for the Arduino sensor.
If you find and use Chinese boards in your system, I can help with further info regarding the connection and other features. Contact me on Experts Exchange or by leaving a comment below. Saving the environment is a key rule for humanity.
I hope you found this information useful.
Instead of disposing of an old laptop that's not suitable for upgrading to a current operating system, consider modifying it to be reused as a Chemical pH measurement system with the code blocks we'll discuss here.
Here's a list of hardware that will be needed:
- A nutrition pH probe suitable for use with Arduino Sensor board can be viewed here: http://www.dfrobot.com/product-1025.html
- An Arduino board for the stations, such as a Mega 2560 board.
Here's how the kit would be assembled:
Figure 1 shows the component connections
As a first step, we must determine how often you will be reading the pH data from the station. If it's going to be rare, then you may prefer a Visual Studio coded user form that can be used to read data from the sensor. (See Figure 2).
If you expect to get scrolling data output of Arduino serial monitor (Below Figure 3; Arduino Emulator Coding Interface from Tools menu of Arduino Emulator), then installing Arduino emulator to the laptop is a better choice. The code is available at the following link;
Reference link
https://create.arduino.cc/projecthub/atlasscientific/arduino-ph-sensor-calibration-ea1b65
The Arduino code is as follows;
//This code was written to be easy to understand.
//Modify this code as you see fit.
//This code will output data to the Arduino serial monitor.
//Type commands into the Arduino serial monitor to control the pH circuit.
//This code was written in the Arduino 1.8.9 IDE
//An Arduino UNO was used to test this code.
//This code was last tested 6/2019


#include <SoftwareSerial.h>   //we have to include the SoftwareSerial library, or else we can't use it
#define rx 2                                          //define what pin rx is going to be
#define tx 3                                          //define what pin tx is going to be


SoftwareSerial myserial(rx, tx);                      //define how the soft serial port is going to work


String inputstring = "";                              //a string to hold incoming data from the PC
String sensorstring = "";                             //a string to hold the data from the Atlas Scientific product
boolean input_string_complete = false;                //have we received all the data from the PC
boolean sensor_string_complete = false;               //have we received all the data from the Atlas Scientific product
float pH;                                             //used to hold a floating point number that is the pH


void setup() {                                        //set up the hardware
  Serial.begin(9600);                                 //set baud rate for the hardware serial port_0 to 9600
  myserial.begin(9600);                               //set baud rate for the software serial port to 9600
  inputstring.reserve(10);                            //set aside some bytes for receiving data from the PC
  sensorstring.reserve(30);                           //set aside some bytes for receiving data from Atlas Scientific product
}


void serialEvent() {                                  //if the hardware serial port_0 receives a char
  inputstring = Serial.readStringUntil(13);           //read the string until we see a <CR>
  input_string_complete = true;                       //set the flag used to tell if we have received a completed string from the PC
}


void loop() {                                         //here we go...


  if (input_string_complete == true) {                //if a string from the PC has been received in its entirety
    myserial.print(inputstring);                      //send that string to the Atlas Scientific product
    myserial.print('\r');                             //add a <CR> to the end of the string
    inputstring = "";                                 //clear the string
    input_string_complete = false;                    //reset the flag used to tell if we have received a completed string from the PC
  }


  if (myserial.available() > 0) {                     //if we see that the Atlas Scientific product has sent a character
    char inchar = (char)myserial.read();              //get the char we just received
    sensorstring += inchar;                           //add the char to the var called sensorstring
    if (inchar == '\r') {                             //if the incoming character is a <CR>
      sensor_string_complete = true;                  //set the flag
    }
  }


  if (sensor_string_complete == true) {               //if a string from the Atlas Scientific product has been received in its entirety
    Serial.println(sensorstring);                     //send that string to the PC's serial monitor
    /*                                                //uncomment this section to see how to convert the pH reading from a string to a float
    if (isdigit(sensorstring[0])) {                   //if the first character in the string is a digit
      pH = sensorstring.toFloat();                    //convert the string to a floating point number so it can be evaluated by the Arduino
      if (pH >= 7.0) {                                //if the pH is greater than or equal to 7.0
        Serial.println("high");                       //print "high" this is demonstrating that the Arduino is evaluating the pH as a number and not as a string
      }
      if (pH <= 6.999) {                              //if the pH is less than or equal to 6.999
        Serial.println("low");                        //print "low" this is demonstrating that the Arduino is evaluating the pH as a number and not as a string
      }
    }
    */
    sensorstring = "";                                //clear the string
    sensor_string_complete = false;                   //reset the flag used to tell if we have received a completed string from the Atlas Scientific product
  }
}
Figure2; The VCS User Form for serial data monitor;
Figure 2
(Optional)Visual Studio Code for Arduino serial read.
To code the VCS User Form for serial data monitor is mentioned below as a tutorial. The thumb of hand and user form should at least consist of port and baud rate, list box, connection, close connection button, pH data box, and measuring start button.
You may be want to add combo boxes by the more extra HW function features like use by connecting dc servo motor or more other sensors to hardware list on user form of our project. Only here main beginner level specification is explained. MS Visual Studio code files you'll create are not given here due to this reason.
At the first stage; Adding Libraries;
The object that will connect to serial port introducing;
Click on form somewhere empty space then Load part will be open then write below code of piece ;
|
1
2
3
4
5
6
7
8
9
10
11
12
|
myPort = IO.Ports.SerialPort.GetPortNames()
ComboBox2.Items.Add(9600)
ComboBox2.Items.Add(19200)
ComboBox2.Items.Add(38400)
ComboBox2.Items.Add(57600)
ComboBox2.Items.Add(115200)
For i = 0 To UBound(myPort)
ComboBox1.Items.Add(myPort(i))
Next
ComboBox1.Text = ComboBox1.Items.Item(0)
ComboBox2.Text = ComboBox2.Items.Item(0)
Button2.Enabled = False
|
Click the double button and write the code shown below;
[/c]Timer1.Start()
 SerialPort1.PortName = ComboBox1.Text
 SerialPort1.BaudRate = ComboBox2.Text
 SerialPort1.Parity = IO.Ports.Parity.None
SerialPort1.StopBits = IO.Ports.StopBits.One
 SerialPort1.DataBits = 8 SerialPort1.Open()
 Label10.Text = "Connected" Button1.Enabled = False
 Button2.Enabled = True[/c]
Timer1.Stop()
SerialPort1.Close()
Button1.Enabled = True
Button2.Enabled = False
Label10.Text = "Connection Failed."
Double click the Baudrate Combobox write the code shown below;
If SerialPort1.IsOpen = False Then
SerialPort1.BaudRate = ComboBox2.Text
Else
MsgBox( "can not change while Port is open" , vbCritical)
End If
The last code is as follows;
|
1
|
End
|
Figure 3; Arduino Emulator Coding Interface
You may read the pH data from the VCS user form by connecting a pH probe with a sensor while connected to an Arduino mega 2560 board. You must define laptop COM ports and baud rate as appropriate.
Note: The Arduino code should be modified as the serial monitor will print serial data on the user form of visual code studio. It is not explained here because every laptop user has different OS's (such as Windows XP 32-bit) and cannot run visual studio code. The VCS file can run when compiled for 64-bit, and you may check these out as referenced at the Arduino forum for the following lines to improve;
- Convert char to double - Arduino Reference 2.
- https://forum.arduino.cc/index.php?topic=587593.0
- Create Rx Tx - Arduino Reference 3.
- https://forum.arduino.cc/index.php?topic=512561.0
So, with the use of three components and a little code, an Arduino board, sensor and pH probe adapted to an old laptop by a USB cable, measuring the data of any chemical compound is made possible.
Reusing your laptop and creating a new test and measure station prevents you from falling down on the budget. The mentioned DIY project is a better way to far more expensive systems. Whilst, you may have continuously been spending on pH bandages, there are disadvantages with pH test kits. The main advantages of the probe system are more accurate and precise than others.
Fish Tank hobbyists know well that in a definite time interval, the controlling of pH tank water is needed, otherwise, water quality damage occurs. This recommendation is a concept that is an understructure of the hardware of an aquarium controller.
The implementation shows that measuring the pH value of any chemical substances such as honey, aquarium water (fish tank), coke, and liquid from water is possible. Be sure to select an appropriate pH probe suitable for the Arduino sensor.
If you find and use Chinese boards in your system, I can help with further info regarding the connection and other features. Contact me on Experts Exchange or by leaving a comment below. Saving the environment is a key rule for humanity.
I hope you found this information useful.
Have a question about something in this article? You can receive help directly from the article author. Sign up for a free trial to get started.
Comments (0)