Building portable Data Science Home Lab under an Hour.


Over 20 years of experience as an Application Architect/Developer, a Database Administrator, and a PM focusing on performance.
Published:
Edited by: Andrew Leniart
Browse All Articles > Building portable Data Science Home Lab under an Hour.
In my work in the IT industry, which spans over 20 years, data has always fascinated me. How we process and store data to which that evolved into what I focus on today, which is the performance of data queries and performance of each data process from one storage unit to another. At work, and in my spare time, by creating virtual machines on my laptop and/or my Linux Server at home and run some tests, I have gotten familiar with all kinds of DBMS and other programs managing data.
Recently I started to learn Data Science and got familiar with some of the technologies and tools related to that field. To experiment with these technologies and tools, I started to create a virtual machine that I would dedicate to Data Science. The amount of programs/tools out there is overwhelming and I soon realized that I needed some way to quickly add or remove programs and/or tools and scale them out quickly rather than creating a bunch of Data Science VMs. This led me to Docker and later on Linux Containers as I found Docker, inadequate for my needs. Linux Containers (LXC) gives you the ability to have persistent storage inside the container and easy control over it while working with the programs and/or databases and ideas you are testing.
Building the Data Science VM
To build the Data Science VM I used CentOS 7 as I'm very familiar with RedHat, CentOS, and Fedora. The Virtualization Environment I use is VirtualBox although KVM or VMWare is also a good choice. I created a Linux VM with two 30GB VDI and two 15GB VDI disks with dynamic allocation enabled. One 30 GB disk for the CentOS 7 system, the other 30GB disk for storing code and data, and the two 15 GB disks to be used as disks for the ZFS filesystem. ZFS filesystem has a great snapshot and recoverability capabilities and is a great fit for LXC. Another great option to ZFS is how easily you can add more disks to the ZFS filesystem if needed.
To install ZFS on CentOS you execute the following:
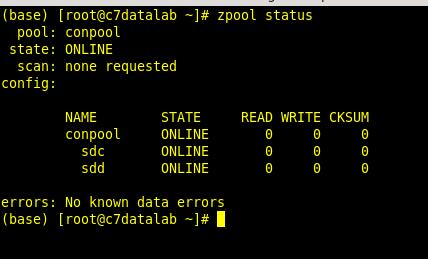
To see the newly created pool you execute the following commands:

Adding additional disks to the pool is very simple. After you have added them to the VM and once they are available to the system you simply execute:
At this point, the environment is ready to add some containers that I will later use to install applications, configure and test out against my applications and/or data workflow code that I create and run from the CentOS host.
For example in one of my experiments, I wanted to create a small Apache Spark Cluster and read, insert, update, and delete data in parallel from the MariaDB Galera cluster using a spark application that I created in both Python and Java for comparison. For this, I created one CentOS 7 container for Spark and one Centos 7 container for the MariaDB database.
After that, I had a three-node Apache Spark Cluster as well as three-node MariaDB Galera Cluster running and available for my applications to be submitted to the cluster. All this in about 45 minutes or so.
To list them out you execute the command:
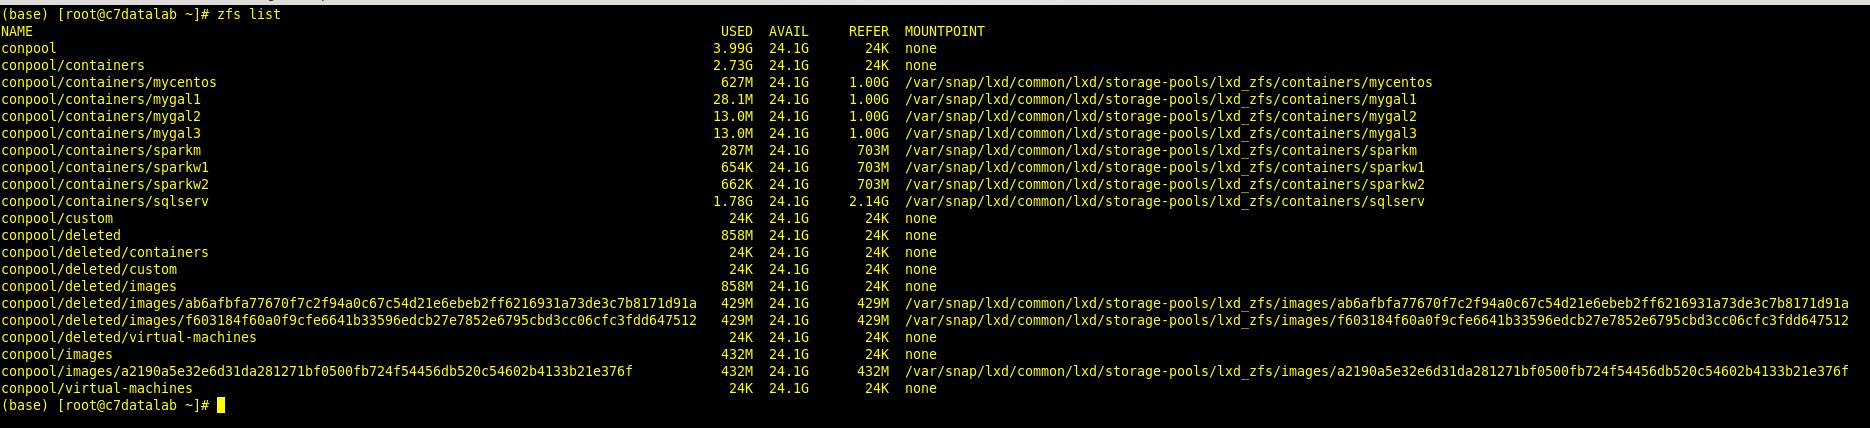
And to list them out on the ZFS filesystem you execute the command:
To build and run my applications I installed and configured Anaconda ( www.anaconda.com) which is a very good Data Science package toolkit/bundle for both Python and R and it comes preinstalled with Jupyter, JupyterLab, and RStudio which are essential Data Science platforms among other useful tools.
With Anaconda you can easily configure and create and clone multiple programming environments for different package versions and bundles for your Data Science applications. I also installed Eclipse ( www.eclipse.org ) for Java/Scala programming.
To connect Apache Spark with Jupyter and JupyterLab I simply installed configured Apache Toree ( toree.apache.org ) which is a Jupyter Kernel allowing Jupyter and Spark to interact at the client level. At this point, my Data Science VM is ready to handle some awesome Data Science workloads. And I can implement my experiments over and over again with ease and hassle-free backup and restore commands either using LXC or ZFS to easily set the same starting point for different tests.
Conclusion
In this article, I have briefly talked about and showed you how I built a portable Data Science Home Lab under an Hour and I hope you have enjoyed and gotten some ideas on how you can implement your Data Science experiments with as little effort as possible.
Linux with Linux Containers running on the ZFS filesystem in a virtual machine is a good platform to conduct Data Science experiments. Using this setup to test out some of the exciting and impressive applications in the field and build your Data Science application workflows is fairly easy and you can later on easily transfer the containers to bigger hosts and scale-out for massive to huge data workloads.
As mentioned earlier, the Anaconda bundle comes pre-installed with Jupyter, JupyterLab, and RStudio that are essential Data Science tools to create Python and R data science applications and workflows. And to easily create and set up your data workflows that flow through your applications of choice whether it is Apache Spark, Kafka, MQ, Hadoop, Hive, MySQL, MariaDB, or any other relational or NoSQL databases, then using LXC container to host the applications is a good choice for easy scale-out and management.
LXC cheat-sheat: https://linuxcontainers.org/lxd/getting-started-cli/
ZFS cheat-sheat: https://cheatography.com/the-iceman-blog/cheat-sheets/zfs-command-line-reference/
Happy coding and data exploring. :)
Recently I started to learn Data Science and got familiar with some of the technologies and tools related to that field. To experiment with these technologies and tools, I started to create a virtual machine that I would dedicate to Data Science. The amount of programs/tools out there is overwhelming and I soon realized that I needed some way to quickly add or remove programs and/or tools and scale them out quickly rather than creating a bunch of Data Science VMs. This led me to Docker and later on Linux Containers as I found Docker, inadequate for my needs. Linux Containers (LXC) gives you the ability to have persistent storage inside the container and easy control over it while working with the programs and/or databases and ideas you are testing.
Building the Data Science VM
To build the Data Science VM I used CentOS 7 as I'm very familiar with RedHat, CentOS, and Fedora. The Virtualization Environment I use is VirtualBox although KVM or VMWare is also a good choice. I created a Linux VM with two 30GB VDI and two 15GB VDI disks with dynamic allocation enabled. One 30 GB disk for the CentOS 7 system, the other 30GB disk for storing code and data, and the two 15 GB disks to be used as disks for the ZFS filesystem. ZFS filesystem has a great snapshot and recoverability capabilities and is a great fit for LXC. Another great option to ZFS is how easily you can add more disks to the ZFS filesystem if needed.
To install ZFS on CentOS you execute the following:
yum install http://download.zfsonlinux.org/epel/zfs-release.el7_7.noarch.rpm -y
yum list zfs*
yum install zfs zfs-dkms
/sbin/modprobe zfs
service zfs startzpool create conpool /dev/sdc /dev/sddTo see the newly created pool you execute the following commands:
zpool status
and
zpool status
Adding additional disks to the pool is very simple. After you have added them to the VM and once they are available to the system you simply execute:
zpool attach conpool /dev/sde /dev/sdfyum install snapd
systemctl enable --now snapd.socket
ln -s /var/lib/snapd/snap /snap
service snapd start
...
snap search lxd
snap install lxdlxd init
Do you want to configure a new storage pool (yes/no) [default=yes]?
Name of the new storage pool [default=default]: lxd_zfs
Name of the storage backend to use (dir, btrfs, ceph, lvm, zfs) [default=zfs]:
Create a new ZFS pool (yes/no) [default=yes]? n
Name of the existing ZFS pool or dataset: your_zpool_name ( conpool in my case ) At this point, the environment is ready to add some containers that I will later use to install applications, configure and test out against my applications and/or data workflow code that I create and run from the CentOS host.
For example in one of my experiments, I wanted to create a small Apache Spark Cluster and read, insert, update, and delete data in parallel from the MariaDB Galera cluster using a spark application that I created in both Python and Java for comparison. For this, I created one CentOS 7 container for Spark and one Centos 7 container for the MariaDB database.
lxc launch images:centos/7/amd64 mygal1
lxc launch images:centos/7/amd64 sparkmlxc copy mygal1 mygal2
lxc copy mygal1 mygal3
lxc copy sparkm sparkw1
lxc copy sparkm sparkw2After that, I had a three-node Apache Spark Cluster as well as three-node MariaDB Galera Cluster running and available for my applications to be submitted to the cluster. All this in about 45 minutes or so.
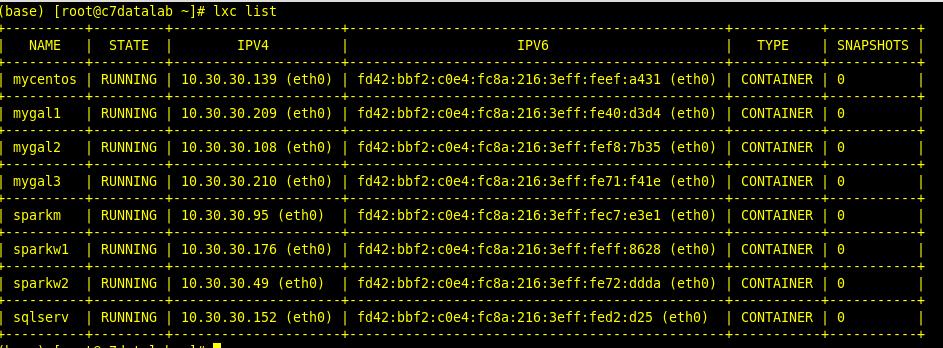
To list them out you execute the command:
lxc listAnd to list them out on the ZFS filesystem you execute the command:
zfs list
Running Data Science Apps and workflows in the VM
To build and run my applications I installed and configured Anaconda ( www.anaconda.com) which is a very good Data Science package toolkit/bundle for both Python and R and it comes preinstalled with Jupyter, JupyterLab, and RStudio which are essential Data Science platforms among other useful tools.
With Anaconda you can easily configure and create and clone multiple programming environments for different package versions and bundles for your Data Science applications. I also installed Eclipse ( www.eclipse.org ) for Java/Scala programming.
To connect Apache Spark with Jupyter and JupyterLab I simply installed configured Apache Toree ( toree.apache.org ) which is a Jupyter Kernel allowing Jupyter and Spark to interact at the client level. At this point, my Data Science VM is ready to handle some awesome Data Science workloads. And I can implement my experiments over and over again with ease and hassle-free backup and restore commands either using LXC or ZFS to easily set the same starting point for different tests.
Conclusion
In this article, I have briefly talked about and showed you how I built a portable Data Science Home Lab under an Hour and I hope you have enjoyed and gotten some ideas on how you can implement your Data Science experiments with as little effort as possible.
Linux with Linux Containers running on the ZFS filesystem in a virtual machine is a good platform to conduct Data Science experiments. Using this setup to test out some of the exciting and impressive applications in the field and build your Data Science application workflows is fairly easy and you can later on easily transfer the containers to bigger hosts and scale-out for massive to huge data workloads.
As mentioned earlier, the Anaconda bundle comes pre-installed with Jupyter, JupyterLab, and RStudio that are essential Data Science tools to create Python and R data science applications and workflows. And to easily create and set up your data workflows that flow through your applications of choice whether it is Apache Spark, Kafka, MQ, Hadoop, Hive, MySQL, MariaDB, or any other relational or NoSQL databases, then using LXC container to host the applications is a good choice for easy scale-out and management.
LXC cheat-sheat: https://linuxcontainers.org/lxd/getting-started-cli/
ZFS cheat-sheat: https://cheatography.com/the-iceman-blog/cheat-sheets/zfs-command-line-reference/
Happy coding and data exploring. :)
Have a question about something in this article? You can receive help directly from the article author. Sign up for a free trial to get started.
Comments (0)