Power Automate – How to auto copy or move files in SharePoint Library


Microsoft MVP Office Dev focussed on Azure services, M365, SharePoint On-Premise & SharePoint Online, Power Automate, Power Apps, LiveTiles
Published:
Browse All Articles > Power Automate – How to auto copy or move files in SharePoint Library
Using Power Automate (MS Flow) to automatically copy or move files from one SP document library to another whenever a file is created or modified in the source library.
Introduction
Hi friends, let us examine how we can use Power Automate (MS Flow) to automatically copy or move files from one SP document library to another whenever a file is created or modified in the source library.
Focus on the Flow
Let us see some of the simple scenarios of copying and moving the files.
Copy File
Whenever a file is uploaded to the source library, the same has to be copied to the destination library.
 Preview
 Move File
Whenever a file is uploaded to the source library, the same has to be copied to the destination library.

 Preview
 What about Library with CheckOut feature?
The above scenario will threw issues like 'item is in a locked mode' because of the checkout feature enabled. The above mentioned scenarios will work only when the document is checked-in, but the documents are not gonna checkin automatically when you upload or drag the files. So the flow will fail when the document is uploaded and it will be successfull only when the file is checked-in.
Note: The trigger used in the above scenario will trigger only when the files are created or modified on the root folder of a library and not on the sub-folders inside a library.
So, how to avoid those checkin problems and how to copy or move files seamlessly without any issues? Lets see how can we overcome those issues. Inorder to overcome the above scenario, we have to change the trigger action, so lets start creating a new flow.

Hi friends, let us examine how we can use Power Automate (MS Flow) to automatically copy or move files from one SP document library to another whenever a file is created or modified in the source library.
Focus on the Flow
Let us see some of the simple scenarios of copying and moving the files.
Copy File
Whenever a file is uploaded to the source library, the same has to be copied to the destination library.
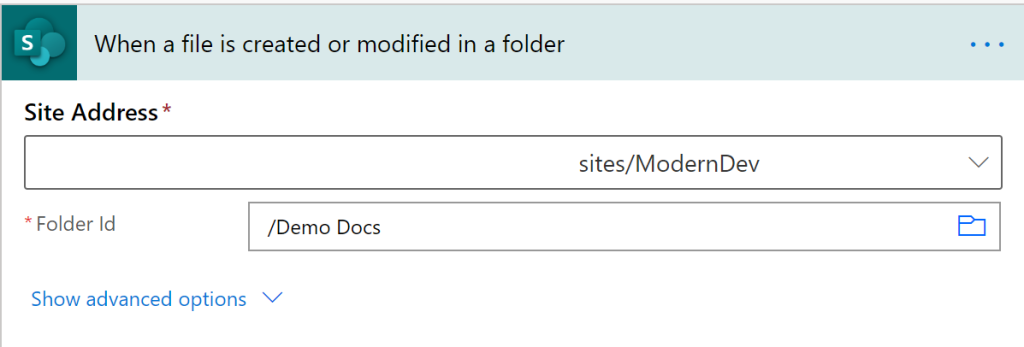
- Create a flow using the trigger action named 'When a file is created or modified in a folder' trigger.
- Fill in the below properties
- Site Address - Choose the site collection where the source library reside.
- Folder Id - Choose the source library root folder
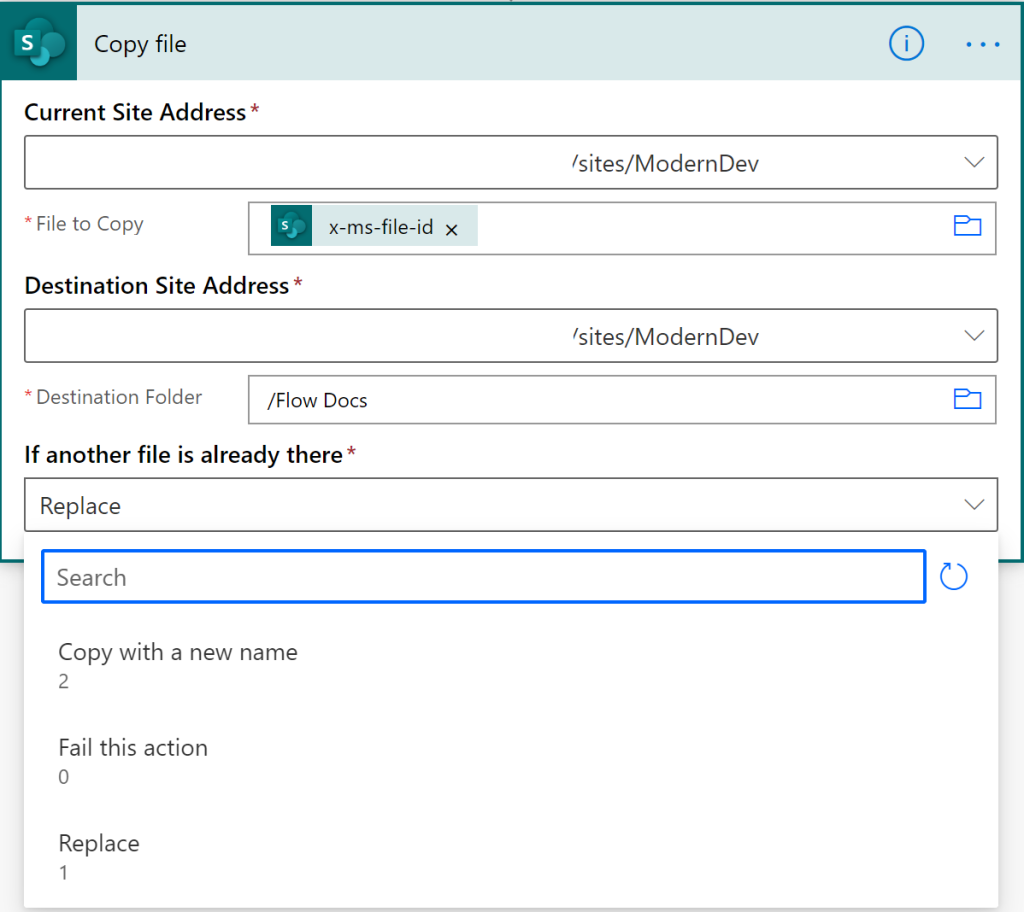
- Add the action 'Copy file' and fill in the below properties.
- Current Site Address - Choose the site collection where the source library reside.
- File to copy - Choose the 'x-ms-file-id' output from the trigger action
- Destination Site Address - Choose the site collection where the destination library reside.
- If another file is already there- This is to make sure a proper action is taken if there is a file with the same name exists on the destination library. You can choose from the actions below
- Copy with a new name - File will be copied with the new name same as file copied to the windows explorer
- Fail this action - No action is taken and the flow is failed.
- Replace - The existing file will get replaced with the new file content.
Preview
Move File
Whenever a file is uploaded to the source library, the same has to be copied to the destination library.
- Create a flow using the trigger action named 'When a file is created or modified in a folder' trigger.
- Fill in the below properties
- Site Address - Choose the site collection where the source library reside.
- Folder Id - Choose the source library root folder
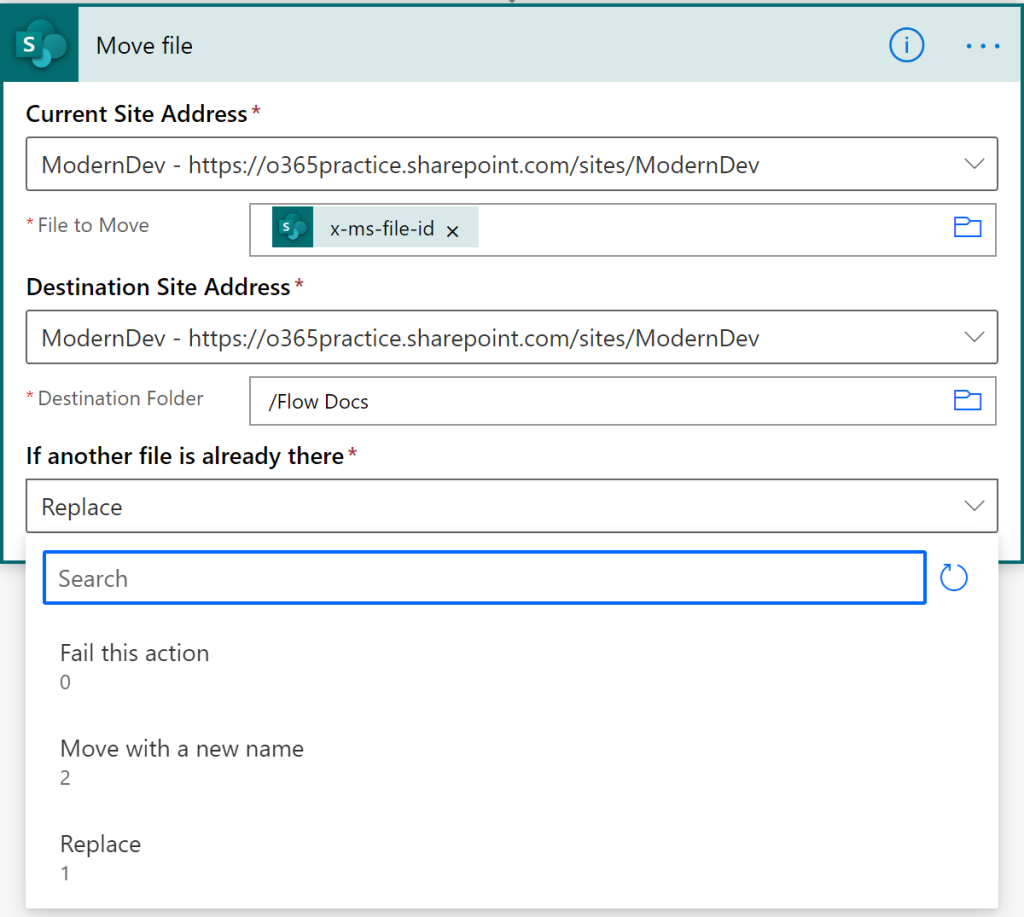
- Add the action 'Move file' and fill in the below properties.
- Current Site Address - Choose the site collection where the source library reside.
- File to copy - Choose the 'x-ms-file-id' output from the trigger action
- Destination Site Address - Choose the site collection where the destination library reside.
- If another file is already there- This is to make sure a proper action is taken if there is a file with the same name exists on the destination library. You can choose from the actions below
- Copy with a new name - File will be copied with the new name same as file copied to the windows explorer
- Fail this action - No action is taken and the flow is failed.
- Replace - The existing file will get replaced with the new file content.
Preview
What about Library with CheckOut feature?
The above scenario will threw issues like 'item is in a locked mode' because of the checkout feature enabled. The above mentioned scenarios will work only when the document is checked-in, but the documents are not gonna checkin automatically when you upload or drag the files. So the flow will fail when the document is uploaded and it will be successfull only when the file is checked-in.
Note: The trigger used in the above scenario will trigger only when the files are created or modified on the root folder of a library and not on the sub-folders inside a library.
So, how to avoid those checkin problems and how to copy or move files seamlessly without any issues? Lets see how can we overcome those issues. Inorder to overcome the above scenario, we have to change the trigger action, so lets start creating a new flow.
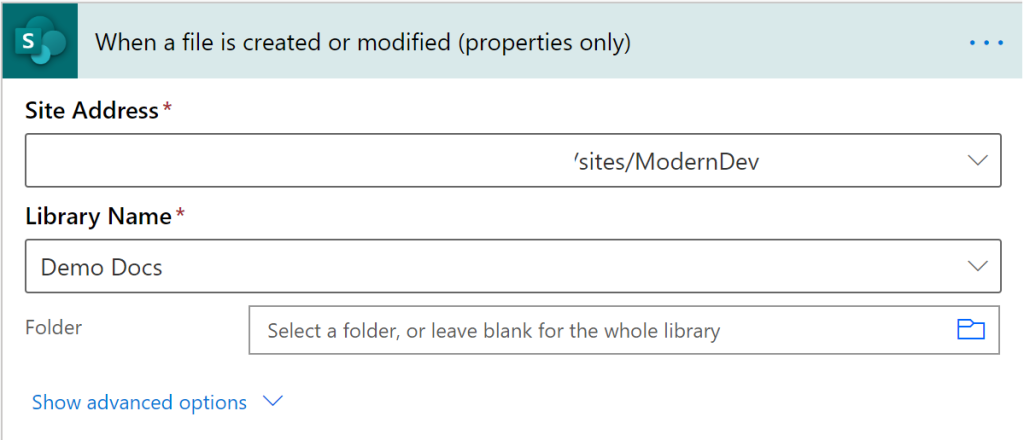
- Create a flow using the trigger action named 'When a file is created or modified (properties only)'
- Fill in the properties
- Site Address - Choose the site collection where the source library reside.
- Library Name - Select the source document library
- Folder - It is an optional property. Select a specific folder when you want the flow to run only for a specific folder.
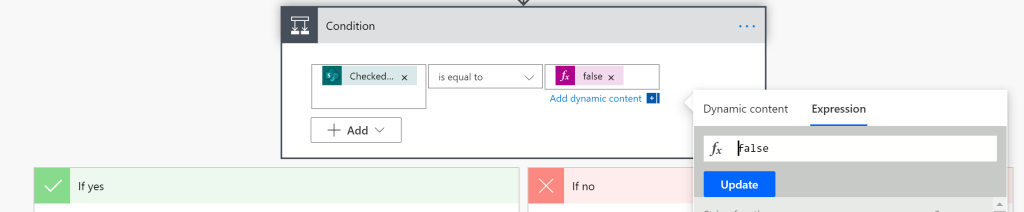
- Add the 'Condition' action and define the condition as below
triggerOutputs()?['body/{IsCheckedOut}'] is equal to false (you have to type false in the expression and not type as a text)- Add the action 'Copy file' or 'Move file' in the Yes block of the condition action and select the 'Identifier' as the value for the property 'File to Copy' or 'File to Move' based on the selected action.
Microsoft MVP Office Dev focussed on Azure services, M365, SharePoint On-Premise & SharePoint Online, Power Automate, Power Apps, LiveTiles
Have a question about something in this article? You can receive help directly from the article author. Sign up for a free trial to get started.
Comments (0)