Swap Microsoft Office 365 from 64-bit to 32-bit or Vice Versa


IT Professional - Helping others to help themselves. https://andrewleniart.com & https://www.computerhelpzone.com.au/testimonial/
Published:
Browse All Articles > Swap Microsoft Office 365 from 64-bit to 32-bit or Vice Versa
The version of Microsoft 365 you have installed may not be ideal. This article explains how to change from a 32-bit install to a 64-bit install or vice versa. Snapshots are included for every step so very easy to follow. Works regardless if you use POP or IMAP accounts in Outlook. Enjoy...
How to Swap 32-bit to 64-bit to 32-bit versions without losing Data by Andrew Leniart
Note: This article was written as a result of a cry for help by a valued Experts Exchange member so that it can hopefully help other users with the same questions as this user posed. (Thanks for your question Basem)
!UPDATE - Added "What if something goes wrong?" to the bottom of this article on May 10th 2021.
Introduction
That said; let's get into it...
Pre-requisites
- A copy of Windows 10 - Home / Pro or Education Edition
- A record of your email account passwords in case you need them
- Make a backup of all of your Outlook data to a PST file, especially if using IMAP. Whilst it's unlikely you'll need to use the backup, better to make one and be safe than sorry. Look here (Microsoft Link) to learn how to make a backup of your Outlook data.
- Finally, ensure all Office programs are closed before starting this process.
Step 1 - Uninstall your current version of Microsoft Office 365
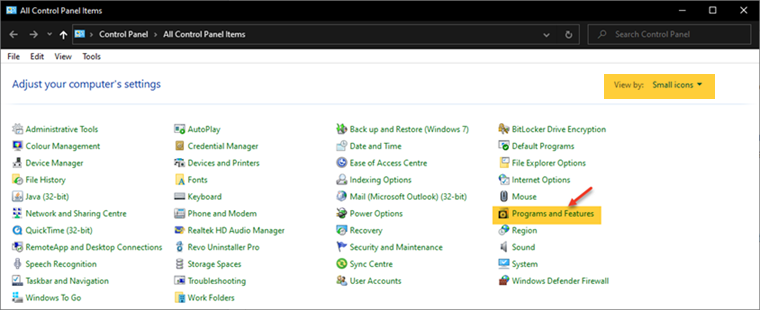
1. Open Control Panel on your computer (Press your Windows Key, type Control Panel, and hit your Enter key).
2. Click the Programs and Features icon.
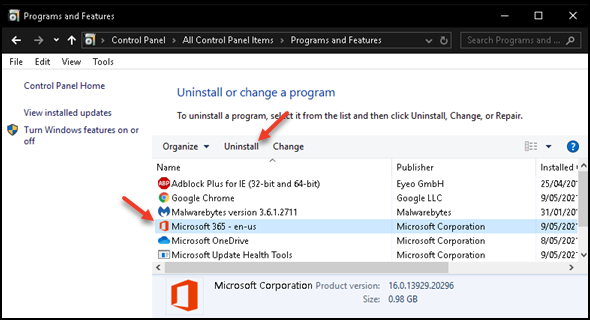
3. Click the entry titled Microsoft 365 - en-us, and then click the Uninstall button.
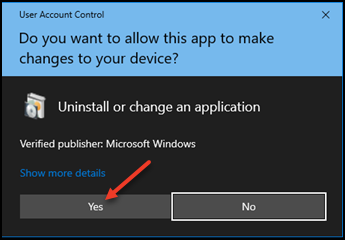
4. Click Yes on the UAC prompt to confirm you want to uninstall.
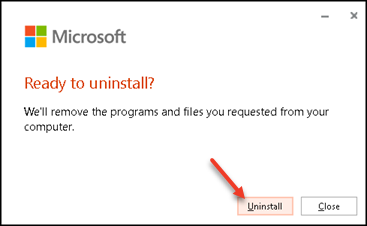
5. Click the next Uninstall button again on the Ready to uninstall? Prompt.
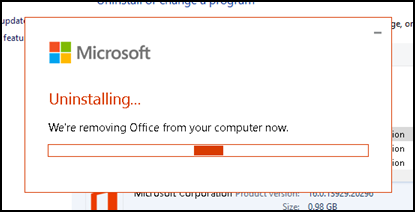
6. Microsoft Office 365 will now begin to uninstall itself, as shown below. Wait until it has finished uninstalling.
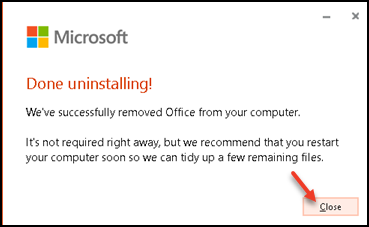
7. When the following window appears, click the Close button and be sure you restart your Windows 10 computer before continuing. Once done, log back into Windows as usual.
8. Now that you have restarted your computer, it's time to reinstall Office 365, only this time; we're going to make sure the correct version (32-bit or 64-bit) of the software is installed per your needs or preference.
Step 2 - Reinstall Office 365 in the version that you prefer
1. Open your favourite web browser and navigate to: https://www.office.com/
2. Click the Sign in button to log into office.com

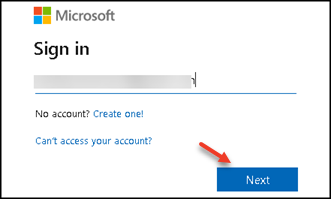
3. Enter your Office 365 account email address and click the Next button. Continue with the login process until you have successfully logged into your Microsoft Office account.
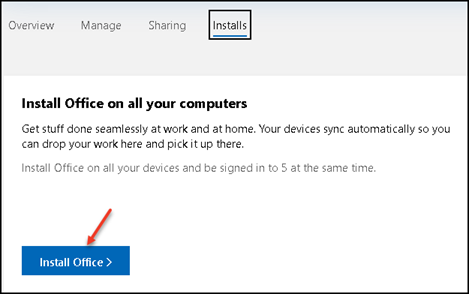
4. Once logged in, click the Install Office button

5. On the next screen, click the Install Office > button once again
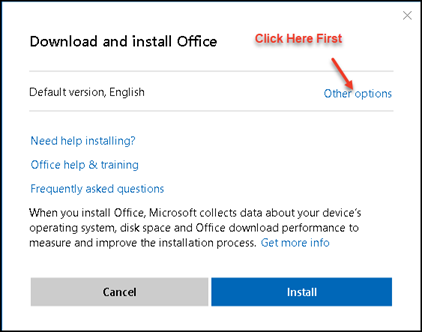
! << IMPORTANT >> On the next screen, do not click the Install button yet.
6. First, click Other options as shown below.
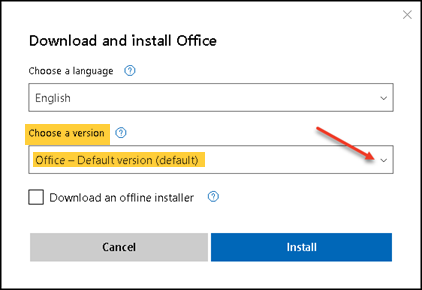
7. Click the Drop arrow box that is titled Office - default version (default) under "Choose a version"
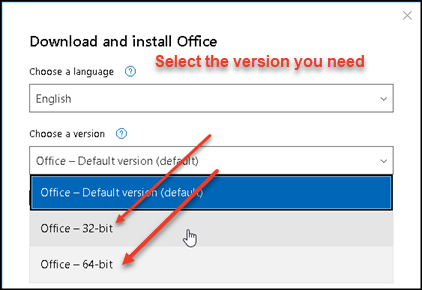
8. Here, you need to select either "Office - 32-bit" or "Office-64-bit" to suit which version you want to be installed on your computer or device.
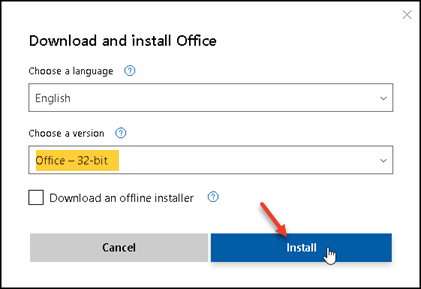
In the above example, I've selected the 32-bit version to replace the 64-bit version I already had installed before, which was giving me problems.
9. Now click the Install button.
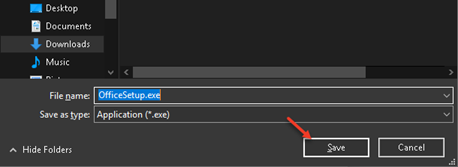
You will be prompted to save an OfficeSetup.exe file to your computer. Save it to your Download folder or any other location where you will remember it's been saved.
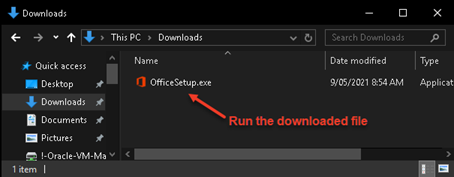
10. Now minimize your web browser (don't close it), and open Windows File Explorer. Navigate to where you saved the above OfficeSetup.exe file. Run OfficeSetup.exe by double-clicking it.
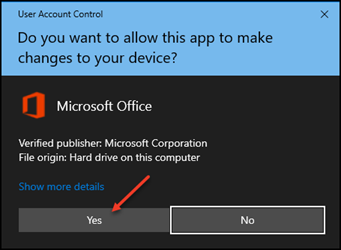
11. Click Yes on the UAC Prompt
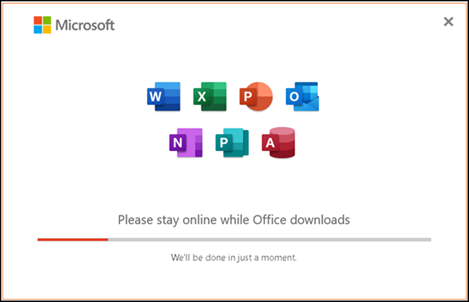
12. Microsoft Office 365 will begin to install - Wait until it completely finishes installing. You will see the following windows as it's installing.

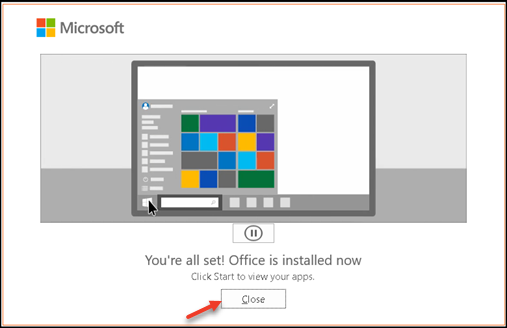
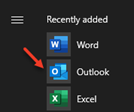
13. Once you see the above window, click the Close button, then click your Windows Start button to click on the Outlook icon to fire it up. Or any other Office 365 application if you prefer, but I've chosen Outlook for this example because there are a few things I'd like to mention about it.
Note: You will need to recreate any shortcuts you may have made to opening Outlook (and any other Office 365 apps) that you may have had before, such as on your Desktop, Taskbar, etc.
Outlook "should" retain all of your Email account settings and passwords. If it doesn't, that's where you may need to re-enter your email accounts and passwords. Providing you know those from memory, or made a note of them as suggested in Pre-requisites at the start of this article, then that should be a trivial matter for you to reconfigure.
What if something goes wrong?
A) Problem - Outlook won't open
The above-written instructions were thoroughly tested and worked exactly as shown here, however, when the EE asker followed the process, he struck a strange problem that shouldn't have occurred, so I'm going to describe what to do to quickly resolve the error he encountered in the event that it also happens to someone else. The issue he encountered was this:
I did all the steps as outlined and I was unable to open Outlook after installation of the 32 bit.exe. [OfficeSetup.exe]
I got this error message. Please help me fix this.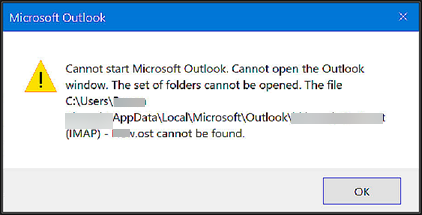
The above problem will not normally occur as Outlook should recreate and repopulate a missing OST file from its IMAP server automatically, however, in the event that it does happen, the fix is relatively simple. There are two methods you can use.
Method 1: Restore the previously deleted OST file.
- Open your recycle bin, locate the .ost file you deleted earlier, right-click on it and select Restore, then try opening Outlook again. This replaces the missing OST file and is the quickest method to restore the ability to open and use Outlook again.
- However, if there was corruption in the OST file you restored, then you've just put the problem back again in your newly installed copy of Microsoft Outlook. You can try and deal with this using the Microsoft included Scanpst file by following the instructions in this Microsoft Repair Outlook Data Files (.pst and .ost) document.
Method 2: Remove the Outlook Profile that stores the OST file location
To remove the troublesome Outlook profile, complete the following steps:
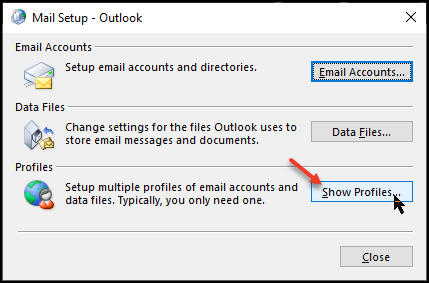
- Press your Windows Key, type Control Panel and then press your Enter key
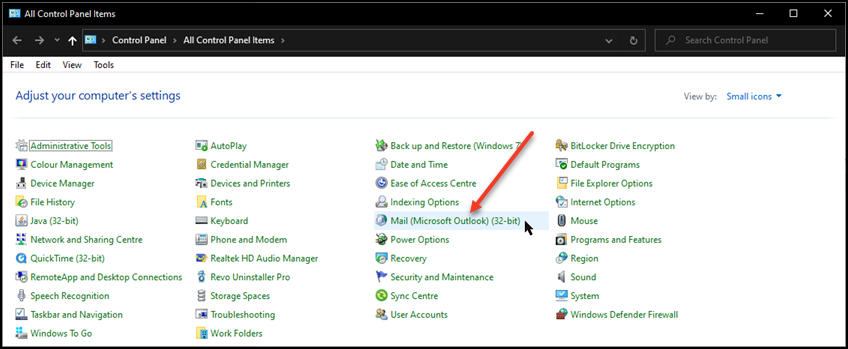
- Click the Show Profiles... button
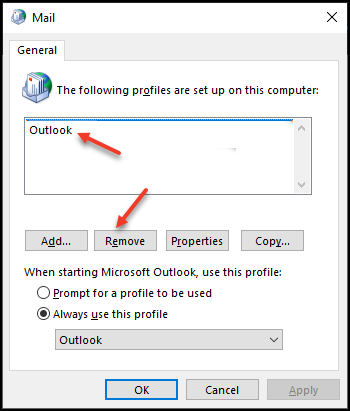
- Select the profile entry there and click the Remove button
- Click Yes on the next warning to confirm.
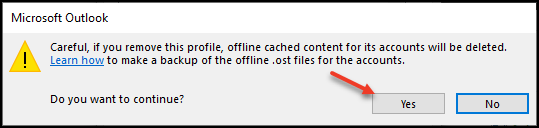
- Now close all windows and try opening Outlook again. It should now open without error.
Either of the above two methods will resolve this obscure error.
I hope this helped you out.
Another Concern - I've lost my recent document lists!
After reading my article, a fellow EE expert and editor (Thomas Zucker-Scharff) sent me the following message:
Note that you will also lose your recent documents for each O365 app, something I use a lot. I have found that the best way to get these back is to have a second computer wish everything opened. Invariably the registry entry misses the important files.
A valid concern for some, but rather than including information on dealing with that issue here, I've decided it will be more useful to write a separate article dedicated to that topic and show the various methods on how to prevent this mild annoyance from happening. That way, it will be easier for people to find the information when searching.
It's currently being written and should be available by the time you read this at the following location.
Till the next time…
Please, do take a second to click the "Thumbs Up" button if you think this article was helpful and useful. Thank you very much.
©Andrew Leniart 2021
IT Professional | Freelance Journalist
Personal Blog: https://andrewleniart.com
IT Professional - Helping others to help themselves. https://andrewleniart.com & https://www.computerhelpzone.com.au/testimonial/
Have a question about something in this article? You can receive help directly from the article author. Sign up for a free trial to get started.
Comments (6)
Author
Commented:Thank you for your comment and especially your endorsement of the article with a thumbs up. Much appreciated.
I agree wholeheartedly Microsoft hasn't made the process very intuitive at all and struggled a bit myself the first time I had to do it for a client as well. When I decided to help with this question I decided to turn it into an article to hopefully help a few others as well. Fingers crossed it will.
Best, Andrew
Commented:
The easiest methods to learn and master computers are taught and can't be explained any simpler by the Expert Andrew Leniart.
Thank you for a very informative and easy to understand article as always.
Basem Khawaja
Author
Commented:Kind regards,
Andrew
Author
Commented:Enjoy...
Andrew Leniart
Commented:
Were there any benefits in using 64 bit?
View More