Backup and Restore "Recent Documents" entries in Microsoft Office Apps


IT Professional - Helping others to help themselves. https://andrewleniart.com & https://www.computerhelpzone.com.au/testimonial/
Published:
Edited by: Thomas Zucker-Scharff
Browse All Articles > Backup and Restore "Recent Documents" entries in Microsoft Office Apps
Depending on the things you do with Microsoft Office, you can sometimes inadvertently lose your recent document lists in apps such as Microsoft Word and Excel. This article shows you how to back up and restore those lists when necessary. Enjoy...
In my previously published article here, a fellow Experts Exchange (EE) Expert and Editor (Thomas Zucker-Scharff) sent me the following note:
An excellent observation (thanks Thomas) as that could be a valid concern for many readers.
In this article, I'll show you how to prevent this annoyance from happening and recover from it if it does.
Pre-requisites
Before you go manipulating your copy of Microsoft Office in any meaningful way by changing 32-bit or 64-bit versions or similar, perform the following steps.
Open the Microsoft Regedit tool.
Microsoft Word: HKEY_CURRENT_USER\Software\Microsoft\Office\16.0\Word\User MRU
Microsoft Excel: HKEY_CURRENT_USER\Software\Microsoft\Office\16.0\Excel\User MRU
Those are the locations where the windows registry stores your most recently used items. The first thing you want to do is make a backup of the keys and save it somewhere on your hard drive. Do that like so...
You have now saved your most recently used Microsoft Word files list.
To do the same thing for Microsoft Excel, simply use the Excel path in the registry editor that I've given above. I.e., HKEY_CURRENT_USER\Software\Microsoft\Office\16.0\Excel\User MRU
How to Restore your saved Recent File list
When it comes to restoring the list, there are two methods you can use. The simplest is the following, however; for the sake of completeness, I'll show both.
Method 1: Using File Explorer to restore
And you're done! - You have now restored your recently used files list for Microsoft Word (and Excel if you performed the same steps for that too).
Method 2: Using the Regedit tool to restore

You have now restored your recently used files list for Microsoft Word (and Excel if you performed the same steps for that too) and you can now close the Registry Editor.
! << Some important information you should be aware of >>
Windows does not retain a record of your Microsoft Office recently used files list forever. It's up to you to specify how long you want that information retained, and that can be from as little as 1 day up to a maximum of 30 days. The default is 14 days,
After that, Windows will automatically delete recently used file entries that are older than the number of days specified. Fortunately, it's easy to change that value to whatever length of time that suits you. Here's how to do it.
The number of days you set above will take effect and be used in both Microsoft Word and Excel.
I hope this helped you out.
Till the next time…
Please take a second to click the "Thumbs Up" button if you think this article was helpful and useful. Thank you very much.

Note that you will also lose your recent documents for each O365 app, something I use a lot. I have found that the best way to get these back is to have a second computer with everything opened. Invariably the registry entry misses the important files.
An excellent observation (thanks Thomas) as that could be a valid concern for many readers.
In this article, I'll show you how to prevent this annoyance from happening and recover from it if it does.
Pre-requisites
- A suitable comfort level in using the Microsoft Regedit Windows Registry editor.
- Knowing which version of Microsoft Office you are using
- Microsoft Office was initially released in the very early '90s, but in the interest of not turning this article into a book, I'll only be explaining the current version in use by most folks and what's currently available for download from Office 365.
- The method for previous Office versions is exactly the same, however, the registry paths may differ slightly.
How to back your recent document list - Microsoft Office 2016
Before you go manipulating your copy of Microsoft Office in any meaningful way by changing 32-bit or 64-bit versions or similar, perform the following steps.
Open the Microsoft Regedit tool.
- Press your Windows Key + R and then hit your Enter key to bring up the Run box.
- In the run box that opens, type Regedit and click OK or press your Enter key.
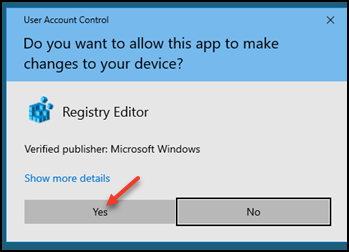
- Acknowledge the UAC prompt that appears, and the Registry Editor will open.
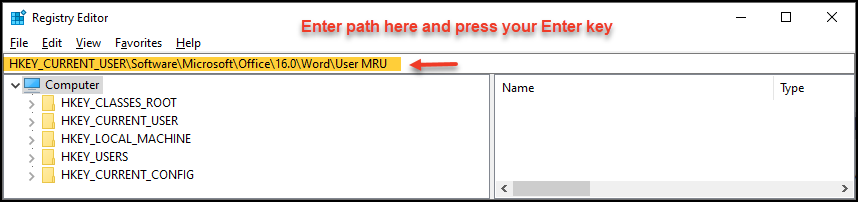
- At the top of the registry window, enter the following path(s):
Microsoft Word: HKEY_CURRENT_USER\Software\Microsoft\Office\16.0\Word\User MRU
Microsoft Excel: HKEY_CURRENT_USER\Software\Microsoft\Office\16.0\Excel\User MRU
Those are the locations where the windows registry stores your most recently used items. The first thing you want to do is make a backup of the keys and save it somewhere on your hard drive. Do that like so...
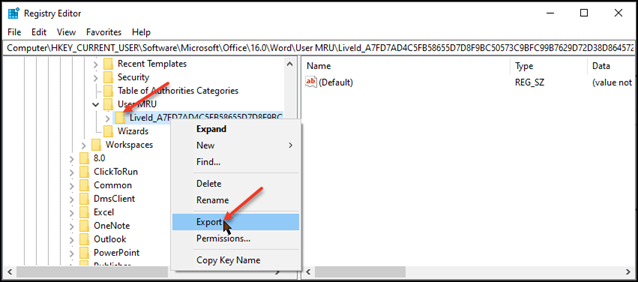
- In Regedit, enter the path as shown below and press your Enter key.
- Left-Click the LiveId_<Random-Letters-and-Numbers> Key once, then Right-Click and select Export from the drop-down context menu that appears.
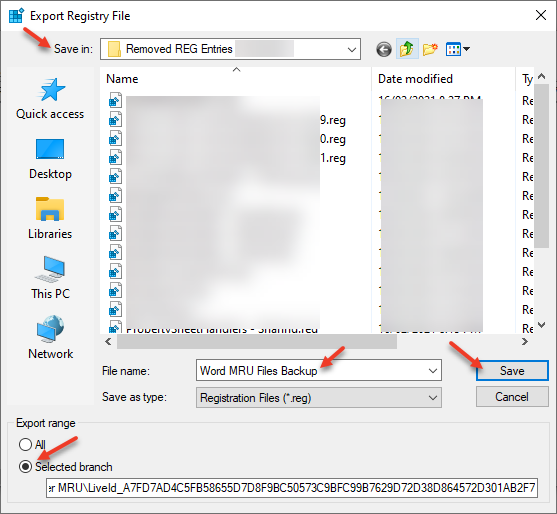
- You will be prompted to save a .reg file to a location on your hard drive. Choose an appropriate folder to save to, give it a descriptive file name such as "Word MRU Files Backup" and click the Save button.
You have now saved your most recently used Microsoft Word files list.
To do the same thing for Microsoft Excel, simply use the Excel path in the registry editor that I've given above. I.e., HKEY_CURRENT_USER\Software\Microsoft\Office\16.0\Excel\User MRU
How to Restore your saved Recent File list
When it comes to restoring the list, there are two methods you can use. The simplest is the following, however; for the sake of completeness, I'll show both.
Method 1: Using File Explorer to restore
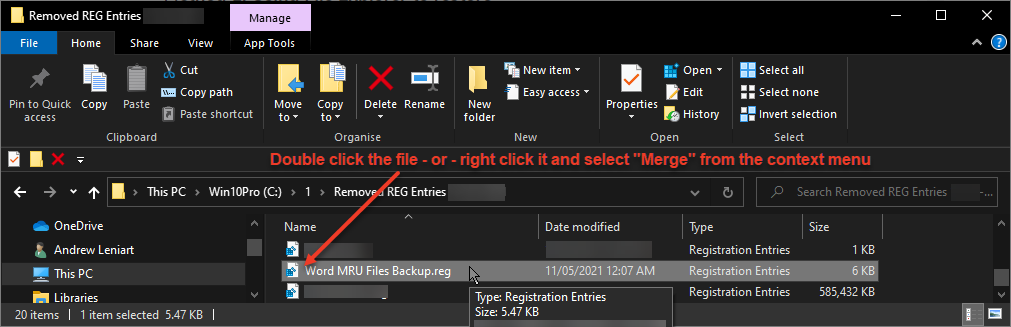
- Open Windows File Explorer and navigate to the path you saved (exported) your list to your hard drive.
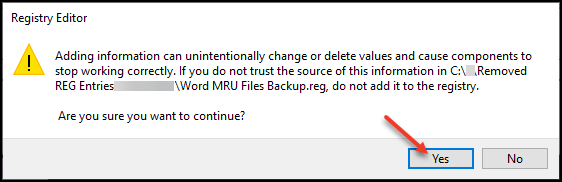
- Double click the file you saved (Ie: Word MRU Files Backup) or alternatively, you can right-click it and select "Merge" from the context menu that will appear. Both will do the same thing.
- Click Yes on the UAC prompt to confirm you want to continue.
- Click Yes yet again to convince Windows that you're quite sure you want to continue!
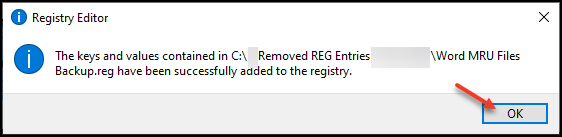
- Windows will then present you with the following window telling you it's done what you wanted. Click OK to close the box.
And you're done! - You have now restored your recently used files list for Microsoft Word (and Excel if you performed the same steps for that too).
Method 2: Using the Regedit tool to restore
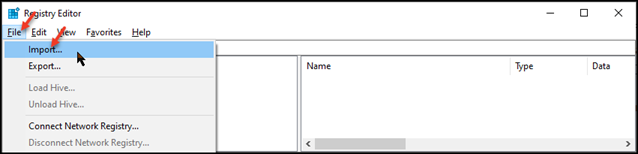
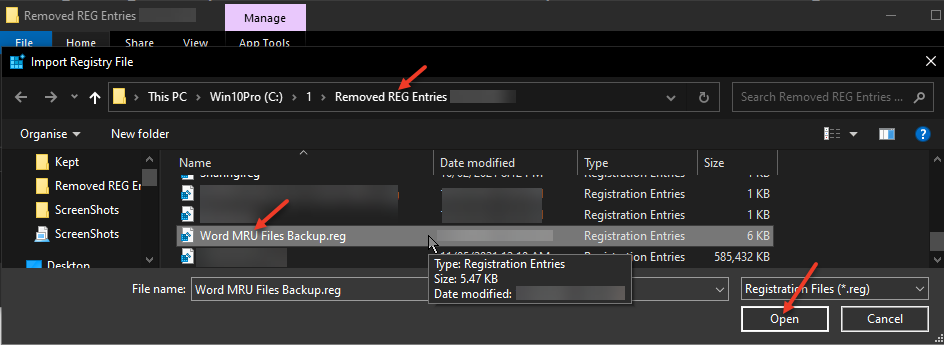
- Open Regedit again and click on File > Import
- Navigate to the path you saved (exported) your saved list to your hard drive and select the file you saved. I.e., "Word MRU Files Backup.reg" then click the Open button.
- Windows will tell you that your saved "Word MRU Files Backup.reg" backup file has been successfully added to the registry and that's it, you're done. Click the OK button to close the box.
You have now restored your recently used files list for Microsoft Word (and Excel if you performed the same steps for that too) and you can now close the Registry Editor.
! << Some important information you should be aware of >>
Windows does not retain a record of your Microsoft Office recently used files list forever. It's up to you to specify how long you want that information retained, and that can be from as little as 1 day up to a maximum of 30 days. The default is 14 days,
After that, Windows will automatically delete recently used file entries that are older than the number of days specified. Fortunately, it's easy to change that value to whatever length of time that suits you. Here's how to do it.
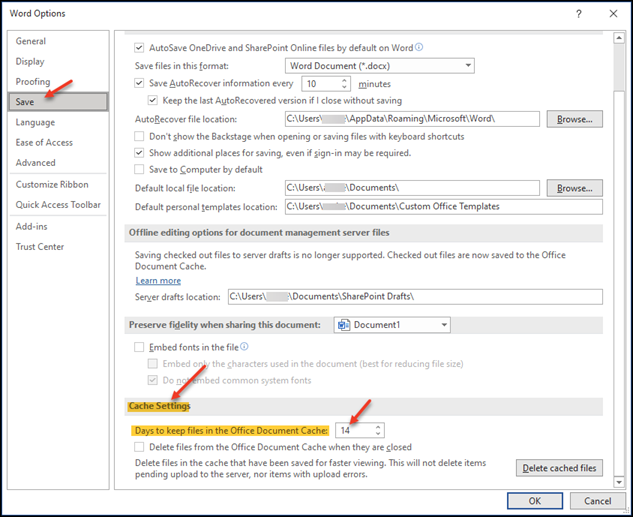
- Open either Microsoft Word or Excel and click on File > Options > Save
- Scroll down to the Cache Settings category.
- The number you want to change here is Days to keep files in the Office Document Cache:
The number of days you set above will take effect and be used in both Microsoft Word and Excel.
I hope this helped you out.
Till the next time…
Please take a second to click the "Thumbs Up" button if you think this article was helpful and useful. Thank you very much.
©Andrew Leniart 2021
IT Professional | Freelance Journalist
Personal Blog: https://andrewleniart.com
IT Professional - Helping others to help themselves. https://andrewleniart.com & https://www.computerhelpzone.com.au/testimonial/
Have a question about something in this article? You can receive help directly from the article author. Sign up for a free trial to get started.
Comments (5)
Commented:
Author
Commented:Got any suggestions on a better title or what to include in the opening summary or article body itself so that people wouldn't get confused? If so, please do share. Always happy to improve the information given and make it easier to understand.
Thanks, Andrew
Commented:
Commented:
Thank you again for another valuable resource. Easy to understand and apply. The best references in the IT world presented by Andrew!
Author
Commented:Best, Andrew