How to Keep Windows 10 in Tip-Top Shape


IT Professional - Helping others to help themselves. https://andrewleniart.com & https://www.computerhelpzone.com.au/testimonial/
Published:
Edited by: Gary Benjamin
Browse All Articles > How to Keep Windows 10 in Tip-Top Shape
In over 20 years of working as an IT Professional fixing computers, I see the same problems posted again and again which can be prevented by just doing some regular maintenance on the Windows operating system. This article explains what you should be doing to keep your computer in tip-top shape.
Despite being the most used operating system globally, Microsoft Windows has always caused its users' grief by frequently breaking down for no apparent reason whatsoever. Unfortunately, that's Microsoft for you. They seem to have a policy of releasing feature updates and new versions first and then worrying about fixing reported errors later.
However, most people don't realise that to keep the Windows 10 operating system performing optimally, regular maintenance should be performed. Whilst Microsoft provides all of the tools needed to do that, they don't have a document or instructions on what maintenance you should be doing or at what intervals you should be performing maintenance tasks. That's what I'm going to explain in this article.
So with all that said, let's get on with the show...
Pre-requisites
There's only one, and that's your being willing to perform these maintenance tasks at least once every three months. Set a repeating reminder in your Personal Information Manager (PIM) such as Microsoft Outlook to remind you when it's time to perform some maintenance again.
Strongly Advised – Backup First
You should already be making periodic backups, certainly no less frequently than once per month, but it is a good idea to make an extra backup as the first step of this quarterly maintenance.
While none of the steps prescribed below should cause any damage, it's better to be safe than sorry. If during the month following this maintenance no unexpected issues arise, and assuming that you also have a monthly or more frequent backup scheduled, then you can erase this extra backup when it's a month old.
If you don't have a regularly scheduled periodic backup (strongly not advised), then I recommend that you keep this pre-maintenance backup until your next quarterly maintenance.
How to backup and which backup software is best to use is a topic on its own. I'll soon be writing an article on how I do daily automated incremental backups of my entire Windows installation for a minimal expense, so keep an eye out for it.
In the meantime, if you're not backing up yet, here's a Techradar Article that lists several backup solutions you may like to check out. It's not an exhaustive list of solutions by any means, but it gives you a place to start and contains no suggestions that I would personally advise against using.
Maintenance Step 1. Clean out temporary files
Why? - Windows and other vendor's programs are supposed to delete temporary files once they're no longer needed. Still, programmers can be lazy and not bother doing that, so Windows tends to accumulate hundreds to thousands of these files all the time. The disadvantage they cause is that they tend to slow Windows down to a crawl if not regularly cleaned out.
Two things will happen.
Here's how to do it:
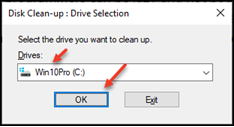
1. Press your Windows Key and type Disk Clean-up and then press your Enter key or click on the Disk Clean-up app icon. The following appears. Select the drive Windows is installed on (usually C:) and click the OK button.
On the next window, first, click on the Clean up system files button. That gives us considerably more available areas to safely clean up as well as potentially regaining quite a bit of hard drive storage space.

You'll now need to again confirm the drive you want to clean up and click the OK button again.
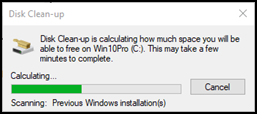
Now, wait a moment. It may seem as though nothing is happening, but rest assured it is. The following progress window will soon pop up.
Followed by this window.
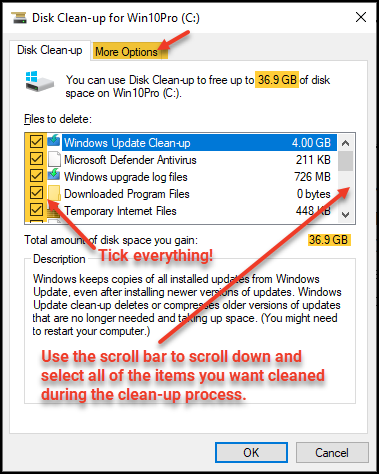
When doing the above procedure for routine maintenance, nothing listed is dangerous to remove. Windows does not list anything which, if deleted, would harm your system in any way; so tick everything in the Files to delete: section.
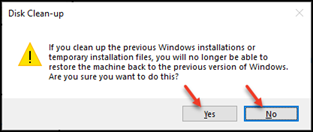
>>> !! Warning - Unselect "Recycle Bin" if you want to hold on to its contents and "Previous Windows installation(s)" if you have recently upgraded Windows and want to retain the ability to roll back to the previous version. <<<
Note that now we have a More Options tab and the opportunity to recover considerably more hard drive space than before. In this example, 36.9 GB of space recoverable, as opposed to only 75.0 MB of space before we clicked the "Clean up system files" button.
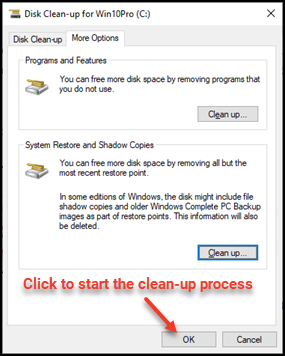
Now click the More Options tab highlighted in the previous screenshot, and the window will change to this:
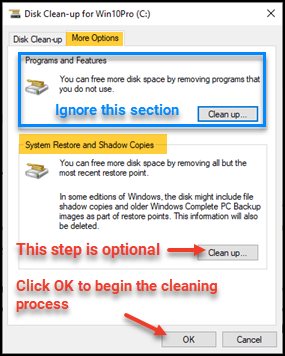
Though optional, I recommend periodically deleting all but the most recent restore points created by Windows.
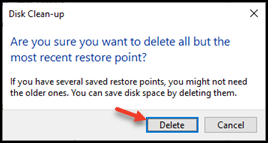
Older ones tend to corrupt and often won't work anyway if too many changes have occurred since they were created, so click the optional step Clean up... button to remove all but the most recent restore point that Windows has made. Once clicked, the following window will appear.
Confirm your decision by clicking the Delete button.
The final step to begin the clean-up process is to now click the OK button.
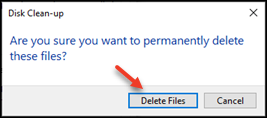
Acknowledge you want to continue by clicking the Delete Files button on the following prompt.
If you have recently upgraded Windows, you will be asked again if you are sure you want to remove the ability to roll back. Click Yes if you are, or No if you prefer to leave the rollback function to remain available to you.
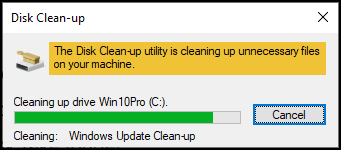
You will see a progress window at this point. Be patient. It can take a long time (15 minutes or more), even on the fastest of hard drives.
Please do not Cancel it; just allow it to complete. I also suggest not using your computer during the Disk Clean-up process as it will just make the task take longer.
Once the above Disk Clean-up has completed the progress window will disappear, and you're done with this part of maintenance. Let's move on to the next step.
Maintenance Step 2. Verify your System File integrity with CHKDSK
The Chkdsk command scans your computer's NTFS or FAT32 filesystem and checks the filesystem's integrity, including filesystem metadata. I always suggest running chkdsk in a "read-only" configuration first, i.e. without any switches, to check for problems. Adding switches such as the /F switch (i.e. chkdsk /f) will require the computer to be rebooted so that repairs can be conducted, even if no repairs were required.
Here's how to run it:
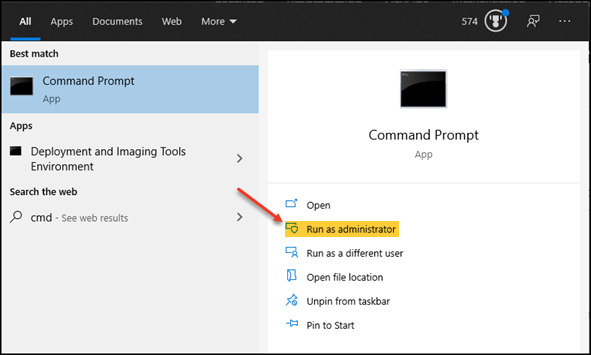
First, open up an Administrative DOS command prompt. Many ways to do this, but one easy way is:
Press your Windows Key, type CMD and select Run as administrator.
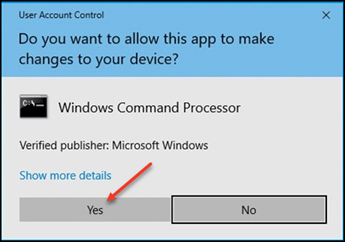
Click Yes on the User Account Control (UAC) prompt to continue.
An Administrator: Command Prompt will appear. We will do our work here.
To run the chkdsk test, simply type the command chkdsk followed by your Enter key. Chkdsk will then commence examining your file system for any errors it can repair.
Usually, you will get the message "Windows has scanned the file system and found no problems. No further action is required" as shown below, in which case you don't need to do anything else in this step.
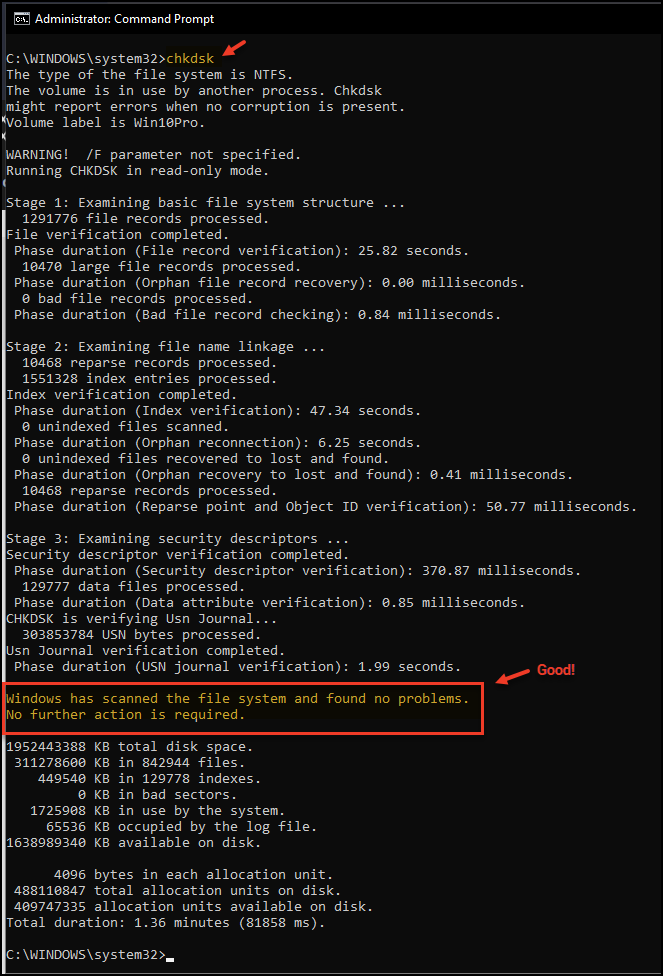
If errors are found you will be advised to run chkdsk again with the /F switch. In this case, follow the instructions. Note that a reboot will be required after running the command chkdsk /f.
In the next step, we will determine if any problems have developed with the Windows 10 protected system files. We do that with the SFC command.
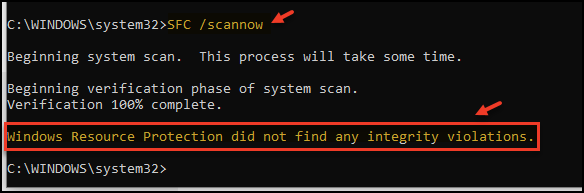
Maintenance Step 3. Check the integrity of Windows Protected System Files
Still in the Administrative Command Prompt window, issue the following command.
SFC /scannow
Windows will now run a series of tests and make any necessary repairs if it finds a problem.
In the example below, SFC reported that it did not find any integrity violations. That's a good thing. If it does find any, it will repair them and advise you of that once it completes its verification scan. No more to do with SFC for maintenance purposes now.
Maintenance Step 4. Use DISM to check for and correct system problems
The DISM command is often used when a computer has problems like not starting up or starting up with errors, performing poorly, or giving unexpected and unexplained errors. It basically repairs Windows installations that tools like SFC and CHKDSK can’t fix.
In such scenarios, the best option is to use DISM to attempt to repair any underlying issues. Its use is harmless so it is safe to use for routine maintenance. It can often do a lot of good by repairing errors that other repair tools can't fix.
Note: There are many switches associated with running DISM, but we're only going to concentrate on two of them for maintenance purposes, namely CheckHealth and RestoreHealth.
Here's how to use it...
Still in the Administrative Command Prompt window, optionally issue the following command.
DISM /Online /Cleanup-Image /CheckHealth and press the Enter key.
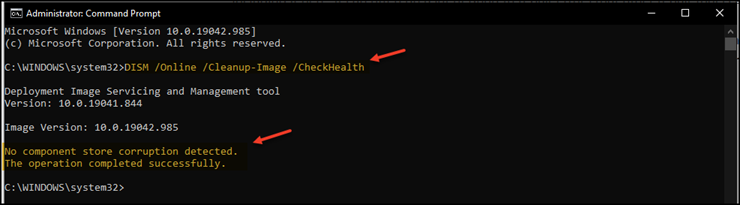
Many people recommend using the CheckHealth switch, so I've included it here for the sake of completeness only. However, I don't trust the command because it typically runs for less than a second and has consistently reported "No component store corruption detected." even when there were problems. For this reason, I recommend always running DISM with the RestoreHealth switch instead of CheckHealth.
Even if there are no problems, DISM will NOT do any harm, and the bonus is that if there are problems, then DISM will repair them for you. Since running DISM with RestoreHealth also does a health check, you only need to run this command:
DISM /Online /Cleanup-Image /RestoreHealth and press the Enter key
You should get a result like the following which means all is now A-OK, and any errors have been corrected automatically:
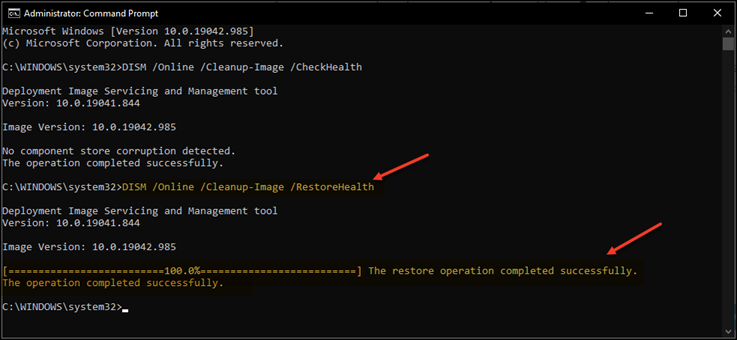
Oh, and it doesn't take all that long to run, either. With a decent Internet connection expect it to take about 10 minutes or so.
Maintenance Step 5. Do manual Virus and Malware scans
Even though all Virus and Malware software vendors offer the ability to schedule periodic scans, I've found many people don't take advantage of this option. If you're one of those folks, then use this opportunity verify that periodic scans are scheduled.
Even so, a scheduled scan is often only effective if your computer is on when the scheduled time arrives. For this reason, I also recommend doing periodic manual scans, and doing them as part of your quarterly maintenance works great.
As a side note, many people often ask me what I think are the best Virus and Malware protection packages. I can never answer that because which is best is subjective, so all I say is that my own security software preference (at the time of writing) is Avast Premium Security and Malwarebytes Premium. I run both in real-time mode, and (for me) they play together perfectly.
Maintenance Step 6. Checking if your Hardware Drivers are up to date
This step doesn't need to be performed as regularly as every three months or so, but it's a good idea to check each time there is a major Windows update or at least twice a year.
As Windows 10 continues to be updated, manufacturers of hardware such as Printers, Graphics cards, and Webcams etc. will update their drivers. Windows Update can often replace your hardware manufacturers' drivers with generic drivers created by Microsoft. While that's sometimes not an issue, at other times this can cause your hardware to either lose some functionality or even malfunction.
That being the case, here's what I do at least twice a year; and doing so has served me (and plenty of my clients) well.
What you need to know
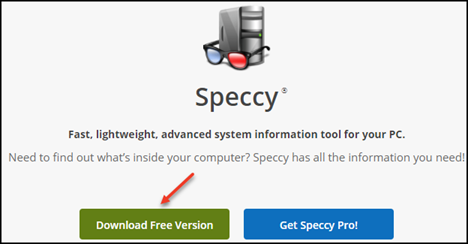
Obviously, you need to know the brand and models of the hardware that you've connected to your computer, but this isn't as hard as it might seem. Make a list of everything using a free tool such as Piriform Speccy, which you can download from here.
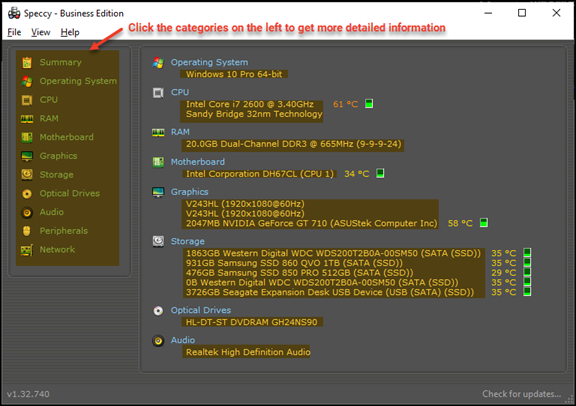
The snapshot below is from the Pro version I own to comply with the license agreement, but if you're not using it in a business environment, the Free Version will give you all the information you need.
Once you've downloaded and installed it, simply run it, and you'll get a report that looks as follows:
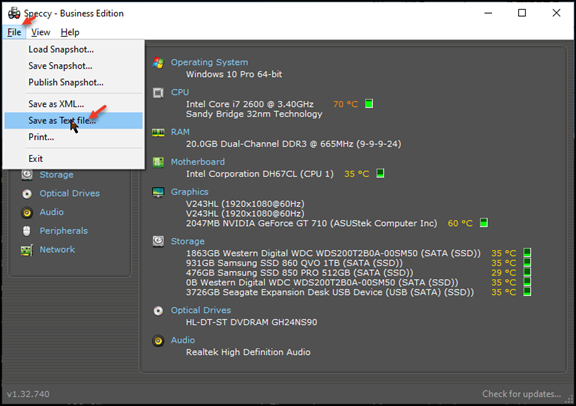
Save the report to a Text File (or whichever other format you prefer), and you will have a list of all of the hardware in your computer, including the manufacturers and model numbers. Very useful information to keep handy.
With all that info in hand, when it's time to check for newly released drivers, visit the manufacturers' websites of the hardware you have installed and check for any updated drivers they recommend you should download and install. Alternatively, if your hardware has a "Check for updates" option, use that instead.
Finally, if the hardware was installed when you bought your computer, such as a memory controller or a graphics card, it's usually best to install the driver from the computer manufacturer's website, since they usually test the new driver before they recommend it, and sometimes customise the driver to make it compatible with the rest of the hardware in your computer. Wherever you get the drivers from, it's a good idea to stay up to date to prevent problems.
>>> !! Important Note on Driver Updating Software <<<
I do not recommend using any software that offers to check for and automatically update your computer's hardware drivers (or, for that matter, your software applications) because they get it wrong far too often and cause considerably more problems than they solve. Examples of such software solutions can be viewed using a Google search for "Automatic Software and Hardware updating software" or published articles like this one about the Best Free Driver Updater Tools.
Neither Google nor the websites that list this type of software are to blame - it's the software packages that cause the problems. Many will disagree, so use them if you must, but know that I've had to fix so many issues as a direct result of Automatic Driver Updaters over the years that I now consider them nothing more than PUPs, and in some cases, even malware. Consider yourself warned.
Maintenance Step 7. Keep the inside of your desktop computer clean
Dust in computers can cause overheating problems, which leads to slow performance and even crashes like the dreaded "Blue Screen of Death". I recommend that you give the inside of your computer cases a good clean out at least once a year. It's well worth doing.
Computers have fans that constantly suck in air and dust particles, so once a year I open the cases of my desktop computers and servers to give them a good vacuuming, paying particular attention to the fans. Regardless of how clean the environment is around your computer, if you look inside the case I'm willing to bet you'll be shocked at how much dust has accumulated after a year of use.
As for how to do it, I think it goes without saying that you should make sure the computer is unplugged from any power supply before opening the case, and you should wear an anti-static wristband before touching any of the components inside. When vacuuming the fans, use a finger or pen to prevent them from spinning wildly. Just be careful and gentle and you'll be fine.
Conclusion
I regularly follow all of the steps described in this article, and to date, the effort has served me well. I rarely have computer problems and I'm convinced that it's because I do this Windows 10 maintenance three to four times a year.
I hope the tips I've shared here help you out. If you have any questions, don't hesitate to ask by either leaving a comment below or contacting me directly if the comments section on this article is not available to you.
Finally, if you found this article interesting and useful, please do take a second to click the Thumbs Up icon below. Thanks very much.

However, most people don't realise that to keep the Windows 10 operating system performing optimally, regular maintenance should be performed. Whilst Microsoft provides all of the tools needed to do that, they don't have a document or instructions on what maintenance you should be doing or at what intervals you should be performing maintenance tasks. That's what I'm going to explain in this article.
So with all that said, let's get on with the show...
Pre-requisites
There's only one, and that's your being willing to perform these maintenance tasks at least once every three months. Set a repeating reminder in your Personal Information Manager (PIM) such as Microsoft Outlook to remind you when it's time to perform some maintenance again.
Strongly Advised – Backup First
You should already be making periodic backups, certainly no less frequently than once per month, but it is a good idea to make an extra backup as the first step of this quarterly maintenance.
While none of the steps prescribed below should cause any damage, it's better to be safe than sorry. If during the month following this maintenance no unexpected issues arise, and assuming that you also have a monthly or more frequent backup scheduled, then you can erase this extra backup when it's a month old.
If you don't have a regularly scheduled periodic backup (strongly not advised), then I recommend that you keep this pre-maintenance backup until your next quarterly maintenance.
How to backup and which backup software is best to use is a topic on its own. I'll soon be writing an article on how I do daily automated incremental backups of my entire Windows installation for a minimal expense, so keep an eye out for it.
In the meantime, if you're not backing up yet, here's a Techradar Article that lists several backup solutions you may like to check out. It's not an exhaustive list of solutions by any means, but it gives you a place to start and contains no suggestions that I would personally advise against using.
Maintenance Step 1. Clean out temporary files
Why? - Windows and other vendor's programs are supposed to delete temporary files once they're no longer needed. Still, programmers can be lazy and not bother doing that, so Windows tends to accumulate hundreds to thousands of these files all the time. The disadvantage they cause is that they tend to slow Windows down to a crawl if not regularly cleaned out.
Two things will happen.
- Your computer should perform noticeably faster
- You may be pleasantly surprised at how much hard drive space you've regained.
Here's how to do it:
1. Press your Windows Key and type Disk Clean-up and then press your Enter key or click on the Disk Clean-up app icon. The following appears. Select the drive Windows is installed on (usually C:) and click the OK button.
On the next window, first, click on the Clean up system files button. That gives us considerably more available areas to safely clean up as well as potentially regaining quite a bit of hard drive storage space.
You'll now need to again confirm the drive you want to clean up and click the OK button again.
Now, wait a moment. It may seem as though nothing is happening, but rest assured it is. The following progress window will soon pop up.
Followed by this window.
When doing the above procedure for routine maintenance, nothing listed is dangerous to remove. Windows does not list anything which, if deleted, would harm your system in any way; so tick everything in the Files to delete: section.
>>> !! Warning - Unselect "Recycle Bin" if you want to hold on to its contents and "Previous Windows installation(s)" if you have recently upgraded Windows and want to retain the ability to roll back to the previous version. <<<
Note that now we have a More Options tab and the opportunity to recover considerably more hard drive space than before. In this example, 36.9 GB of space recoverable, as opposed to only 75.0 MB of space before we clicked the "Clean up system files" button.
Now click the More Options tab highlighted in the previous screenshot, and the window will change to this:
Though optional, I recommend periodically deleting all but the most recent restore points created by Windows.
Older ones tend to corrupt and often won't work anyway if too many changes have occurred since they were created, so click the optional step Clean up... button to remove all but the most recent restore point that Windows has made. Once clicked, the following window will appear.
Confirm your decision by clicking the Delete button.
The final step to begin the clean-up process is to now click the OK button.
Acknowledge you want to continue by clicking the Delete Files button on the following prompt.
If you have recently upgraded Windows, you will be asked again if you are sure you want to remove the ability to roll back. Click Yes if you are, or No if you prefer to leave the rollback function to remain available to you.
You will see a progress window at this point. Be patient. It can take a long time (15 minutes or more), even on the fastest of hard drives.
Please do not Cancel it; just allow it to complete. I also suggest not using your computer during the Disk Clean-up process as it will just make the task take longer.
Once the above Disk Clean-up has completed the progress window will disappear, and you're done with this part of maintenance. Let's move on to the next step.
Maintenance Step 2. Verify your System File integrity with CHKDSK
The Chkdsk command scans your computer's NTFS or FAT32 filesystem and checks the filesystem's integrity, including filesystem metadata. I always suggest running chkdsk in a "read-only" configuration first, i.e. without any switches, to check for problems. Adding switches such as the /F switch (i.e. chkdsk /f) will require the computer to be rebooted so that repairs can be conducted, even if no repairs were required.
Here's how to run it:
First, open up an Administrative DOS command prompt. Many ways to do this, but one easy way is:
Press your Windows Key, type CMD and select Run as administrator.
Click Yes on the User Account Control (UAC) prompt to continue.
An Administrator: Command Prompt will appear. We will do our work here.
To run the chkdsk test, simply type the command chkdsk followed by your Enter key. Chkdsk will then commence examining your file system for any errors it can repair.
Usually, you will get the message "Windows has scanned the file system and found no problems. No further action is required" as shown below, in which case you don't need to do anything else in this step.
If errors are found you will be advised to run chkdsk again with the /F switch. In this case, follow the instructions. Note that a reboot will be required after running the command chkdsk /f.
In the next step, we will determine if any problems have developed with the Windows 10 protected system files. We do that with the SFC command.
Maintenance Step 3. Check the integrity of Windows Protected System Files
Still in the Administrative Command Prompt window, issue the following command.
SFC /scannow
Windows will now run a series of tests and make any necessary repairs if it finds a problem.
In the example below, SFC reported that it did not find any integrity violations. That's a good thing. If it does find any, it will repair them and advise you of that once it completes its verification scan. No more to do with SFC for maintenance purposes now.
Maintenance Step 4. Use DISM to check for and correct system problems
The DISM command is often used when a computer has problems like not starting up or starting up with errors, performing poorly, or giving unexpected and unexplained errors. It basically repairs Windows installations that tools like SFC and CHKDSK can’t fix.
In such scenarios, the best option is to use DISM to attempt to repair any underlying issues. Its use is harmless so it is safe to use for routine maintenance. It can often do a lot of good by repairing errors that other repair tools can't fix.
Note: There are many switches associated with running DISM, but we're only going to concentrate on two of them for maintenance purposes, namely CheckHealth and RestoreHealth.
Here's how to use it...
Still in the Administrative Command Prompt window, optionally issue the following command.
DISM /Online /Cleanup-Image /CheckHealth and press the Enter key.
Many people recommend using the CheckHealth switch, so I've included it here for the sake of completeness only. However, I don't trust the command because it typically runs for less than a second and has consistently reported "No component store corruption detected." even when there were problems. For this reason, I recommend always running DISM with the RestoreHealth switch instead of CheckHealth.
Even if there are no problems, DISM will NOT do any harm, and the bonus is that if there are problems, then DISM will repair them for you. Since running DISM with RestoreHealth also does a health check, you only need to run this command:
DISM /Online /Cleanup-Image /RestoreHealth and press the Enter key
You should get a result like the following which means all is now A-OK, and any errors have been corrected automatically:
Oh, and it doesn't take all that long to run, either. With a decent Internet connection expect it to take about 10 minutes or so.
Maintenance Step 5. Do manual Virus and Malware scans
Even though all Virus and Malware software vendors offer the ability to schedule periodic scans, I've found many people don't take advantage of this option. If you're one of those folks, then use this opportunity verify that periodic scans are scheduled.
Even so, a scheduled scan is often only effective if your computer is on when the scheduled time arrives. For this reason, I also recommend doing periodic manual scans, and doing them as part of your quarterly maintenance works great.
As a side note, many people often ask me what I think are the best Virus and Malware protection packages. I can never answer that because which is best is subjective, so all I say is that my own security software preference (at the time of writing) is Avast Premium Security and Malwarebytes Premium. I run both in real-time mode, and (for me) they play together perfectly.
Maintenance Step 6. Checking if your Hardware Drivers are up to date
This step doesn't need to be performed as regularly as every three months or so, but it's a good idea to check each time there is a major Windows update or at least twice a year.
As Windows 10 continues to be updated, manufacturers of hardware such as Printers, Graphics cards, and Webcams etc. will update their drivers. Windows Update can often replace your hardware manufacturers' drivers with generic drivers created by Microsoft. While that's sometimes not an issue, at other times this can cause your hardware to either lose some functionality or even malfunction.
That being the case, here's what I do at least twice a year; and doing so has served me (and plenty of my clients) well.
What you need to know
Obviously, you need to know the brand and models of the hardware that you've connected to your computer, but this isn't as hard as it might seem. Make a list of everything using a free tool such as Piriform Speccy, which you can download from here.
The snapshot below is from the Pro version I own to comply with the license agreement, but if you're not using it in a business environment, the Free Version will give you all the information you need.
Once you've downloaded and installed it, simply run it, and you'll get a report that looks as follows:
Save the report to a Text File (or whichever other format you prefer), and you will have a list of all of the hardware in your computer, including the manufacturers and model numbers. Very useful information to keep handy.
With all that info in hand, when it's time to check for newly released drivers, visit the manufacturers' websites of the hardware you have installed and check for any updated drivers they recommend you should download and install. Alternatively, if your hardware has a "Check for updates" option, use that instead.
Finally, if the hardware was installed when you bought your computer, such as a memory controller or a graphics card, it's usually best to install the driver from the computer manufacturer's website, since they usually test the new driver before they recommend it, and sometimes customise the driver to make it compatible with the rest of the hardware in your computer. Wherever you get the drivers from, it's a good idea to stay up to date to prevent problems.
>>> !! Important Note on Driver Updating Software <<<
I do not recommend using any software that offers to check for and automatically update your computer's hardware drivers (or, for that matter, your software applications) because they get it wrong far too often and cause considerably more problems than they solve. Examples of such software solutions can be viewed using a Google search for "Automatic Software and Hardware updating software" or published articles like this one about the Best Free Driver Updater Tools.
Neither Google nor the websites that list this type of software are to blame - it's the software packages that cause the problems. Many will disagree, so use them if you must, but know that I've had to fix so many issues as a direct result of Automatic Driver Updaters over the years that I now consider them nothing more than PUPs, and in some cases, even malware. Consider yourself warned.
Maintenance Step 7. Keep the inside of your desktop computer clean
Dust in computers can cause overheating problems, which leads to slow performance and even crashes like the dreaded "Blue Screen of Death". I recommend that you give the inside of your computer cases a good clean out at least once a year. It's well worth doing.
Computers have fans that constantly suck in air and dust particles, so once a year I open the cases of my desktop computers and servers to give them a good vacuuming, paying particular attention to the fans. Regardless of how clean the environment is around your computer, if you look inside the case I'm willing to bet you'll be shocked at how much dust has accumulated after a year of use.
As for how to do it, I think it goes without saying that you should make sure the computer is unplugged from any power supply before opening the case, and you should wear an anti-static wristband before touching any of the components inside. When vacuuming the fans, use a finger or pen to prevent them from spinning wildly. Just be careful and gentle and you'll be fine.
Conclusion
I regularly follow all of the steps described in this article, and to date, the effort has served me well. I rarely have computer problems and I'm convinced that it's because I do this Windows 10 maintenance three to four times a year.
I hope the tips I've shared here help you out. If you have any questions, don't hesitate to ask by either leaving a comment below or contacting me directly if the comments section on this article is not available to you.
Finally, if you found this article interesting and useful, please do take a second to click the Thumbs Up icon below. Thanks very much.
©Andrew Leniart 2021
IT Professional | Freelance Journalist
IT Professional - Helping others to help themselves. https://andrewleniart.com & https://www.computerhelpzone.com.au/testimonial/
Have a question about something in this article? You can receive help directly from the article author. Sign up for a free trial to get started.
Comments (6)
Commented:
With regards to CCleaner (published by the same company as Speccy) being free and less spammy than before, I share Andrew L's distaste for these automated cleaners. I find that they are sometimes too aggressive and they end up cleaning out registry entries or files that you only find out you need long, long after the cleaner deleted them. By then, you can't even be sure what deleted the file or registry entry. Even if the cleaner lets you choose what to delete and backs up the deletions for potential restoration (which, to a certain extent, makes the deletion purposeless since the backup fills the space you just freed up), the options are impossible to understand for a layman, and even for a seasoned computer expert. Also, the list can be very long and take hours to evaluate; something that a client is unwilling to pay for. Not only is it impossible to know what is safe to delete, it is impossible to know what to restore when you finally find something broken. Furthermore, it is often impossible to just restore, since the missing bits may have already been replaced by other bits. For when you have issues, my preferred fix is to uninstall and re-install, and if that fails, to start from scratch with a fresh Windows install.
Commented:
Another suggestion. While you are updating drivers that's an opportunity to download and keep the latest version of every driver in a folder organized by hardware like network, printer, video, etc. This means you can't use automated updates, since then it is difficult to find and keep a copy of the updated driver. Ultimately, this means it will likely take twice as long to first download and then update drivers. However, if you ever need to re-install Windows it is very practical to have all the drivers on-hand, especially if you only have a single computer and no easy way to browse for drivers while you are getting up and running. By archiving the older versions of the drivers, this gives you an audit trail of driver updates, and lets you roll back to an earlier version if a new driver turns out to be faulty. Finally, while the easiest thing to do is to always update to the latest driver version, it isn't always the best. I have seen many driver updates where the main change is for a universal driver to support newer hardware. For example, new camera models from Logitech or new printers from HP. In some cases, the new version also drops support for certain features, so you can have an update that doesn't add any value in terms of stability or safety, but costs you if you were using the dropped feature. For this reason it is a good idea to read the release notes for all of the versions released since the version already installed, to weigh the pros and cons of installing the newest release.
Commented:
Thank you for this article. Definitely a Life Saver, at least for me. Worth of being Go To Source for prolonging the life span of my PC. It will be a permanent icon on my Desktop. Thank you once again.
Basem Khawaja
Author
Commented:Thank you for your kind comment and I'm very glad you found the article useful. Also for endorsing the article with a Thumbs Up. Very much obliged.
Regards, Andrew
Commented:
You are welcome. Do you want to start the Team Viewer in 30 minutes? Just let me know.
Thank you,
Basem Khawaja
View More