VMware vConverter - P2V for Windows Servers


vExpert vSAN, NSX, Cloud Provider, Veeam Vanguard, Virtual Backups, and Storage design, and an active blogger.
Published:
Browse All Articles > VMware vConverter - P2V for Windows Servers
In this article I will like to share some of my experience in P2V Physical Windows Servers.
This tutorial will use as a Single Cold Migration, but many of the pre and post tasks, can be used in a Standalone Migration. Additionally, this article will focus on Windows Operating System Servers that are either Physical Servers with local disks or with storage disks.
--------------------------------------- // ---------------------------------------
This guide describes the procedure to convert/Migrate a Physical Server to Virtual Server (P2V) in Windows Servers.
At the end of this document you will be able to:
> Required software
VMware vCenter Converter Boot CD.
P2V Scripts.
> P2V requirement analysis and check.
• Check for any System Operation issues or Hardware issues, regarding P2V this SO or this type of Hardware.
http://www.vmware.com/support/pubs/converter_pubs.html
Note: Check the type of Windows Server license. OEM licenses or Appliance Editions cannot be P2V or will need special attention.
> Virtual environment analysis:
> P2V Pre-requirements tasks:
Clean any software related to any hardware management and any unneeded data or services.
On the Physical Server:
Go to Start Menu and Run > msconfig
Or go to console and run c:>msconfig
• On the General tab
• Click "Close"
> P2V Hardware and Network Settings:
Let’s start to import the physical machine settings to use after in the VM settings.
Run c:\P2V\EE-Pre1.bat
• The script creates files with Network Settings, Disk Drivers Letters.
• Files Created: Route_Settings.txt, IP_Settings.txt, Disk_Letters.txt, PhysicalMachine.txt.
• The script creates a list of all devices of the physical machine (including non-present devices).
Note: For a better disk letter or partition control for further view, you can take a print screen for the Disk Management partitions and save on the physical server.
> P2V Storage Pre-requirements tasks:
First we need to check if there is any Storage Disks attach to the physical server.
Disks that are assigned from the disk array to the physical host have to be treated in special way. First they have to be protected during the P2V migration process. Second task is to provide the recovery point for roll back of the migration. Last task is to reconnect all LUNs to migrated Virtual Machine.
Check if there is any Storage Disk checking if there is any FC Adapter.
• Go to Start Menu and Run > devmgmt.msc
Check if there is any Storage Disk checking if there is any FC Adapter.
• Go to Start Menu and Run > devmgmt.msc
And check SCSI and RAID controllers![SCSI Controlleres]() If there is Storage Disks and FC Adapters, follow the above tasks.
If there is Storage Disks and FC Adapters, follow the above tasks.
This next section is only needed if your physical server uses Storage data disks. If this is not the case, bypass this section.
Download a small tool to get adapter/disks information for Storage team.
http://www.microsoft.com/downloads/details.aspx?FamilyID=73d7b879-55b2-4629-8734-b0698096d3b1&displaylang=en
• Install the fcinfo_x86.msi
• Using the fcinfo get the WWN and the LUN ID for each disk.
After installing the small tool, Go to Start Menu and Run> cmd
Then just run the following command in the console:
Following tasks has to be performed to protect LUNs during P2V migration.
This pre-Storage tasks need to be done in the Storage Management side.
• Identify all LUNs connected to physical server.
• Create SnapView session for each LUN connected to the physical server.
• Confirm that all sessions have been created correctly.
> After all this tasks, put the Converter BootCD in the CD-ROM, and restart the server.
> Start the P2V Windows Server migration.
Start with the P2V tasks:
• When the server starts, the vConverter BootCD will boot up.
• After the vConverter BootCD start, need to start the P2V migration.
Note: If this Physical Server is a Windows NT4 server which has Service Pack 6a you need to add two files to the vConverter (startup) as per the requirements:
Requirements Files:
SP6I386.exe
http://www.filewatcher.com/m/sp6i386.exe.35720696.0.0.html
KB885835
http://www.microsoft.com/downloads/details.aspx?FamilyId=325EAA8F-AF09-4839-B9E8-BB218C7A8564&displaylang=en
Use and add this files then continue with the P2V Migration.
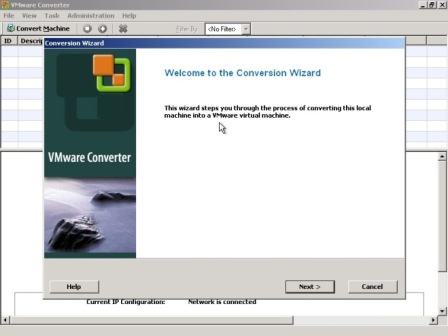
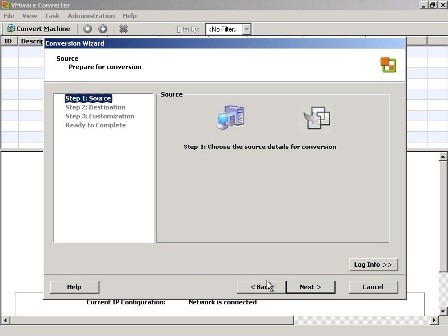
> Customizing Physical server (source)
vConverter will start to collect information from the Physical server.
![P2V001]()
In this screen do not update network parameters.
![P2V002]()
Choose “Conversion Machine” option.
![P2V003]()
Next on the source.
![P2V004]()
> Customizing the Virtual Machine and resources (destination).
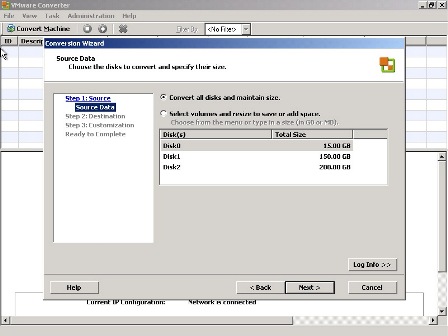
This task is to choose what to migrate, and choose the allocation for the P2V resources.
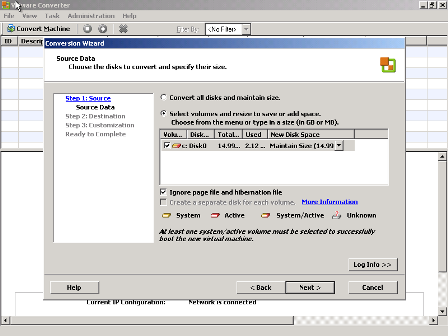
Choose what disks are to migrate to Virtual environment.
![P2V005]()
![P2V006]() Very important Notes:
Very important Notes:
.
This is P2V to a VMware infrastructure, so choose VMware Infrastructure.
![P2V007]()
> Specify Destination Source:
> Virtual Machine settings and resources:
Change or add the settings and the resources for the Virtual Machine that is created in this P2V.
![P2V008]()
![P2V009]()
> Finished P2V on Server side.
This finishes the migration on the Physical server side. In the next section we will work on the VM settings and post P2V tasks.
> P2V post-installation tasks.
Here we will check the VM after P2V and clean some “trash” from the new VM and start software services.
> VM Review Tasks:
Before start the VM review and adjust the virtual hardware and settings depending of the need of the new VM and type of server. (Management, Database, Application, etc.)
> Clean P2V VM:
Here we will clean and adjust the P2V VM from all unnecessary hardware and/or Software and Set-tings.
Go to console and run the scripts.
Run c:\P2V\EE-Post1.bat
> Software and Networking adjust.
Or just manually uninstall any HP (or other Hardware management software) Support software.
Note: Update the HAL - Only do this task if you changed from multi to uniprocessor.
Note2: If the physical server is a Windows NT, just follow this Microsoft KB.
• Reboot your server.
> Finalizing the P2V.
Here we will finalize the P2V and shutdown the physical server and connect the VM.
• Check local disks letters (if needed change drive letters to the original values that is in the file Disk_Letters.txt created earlier or
print screen created).
• Compare the values with the files created in the initial P2V Pre-requirements tasks.
• In the VM connect all the NICS and reboot the VM server.
• Logon to server Test network connectivity from and to the VM.
• Test your Application/Database Servers or reconfigure depending on the new settings.
> Storage Tasks:
This section will only be necessary if in the Physical Server has any Storage Disks.
> Storage side.
This section is done on the Storage management by the Storage Team.
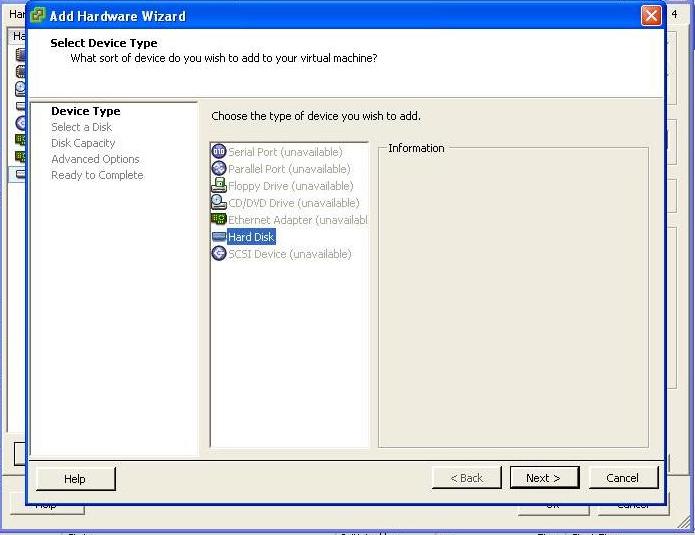
In the VM settings add a new hard disk.
![P2V010]()
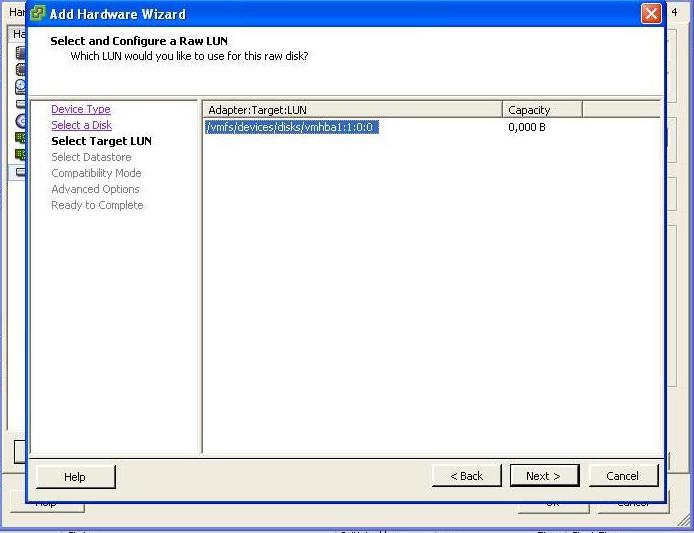
Choose a RAW disk to add.
![P2V011]() In the next screen you can see the RAW disk to add to the VM.
In the next screen you can see the RAW disk to add to the VM.
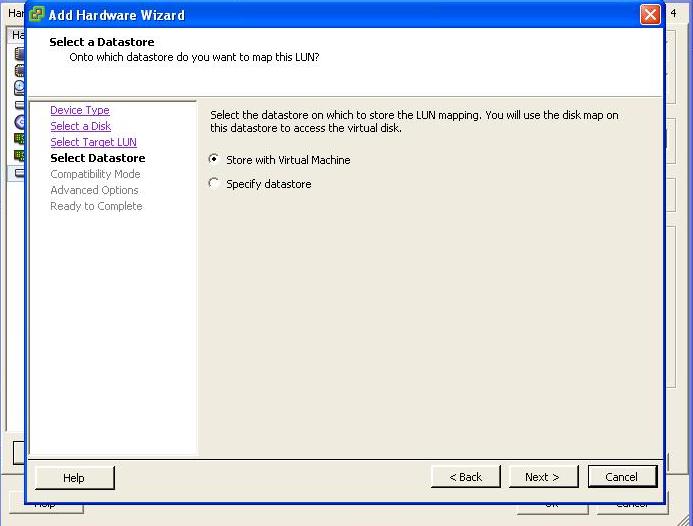
![P2V012]() You can choose to hold this RAW disk with the VM (recommended), or you can choose a different Storage to hold the RAW disk.
You can choose to hold this RAW disk with the VM (recommended), or you can choose a different Storage to hold the RAW disk.
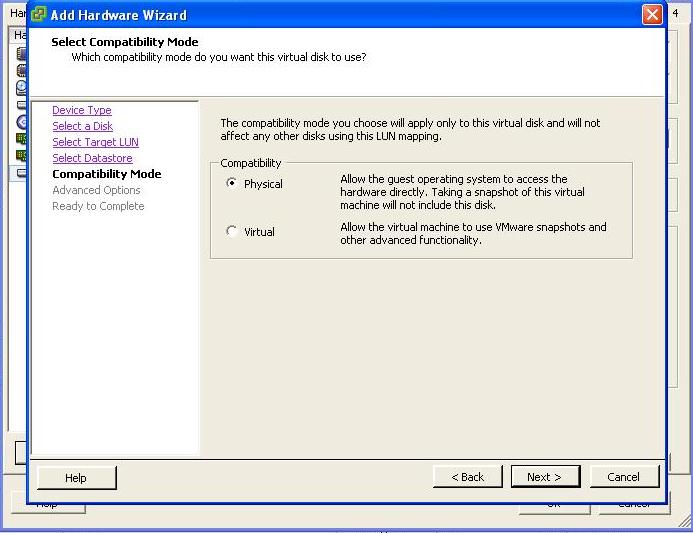
![P2V013]() Use the Virtual compatible mode. With this mode you can snapshot the VM that will include this RAW disk.
Use the Virtual compatible mode. With this mode you can snapshot the VM that will include this RAW disk.
Next and Finish adding this RAW disk.
![P2V014]()
> VM System Operation side:
> Finishing and Testing the VM (application or database).
To complete the P2V just make some test after the final post-P2V tasks. After this testes the P2V is finish.
Testing Tasks:
This finishes this long tutorial about migration P2V for Windows server.
Hope this will be helpful for all the users in future P2V servers
Thank you for reading this
PS: If you have any issues or any type of problems with P2V, just contact me and maybe I can help, or can be an issue that I have encounter in the past and I can help.
Note: I like to thank you Lieven D'hoore and is site, for the help and ideas on P2V and with the pre and post scripts.
Important: Download the P2V Scripts from here
This tutorial will use as a Single Cold Migration, but many of the pre and post tasks, can be used in a Standalone Migration. Additionally, this article will focus on Windows Operating System Servers that are either Physical Servers with local disks or with storage disks.
--------------------------
This guide describes the procedure to convert/Migrate a Physical Server to Virtual Server (P2V) in Windows Servers.
At the end of this document you will be able to:
• Follow all the requirements analysis to migrate Windows servers to Virtual Server(P2V):
• Follow all the pre- tasks before P2V Windows Server.
• Use vConverter Boot CD to P2V (single cold migration) Windows Servers.
• Follow post-tasks after P2V Windows Server
.
• Follow all the pre- tasks before P2V Windows Server.
• Use vConverter Boot CD to P2V (single cold migration) Windows Servers.
• Follow post-tasks after P2V Windows Server
> Required software
VMware vCenter Converter Boot CD.
P2V Scripts.
> P2V requirement analysis and check.
• Check for any System Operation issues or Hardware issues, regarding P2V this SO or this type of Hardware.
http://www.vmware.com/support/pubs/converter_pubs.html
Note: Check the type of Windows Server license. OEM licenses or Appliance Editions cannot be P2V or will need special attention.
• Check the Physical Server Applications and is Server for any issues regarding Virtualization methods.
• Check Storage in the Virtualization Infrastructure to hold the Physical Server(all the disks).
• Check if the physical server has the minimum 200Mb free disk space and at least 364 Mb memory (RAM).
• Check if the server will use serial ports or USB, P2V will need to be restricted to an ESX host with physical serial device.
• Check if the server as any Storage allocated, or any shared disks. If server as any Storage disks, Storage team need to be involved in the P2V process, and some additional tasks need to be added.
> Virtual environment analysis:
• Check if there is enough CPU available in the virtual environment to accommodate the new VMs needs.
Note: Physical machines with multiple CPUs but only using single threaded applications should be set to 1vCPU. Adding extra CPUs would waste CPU time / cycles because the applications would not make use of it.
• Check if there is enough RAM available in the virtual environment to accommodate the new VMs needs.
• Check if there is enough RAM available in the virtual environment to accommodate the new VMs needs.
> P2V Pre-requirements tasks:
Clean any software related to any hardware management and any unneeded data or services.
On the Physical Server:
• Login as local administrator.
• Stop any software mirroring, break the mirror (but not the data) since VMware converter does not support software mirrors.
• Clean-up any temporary files and unneeded data.
Note: For this task I use a free tool to do the job ( CCleaner - http://www.piriform.com/ccleaner).
• Defrag and fix servers disks errors (will reduce the migration time and fix some possible migration errors). Run this task for each local disk.
Note: For this task I use a free tool to do the job (MyDefrag http://www.mydefrag.com).
• Extract the P2V Scripts to the physical server “c:\P2V” (create the P2V directory if not exists).
Run the System Configuration Utility to disable all unnecessary software services on start.
• Stop any software mirroring, break the mirror (but not the data) since VMware converter does not support software mirrors.
• Clean-up any temporary files and unneeded data.
Note: For this task I use a free tool to do the job ( CCleaner - http://www.piriform.com/ccleaner).
• Defrag and fix servers disks errors (will reduce the migration time and fix some possible migration errors). Run this task for each local disk.
Note: For this task I use a free tool to do the job (MyDefrag http://www.mydefrag.com).
• Extract the P2V Scripts to the physical server “c:\P2V” (create the P2V directory if not exists).
Go to Start Menu and Run > msconfig
Note: For Windows NT and 2000 servers, you need to use the msconfig.exe from a Windows XP. Just copy the msconfig.exe to the physical server and use it.
Or go to console and run c:>msconfig
• On the General tab
1. Select "Selective Startup
2. Uncheck "Load Startup Items"
• On the Services tab
2. Uncheck "Load Startup Items"
1. Select "Hide All Microsoft Services"
2. Click "Disable All"
• Click "Apply"
2. Click "Disable All"
• Click "Close"
> P2V Hardware and Network Settings:
Let’s start to import the physical machine settings to use after in the VM settings.
Run c:\P2V\EE-Pre1.bat
• The script creates files with Network Settings, Disk Drivers Letters.
• Files Created: Route_Settings.txt, IP_Settings.txt, Disk_Letters.txt, PhysicalMachine.txt.
• The script creates a list of all devices of the physical machine (including non-present devices).
Note: For a better disk letter or partition control for further view, you can take a print screen for the Disk Management partitions and save on the physical server.
> P2V Storage Pre-requirements tasks:
First we need to check if there is any Storage Disks attach to the physical server.
Disks that are assigned from the disk array to the physical host have to be treated in special way. First they have to be protected during the P2V migration process. Second task is to provide the recovery point for roll back of the migration. Last task is to reconnect all LUNs to migrated Virtual Machine.
Check if there is any Storage Disk checking if there is any FC Adapter.
• Go to Start Menu and Run > devmgmt.msc
Check if there is any Storage Disk checking if there is any FC Adapter.
• Go to Start Menu and Run > devmgmt.msc
And check SCSI and RAID controllers
 If there is Storage Disks and FC Adapters, follow the above tasks.
This next section is only needed if your physical server uses Storage data disks. If this is not the case, bypass this section.
Download a small tool to get adapter/disks information for Storage team.
http://www.microsoft.com/downloads/details.aspx?FamilyID=73d7b879-55b2-4629-8734-b0698096d3b1&displaylang=en
• Install the fcinfo_x86.msi
(Fibre Channel Information Tool is a command line interface (CLI) tool that supports scripting. The Fibre Channel Information Tool requires the following:
Windows Server 2003 or Windows 2000 Server, SP3 or greater (SP4 recommended).
A Fibre Channel HBA driver that supports the HBAAPI standard.)
Windows Server 2003 or Windows 2000 Server, SP3 or greater (SP4 recommended).
A Fibre Channel HBA driver that supports the HBAAPI standard.)
• Using the fcinfo get the WWN and the LUN ID for each disk.
After installing the small tool, Go to Start Menu and Run> cmd
Then just run the following command in the console:
c:>fcinfo /mapping > c:\P2V\Files\Storage_Settings.txt

                      (Targeted command: if no adapter specified, defaults to adapter 0)
                      Output example:

                      		com.emulex-LP9002-0, num: 9
                      ---------------------------------------------------------------
                      (DeviceName,           B, T, L) <--- B=Bus, T=Target, L=LUN
                      ( \\.\PhysicalDrive1:, 1, 0, 0)
                      (FcId, 	WWN, 				PortWWN, 			  L)
                      (x11556, 20:00:00:20:37:0b:6d:6d, 21:00:00:20:37:0b:6d:6d, 0)
Following tasks has to be performed to protect LUNs during P2V migration.
This pre-Storage tasks need to be done in the Storage Management side.
• Identify all LUNs connected to physical server.
• Create SnapView session for each LUN connected to the physical server.
• Confirm that all sessions have been created correctly.
> After all this tasks, put the Converter BootCD in the CD-ROM, and restart the server.
> Start the P2V Windows Server migration.
Start with the P2V tasks:
• When the server starts, the vConverter BootCD will boot up.
• After the vConverter BootCD start, need to start the P2V migration.
Note: If this Physical Server is a Windows NT4 server which has Service Pack 6a you need to add two files to the vConverter (startup) as per the requirements:
Requirements Files:
SP6I386.exe
http://www.filewatcher.com/m/sp6i386.exe.35720696.0.0.html
KB885835
http://www.microsoft.com/downloads/details.aspx?FamilyId=325EAA8F-AF09-4839-B9E8-BB218C7A8564&displaylang=en
Use and add this files then continue with the P2V Migration.
> Customizing Physical server (source)
vConverter will start to collect information from the Physical server.

In this screen do not update network parameters.

Choose “Conversion Machine” option.
Next on the source.
> Customizing the Virtual Machine and resources (destination).
This task is to choose what to migrate, and choose the allocation for the P2V resources.
Choose what disks are to migrate to Virtual environment.
 Very important Notes:
1. You can choose to create a separate disk for each volume, however, active and system volumes will not be separated onto individual disks if they currently together on one. So don’t choose this option in these cases.
2. If you have any Storage disks do not select to migrate. In this example we do not migrate the Storage disks, we will reattach the disks into the new Server(in this case the new VM).
3. Some Server brands use dedicated partitions to hold the restore RAID point. In this cases choose selecting the volumes and de-select this partition, leave the rest selected.
If choose to separate the migration partitions for one physical disk (example 1 physical disk and 3 partition) please be aware of the notes(point 1) in above.
2. If you have any Storage disks do not select to migrate. In this example we do not migrate the Storage disks, we will reattach the disks into the new Server(in this case the new VM).
3. Some Server brands use dedicated partitions to hold the restore RAID point. In this cases choose selecting the volumes and de-select this partition, leave the rest selected.
.
This is P2V to a VMware infrastructure, so choose VMware Infrastructure.

> Specify Destination Source:
• Destination Type.
o Select destination type: VMware Infrastructure virtual machine.
o VMware Infrastructure details .
• Server: (choose the ESX host, or Virtual Center to migrate this P2V).
o User name: (Provided by the VMware ESX administrator).
o Password: type the password of the above user name.
o Click NEXT
o Select destination type: VMware Infrastructure virtual machine.
o VMware Infrastructure details .
• Server: (choose the ESX host, or Virtual Center to migrate this P2V).
o User name: (Provided by the VMware ESX administrator).
o Password: type the password of the above user name.
o Click NEXT
• Host/Resource.
o Select the ESX-vCenter host/group you want to convert to.
o Virtual machine name: type the name of the destination virtual machine.
o Datasource: Select disk Storage allocation (need to choose the path/storage to allocate the VM, and VM disks).
o Click NEXT
o Select the ESX-vCenter host/group you want to convert to.
o Virtual machine name: type the name of the destination virtual machine.
o Datasource: Select disk Storage allocation (need to choose the path/storage to allocate the VM, and VM disks).
o Click NEXT
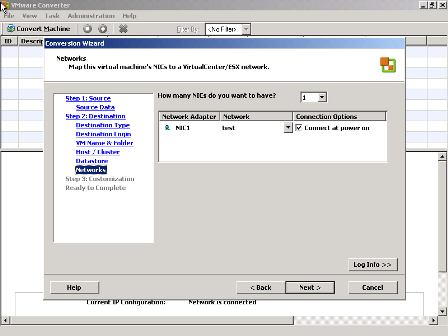
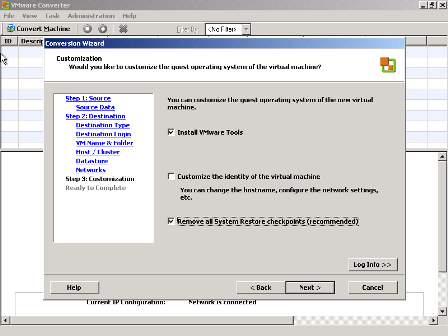
> Virtual Machine settings and resources:
Change or add the settings and the resources for the Virtual Machine that is created in this P2V.
• Network adapters.
o Choose the number of network adapters you need.
o De-select Connect at power-on.
o Choose the number of network adapters you need.
o De-select Connect at power-on.
• Advanced options.
o De-select "Power on target machine".
o Select "Install VMware Tools on the imported machine".
o Select "Remove System Restore checkpoints on destination".
o De-select "Power on target machine".
o Select "Install VMware Tools on the imported machine".
o Select "Remove System Restore checkpoints on destination".
• Click NEXT
• Ready to Complete.
• Review the summary information.
• Click NEXT
• Ready to Complete.
• Review the summary information.
• Click NEXT
> Finished P2V on Server side.
This finishes the migration on the Physical server side. In the next section we will work on the VM settings and post P2V tasks.
> P2V post-installation tasks.
Here we will check the VM after P2V and clean some “trash” from the new VM and start software services.
• First need to connect to the Virtual Center, or ESX host, using a VI Client.
> VM Review Tasks:
Before start the VM review and adjust the virtual hardware and settings depending of the need of the new VM and type of server. (Management, Database, Application, etc.)
• Before change anything on the new P2V VM, create a VM Snapshot to rollback any wrong set-tings(on comments add
Initial Sate).
• Before start the VM adjust the number of NICs(leave all NICs power on, but disconnect for now), CPUs(If you change the
numbers of CPUs, different from the physical server, don’t forget to change the HAL running the right script).
• Remove any unnecessary devices such as serial ports, USB controllers, COM ports, floppy drives, etc.
• Start Windows Server in Safe Mode(F8 on server start).
• Log on to the virtual machine.
• Check if virtual machine boots without any booting errors.
> Clean P2V VM:
Here we will clean and adjust the P2V VM from all unnecessary hardware and/or Software and Set-tings.
> Hardware Clean.
The following scripts will clean and set the new VM to work properly:
Go to console and run the scripts.
Run c:\P2V\EE-Post1.bat
This Script will:
1. Creates a list of all devices that matches the virtual machine.
2. Compares the list of all devices of the physical machine (created in the previous step "P2V Pre-requirements tasks") with the
list of all devices that match the virtual machine.
3. Removes all phantom hardware.
4. Rescans hardware.
5. Reboots the server.
> Software and Networking adjust.
• Run c:\P2V\EE-Post2.bat
This script will change the registry key for profile problem after P2V in VMware (VMware Article).
This script will change the registry key for profile problem after P2V in VMware (VMware Article).
• Run c:\P2V\ EE-Post3.bat
This script will run the vbs script c:\P2V\ Post-Task3.vbs and will Enable Video Hardware Acceleration.
If this P2V is converting HP Proliant hardware you can clean up the HP hardware related drivers, utilities, agents using the HP Proliant Support Pack Cleaner from Guillermo Musumeci.
This script will run the vbs script c:\P2V\ Post-Task3.vbs and will Enable Video Hardware Acceleration.
Or just manually uninstall any HP (or other Hardware management software) Support software.
Note: Don't forget Network Configuration Utility Agent in the Network Adapters.
• Run the System Configuration Utility to enable the normal services boot.
• Go to Start Menu and Run > msconfig
o For Windows NT and 2000 Servers use the same msconfig.exe from previous pro P2V tasks.
• Go to Start Menu and Run > msconfig
o For Windows NT and 2000 Servers use the same msconfig.exe from previous pro P2V tasks.
Or go to console and run c:>msconfig
o On the General tab, Select the "normal startup" option.
o Reboot the server.
Logon to the VM again.
o On the General tab, Select the "normal startup" option.
o Reboot the server.
• Go to Start Menu and Run > cmd
c:\>set devmgr_show_nonpresent_devices=1
c:\>devmgmt.msc
o Select view > show hidden devices.
o Check if there are still unused devices present and uninstall them manually.
• Run c:\P2V\EE-Post4.bat
c:\>set devmgr_show_nonpresent_dev
c:\>devmgmt.msc
o Select view > show hidden devices.
o Check if there are still unused devices present and uninstall them manually.
Note: Update the HAL - Only do this task if you changed from multi to uniprocessor.
Note2: If the physical server is a Windows NT, just follow this Microsoft KB.
• Reboot your server.
> Finalizing the P2V.
Here we will finalize the P2V and shutdown the physical server and connect the VM.
• After double check all the previews tasks, shutdown physical server.
• Use files created in P2V Pre-requirements tasks to add the network settings (IP address, DNSs, etc.).
• Use files created in P2V Pre-requirements tasks to add the network settings (IP address, DNSs, etc.).
After updating the network adapter settings, run in console.
c:\route print
c:\ipconfig /all• Check local disks letters (if needed change drive letters to the original values that is in the file Disk_Letters.txt created earlier or
print screen created).
• Compare the values with the files created in the initial P2V Pre-requirements tasks.
• In the VM connect all the NICS and reboot the VM server.
• Logon to server Test network connectivity from and to the VM.
• Test your Application/Database Servers or reconfigure depending on the new settings.
> Storage Tasks:
This section will only be necessary if in the Physical Server has any Storage Disks.
> Storage side.
This section is done on the Storage management by the Storage Team.
Reconnection of LUNs after successful P2V migration.
• Identify all LUNs connected previously to the physical server.
• Remove all the LUNs from physical host Storage Group.
• Remove physical host from that Storage Group.
• Remove the Storage Group.
• Assign all the LUNs to the Storage Group of the ESX cluster that is hosting new Virtual Machine.
• Assign Host ID for each LUN in new Storage Group.
• Provide Host ID to the Virtualization Team.
• Virtualization team has to connect LUNs to the Virtual Machine as a RDM disks.
Roll back procedure after failed P2V migration:
• Shut down the physical server.
• Identify all LUNs connected previously to the physical server.
• Identify SnapView sessions for each LUN.
• Disconnect LUs from the physical server Storage Group.
• Roll back SnapView session for each LUN.
• Reconnect LUNs for the physical server Storage Group.
• Shut down the physical server.
• Identify all LUNs connected previously to the physical server.
• Identify SnapView sessions for each LUN.
• Disconnect LUs from the physical server Storage Group.
• Roll back SnapView session for each LUN.
• Reconnect LUNs for the physical server Storage Group.
> ESX host side:
• Rescan the Storage connections (on the ESX host in Storage Adapters option).
• Check if the new Storage LUN is available in the Storage area.
• Reattach the new LUN to the new VM as a RAW disk.
• Rescan the Storage connections (on the ESX host in Storage Adapters option).
• Check if the new Storage LUN is available in the Storage area.
• Reattach the new LUN to the new VM as a RAW disk.
In the VM settings add a new hard disk.
Choose a RAW disk to add.
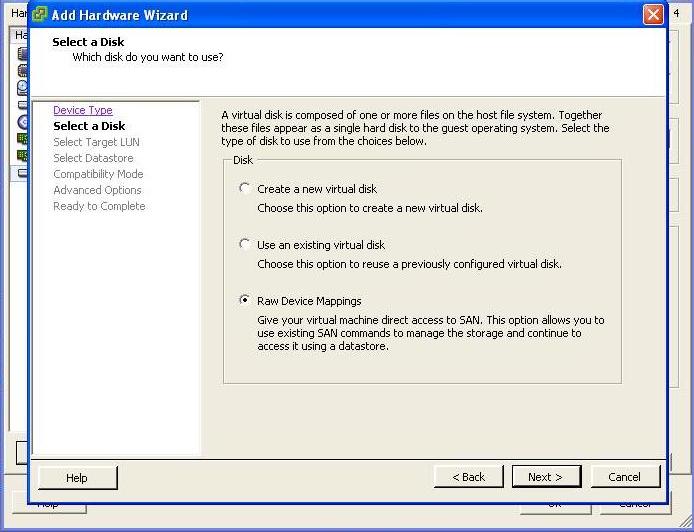 In the next screen you can see the RAW disk to add to the VM.
 You can choose to hold this RAW disk with the VM (recommended), or you can choose a different Storage to hold the RAW disk.
 Use the Virtual compatible mode. With this mode you can snapshot the VM that will include this RAW disk.
Next and Finish adding this RAW disk.
> VM System Operation side:
• Reattach the RAW disk(s) to the Windows.
• Rescan disks to add the new RAW disk.
• Use the same letter disk to add the disk to the server.
• Rescan disks to add the new RAW disk.
• Use the same letter disk to add the disk to the server.
Note: When VM is working an in production and the P2V is a success, remove the VM initial state snapshot and any Storage snapshot created for servers with disk LUNs.
> Finishing and Testing the VM (application or database).
To complete the P2V just make some test after the final post-P2V tasks. After this testes the P2V is finish.
Testing Tasks:
1. Logon to the server using a Domain Account.
2. Ping Gateway and a DC Server.
3. Ping from another server the VM IP server.
4. Open Browser and test internet connection.
5. Check the Automatic services, if they are all running.
6. Testing Database and Application Server.
• If this server is a Database Server, check Database Services and run Database Management Tools.
• If this server is a Webserver, check if IIS is running and test one or two sites configured in IIS.
• If this server is an Application server, run the app to see if you experience any issues.
This finishes this long tutorial about migration P2V for Windows server.
Hope this will be helpful for all the users in future P2V servers
Thank you for reading this
PS: If you have any issues or any type of problems with P2V, just contact me and maybe I can help, or can be an issue that I have encounter in the past and I can help.
Note: I like to thank you Lieven D'hoore and is site, for the help and ideas on P2V and with the pre and post scripts.
Important: Download the P2V Scripts from here
vExpert vSAN, NSX, Cloud Provider, Veeam Vanguard, Virtual Backups, and Storage design, and an active blogger.
Have a question about something in this article? You can receive help directly from the article author. Sign up for a free trial to get started.
Comments (21)
Commented:
Ther is batch file running which uses hostname.
Commented:
Author
Commented:I have tried and it works ok for me from:
https://filedb.experts-exc
Even I do not do login, I can still download the files.
Commented:
Please let me know how much time it takes for 5tb P2V
Commented:
Ask a question related to this article so the experts can try and help you. In the nav, click Ask a question and in your post provide the URL to this article.
View More