Part 8 - Build an immutable backup repository for Veeam Backup & Replication.


Published:
Browse All Articles > Part 8 - Build an immutable backup repository for Veeam Backup & Replication.
For Veeam Backup & Replication, this guide will show you, step by step, how to create and implement a disk-based immutable backup repository from scratch.
In this part: Tighten security on the Linux server (MFA/2FA).
In this part: Tighten security on the Linux server (MFA/2FA).
Veeam immutable repository by under a Public Domain Work license
Introduction
Purpose of these articles
You are a Windows administrator running Veeam Backup & Replication and wish to raise protection against malware attacks and hackers without reverting to shuffle or rotating physical media.This you can accomplish by immutable backups stored on a physical server running Linux. However, you have no Linux servers running and don't want to.
But, like it or not, that is your only option, as the XFS file system is the only one capable of immutability, and XFS only runs under Linux.
Thus, a Linux server is a must. When you have accepted this fact, then what? Where to start?
Like me, you have about zero experience with Linux and, therefore, hesitate to set up a Linux server, indeed in a production environment.
If so, this guide is for you. Here, nothing about Linux is taken for granted.
Sections
The guide has been split into nine parts. This allows you to skip parts you are either familiar with or wish to implement later if at all.- Part 1 - Prepare the install of Linux
- Part 2 - Install Linux on the server
- Part 3 - Prepare the Linux server for Veeam
- Part 4 - Create the immutable Veeam backup repository
- Part 5 - Prepare for backup of the Linux server itself
- Part 6 - Backup of the Linux server itself
- Part 7 - Bare Metal Recovery of the Linux server
- Part 8 - Tighten security on the Linux server (MFA/2FA)
- Part 9 - Maintenance and deactivation/reactivation of MFA/2FA
Requirements
You are familiar with:- the usual tasks administering at least a small network with one Windows Server
- Veeam Backup & Replication and have it installed and running
- the command line - from PowerShell, Command Prompt, or even DOS
Veeam Backup & Replication is assumed to be of version 11 or later. It can be a licensed trial or paid version or even the free Community Edition.
Part 8. Tighten security on the Linux server
In the previous sections, Part 7, we equipped the Linux server with a proven backup system to be able to quickly perform a bare metal recovery and bring the server online, in case the system drive should cease to function.In this section, some methods will be shown to tighten the security on the server. All of these are related to SSH, the method we use to remote control the server as it, in many cases, is quite cumbersome to be forced to sit and physically operate the server via a directly connected keyboard and monitor.
SSH is, in general, considered to be extremely secure and, by all practical measures, impossible to crack. However, as they say, “you never know”,
The ultimate method is, of course, simply to shut down the SSH server on the Linux server. However, a less brute and more flexible method is to deactivate the service.
Deactivate SSH on the Linux server
One safe method to disable remote access to the Linux server is, of course, to shut down the SSH service itself. You don't have to uninstall the service, only stop it.To view the status of SSH, run this command:
sudo systemctl status sshd.serviceIf running normally, you will see the current status and the recent log:
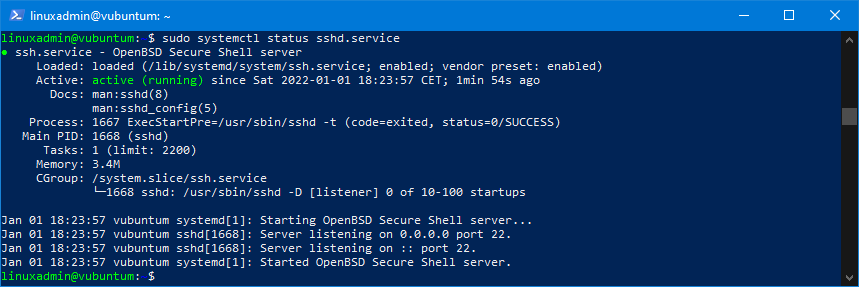
Notice, that active (running) is green.
To stop the SSH service, run this command:
sudo systemctl stop sshd.serviceNote, that this command does not close a current connection; you can call this command from an SSH client, view the status, and even restart the service, if you like.
Checking the status, when the service is stopped, will show this:
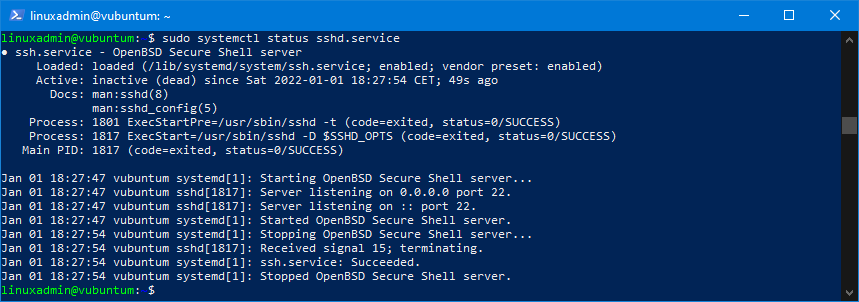
Notice, that the status now is inactive (dead) and neutral colour.
After a log out in the SSH client, you can't log in again. If you try, you'll see that the connection is refused:

To restart the SSH service, run this command:
sudo systemctl restart sshd.serviceRemote connection is now again possible.
Scenario for operation with closed SSH
If you prefer normally to have no remote access to the Linux server, a procedure to allow for remote control for a single session could be:- go to the server, login via physical keyboard and monitor, activate SSH
- go to your workstation, connect to the Linux server with your SSH client
- do your work via your SSH client
- via your SSH client, deactivate SSH on the server, and logout from the session
Remote control via SSH has again been deactivated.
Firewall
If the above method is too restrictive, a permanent solution could be to move the Linux server behind a separate firewall.A few ports and port ranges need to be open for the TCP protocol for Veeam Backup & Replication to be able to control the repository hosted by the Linux server:
| Port | Notes |
|---|---|
| 22 | Port used as a control channel from the console to the target Linux host |
| 6162 | The default port used by the Veeam Data Mover |
| 2500 to 3300 | The default range of ports used as data transmission channels. For every TCP connection that a job uses, one port from this range is assigned. |
Full documentation on ports used by Veeam can be found here:
Linux server connections
In the firewall, you could set up rules that block connections to SSH from all IP addresses except those from your Veeam server and that (those) of your workstation(s). This will force a hacker or the malware to first gain access to either of these machines or to know an IP address of these and how to spoof it. This is doable, of course, but difficult.
Another option is to have admin control to the firewall and have the SSH connection option from your workstation to the Linux server normally blocked. Then, to remote control the Linux server:
- log in to the firewall and enable the SSH rule for your workstation to connect
- log in to the Linux server and do your work
- log out from the Linux server
- log in to the firewall and disable the SSH rule for your workstation
Alternatively, you could open a Remote Desktop connection to the Windows server hosting Veeam Backup & Replication, and then use PowerShell on the server to connect to the Linux Server.
Implement MFA/2FA authentication
Finally, as you probably already have implemented for admin accounts in your Windows environment, you can install and force MFA (Multi-Factor Authentication) or 2FA (Two Factor Authentication) on the Linux server to log in to this.For this, we will use the Microsoft Authenticator as you most likely already have this installed on your phone.
If you don't have the Microsoft Authenticator installed on your phone, get it now from here:
Microsoft Authenticator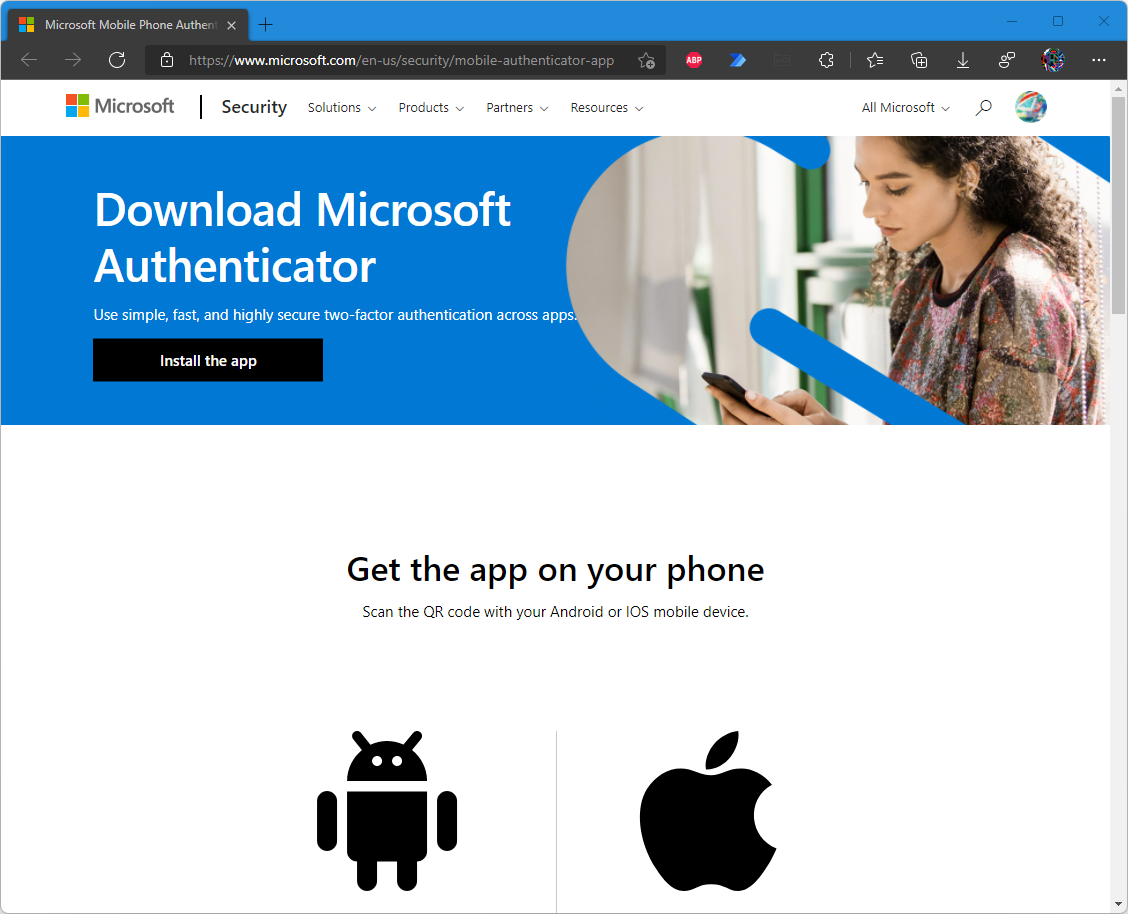
Browse a page down to reach the large QR code. Scan this with the phone to install the app.
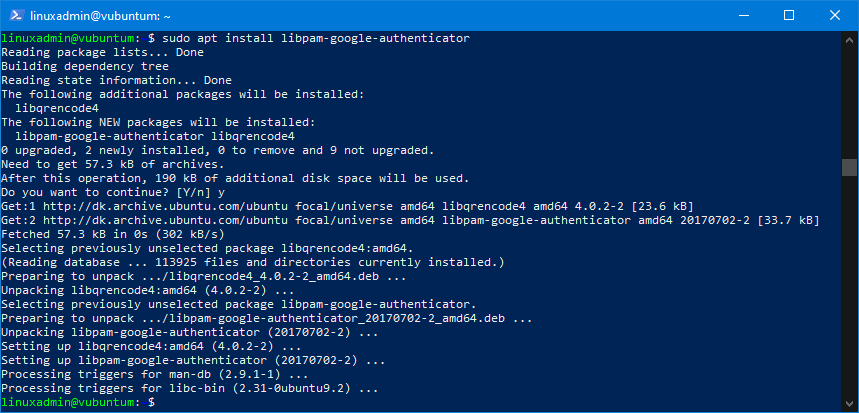
Install the Google Authenticator PAM
First, to enable 2FA on the server, you need to install a Pluggable Authentication Module (PAM), which offers the necessary infrastructure to integrate multi-factor authentication for SSH in Linux.Google Authenticator PAM is the most popular PAM as it is quite easy to implement and use. It offers all the necessary functionality required to authenticate users using Time-based One-Time Password (TOTP) codes (six-digit codes).
To install Google Authenticator PAM, run the following command:
sudo apt install libpam-google-authenticatorEnter y at the installation prompt to confirm the process. It will go like this:
Next, SSH must be tweaked a little to use the installed PAM for authentication. For this, you need to edit a couple of configuration files.
First configuration file
The first file is a lengthy file.You can view the file in an editor using this command:To insert the lines in the file, run these three commands:
sudo nano /etc/pam.d/sshd
When done, exit the editor with Ctrl+X.
echo '# Google Authenticator.' | sudo tee -a /etc/pam.d/sshd
echo 'auth required pam_google_authenticator.so' | sudo tee -a /etc/pam.d/sshd
echo '' | sudo tee -a /etc/pam.d/sshd
You can review the changes to the file in an editor using this command:
sudo nano /etc/pam.d/sshd
When done, exit the editor with Ctrl+X.
Then restart the SSH service with this command:
sudo systemctl restart sshd.serviceThe terminal window should now look like this:

Second configuration file
Open the second file using nano:sudo nano /etc/ssh/sshd_configIn this file, locate the line:
ChallengeResponseAuthentication noand change its status from “no” to “yes”. This will instruct SSH to ask for an authentication code whenever someone attempts to log in to the system.
Press Ctrl+O and Enter to save the file, then Ctrl+X to exit.
Once again, restart the SSH service:
sudo systemctl restart sshd.serviceLink the server in the authenticator
First, make sure the Microsoft Authenticator is properly installed on your phone as described above.If so, call this command in the terminal:
google-authenticatorand it will display a large QR code:
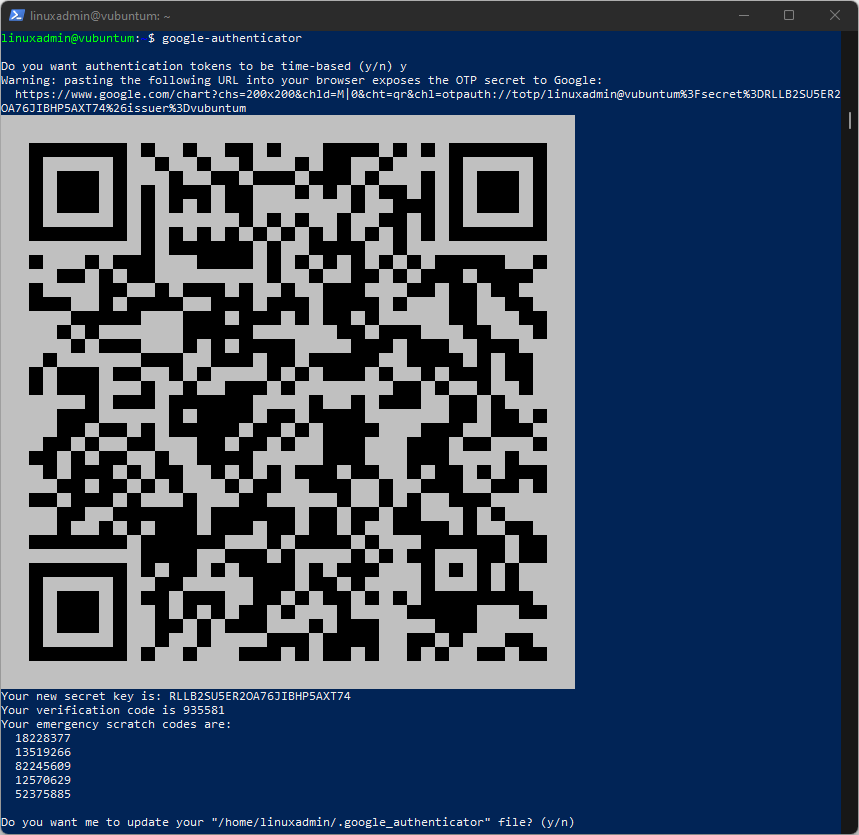
Important: Following the QR are listed the literal key, code, and the emergency scratch codes. Copy these and save them in a safe place.Pick your phone and:
- Open the Microsoft Authenticator
- Press the + sign at the top right
- Select: Other (Google, Facebook, etc.) >
Then scan the QR picture. When captured, the app will add the server to the list and identify it by:
- hostname
- useraccount@hostname
as you can see here at the bottom:
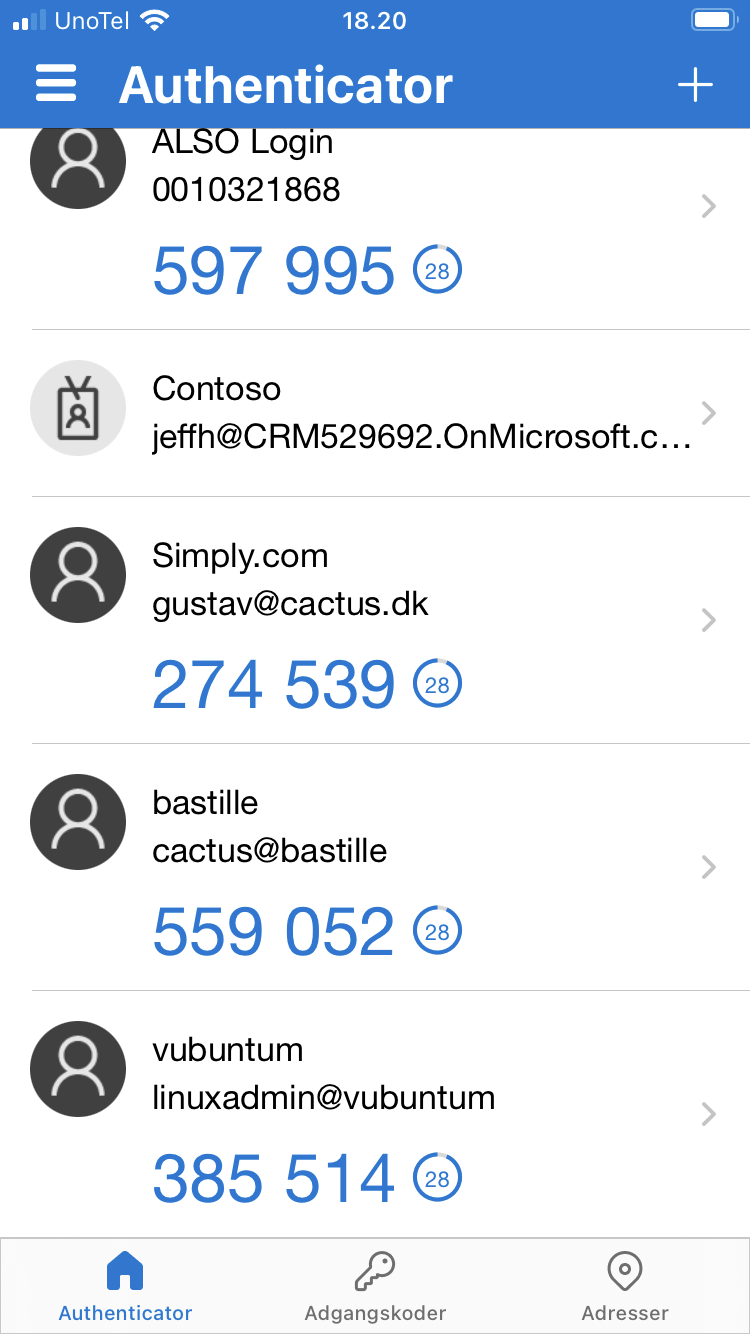
Tap the small arrow (>) at the right to study the few details:
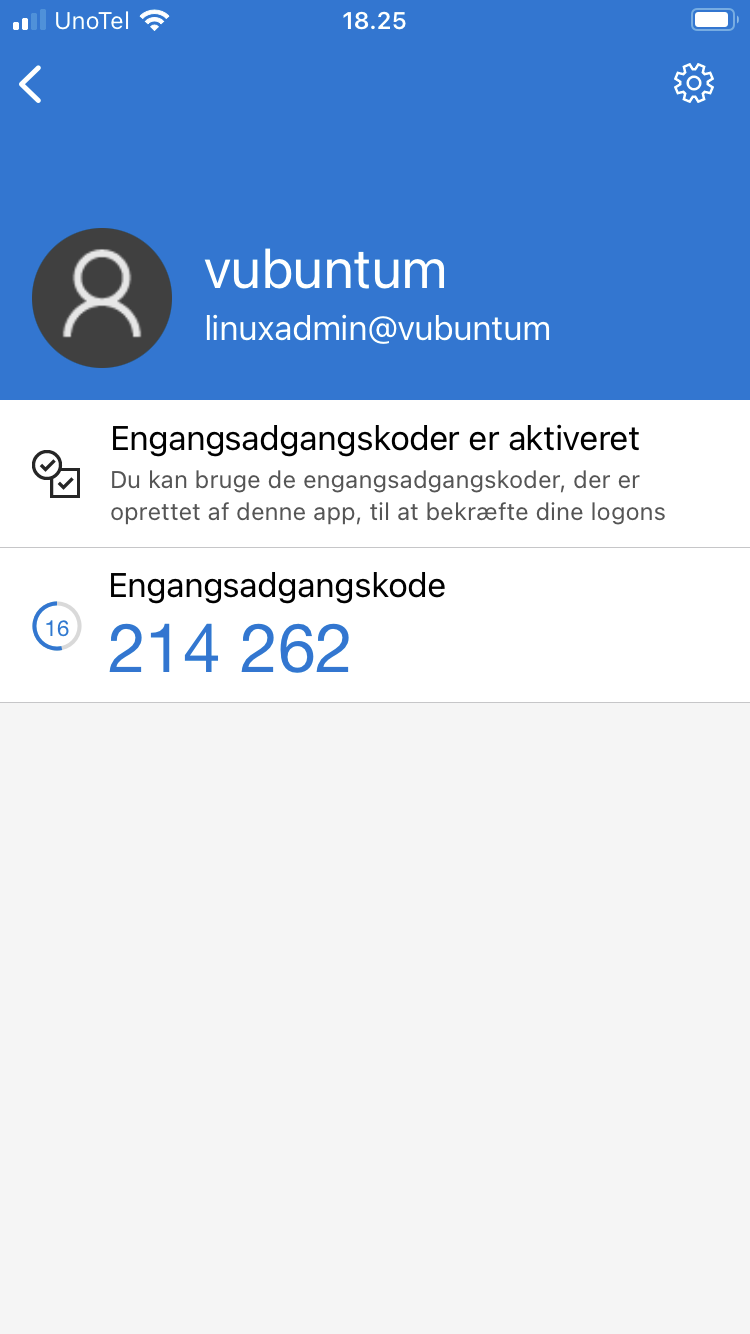
Put the phone away for a moment and return to the terminal window where the large QR still is on display.
Following the key and codes (see the image above with the QR code), you'll see a question.
Answer Y to this, and a series of questions will pop forward. Also answer Y to these to accept the default settings:

That's it! You have now enabled 2-factor authentication for SSH connections on the Linux server.
Verify 2FA/MFA login
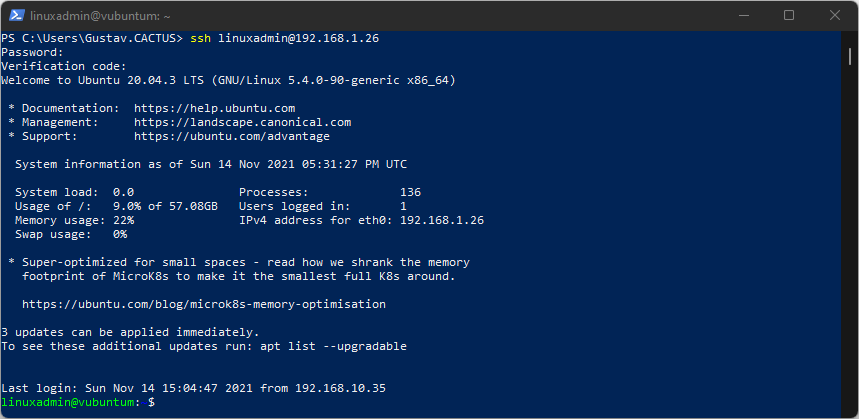
To confirm that 2FA/MFA is active, log out of the console and log in again.As usual, connect with the user account and hostname/IP address:
ssh useraccount@ip-addressand then it will ask for:
- Password:
Enter this, and now it will also ask for:
- Verification code:
To obtain this code, follow these steps:
- pick your phone
- open Microsoft Authenticator
- browse to the entry for the Linux server
- read the displayed code
- enter the code without the space, like 385514
The login will now proceed as usual:
The 2-factor authentication is now implemented and tested, and a security layer has been added that is extremely difficult to break.
Conclusion
In this section, three additional steps to tighten security on the Linux server have been demonstrated. Each of these can be implemented either on its own or in a combination of two - or even all three - as to your preferences.Epilogue
Keep in mind, though, that everything falls to the ground if the bad guy (black hat) can get physical access to the Linux server.This is the last part of the series of articles that deals with the installation of the immutable repository.
The last covers a few maintenance tasks:
Part 9 - Build an immutable backup repository for Veeam Backup & Replication.
I hope you found this article useful. You are encouraged to ask questions, report any bugs or make any other comments about it below.
Note: If you need further "Support" about this topic, please consider using the Ask a Question feature of Experts Exchange. I monitor questions asked and would be pleased to provide any additional support required in questions asked in this manner, along with other EE experts.
Please do not forget to press the "Thumbs Up" button if you think this article was helpful and valuable for EE members.

Have a question about something in this article? You can receive help directly from the article author. Sign up for a free trial to get started.
Comments (0)