Introducing and Migrating to a Windows Server 2019 Domain Controller


I have over 30 years in the IT industry. During this time I have worked with a variety of products in a variety of industries.
Published:
Browse All Articles > Introducing and Migrating to a Windows Server 2019 Domain Controller
As Microsoft comes out with new, updated versions of their server operating system, it becomes necessary to upgrade the domain controllers in your environment. This document will walk through the process of adding a new domain controller, migrating to it, and decommissioning the old one.
As new operating system versions are released by Microsoft, it becomes necessary to add these new versions to your environment and eventually replace your domain controllers with newer versions. There are specific steps to implementing these versions and migrating all services to them.
For this example, the original server is a Windows Server 2012 R2 Standard Edition which is being replaced by a Windows Server 2019 Essentials Edition Server.
There are a number of optional tasks that can be performed after all of the domain controllers in the environment have been upgraded. One is to raise the functional level of both the forest and domain. While this is not going to crash Active Directory, it can cause issues with other systems that communicate with it. For example, when moving
from 2008R2 functional level to 2012R2, printers failed authentication for scannin
g to
fol
der due to the fact they were configured only for NTLMv1. Each one had to be reconfigured for NTLMv2. There were also a few management systems that required a reboot in order to reestablish communication. These are potential problems you should be aware of before proceeding.
Raising the Functional Forest and Domain Level
In order to raise the functional level of the domain, all domain controllers need to be on the
same, newer version of Windows Server. In this case, it is Windows Server 2019 single domain controller environment. First, raise the functional level of the domain by launching the “Active Directory Domains and Trust” console. Then, right click on the domain and select “Raise Domain Functional Level”.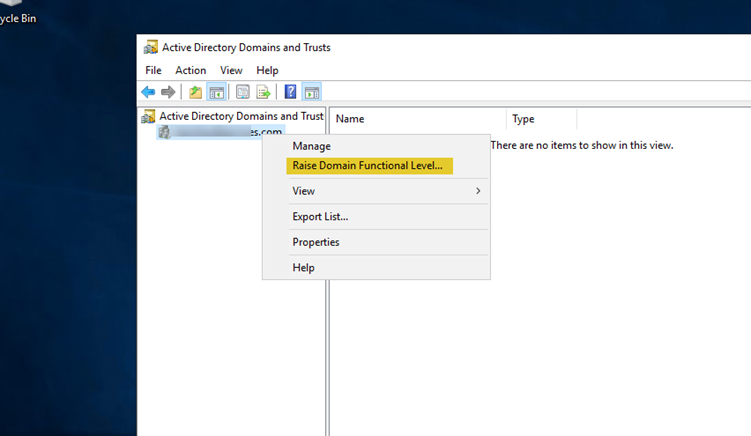
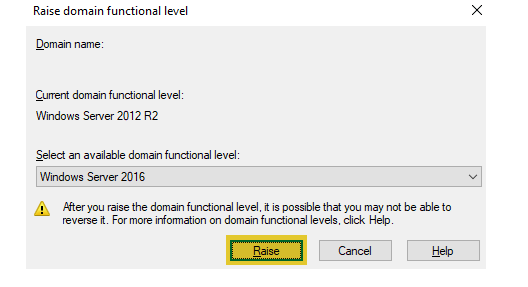
Ensure the highest available level is selected from the drop down and click on “Raise” and click “OK” on the confirmation page.
 You will see a confirmation that the domain level has been successfully raised.
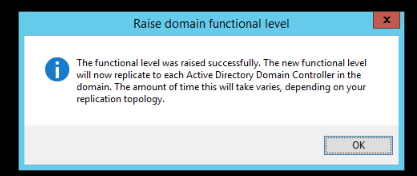
Once the domain functional level has been raised, the forest functional level can be raised. To do return to the “Active Directory Domains and Trust” console and right-click on “Active Directory Domains and Trust”, then select “Raise Forest Functional Level”.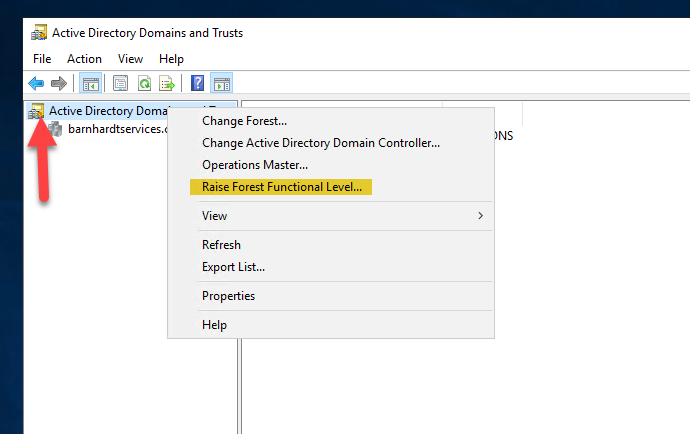
Ensure the highest functional level is selected and click on “Raise” and then “OK” on the confirmation page.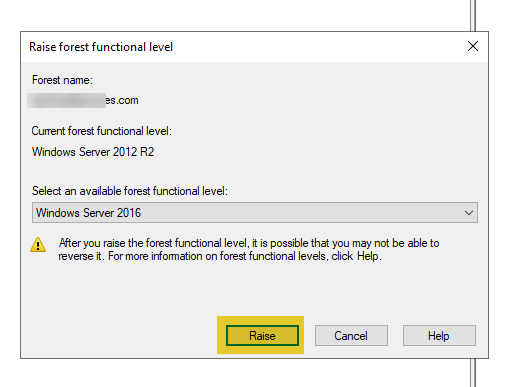
There will be a confirmation that the forest functional level has been successfully raised.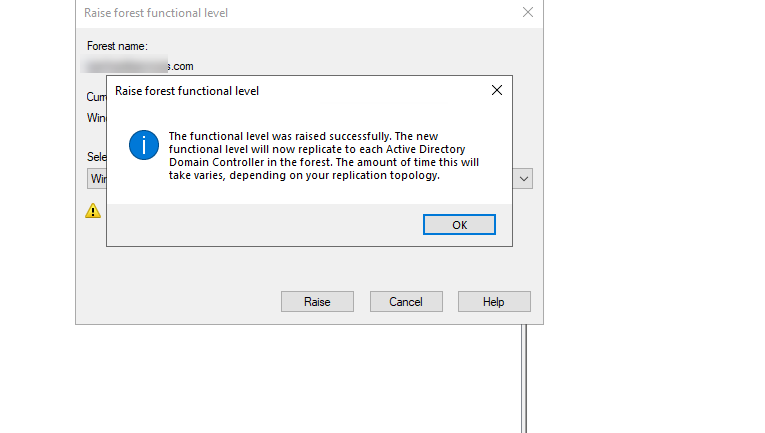
Windows Server 2012 – Configuring NTP Servers for Time Synchronization
Securing Active Directory Domain Controllers
For this example, the original server is a Windows Server 2012 R2 Standard Edition which is being replaced by a Windows Server 2019 Essentials Edition Server.
- Build a new server (either physical or virtual) on Windows Server 2019. If this is a virtual environment DO NOT clone a machine already joined to the domain. Either build it from scratch from the ISO or use an actual template file. This ensures a clean operating system. Since this will be promoted to a domain controller, be sure to assign it a static IP address.
- Join the new server to the domain.
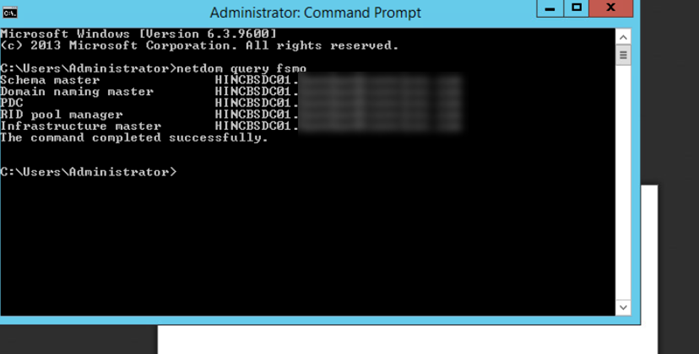
- On the old domain controller, verify where the FSMO roles reside (this is more of an issue in environments with multiple domain controllers. To do this, open an elevated command prompts and type netdom query fsmo and hit enter. This will produce an output like the one below showing the servers where the roles are running.
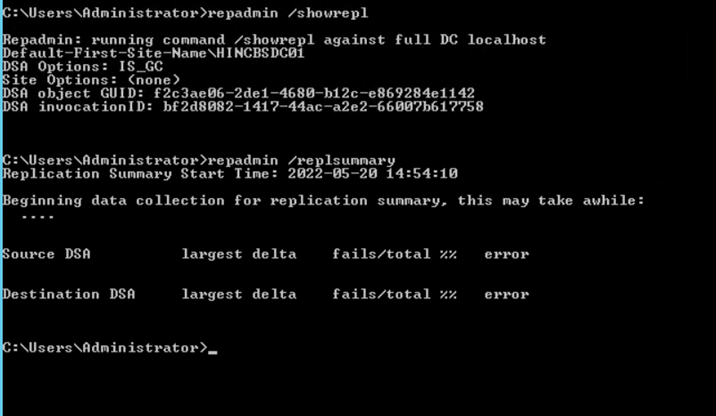
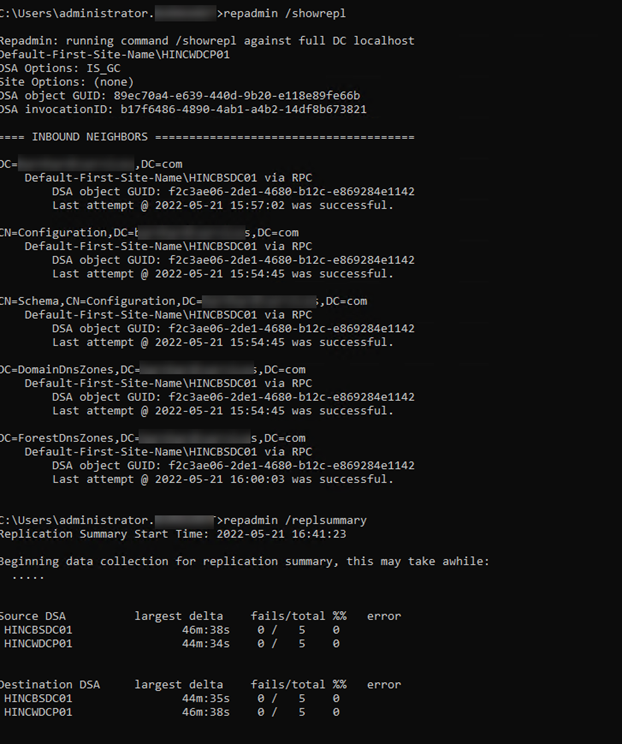
- It is also a good idea to verify replication is working and the server is healthy if you have an environment with multiple domain controllers. This is done in the same elevated command prompt window with the repadmin /showrepl and repadmin /replsummary. Outputs would be similar as below, but this lab is a single DC so there are no additional messages.
- Once all of the pertinent checks have been completed log into the new server that is being promoted to a domain controller. Ensure you log in with the DOMAIN administrator account. This is a Microsoft recommendation to ensure the account configuring and promoting the domain controller has all of the necessary right to complete the process without error.
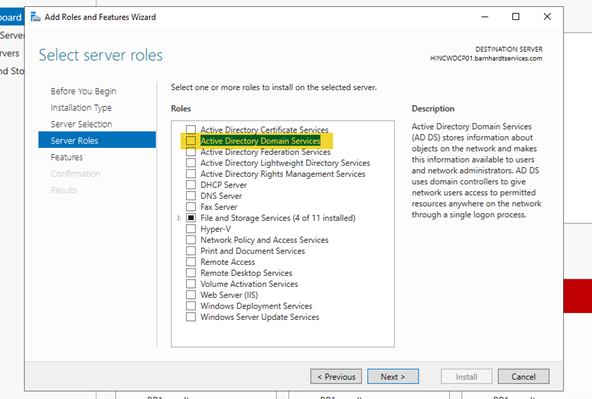
- Launch Server Manager and go to Manage -> Add Roles and Features and click on Next until you come to Server Roles and Features. On this screen, check the box for “Active Directory Domain Services”.
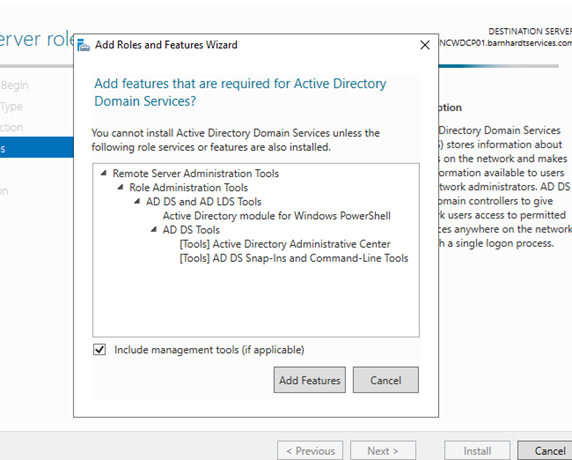
- There will be a popup that ask about installing other required features. Ensure that “Include management tools (if applicable)” is selected and click “Add Features”.
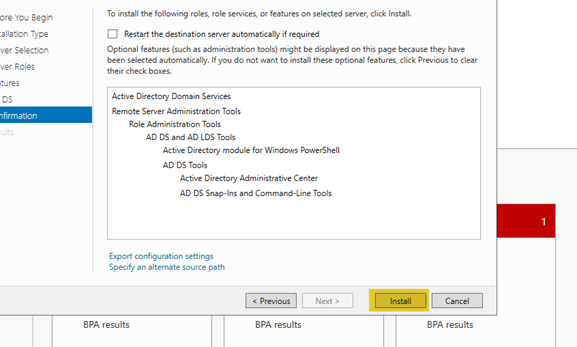
- Click “Next” through the other options until you get to the confirmation page, then click “Install”.
- The process will take some time, possibly up to 30 minutes. Once it has completed, click on “Close”
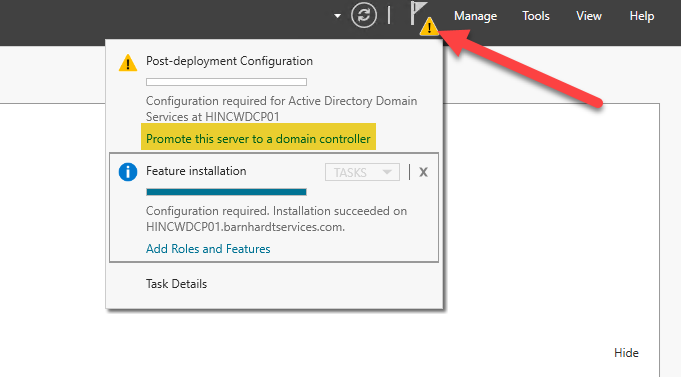
- There will now be a yellow triangle in the upper right corner of the Server Manager panel. When you click on this triangle, there is a message that the feature installation has completed successfully and now the server needs to be promoted to a domain controller. Click where it says “Promote this server to a domain controller”.
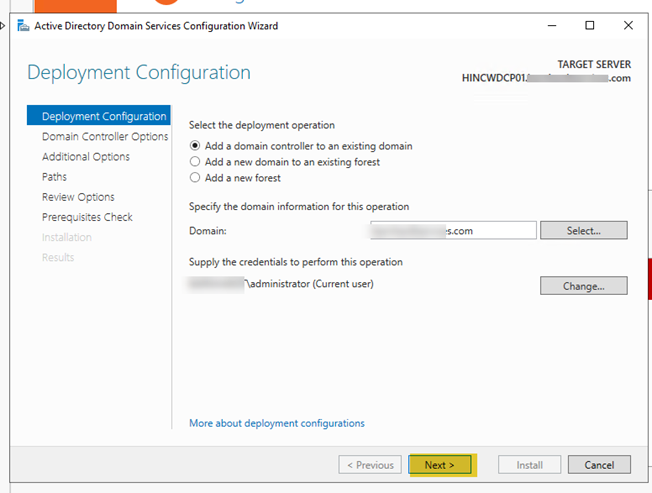
- Ensure that the option to add this server to an existing domain is selected, that the domain is correct, and that the domain administrator is the account being used to perform the actions, then click “Next”.
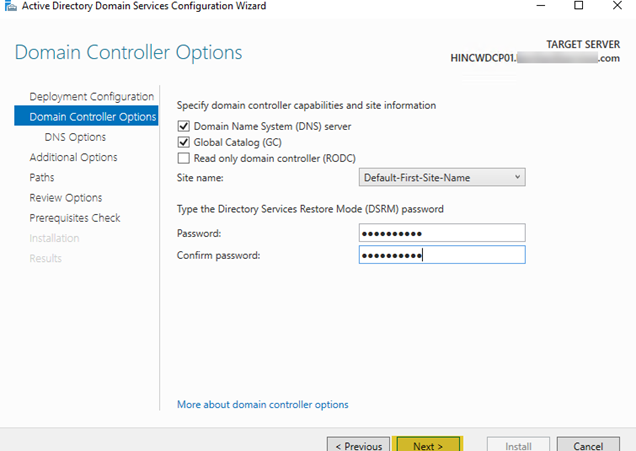
- Ensure that the option to install DNS and to make the server a Global Catalog are selected. Especially, since this will be replacing another domain controller. Enter a recovery password (make sure it is something you will remember or keep it somewhere safe), then click “Next”.
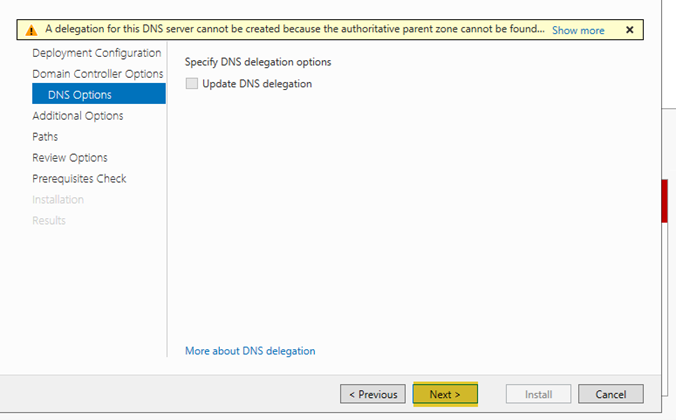
- The warning about the DNS server can be safely ignored since this will be installing the DNS server during this process. Click “Next”.
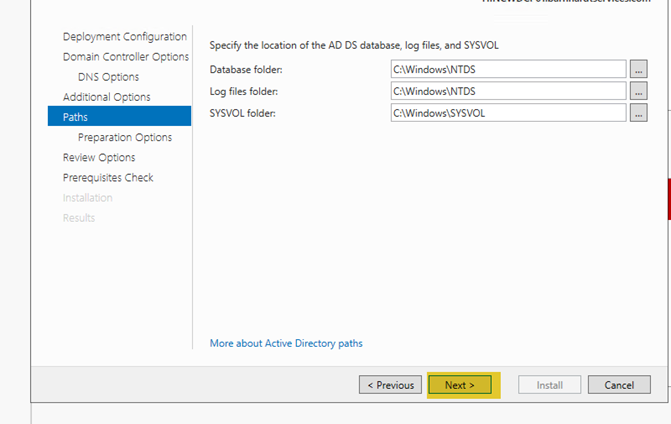
- Click on “Next” twice until you come to the file location. Unless you have previously installed these in a custom path, take the defaults and click “Next”.
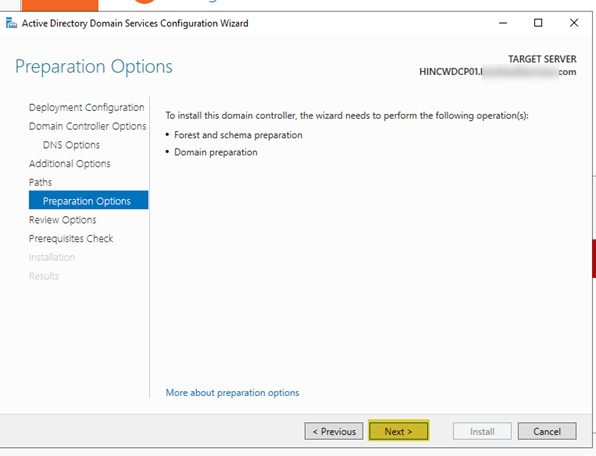
- Unless done in advance, the promotion process will need to perform both a forest and schema update as well as a domain preparation as part the of the promotion process. Click “Next”.
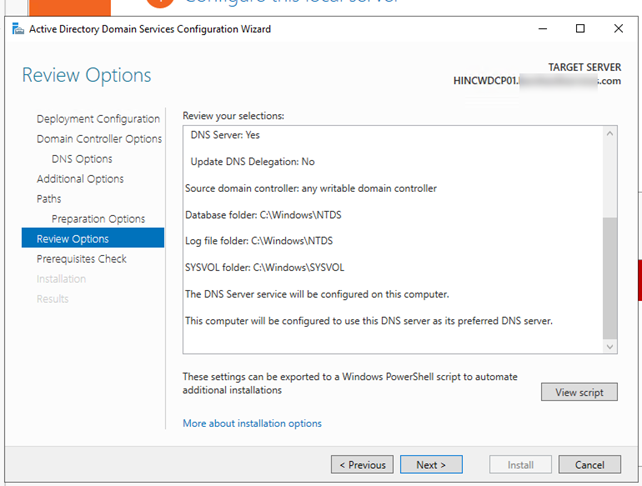
- Review all settings on the Review Options screen. If there is nothing that needs to be changed, select “Next”.
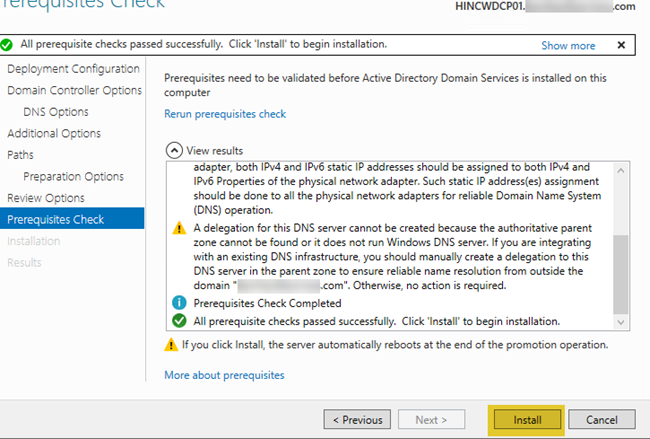
- The installation will do a prerequisite check. Yellow warnings should be read, but can generally be safely ignored. Click “Install”.
- The installation will begin. The amount of time it takes varies on the system as well as the network performance for syncing the Active Directory data. The server will automatically reboot when it is complete.
- Once the reboot has completed, log in and verify you can launch the Active Directory Users and Computer utility. Review the OU’s and data to ensure they look correct. Wait about an hour or so and on the new domain controller open an administrative command prompt. Run the replication verification commands repadmin /showrepl and repadmin /replsummary again and ensure there are no errors.
Migrating FSMO Roles to the New Domain Controller
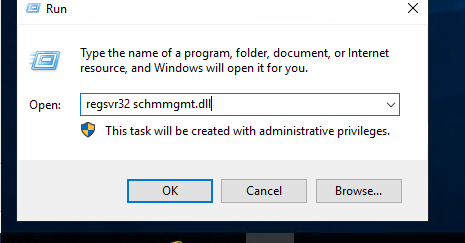
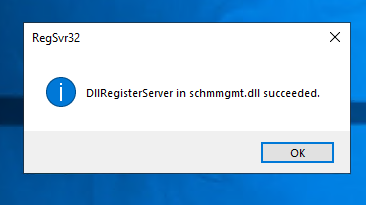
- On the new server, go to START -> RUN and in the box type regsvr32 schmmgmt.dll and click OK. You should then see a message the registration was successful.
- Next, transfer the Schema Master Role
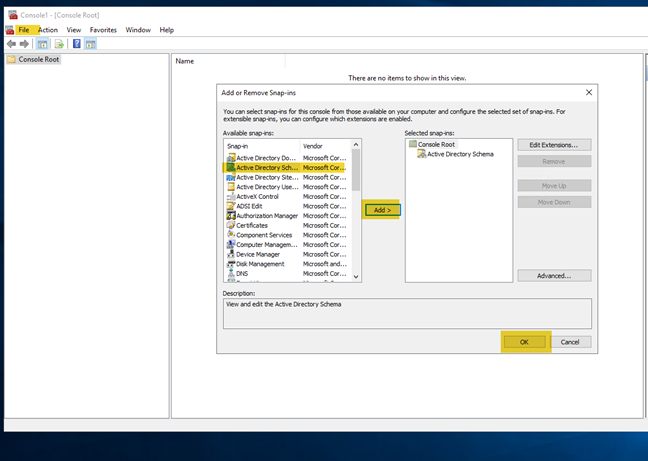
- Click START -> RUN -> MMC
- Then FILE -> Add/Remove Snap-in -> scroll down to Active Directory Schema, highlight it and click “Add”, then OK
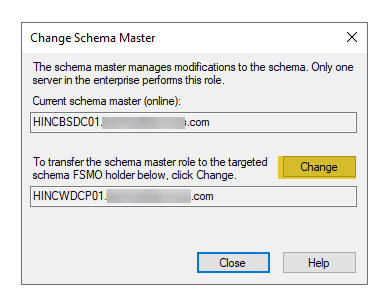
- Right click on “Active Directory Schema” and select “Connect to Schema Operations Master”. Then, right-click and select “Operations Master”. This will show the current domain controller. Since there is only the old and new domain controllers in this environment, those are the only options given. Click on “Change” to move the roles. There will be a confirmation the change was successfully completed.
- Next, launch the “Active Directory Domains and Trust” tool. Right-click and select “Change Active Directory Domain Controller” and select the new domain controller. Then, right-click again and select “Operations Master”.
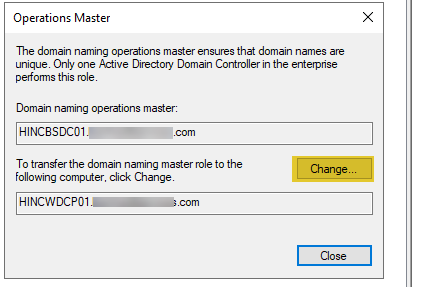
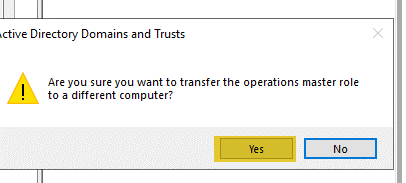
- You will be asked to confirm the move. A message will then appear confirming the successful move of the role.
- Finally, launch the “Active Directory Users and Computers” tool. This will be used to move the final three roles.
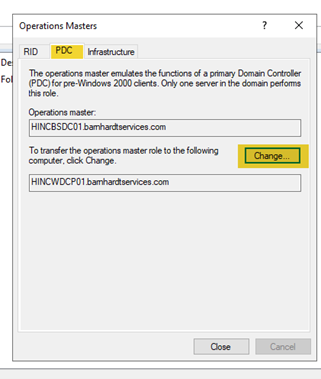
- Right-click on the “Active Directory Users and Computers” and select “Change Domain Controllers”. Verify that the currently connected domain controller is the new one. Right-click again and select “All Tasks” -> “Operations Masters”. The screen will look like the one below.
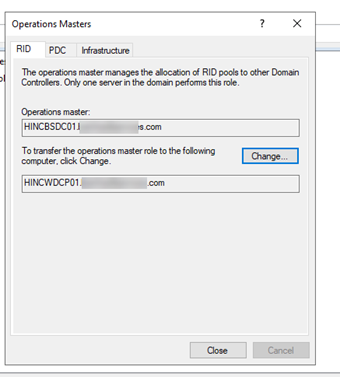
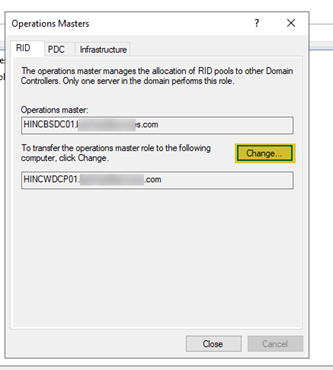
- On the first tab, RID, select “Change”. There is a confirmation message, click “Yes”.
- Move to the PDC tab and click “Change” and answer “Yes” to the confirmation question.
- Finally, move to the Infrastructure tab and click “Change”, then “Yes” to the confirmation question.
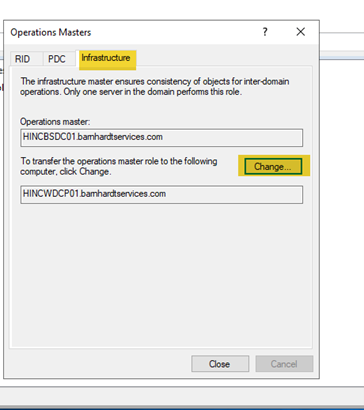
- All FSMO roles have now been moved to the new domain controller.
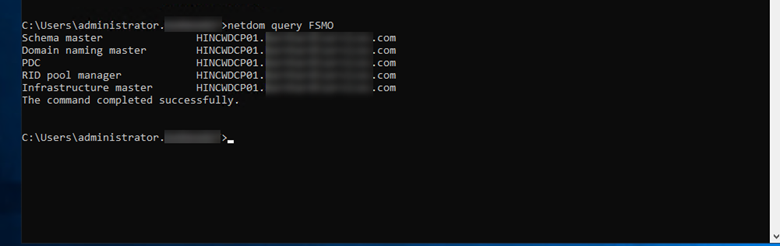
- To verify all roles have been successfully moved, launch an administrative command prompt and type netdom query fsmo and hit return. This will list all of the roles and the server holding them. Verify the new server is listed in each case.
- Here is a little-known item that needs to be checked\migrated. It is often missed and can cause problems. It is the holder of the DNS root. To check or move this role, launch ADSIEdit on the new domain controller. Then right-click and select “Connect to” then select “Select or type a Distinguished Name or Naming Context:”
- Enter “dc=forestdnszones,dc=domain,dc=com” (substituting the word domain for your domain name) and click “OK”.
- Right-click “CN=Infrastructure and select “Properties”.
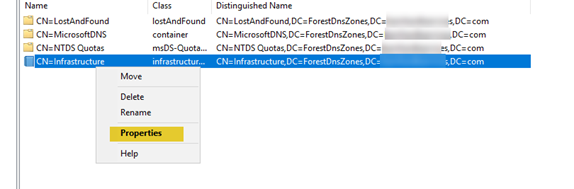
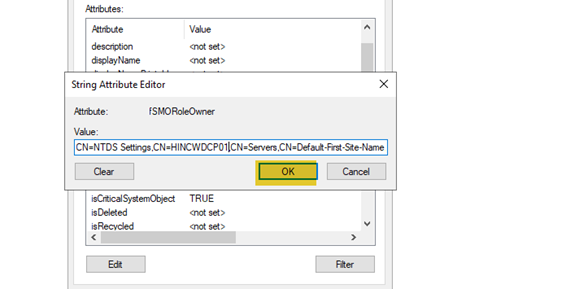
- Scroll down to “FSMORoleOwner”. More than likely it still has the old server name. Highlight it and select “Edit”.
- Change the “CN” to the new server’s name. Then click “OK” and “Apply”.
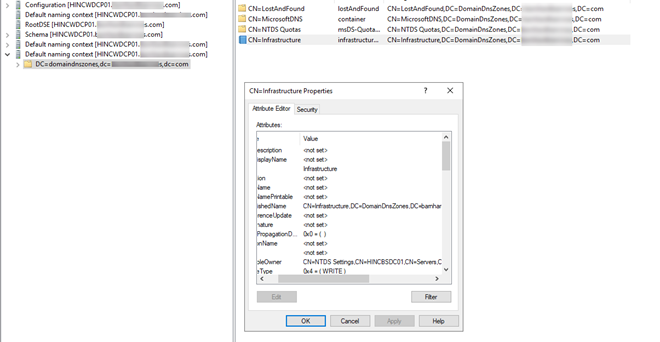
- Right-click on ADSIEdit, and select “Connect to”, and enter “dc=domaindnszones,dc=domain,dc=com” (substituting domain for your domain name) and click OK. Once again, right-click on “Infrastructure” and select “Properties”. Scroll down to “FSMORoleOwner” and the old server will still be listed.
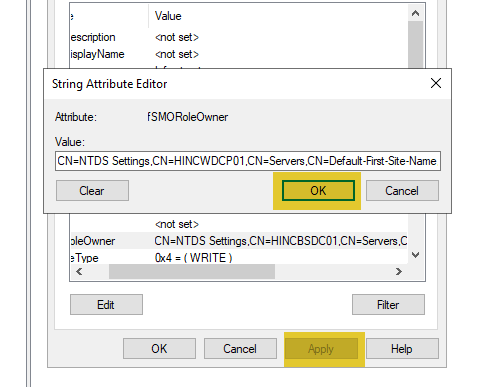
- Highlight it and select “Edit”. Change the “CN” portion to the new server’s name, then click “OK” and “Apply”.
- The old domain controller can now be decommissioned.
Decommissioning Old Windows Server 2012 R2 Domain Controller
When a domain controller is no longer needed, it needs to be decommissioned and removed from the environment. Once it has been confirmed that there are no longer any FSMO roles or other needed functions running on the old server, use the following process to decommission it.- On the old domain controller, launch Server Manager by going to START -> Server Manager.
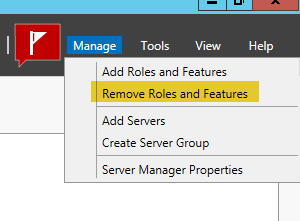
- In the upper right corner, select “Manage” and then “Remove Roles and Features”.

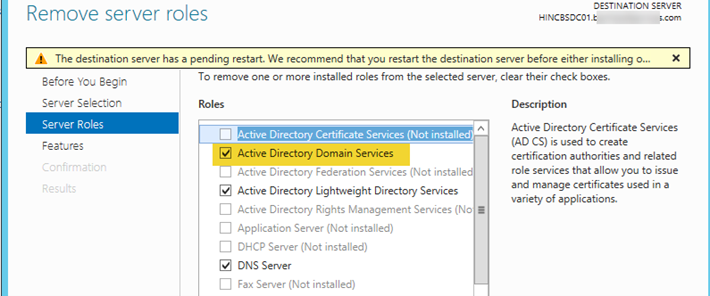
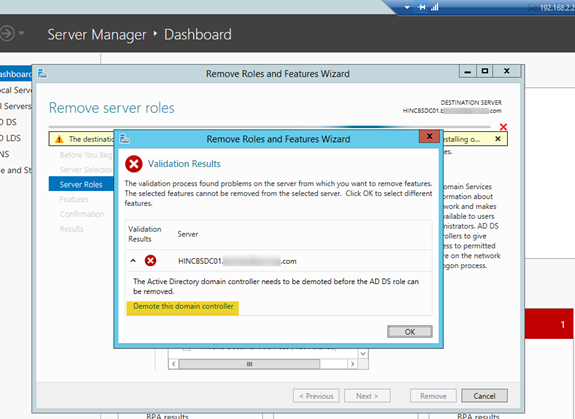
- Click on “Next” twice until you get to “Remove Server Roles” and uncheck “Active Directory Domain Services”.
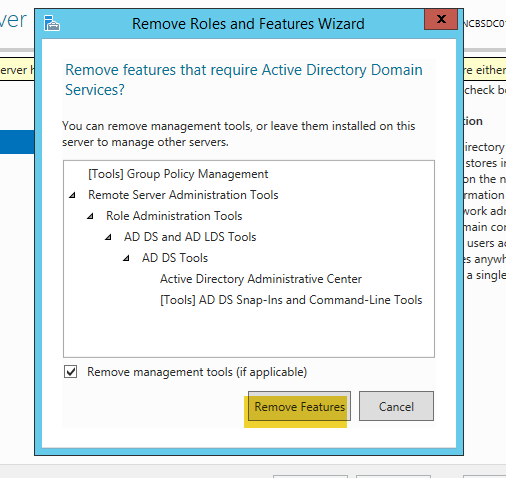
- Next, there will be a message to remove the other required features. Click on “Remove Features”.

- There will then be what looks like an error message about the server needing to be demoted. Click on “Demote this domain controller”.
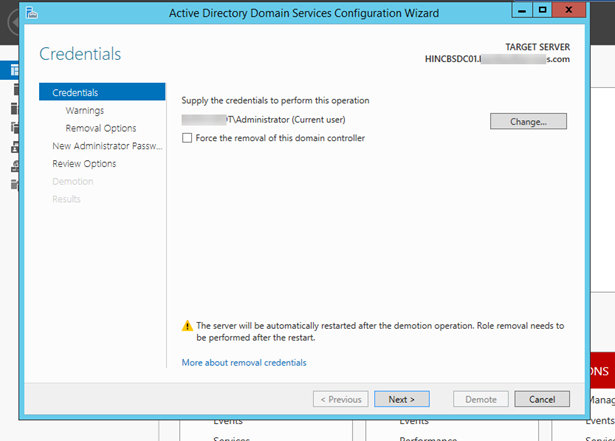
- Ensure you are logged in as the domain administrator and click “Next”.
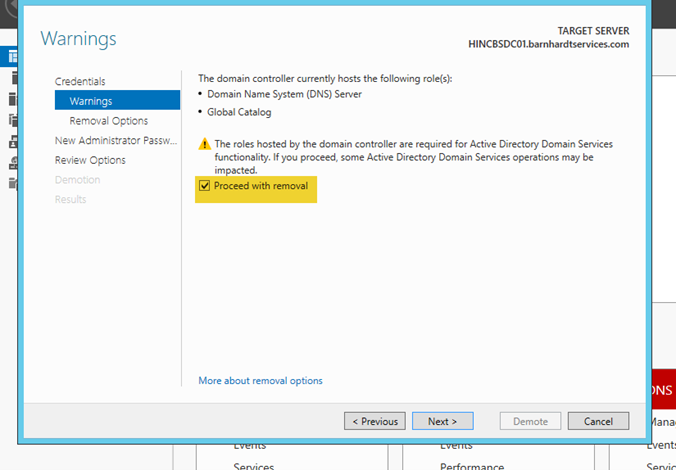
- There will be a verification warning, check the box by “Proceed with removal”.
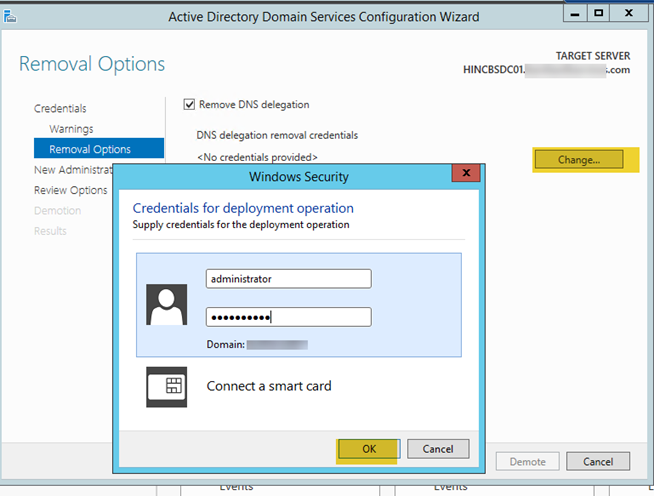
- To remove the DNS delegation, you must enter the domain administrator credentials. Click “Change”, enter the credentials, the click “OK”.
- Enter a password for the local administrator account that will be needed for the server once it is demoted.
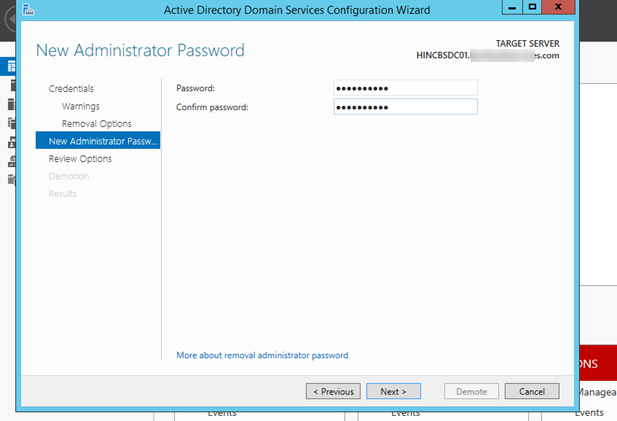
- Review all the settings on the next page, then click on “Demote”.
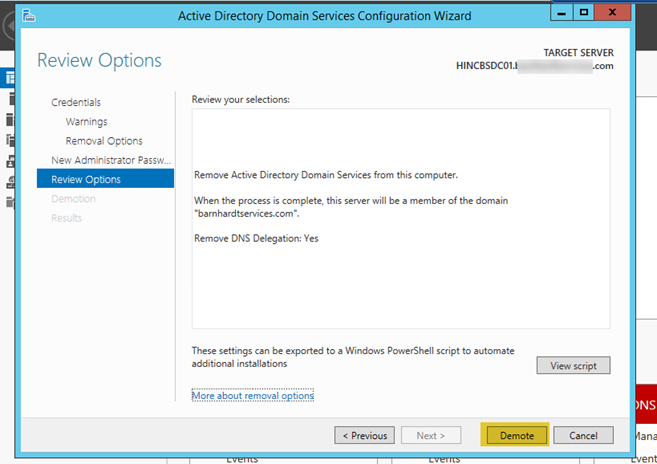
- The server will display a message that the system needs to reboot for the role change and will automatically reboot.
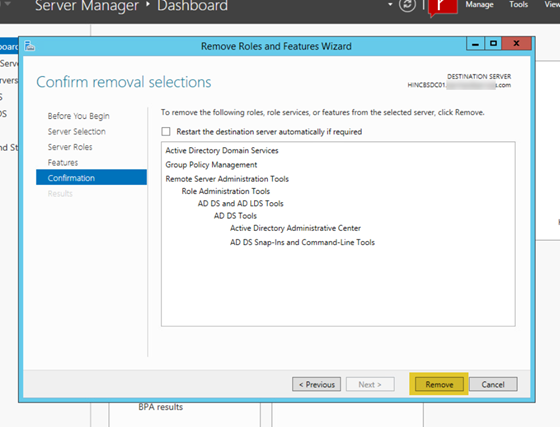
- Now that the server has been demoted. You have to go through the process of removing the roles again to actually remove them. Launch Server Manager again and in the upper right, select “Manage” and then “Remove Roles and Features”.
- Next, there will be a message to remove the other required features. Click on “Remove Features”.
- Click on “Next” to bypass removing any features.
- On the confirmation page, click “Remove”. This will start the removal of the roles.
- The server can now be disjoined and deleted from the domain.
Optional Post Upgrade and Migration Tasks
There are a number of optional tasks that can be performed after all of the domain controllers in the environment have been upgraded. One is to raise the functional level of both the forest and domain. While this is not going to crash Active Directory, it can cause issues with other systems that communicate with it. For example, when moving
from 2008R2 functional level to 2012R2, printers failed authentication for scannin
g to
fol
der due to the fact they were configured only for NTLMv1. Each one had to be reconfigured for NTLMv2. There were also a few management systems that required a reboot in order to reestablish communication. These are potential problems you should be aware of before proceeding.
Raising the Functional Forest and Domain Level
In order to raise the functional level of the domain, all domain controllers need to be on the
same, newer version of Windows Server. In this case, it is Windows Server 2019 single domain controller environment. First, raise the functional level of the domain by launching the “Active Directory Domains and Trust” console. Then, right click on the domain and select “Raise Domain Functional Level”.
Ensure the highest available level is selected from the drop down and click on “Raise” and click “OK” on the confirmation page.
You will see a confirmation that the domain level has been successfully raised.
Once the domain functional level has been raised, the forest functional level can be raised. To do return to the “Active Directory Domains and Trust” console and right-click on “Active Directory Domains and Trust”, then select “Raise Forest Functional Level”.
Ensure the highest functional level is selected and click on “Raise” and then “OK” on the confirmation page.
There will be a confirmation that the forest functional level has been successfully raised.
NTP Time Server Setting
If the domain controller acting as the PDC Emulator was replaced, then it needs to be set up to perform NTP time synchronization for the domain. Here is a link to a video I created showing how to configure the server as an NTP server for the domain:Windows Server 2012 – Configuring NTP Servers for Time Synchronization
Changing the IP Address
In many larger environments, a single domain controller can be statically configured on many clients. Changing all of these clients can be a painstaking long process. Fortunately, the IP address can be successfully change to the IP address of the old domain controller. However, the previous domain controller MUST BE FULLY DEMOTED, DISJOINED, AND REMOVED FROM THE ENVIRONMENTbefore you perform the following task. Once this has been verified, do the following:- Log on to the server console (NOT RDP) either directly on a monitor or via a virtual machine console.
- Run dcdiag from an elevated command prompt and ensure there are no errors.
- Go to Control Panel -> Network and Sharing Center -> Change adapter settings.
- Right click on the network adapter for the domain controller and select “Properties”.
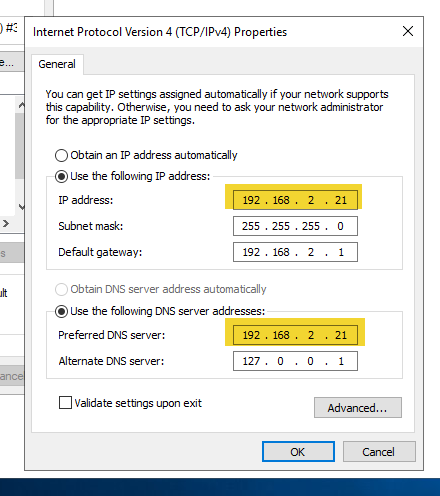
- Highlight “Internet Protocol Version 4 (TCP/IP4) and select “Properties”.
- On the IP address, change the IP address of the server and if this is also the only DNS server, the IP shown for DNS, then click “OK”.
- Open an elevated command prompt
- Type ipconfig /flushdns and hit “Enter”
- Type ipconfig /registerdns and hit “Enter”
- Type dcdiag /fix and verify there are no errors.
- If this is in an environment with multiple domain controllers, wait about 30 minutes and run both repadmin /showrepl and repadmin /replsummary to verify replication is working correctly.
Securing Active Directory Domain Controllers
Below is a link to another article on Experts-Exchange that describes the steps that can be taken to harden the domain controllers in your environment using Group Policy. This means that these security settings will always be in place regardless of domain controllers being added or removed over time.Securing Active Directory Domain Controllers
I have over 30 years in the IT industry. During this time I have worked with a variety of products in a variety of industries.
Have a question about something in this article? You can receive help directly from the article author. Sign up for a free trial to get started.
Comments (18)
Author
Commented:Commented:
Is there any problem if we have already added the new 2019 server as a domain member?
Author
Commented:Commented:
Commented:
Please see this post - https://www.experts-exchange.com/dashboard/#/questions/29265999
View More