How to Migrate Public Folder Contacts to Microsoft 365?


I am a dynamic Tech Enthusiast, specializing in various Microsoft technologies.
Published:
Browse All Articles > How to Migrate Public Folder Contacts to Microsoft 365?
In Exchange Server, we have the option to use Public Folders to store emails and other data, instead of keeping them in our mailboxes. This article tells you how to migrate public folder contacts to Microsoft 365.
In Exchange Server, we have the option to use Public Folders to store emails and other data, instead of keeping them in our mailboxes. This helps in centralizing the data of a particular department or function of the company. Also, if a particular person leave the company, there is no need to perform the full leaver procedure as the person’s client communication is available to other employees or manager. The public folders are dependent on the users’ mailboxes.
When using public folders, the users or owners (depending on the permissions) can create multi-use folders to store different sort of items, such as contacts, calendar, journal, mail/post, tasks, etc. This way, apart from centralizing email data, you can centralize other things. In Microsoft 365, you can leverage Microsoft 365 Groups, along with Microsoft Teams and other collaborative features. However, you can also migrate on-premises public folders to Microsoft 365 public folders, which are fully supported by the system.
Enter the name for the folder, change Mail and Post Items under Folder contains to Contact Items, and click on OK.
 This will create the contacts folder where you can either drag and drop your contacts or create new contacts.
You can export contacts from the Outlook application itself. To export the contacts, click on File > Open & Export > Import/ Export.
 Then, select Export to a file and click on the Next button.
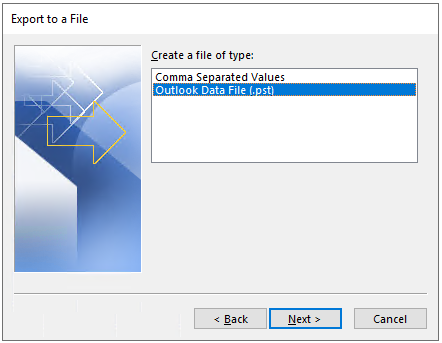
 Select Outlook Data File (.pst) and click on the Next button.
 Select the contacts folder you need to export, click on Include subfolders, and click on the Next button.
Select the destination file to save the contacts and click the Finish button.
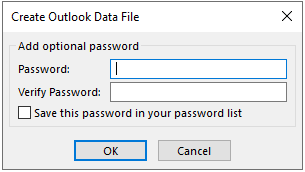
 In the next screen, you will be asked to enter a password for the PST file. If you wish not to have a password, you can go ahead and click on the OK button.
Once completed, you can check the PST file containing all the public folder contacts.
 Once completed, you can check the PST file containing all the public folder contacts.
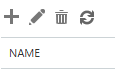
 Click on the plus button to create a new public folder mailbox.
 Enter the name for your public folder mailbox and click on the Save button.
 After this is complete, click on Public folders again and click on Public folders.
Click on the plus button to create a new public folder.
Enter the name for the public folder and click on the Save button.
Note: The contacts folder name must be the same as the source. Else, it will not allow you to import.
Click on the newly created public folder to open its page.
Click on Manage under the Folder permissions.
Here, you need to assign the public folder permissions to the user who will be importing the folder. It’s important that whoever is importing the information, must have the Owner permission.
Open Outlook with the user’s profile.
Click on the three dots on the right and click on Folders.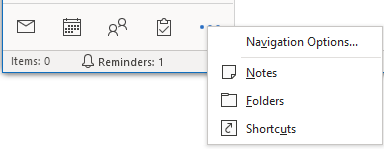 Find the public folder under Public Folders.
Right-click on the public folder and click on New folder.
 Enter the folder name. Under Folder Contains, select Contact Items from the dropdown list and click on the OK button.
 The contacts folder will be created.
 Now, click on File and then click Open & Export.
Click on Import/Export.
Select Import from another program or file and click on the Next button.
 Select Outlook Data File (.pst) and click on the Next button.
 Select the file to import and click Next. Before proceeding, make sure you select the right Options in case you already have any contacts under the public folder in Exchange Online.
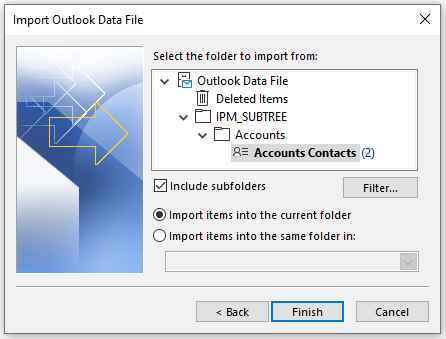
Select the folder you want to import, click on Import items into the current folder, and click on the Finish button.
 Your contacts will be imported.
When using public folders, the users or owners (depending on the permissions) can create multi-use folders to store different sort of items, such as contacts, calendar, journal, mail/post, tasks, etc. This way, apart from centralizing email data, you can centralize other things. In Microsoft 365, you can leverage Microsoft 365 Groups, along with Microsoft Teams and other collaborative features. However, you can also migrate on-premises public folders to Microsoft 365 public folders, which are fully supported by the system.
How to Create Contacts Folder in Public Folders?
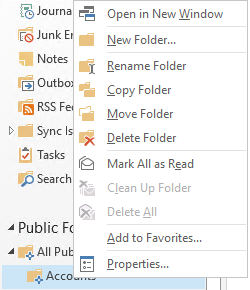
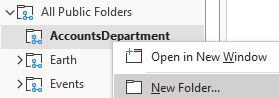
You can create a different type of folder in the public folder, if you’re the owner of the folder or if you have necessary permissions set by the Exchange Admin. To create a contacts folder in public folder, you need to right-click on the folder where you want your contacts to be created and click on NewFolder.
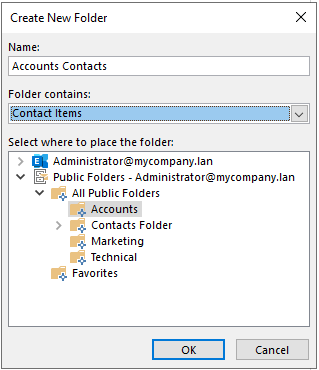
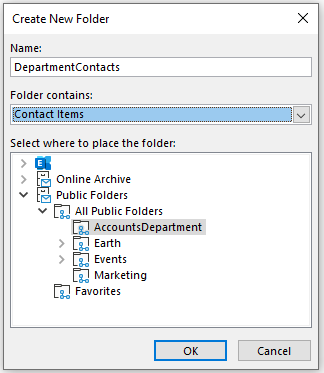
Enter the name for the folder, change Mail and Post Items under Folder contains to Contact Items, and click on OK.
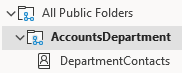
This will create the contacts folder where you can either drag and drop your contacts or create new contacts.
 Exporting Contacts from Public Folder
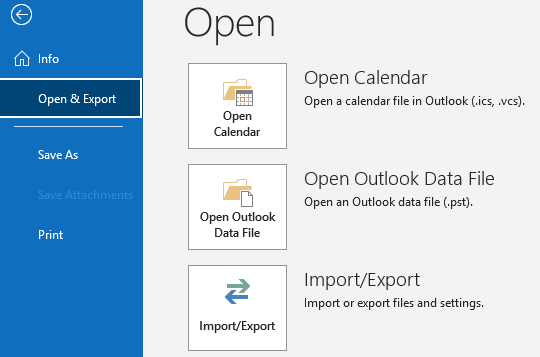
You can export contacts from the Outlook application itself. To export the contacts, click on File > Open & Export > Import/ Export.
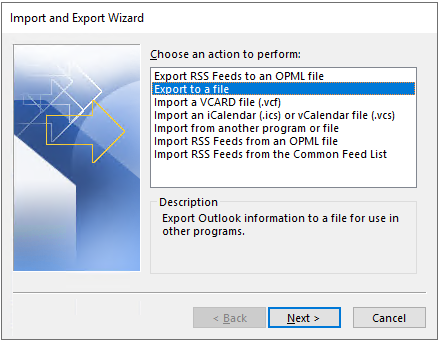
Then, select Export to a file and click on the Next button.
Select Outlook Data File (.pst) and click on the Next button.
Select the contacts folder you need to export, click on Include subfolders, and click on the Next button.
Select the destination file to save the contacts and click the Finish button.
In the next screen, you will be asked to enter a password for the PST file. If you wish not to have a password, you can go ahead and click on the OK button.
Once completed, you can check the PST file containing all the public folder contacts.
Once completed, you can check the PST file containing all the public folder contacts.
Importing Public Folder Contacts into Microsoft 365
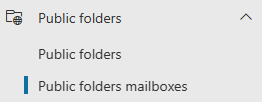
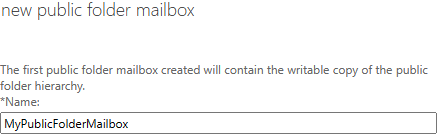
In Microsoft 365, you need to set up public folders in a new exchange online organization using the Exchange Admin Center. For this, go to https://admin.exchange.microsoft.com, log in with your global admin credentials, click on Public Folders, and Public folder mailboxes.Click on the plus button to create a new public folder mailbox.
Enter the name for your public folder mailbox and click on the Save button.
After this is complete, click on Public folders again and click on Public folders.
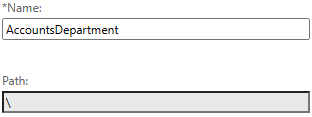
Click on the plus button to create a new public folder.
Enter the name for the public folder and click on the Save button.
Note: The contacts folder name must be the same as the source. Else, it will not allow you to import.
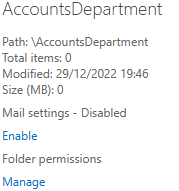
Click on the newly created public folder to open its page.
Click on Manage under the Folder permissions.
Here, you need to assign the public folder permissions to the user who will be importing the folder. It’s important that whoever is importing the information, must have the Owner permission.
Open Outlook with the user’s profile.
Click on the three dots on the right and click on Folders.
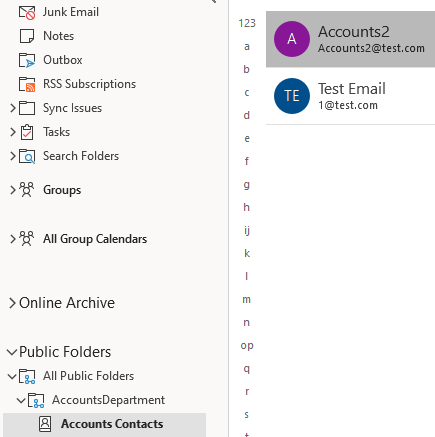
Find the public folder under Public Folders.
Right-click on the public folder and click on New folder.
Enter the folder name. Under Folder Contains, select Contact Items from the dropdown list and click on the OK button.
The contacts folder will be created.
Now, click on File and then click Open & Export.
Click on Import/Export.
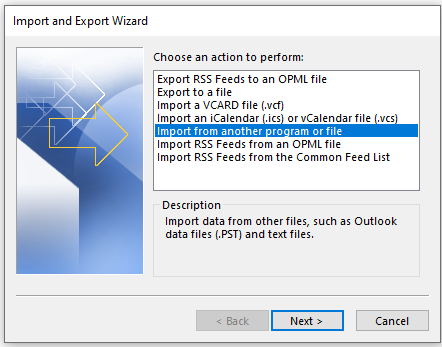
Select Import from another program or file and click on the Next button.
Select Outlook Data File (.pst) and click on the Next button.
Select the file to import and click Next. Before proceeding, make sure you select the right Options in case you already have any contacts under the public folder in Exchange Online.
Select the folder you want to import, click on Import items into the current folder, and click on the Finish button.
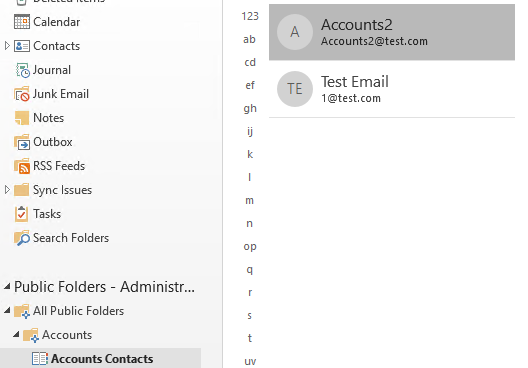
Your contacts will be imported.
What if Exchange Server is not available?
The above method will work if the Exchange Server is available and working fine, and the databases are active and mounted. Also, you need to have an Outlook profile set with the right permission on the folders.
I am a dynamic Tech Enthusiast, specializing in various Microsoft technologies.
Have a question about something in this article? You can receive help directly from the article author. Sign up for a free trial to get started.
Comments (1)
Commented: