How to create your own bootstrapper package for use in a ClickOnce Deployment in Visual Studio 2005

Published:
Browse All Articles > How to create your own bootstrapper package for use in a ClickOnce Deployment in Visual Studio 2005
To create your own bootstrapper package for use in a ClickOnce deployment may seem overwelming at first. I have created and put into production several custom bootstrapper packages.
What is the advantage to creating your own bookstrapper package? If you have a piece of your program that needs to run once using administrator privileges, you don't want to make your whole program ask for elevation when it is not needed. To make a cleaner program, split that piece of code out into it's own exe or dll and make it a prerequisite of your main program.
For my example, I will have a small exe that will set the path of a trusted location in the registry. I will call it TrustedLocation.exe
I will modify my XML files with a free program called Notepad++. You can download it from Notepad ++ Make sure that you start the program "As Administrator". If you do not, any changes you make will not be saved properly.
ckages Please note that your path may vary depending on if you are running on a 64-bit or 32-bit system and which version of Visual Studio you are running.
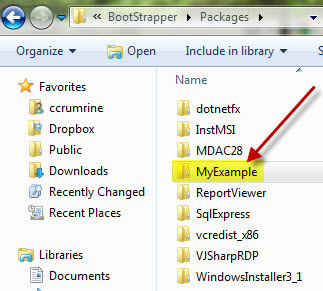
There will be several folders that were installed with Visual Studio. You can copy and paste or create a new folder. I will create a new folder called MyExample.
![Folder Structure for Packages]() Inside of my folder, I will need to add an XML file called product.xml and another folder called en. Inside of the en folder, I will need another XML file called package.xml and my program. You will notice that I have not included the eula.txt for this example. If you wish to have the user agree to a EULA before installing or running your program, you will need to include it here.
Inside of my folder, I will need to add an XML file called product.xml and another folder called en. Inside of the en folder, I will need another XML file called package.xml and my program. You will notice that I have not included the eula.txt for this example. If you wish to have the user agree to a EULA before installing or running your program, you will need to include it here.
You can copy one of the folders that already exists and simply modify the XML files if you would like.
[step="B" title="Product XML"][/step] Open the Product XML.
Add or edit the code to look like this:
Change the ProductCode to a useful name that you will recognize. This will be used again in the package.xml
If you want to make sure other packages are installed before your program runs, add them as a DependsOnProduct. In this example, I want the Framework 2.0 and the MS AccessRuntime installed before my program runs on the system.
[step="C" title="Package XML"][/step] Open the Package XML.
Add or edit the code to look like this:
Change the Command PackageFile name on line 13 to TrustedLocation.exe Change the Estimated Installed Bytes to the approximate size of the exe. This is used to calculate the remaining time during the install. It does not have to be accurate but gives a better user experience if it is accurate.
You should not have to change any of the install conditions or exit codes. However, if you would like to customize your conditions, here is where you can do it.
The strings section starting on line 37 will supply any of the messages seen by the end user. The first entry, on line 38, will be the Display Name. This name will show in your Visual Studio Prerequisites. The next entry, on line 39, will refer to the language and folder you created earlier. The next entries will contain messages for the conditions and exit codes in the previous section. The last entry, on line 50, will supply the location of the trustedlocation.exe. I will come back to this later on.
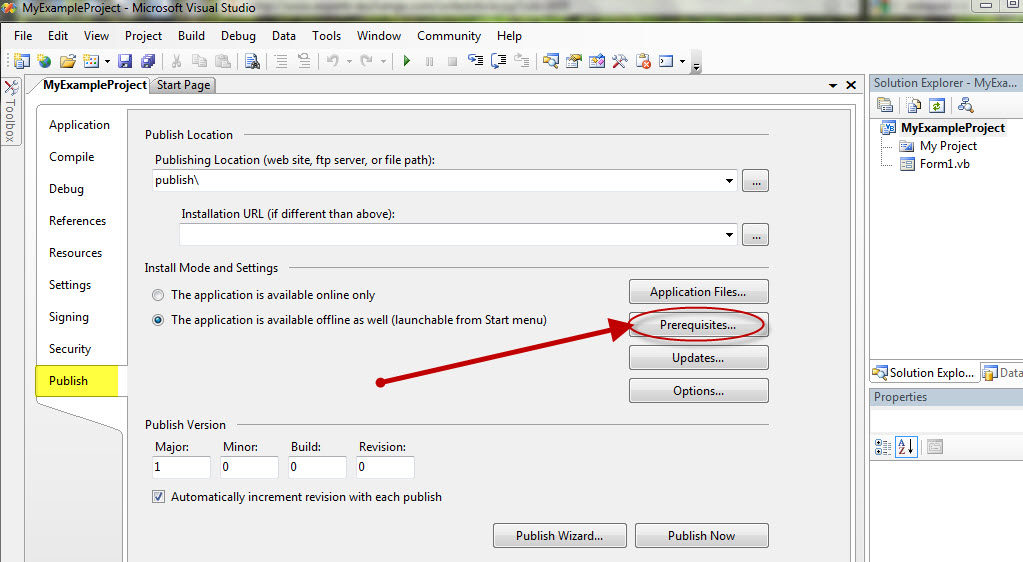
Right click on the project and select properties. Click on the Publish tab and click on the Prerequisites button.
![Prerequisites Tab]()
You will now have "My Trusted Location" as a prerequisite.
![Prerequisites Available]()
Notice the section at the bottom titled "Specify the install location for prerequisites". If you choose "Download prerequisites from the component vendor's web site" the program will be downloaded separately from your deployed program from the site specified in the Package XML line 50. If you choose "Download prerequisites from the same location as my application" the program will be downloaded along with your program. You will want to use this option if you are creating a CD.
What is the advantage to creating your own bookstrapper package? If you have a piece of your program that needs to run once using administrator privileges, you don't want to make your whole program ask for elevation when it is not needed. To make a cleaner program, split that piece of code out into it's own exe or dll and make it a prerequisite of your main program.
For my example, I will have a small exe that will set the path of a trusted location in the registry. I will call it TrustedLocation.exe
I will modify my XML files with a free program called Notepad++. You can download it from Notepad ++ Make sure that you start the program "As Administrator". If you do not, any changes you make will not be saved properly.
1. Creating the package
[step="A" title="Folder Structure"][/step] The first thing you need to do is open Windows Explorer with Administrative Rights. Browse to: C:\Program Files (x86)\Microsoft Visual Studio 8\SDK\v2.0\BootStrapper\PaThere will be several folders that were installed with Visual Studio. You can copy and paste or create a new folder. I will create a new folder called MyExample.
 Inside of my folder, I will need to add an XML file called product.xml and another folder called en. Inside of the en folder, I will need another XML file called package.xml and my program. You will notice that I have not included the eula.txt for this example. If you wish to have the user agree to a EULA before installing or running your program, you will need to include it here.
You can copy one of the folders that already exists and simply modify the XML files if you would like.
[step="B" title="Product XML"][/step] Open the Product XML.
Add or edit the code to look like this:
<?xml version="1.0" encoding="utf-8" ?>
                      <Product
                        xmlns="http://schemas.microsoft.com/developer/2004/01/bootstrapper"
                        ProductCode="MyTrustedLocation">

                            <RelatedProducts>
                      		<!-- Make sure the framework is installed first or will get all kinds of errors. -->
                      	    <DependsOnProduct Code="Microsoft.Net.Framework.2.0" />
                      		<DependsOnProduct Code="AccessRuntime" />
                          </RelatedProducts>

                        <InstallChecks>

                        </InstallChecks>
                      </Product>
Change the ProductCode to a useful name that you will recognize. This will be used again in the package.xml
If you want to make sure other packages are installed before your program runs, add them as a DependsOnProduct. In this example, I want the Framework 2.0 and the MS AccessRuntime installed before my program runs on the system.
[step="C" title="Package XML"][/step] Open the Package XML.
Add or edit the code to look like this:
<?xml version="1.0" encoding="utf-8" ?>
                      <Package
                        xmlns="http://schemas.microsoft.com/developer/2004/01/bootstrapper"
                        Name="DisplayName"
                        Culture="Culture">

                        <PackageFiles CopyAllPackageFiles="true">
                      		<PackageFile Name="TrustedLocationSetup.exe" HomeSite="TrustedLoc" />
                          </PackageFiles>


                        <Commands>
                              <Command PackageFile="TrustedLocationSetup.exe"
                                       EstimatedInstalledBytes="28000" >
                                  <InstallConditions>
                      				<BypassIf Property="IsDLLRegistered" Compare="VersionGreaterThanOrEqualTo" Value="1"/>
                                      <BypassIf Property="VersionNT" Compare="VersionLessThan" Value="5.1"/>
                                      <FailIf Property="AdminUser" Compare="ValueEqualTo" Value="false" String="AdminRequired"/>
                                      <FailIf Property="Version9x" Compare="ValueExists" String="InvalidPlatformXP"/>
                                      <FailIf Property="VersionNT" Compare="VersionLessThan" Value="5.1.2" String="InvalidPlatformXP"/>
                                  </InstallConditions>
                                  <ExitCodes>
                                      <ExitCode Value="0" Result="Success"/>
                                      <ExitCode Value="1641" Result="SuccessReboot"/>
                                      <ExitCode Value="3010" Result="SuccessReboot"/>
                                      <ExitCode Value="50198" Result="Fail" String="InsufficientHardware"/>
                                      <ExitCode Value="50236" Result="Fail" String="InsufficientHardware"/>
                                      <ExitCode Value="50222" Result="Fail" String="InvalidPlatformOSServicePacks"/>
                                      <ExitCode Value="70003" Result="Fail" String="InvalidPlatformOSServicePacks"/>
                                      <ExitCode Value="70004" Result="Fail" String="AnotherInstanceRunning"/>
                                      <DefaultExitCode Result="Fail" FormatMessageFromSystem="true" String="GeneralFailure" />
                                  </ExitCodes>
                              </Command>
                          </Commands>


                        <Strings>
                          <String Name="DisplayName">My Trusted Location</String>
                          <String Name="Culture">en</String>
                              <String Name="AdminRequired">You do not have the permissions required to install the Trusted Location tool.  Please contact your administrator.</String>
                              <String Name="GeneralFailure">An error occurred attempting to install the Trusted Location Tool.</String>
                              <String Name="InvalidPlatform">Windows 2000 or later is required to install the Trusted Location Tool.</String>
                              <String Name="InvalidPlatform2K">Windows 2000 Service Pack 4 or later is required to install the Trusted Location Tool.</String>
                              <String Name="InvalidPlatformXP">Windows XP Service Pack 2 or later is required to install the Trusted Location Tool.</String>
                              <String Name="InsufficientHardward">The current system does not meet the minimum hardware requirements for the Trusted Location Tool. Contact your application vendor.</String>
                              <String Name="InvalidPlatformOSServicePacks">The current operating system does not meet Service Pack level requirements for the Trusted Location Tool. Install the most recent Service Pack from the Microsoft download center at http://www.microsoft.com/downloads before continuing setup.</String>
                              <String Name="AnotherInstanceRunning">Another instance of setup is already running. The running instance must complete before this setup can proceed.</String>
                              <!-- <String Name="InvalidPlatformArchitecture">This version of the Trusted Location Tool is not supported for the current processor architecture.</String> -->
                              <String Name="ErrorDiskFull">There is not enough space on the destination disk for the Trusted Location Tool.</String>
                      		<String Name="TrustedLoc">http://myExampleWebsite.com/PrereqFiles/TrustedLocation/TrustedLocationSetup.exe</String>
                        </Strings>
                      </Package>
Change the Command PackageFile name on line 13 to TrustedLocation.exe Change the Estimated Installed Bytes to the approximate size of the exe. This is used to calculate the remaining time during the install. It does not have to be accurate but gives a better user experience if it is accurate.
You should not have to change any of the install conditions or exit codes. However, if you would like to customize your conditions, here is where you can do it.
The strings section starting on line 37 will supply any of the messages seen by the end user. The first entry, on line 38, will be the Display Name. This name will show in your Visual Studio Prerequisites. The next entry, on line 39, will refer to the language and folder you created earlier. The next entries will contain messages for the conditions and exit codes in the previous section. The last entry, on line 50, will supply the location of the trustedlocation.exe. I will come back to this later on.
2. Select the Package in Visual Studio
First, open visual studio and open your program.Right click on the project and select properties. Click on the Publish tab and click on the Prerequisites button.
You will now have "My Trusted Location" as a prerequisite.

Notice the section at the bottom titled "Specify the install location for prerequisites". If you choose "Download prerequisites from the component vendor's web site" the program will be downloaded separately from your deployed program from the site specified in the Package XML line 50. If you choose "Download prerequisites from the same location as my application" the program will be downloaded along with your program. You will want to use this option if you are creating a CD.
Have a question about something in this article? You can receive help directly from the article author. Sign up for a free trial to get started.
Comments (0)