

Browse All Articles > Create an EE Article from a Word Document
EE Page Editors cannot publish an article that contains only an attached Word Document file. The entire content of the article must be immediately visible to the reader. Alas, there is no automated way to do the conversion, and even if there were, it would certainly not work perfectly for all submissions.
This article discusses the manual steps that I have used to create an attractive, readable EE article from an Office Word document. I'm using Word 2007, but the general techniques that I describe should apply to most versions.
Some Background-- Considerations and Limitations
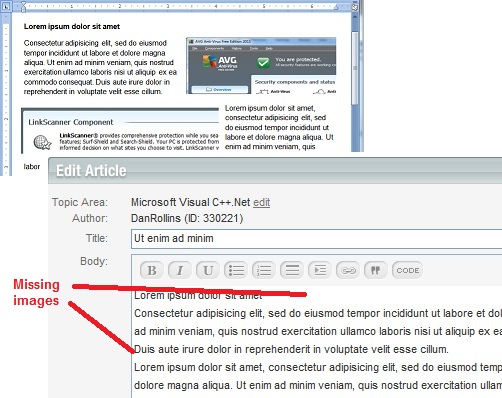
We must, of necessity, convert the document to plain text. In a text conversion, images are altogether ignored -- they are simply missing from the output. Since a common reason for the author to use Word in the first place is to embed some nice graphics, handling this issue is a key (most important) aspect of the conversion.
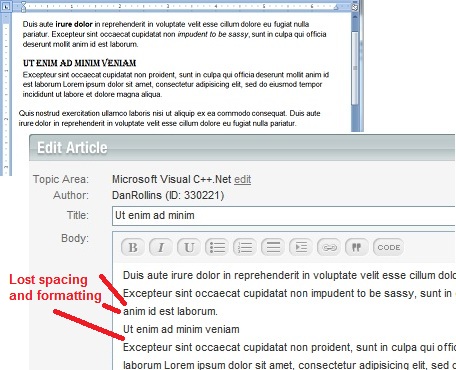
![Images are lost]() Special spacing -- especially in paragraph attributes -- is lost. For instance, it is normal in Word to have a 6- or 10-point gap between paragraphs -- it looks great in Word or on paper, but in EE Articles, the paragraphs end up jammed together. Text formatting -- Bold, italics, section titles, and so forth are also lost.
Special spacing -- especially in paragraph attributes -- is lost. For instance, it is normal in Word to have a 6- or 10-point gap between paragraphs -- it looks great in Word or on paper, but in EE Articles, the paragraphs end up jammed together. Text formatting -- Bold, italics, section titles, and so forth are also lost.
![Paragraph spacing and text formats are lost]() Also, in the conversion to plain text, Word's numbered and bullet lists get converted to "hard-coded" lines -- the hanging indent is lost and lists become simple lines of text that start with a literal character or number. The result is rather ugly.
Also, in the conversion to plain text, Word's numbered and bullet lists get converted to "hard-coded" lines -- the hanging indent is lost and lists become simple lines of text that start with a literal character or number. The result is rather ugly.
![Bullets and numbers become hard-coded literals]() Most of the conversion work is in the handling of these three issues. But it is not all that hard, and a typical submission can be converted in about 30 minutes with practice. Let's get started.
Most of the conversion work is in the handling of these three issues. But it is not all that hard, and a typical submission can be converted in about 30 minutes with practice. Let's get started.
One way to do that is click on each image, press Ctrl+C, paste it into an MsPaint document, and then save it with filename that contains a sequential number (e.g., fig1.jpg, fig2.jpg, etc.).
But the easiest way I've found is to save the entire Word document as an HTML file:
Save As / Other Formats / Web Page, Filtered
When you do that, Word outputs an image file (typically JPG or PNG) of each image. So...
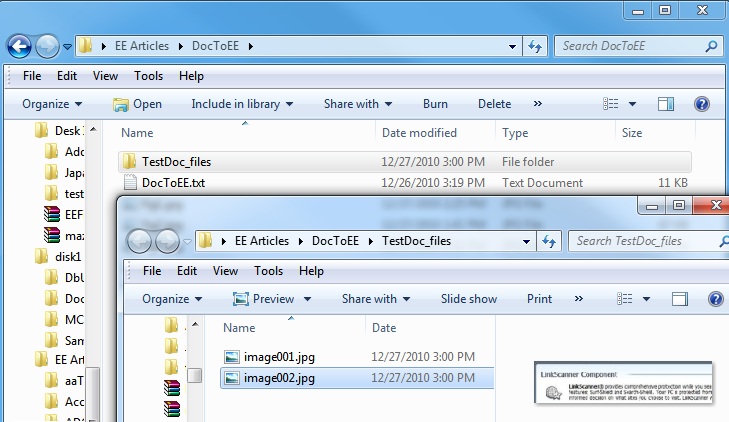
![Save as HTML]() Now you'll have a folder named filename_files and the images in it have names that include sequential numbers.
Now you'll have a folder named filename_files and the images in it have names that include sequential numbers.
![Folder contains all images, ready for upload]() Put placeholders into the Word document.
Put placeholders into the Word document.
Locate the first image. If needed, set the text wrapping to "In Line with Text." Right below it, type (for instance):
{{{ image01.png -- shows blah blah }}}
as a placeholder for the image.
As you do that, switch back to the Explorer window and verify that you are using the correct filename. (Note: It really helps to have two monitors :-) Put some descriptive text into the placeholder, to help you keep things straight and because you'll need something for the "Attached Files" Description field later, anyway.
If desired, you can delete the image from the Word document now.
![Add "placeholders" to the text]()
1) Upload the first image (click the Image link, then the [Add File] button.
2) Set the description text (refer back to the Word Document and/or the Explorer window with the Preview pane visible).
3) Repeat steps 1-2 until all images have been attached.
4) Now click the [Embed] button that is next to each of the attached files. Start at the top and work your way down... Click the buttons in the order in which the images will appear.
5) Scroll to the end of the article body input box and you will see something like:
6) Scroll up to locate your first {{{ image }}} placeholder.
7) Paste the entire "embed" sequence directly below it.
8) Select all but the first [embed] tag and CUT it to the clipboard (Ctrl+X or Shift+Delete). At this point, you have left the first [embed] tag at the right place, and all of the rest of the tags are on the clipboard.
9) Scroll down to your next {{{ image }}} placeholder.
Repeat steps 7-9 until done. Remember to remove the [embed=image] tags from the end of the article.
I recommend leaving your inserted {{{ image }}} placeholders in place during this sequence. Here's why: It is possible to get confused and omit an image or paste the wrong [embed] tag twice. Your placeholders each contain a brief description of the image so you can fix things later if something goes wrong. It is easy to delete the placeholders during a later edit pass.
Notes:
Use the Preview feature of the Write Your Article screen early and often.
If you forget to include an [embed...] tag, the image or file attachment will automatically
appear at the end of the article. So if you end up with some unwanted attachments at the
end, that means you need to recheck your emeddings.
First, the EE Articles viewer does not support a useful "numbered list" feature. The [step] tag is useful for some situations such as section headings, but it's wrong for short lists and there are certain awkward limitations on what you can do inside of a [step] block. I recommend trying to avoid using [step] except (possibly) as high-level section headings.
Convert:
Refer to the original Word document to try (as much as possible) to retain the author's original intentions. Of course many things don't convert; for instance, font-face and -size changes are lost. Paragraph spacing must be handled manually (always leave a blank line between paragraphs).
You can use the [subtitle] tag for headings, or just make the line of text bold (details here). If you are using bold-only for subheads, then be sure to leave two blank lines above the the subheading text.
Use bold and italics consistently. Don't be afraid to override the author's minor decisions. If the most important phrase is buried in the middle of a paragraph, make that text bold, or break the paragraph in a way that brings the eye to the important text.
Here is a very useful trick:
Open two web browser windows -- one on the "View Article" page and another on the "Edit Article" page. I like to read the text (and review formatting) in its final form (the View Article browser), then switch to the Edit Article browser window to make changes. I go back and forth, incrementally (the View window helps me keep my place). To save changes, I hit Submit on the Edit window, then refresh the View window. To start another pass, I edit again.
Summary
It's not too hard to convert a Word document to an EE Article. The key steps are:
=-=-=-=-=-=-=-=-=-=-=-=-=-=-=-=-=-=-=-=-=-=-=-=-=-=-=-=-=
If you liked this article and want to see more from this author, please click the Yes button near the:
Was this article helpful?
label that is just below and to the right of this text. Thanks!
=-=-=-=-=-=-=-=-=-=-=-=-=-=-=-=-=-=-=-=-=-=-=-=-=-=-=-=-=-=-=-=-=-=-=-=-=-=-=-=-=-=
This article discusses the manual steps that I have used to create an attractive, readable EE article from an Office Word document. I'm using Word 2007, but the general techniques that I describe should apply to most versions.
Some Background-- Considerations and Limitations
We must, of necessity, convert the document to plain text. In a text conversion, images are altogether ignored -- they are simply missing from the output. Since a common reason for the author to use Word in the first place is to embed some nice graphics, handling this issue is a key (most important) aspect of the conversion.
 Special spacing -- especially in paragraph attributes -- is lost. For instance, it is normal in Word to have a 6- or 10-point gap between paragraphs -- it looks great in Word or on paper, but in EE Articles, the paragraphs end up jammed together. Text formatting -- Bold, italics, section titles, and so forth are also lost.
 Also, in the conversion to plain text, Word's numbered and bullet lists get converted to "hard-coded" lines -- the hanging indent is lost and lists become simple lines of text that start with a literal character or number. The result is rather ugly.
 Most of the conversion work is in the handling of these three issues. But it is not all that hard, and a typical submission can be converted in about 30 minutes with practice. Let's get started.
1. Setup
Create a folder on your desktop. Name the folder, for instance, TheArticle. You'll use it for keeping everything together. Copy the .DOCX file into it (Note: Be sure to retain a backup copy of the original .DOCX file.)2. Handling Images
We need to create an upload-able file from each of the images in the Word document.One way to do that is click on each image, press Ctrl+C, paste it into an MsPaint document, and then save it with filename that contains a sequential number (e.g., fig1.jpg, fig2.jpg, etc.).
But the easiest way I've found is to save the entire Word document as an HTML file:
Save As / Other Formats / Web Page, Filtered
When you do that, Word outputs an image file (typically JPG or PNG) of each image. So...
 Now you'll have a folder named filename_files and the images in it have names that include sequential numbers.
 Put placeholders into the Word document.
Locate the first image. If needed, set the text wrapping to "In Line with Text." Right below it, type (for instance):
{{{ image01.png -- shows blah blah }}}
as a placeholder for the image.
As you do that, switch back to the Explorer window and verify that you are using the correct filename. (Note: It really helps to have two monitors :-) Put some descriptive text into the placeholder, to help you keep things straight and because you'll need something for the "Attached Files" Description field later, anyway.
If desired, you can delete the image from the Word document now.

3. Convert to Unformatted Text
This is the big step of copying the body text from the Word document into the EE Article. Before you do this, consider that many editing tasks, such as spell checking and adding a blank line between paragraphs, might be easier to do in Word than in your browser. So I recommend that you take a pass through the text to look for little fixups you can do now to save yourself some time later.Note: I do NOT recommend that you attempt to add EE markup tags to the text yet. For instance, don't manually add [b]...[/b] around bold sequences. It is easy to make a small mistake, and in a very long article, a missing bracket character can be very hard to track down and fix.When ready, simply select the entire Word document contents and copy it to the clipboard (Ctrl+A, Ctrl+C). Then open the browser to the "Write your Article" screen, click the Body textbox and paste it (Ctrl+V).
As a middle ground, I've found it convenient to insert notes to myself, such as
{{{ indent starts }}}
...or...
{{{ URL link here http://google.com }}}
...so that in my edit pass, I'll have some visible signposts and I can later search for "{{{" if needed.
4. Upload and Embed the Images
The task is to upload all images, set the description text, and embed each image at the desired location in the article. I've found that the best way to handle this task is in these steps:1) Upload the first image (click the Image link, then the [Add File] button.
2) Set the description text (refer back to the Word Document and/or the Explorer window with the Preview pane visible).
3) Repeat steps 1-2 until all images have been attached.
4) Now click the [Embed] button that is next to each of the attached files. Start at the top and work your way down... Click the buttons in the order in which the images will appear.
5) Scroll to the end of the article body input box and you will see something like:
   [embed=image 383516] [embed=image 383517] [embed=image 383519] [embed=image 383522]
[embed=image 383526]6) Scroll up to locate your first {{{ image }}} placeholder.
7) Paste the entire "embed" sequence directly below it.
8) Select all but the first [embed] tag and CUT it to the clipboard (Ctrl+X or Shift+Delete). At this point, you have left the first [embed] tag at the right place, and all of the rest of the tags are on the clipboard.
9) Scroll down to your next {{{ image }}} placeholder.
Repeat steps 7-9 until done. Remember to remove the [embed=image] tags from the end of the article.
I recommend leaving your inserted {{{ image }}} placeholders in place during this sequence. Here's why: It is possible to get confused and omit an image or paste the wrong [embed] tag twice. Your placeholders each contain a brief description of the image so you can fix things later if something goes wrong. It is easy to delete the placeholders during a later edit pass.
Notes:
Use the Preview feature of the Write Your Article screen early and often.
If you forget to include an [embed...] tag, the image or file attachment will automatically
appear at the end of the article. So if you end up with some unwanted attachments at the
end, that means you need to recheck your emeddings.
5. Other Fixups -- Bullets and Numbers
In Word documents, we tend to see a lot of auto-numbered and bullet formatted paragraphs. With a simple text conversion, they come out looking almost not too bad without any effort. But if you want the final article to look great, you need to exert some extra effort.First, the EE Articles viewer does not support a useful "numbered list" feature. The [step] tag is useful for some situations such as section headings, but it's wrong for short lists and there are certain awkward limitations on what you can do inside of a [step] block. I recommend trying to avoid using [step] except (possibly) as high-level section headings.
Some numbered lists don't need to be numbered... convert them to bullets. This is the only way to get a clean "hanging indent" for each item. More discussion here.
Word tends to insert a tab after the number and that does not translate well, leaving an odd-looking gap. Remove the tab and replace it with two spaces.
Standard bullet handling leaves an entire blank line between items. You can tighten-up a bullet list as follows.
Convert: [bullet]This is item one[/bullet] [bullet]This is item two[/bullet] [bullet]This is item three[/bullet] ... to ... [bullet]This is item one [/bullet][bullet]This is item two [/bullet][bullet]This is item three [/bullet]
The output of the above shows the second group with less spacing, like so:
Convert: [bullet]This is item one[/bullet] [bullet]This is item two[/bullet] [bullet]This is item three[/bullet] ... to ... [bullet]This is item one [/bullet][bullet]This is item two [/bullet][bullet]This is item three [/bullet]
Convert:
This is item one
This is item two
This is item three
... to ...
This is item one
This is item two
This is item three
6. Other Fixups -- Character Formatting
I like to leave this to last because it is easiest to edit narrative text when it is not studded with formatting tags.Refer to the original Word document to try (as much as possible) to retain the author's original intentions. Of course many things don't convert; for instance, font-face and -size changes are lost. Paragraph spacing must be handled manually (always leave a blank line between paragraphs).
You can use the [subtitle] tag for headings, or just make the line of text bold (details here). If you are using bold-only for subheads, then be sure to leave two blank lines above the the subheading text.
Use bold and italics consistently. Don't be afraid to override the author's minor decisions. If the most important phrase is buried in the middle of a paragraph, make that text bold, or break the paragraph in a way that brings the eye to the important text.
Here is a very useful trick:
Open two web browser windows -- one on the "View Article" page and another on the "Edit Article" page. I like to read the text (and review formatting) in its final form (the View Article browser), then switch to the Edit Article browser window to make changes. I go back and forth, incrementally (the View window helps me keep my place). To save changes, I hit Submit on the Edit window, then refresh the View window. To start another pass, I edit again.
Summary
It's not too hard to convert a Word document to an EE Article. The key steps are:
Add image placeholders in the Word document
Copy the document text into the EE Article (losing all formating)
Use Office Word's Save as Web Page feature to get a folder full of image files.
Attach (upload) and embed all of the image files.
Put each image [embed] tag in the right place.
Use Preview (and/or use two browser windows) as you make editing passes through the text to fixup section heading and character formatting.
=-=-=-=-=-=-=-=-=-=-=-=-=-If you liked this article and want to see more from this author, please click the Yes button near the:
Was this article helpful?
label that is just below and to the right of this text. Thanks!
=-=-=-=-=-=-=-=-=-=-=-=-=-
Have a question about something in this article? You can receive help directly from the article author. Sign up for a free trial to get started.
Comments (1)
Author
Commented:Notes on Subheadings
Most EE articles are written in sections. At a minimum, there is typically an introduction, a body, and a summary.In MsWord, you would tend to use the standard styles named, Heading 1, Heading 2, etc. to start each section. But upon converting to plain text, MsWord's character formatting and paragraph spacing is all lost. That means that you will need to do some manual work to format your subheadings for the EE Articles system.
There are two main ways to handle subheads:
Next, when you place a subheading, remember that the important visual cue for the reader is a gap of whitespace above it -- you need to indicate a break from the previous text. So with either technique, you will likely need to manually insert two blank lines above each subheading.
Another visual cue is the capitalization for the section headings. I recommend using Title Caps; that is, capitalize each important word in the subheading text. Another option is ALL CAPS. That certainly makes the subheads stand out more... but perhaps too much.
Using the [subtitle] Tag
Here's how the text in the Article Body will look when using the [subtitle] tag:Open in new window
Using the [b] (Bold Text) [/b] Option
Here's how the text in the Article Body will look when using bold text for your subheadings:Open in new window
Other Options
If you need two levels of headings, then I recommend using the [subtitle] technique for the top level, and the bolding technique for the sub-subheadings. For three levels of subheads, you might might consider using ALL CAPS to distinguish the highest-level section headings.You might try using numbered [step] blocks for section headings (I did this in part of the main article, above). However, there are distinct drawbacks... limitations of EE's Article rendering systems. For instance, you can't use [indent] or [bullet] tags inside of the hanging-indent of a [step] tag. Also, there are some other quirks and tricks that come into play to make this work. I may address some of these options in a future article.
-- Dan