Creating bootable VHDs for Windows 7 or 2008 R2


I am a Cloud Architect, technical writer, and documentation aficionado with a strong focus in Microsoft Azure.
Published:
Browse All Articles > Creating bootable VHDs for Windows 7 or 2008 R2
Both the Windows 7 and Windows Server 2008 R2 release candidates will allow systems to boot from a Virtual Hard Disk (VHD). This feature can speed up the time to rebuild or partition systems immensely. Once the VHD is created and an OS added to it, the boot menu detects the Operating System and will allow it to start.
This article looks at creating a bootable VHD using Diskpart.exe and the Windows installation media.
To get started, you will need to boot your system from the installation media as you would if you were setting up Windows from a DVD. When prompted to install Windows, select the Repair option from the first screen.
This will display a list of repair options for your system, including system restore and command prompt. Select command prompt as the option for repair. When the command prompt opens, change the directory to the C:\ drive and create a directory for your Virtual Disks called Virtual .
Mkdir c:\virtual
This will give you a common location to store VHD files in, making them easier to locate later.
Start the Diskpart utility by entering diskpart.exe on the command line.
From here you will use diskpart to create a VHD file and format it using the NTFS file system, and set it as a primary partition. These actions will allow the Windows installer to find the new virtual disk during installation, and place the install of Windows into the VHD.
Within Diskpart enter the following commands to create and select the VHD,
Create vdisk file= C:\virtual\mynewvhd.vhd maximum=25000 type=expandable
Select vdisk file= c:\virtual\mynewvhd.vhd
The first command creates the VHD called mynewvhd.vhd sets the maximum size to 25GB and the type to expandable, which allows for future growth.
Next you will select the VHD you created so it can be attached using the attach vdisk command.
Once the virtual disk is attached, you can create a primary partition on the disk and format it using the commands below:
Create partition primary
Format fs=ntfs label= Label for volume quick
These steps will create a partition, format it with the NTFS file system and a label, using the quick switch.
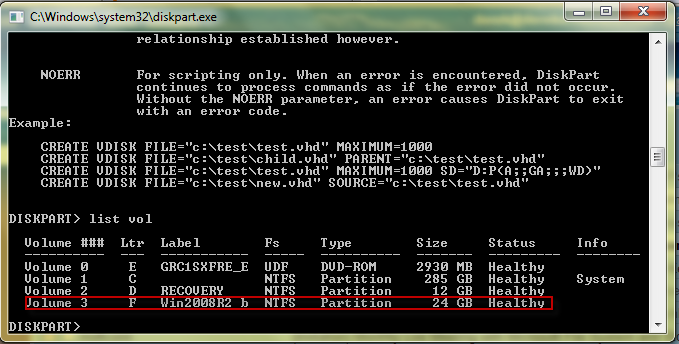
Once these have completed, entering the list vol command should display all physical disks and the virtual disk you have created on the screen.
![Diskpart]() At the command prompt, type exit twice, once to leave diskpart and once to close the command prompt window.
At the command prompt, type exit twice, once to leave diskpart and once to close the command prompt window.
On the repair options window click the close box in the top left corner. This will return you to the Initial setup screen for the media.
Now you can proceed through the installation as you normally would, when Windows asks you to select a disk to use for installation, select the Virtual disk created above, which is most easily identified by label, and follow the installation instructions as normal. Once the installer completes you will be able to select from your root OS or your VHD OS at boot time.
Note: A core installation of Windows 7 or Windows 2008 R2 RC is required to allow the system to boot from Virtual Hard Disks.
This article looks at creating a bootable VHD using Diskpart.exe and the Windows installation media.
To get started, you will need to boot your system from the installation media as you would if you were setting up Windows from a DVD. When prompted to install Windows, select the Repair option from the first screen.
This will display a list of repair options for your system, including system restore and command prompt. Select command prompt as the option for repair. When the command prompt opens, change the directory to the C:\ drive and create a directory for your Virtual Disks called Virtual .
Mkdir c:\virtual
This will give you a common location to store VHD files in, making them easier to locate later.
Start the Diskpart utility by entering diskpart.exe on the command line.
From here you will use diskpart to create a VHD file and format it using the NTFS file system, and set it as a primary partition. These actions will allow the Windows installer to find the new virtual disk during installation, and place the install of Windows into the VHD.
Within Diskpart enter the following commands to create and select the VHD,
Create vdisk file= C:\virtual\mynewvhd.vhd maximum=25000 type=expandable
Select vdisk file= c:\virtual\mynewvhd.vhd
The first command creates the VHD called mynewvhd.vhd sets the maximum size to 25GB and the type to expandable, which allows for future growth.
Next you will select the VHD you created so it can be attached using the attach vdisk command.
Once the virtual disk is attached, you can create a primary partition on the disk and format it using the commands below:
Create partition primary
Format fs=ntfs label= Label for volume quick
These steps will create a partition, format it with the NTFS file system and a label, using the quick switch.
Once these have completed, entering the list vol command should display all physical disks and the virtual disk you have created on the screen.
 At the command prompt, type exit twice, once to leave diskpart and once to close the command prompt window.
On the repair options window click the close box in the top left corner. This will return you to the Initial setup screen for the media.
Now you can proceed through the installation as you normally would, when Windows asks you to select a disk to use for installation, select the Virtual disk created above, which is most easily identified by label, and follow the installation instructions as normal. Once the installer completes you will be able to select from your root OS or your VHD OS at boot time.
Note: A core installation of Windows 7 or Windows 2008 R2 RC is required to allow the system to boot from Virtual Hard Disks.
I am a Cloud Architect, technical writer, and documentation aficionado with a strong focus in Microsoft Azure.
Have a question about something in this article? You can receive help directly from the article author. Sign up for a free trial to get started.
Comments (1)
Commented:
There are a few links that i would like to add which i found usefull too -
http://edge.technet.com/Media/Windows-7-Boot-from-VHD/
http://blogs.msdn.com/b/knom/archive/2009/04/07/windows-7-vhd-boot-setup-guideline.aspx
http://blogs.technet.com/b/keithcombs/archive/2009/05/22/dual-boot-from-vhd-using-windows-7-and-windows-server-2008-r2.aspx