

Browse All Articles > How to create a silent self-extracting deployment package with Paquet Builder
Purpose: This article describes how to use Paquet Builder to create a basic single-file silent self-extracting installation package including a Start Menu shortcut and an Uninstall option in Add/Remove Programs. Paquet Builder (PB) is a powerful and flexible utility that can simply package files for distribution or create full-featured installation packages. Their site at http://www.gdgsoft.com/pb/ has more detailed support offerings including forums and email. They have two reasonably priced editions, both have the same features, it just depends on how many users are in your company.
This article includes some support files in the attached compressed ZIP file. Download the attached file and expand to the folder “C:\PBSample” if you want to use them to follow along with this article. (Included in the ZIP file is a PDF version of this article with screenshots to make it easier to follow along.)
This attachment includes an example do-nothing VB6 project only for demonstration purposes that was used to prepare this article. Also included in the attached file is the Paquet Builder project file that correlates with this article. You can simply load the Paquet Builder project, named “SampleVB6Package.pbp”, from the expanded files and build the project in Paquet Builder to quickly get to the resulting silent installation executable package.
The following steps guide you through the key actions to create a self-extracting single executable deployment file.
1. Start Paquet Builder (PB). It is a fully graphical interface, and no scripting is required.
2. Click “Start a new project”
3. Select “Standard Package” to have the most flexibility.
4. Click “Manage files to compress”
Here you will need to add the files to be included in the package. For example, using VB6’s Package & Deployment Wizard (PDW) to generate a standard installation, you could look at the LST file created by the VB6 PDW. This identifies the files you need easily. And it gathers the files you need into an easy-to-access folder you specify during the execution of PDW, usually a “Package” folder under the project folder. Select the files from this location so you avoid problems with trying to access files in use from other folders.
5. With the files from the project added to the PB File Manager, select each file one at a time and click the [Properties] button to configure file-specific aspects.
6. The left side of the PB File Manager is the “Components”. With the Main component selected, click the Properties button below it.
7. On the main Paquet Builder window, select “Set main destination folder” and set the main destination folder appropriately. In this example, it is set to “%PROGFILESDIR%\SampleVB6Project”.
8. Select “Select components” and be sure to uncheck “Include a component selection dialog in my package”.
9. Select the “Functionality” category on the main PB screen.
The first screen is the configuration of extracted files. Set this to “Only overwrite older existing files.”. Here it is important to select “Create a silent package” and uncheck “Allow users to stop the extraction process.”
10. Select “Edit progress monitor” and check the box “Do not show the progress monitor dialog”.
11. If shortcuts are desired, select the “Create shortcuts” option on the left side of PB.
12. If an uninstall option is desired, select the “Configure uninstaller” option on the left and set the options appropriately, such as in the following example:
13. Once this is complete, save the PB Package information by clicking the [Save] button.
Then click the [Build] button to build the installation package.
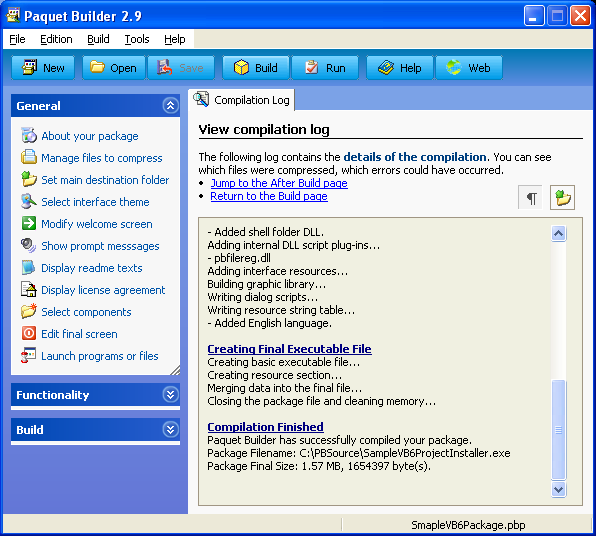
If it is successful, PB will report “Compilation Finished” as shown below:
![Completion of Paquet Builder process]()
Test the package by running it. If you use the included sample VB6 application, it will be installed on the computer and you can test it. (It doesn’t really do anything. It’s just a demonstration that Paquet Builder built the file properly.)
You should see no dialogs during the installation. This sample application should be installed in the folder C:\Program Files\SampleVB6Package and there should be a new Start Menu option for SampleVB6Package.
The Add/Remove Programs dialog will show the newly installed application ready to be uninstalled.
Conclusion: This demonstrates how to create installation packages with Paquet Builder to silently install a custom developed application, which would commonly be used for enterprises managing multiple computer systems, or circumstances where it is intended to simplify an installation for a user. The resulting silent installation file can be executed from a login script, for instance, or from a corporate intranet. Paquet Builder can be used this way with any development language, or simply to delivery files using a single self-extracting compressed file. The VB6 project example included with this article is just for demonstration purposes.
NOTE about the attached Support Files: Due to file restrictions on uploads, some files have been renamed within the ZIP file. I could have linked to them from somewhere else, but then there would be one more place to manage this article.
PBSupportFiles.zip
All files that have been renamed follow a pattern that changes the period and extension to an underscore and extension, then a new period and "txt" are added at the end. All files that have a txt extension need to be renamed after you expand the contents of the ZIP file. They have to be renamed without the current ".txt" extension and change the underscore to a period. There are two files in the main directory and all the DLL and TLB files in the Package\Support folder have been renamed following this pattern.
This article includes some support files in the attached compressed ZIP file. Download the attached file and expand to the folder “C:\PBSample” if you want to use them to follow along with this article. (Included in the ZIP file is a PDF version of this article with screenshots to make it easier to follow along.)
This attachment includes an example do-nothing VB6 project only for demonstration purposes that was used to prepare this article. Also included in the attached file is the Paquet Builder project file that correlates with this article. You can simply load the Paquet Builder project, named “SampleVB6Package.pbp”, from the expanded files and build the project in Paquet Builder to quickly get to the resulting silent installation executable package.
The following steps guide you through the key actions to create a self-extracting single executable deployment file.
1. Start Paquet Builder (PB). It is a fully graphical interface, and no scripting is required.
2. Click “Start a new project”
3. Select “Standard Package” to have the most flexibility.
4. Click “Manage files to compress”
Here you will need to add the files to be included in the package. For example, using VB6’s Package & Deployment Wizard (PDW) to generate a standard installation, you could look at the LST file created by the VB6 PDW. This identifies the files you need easily. And it gathers the files you need into an easy-to-access folder you specify during the execution of PDW, usually a “Package” folder under the project folder. Select the files from this location so you avoid problems with trying to access files in use from other folders.
5. With the files from the project added to the PB File Manager, select each file one at a time and click the [Properties] button to configure file-specific aspects.
a. For instance, the file in this sample project called “SampleVB6Project.exe” will need to be placed in the application folder “%PROGFILESDIR%\SampleVB6Project”, so in the Custom Destination Folder select “%PROGFILESDIR%” and add “\SampleVB6Project”.
b. You can also set additional options per file (or group of selected files). Select the sample file asycfilt.dll and click the [Properties] button. Set the Custom Destination Folder to “%SYS%” to designate the Windows System folder. Then select the File Actions tab and check the box for “Self-register file(s)”.
c. You can select multiple files in the PB File Manager window and set properties for all of them at once. Apply the same settings in the previous step to all of the other DLL files.
6. The left side of the PB File Manager is the “Components”. With the Main component selected, click the Properties button below it.
a. Select the “Selection Dialog” tab and uncheck “Allow Users to decide whether the component will be installed or not“ and then click [OK] on the Component Properties and [OK] on the PB File Manager.
7. On the main Paquet Builder window, select “Set main destination folder” and set the main destination folder appropriately. In this example, it is set to “%PROGFILESDIR%\SampleVB6P
8. Select “Select components” and be sure to uncheck “Include a component selection dialog in my package”.
9. Select the “Functionality” category on the main PB screen.
The first screen is the configuration of extracted files. Set this to “Only overwrite older existing files.”. Here it is important to select “Create a silent package” and uncheck “Allow users to stop the extraction process.”
10. Select “Edit progress monitor” and check the box “Do not show the progress monitor dialog”.
11. If shortcuts are desired, select the “Create shortcuts” option on the left side of PB.
a. Set the primary options for the Default Start Menu Folder Name, in this case “Sample VB6 Package”.
b. Click the [Add] button to configure a shortcut.
c. Select the file that the shortcut should point to and click [OK].
d. Fill in the Shortcut Properties dialog and click [OK] again. The Shortcut Filename will begin with %SHORTCUTPATH%, which is automatically managed by PB when the installation is in progress to point to the proper installation folder.
e. Be sure to set the Component the shortcut applies to at the bottom of the dialog.
f. After you click OK on the Shortcut Properties dialog, you will see the new shortcut in the Shortcut Manager window.
12. If an uninstall option is desired, select the “Configure uninstaller” option on the left and set the options appropriately, such as in the following example:
13. Once this is complete, save the PB Package information by clicking the [Save] button.
Then click the [Build] button to build the installation package.
If it is successful, PB will report “Compilation Finished” as shown below:
Test the package by running it. If you use the included sample VB6 application, it will be installed on the computer and you can test it. (It doesn’t really do anything. It’s just a demonstration that Paquet Builder built the file properly.)
You should see no dialogs during the installation. This sample application should be installed in the folder C:\Program Files\SampleVB6Package and there should be a new Start Menu option for SampleVB6Package.
The Add/Remove Programs dialog will show the newly installed application ready to be uninstalled.
Conclusion: This demonstrates how to create installation packages with Paquet Builder to silently install a custom developed application, which would commonly be used for enterprises managing multiple computer systems, or circumstances where it is intended to simplify an installation for a user. The resulting silent installation file can be executed from a login script, for instance, or from a corporate intranet. Paquet Builder can be used this way with any development language, or simply to delivery files using a single self-extracting compressed file. The VB6 project example included with this article is just for demonstration purposes.
NOTE about the attached Support Files: Due to file restrictions on uploads, some files have been renamed within the ZIP file. I could have linked to them from somewhere else, but then there would be one more place to manage this article.
PBSupportFiles.zip
All files that have been renamed follow a pattern that changes the period and extension to an underscore and extension, then a new period and "txt" are added at the end. All files that have a txt extension need to be renamed after you expand the contents of the ZIP file. They have to be renamed without the current ".txt" extension and change the underscore to a period. There are two files in the main directory and all the DLL and TLB files in the Package\Support folder have been renamed following this pattern.
Have a question about something in this article? You can receive help directly from the article author. Sign up for a free trial to get started.
Comments (0)