Manually remove a Hardware Device and its Drivers from Windows


Published:
Browse All Articles > Manually remove a Hardware Device and its Drivers from Windows
I wanted to pass this along in case anyone has a problem removing a device from the Device Manager, or if you suspect a corrupted Driver that you want to remove in its entirety. I know it is kinda lengthy and very basic in its format, but I figured I would just drop to the basics and make it easy to follow. I know most of you might just skip through it for the most important steps, but hey, I like to be thorough.
Please keep in mind that this is an ADVANCED method that requires renaming files in the System Directory, and removing keys from the Registry. If you are not comfortable doing this, please do not attempt this process.
For this scenario, let's use my Video Driver, an ATI Mobility Radeon HD 2600. Please, make sure that you are doing this for the proper device installed on YOUR system, as this is only an example. This device was in a laptop, so it was not needed to actually remove the device.
If you are working on a Desktop PC, then once the device is removed, it *should* remove some of the configuration details from the Registry on its own. So as long as you do your "due diligence" in documentation before you start, you should have a little bit less to go through. Part of that "due diligence" might also involve taking backups and creating a "recovery" disk - depends on what you are removing. Keep in mind, less complex Devices aren't quite as hard to remove, as there is less configuration information in the Registry, as well as installed apps and less Driver files.
First of all, go to (Start>Run>) MSConfig, and uncheck ALL items under both the Services and the Startup Tabs (if any exist) for your device in question. This will ensure that the needed files won't be in memory next boot up, can be deleted after the upcoming reboot. If there is a problem down the road, these can always be enabled again....
You can even go as far as to use the freeware ShellExView (available from here ), to remove any Shell Extensions, related to your Device. Launch the app, and search/sort by your Device Vendor's name, and you can delete the associated files.
Next, remove any other Devices form the hardware category that you are dealing with, just in case they are interfering with YOUR device. In my case, the LANDesk Mirror Driver, and the Logmein Display Driver were the only other two items in the Display category.
First of all, you need to go into the device properties, and get the Driver details. From the Device Properties>Driver Tab>Driver Details, and make note of all the .SYS, and .DLL files (and in some cases .EXE files) from that window.
![Driver File Details - Figure1]()
They will normally reside in "C:\Windows", "C:\Windows\System32" and "C:\Windows\System32\Drivers" . Those will need to be removed manually later on once the Device is removed. Now, move on to the Details Tab in the device properties, and we will need to get the Device Instance ID, and the Service entry, if there is any listed.
For the Device instance ID, it will be a long string of alpha numeric digits, broken into sections. Highlight it, and hit "CTRL+C" to copy it. Hit the drop down menu, to select the Service as well. That is going to be the actual registered name of the service.
![Device Details - Figure2]()
For our ATI video card,
Device instance ID - PCI\VEN_1002&DEV_9581&SUBSYS_30C5103C&REV_00\4&171B8011&0&0008
Service - ati2mtag
To start with, you are going to need to get rid of the .INF's responsible for installing the device, once it is removed after the reboot. If there is no .INF, the device can't be reinstalled by the PnP Service. Take the first 2 sections of the Device instance ID, the PCI\VEN and the DEV sections and use those as your search term. Go to Windows Search, and use the "Containing text:" search for "PCI\VEN_1002&DEV_9581" (no quotes of course), to search in "C:\Windows\INF". You might get multiple .INF, which is fine. Rename all the ones you find from an .INF extension, to a .OLD extension (or whatever you like to use for renamed files). Once those are renamed, then Windows will simply pop up the "New Hardware Wizard" shortly, once you have removed the device from the Registry and rebooted.
*Windows Vista makes it easy by listing the INF name directly on the Device Details Tab in Figure2
You can also verify you don't have any possible remnants of some older Drivers in the Device Manager, under the Non Plug and Play Drivers (if you don't see this, click View from the top of the window, and select "Show Hidden Devices"). If you don't see this option above, see the following KB article "Device Manager does not display Devices that are not connected to the Windows XP-based computer" to enable the feature.
In this case I had to remove an older LogMeIn device that was left behind when the app was uninstalled.
Now the fun part.
PLEASE REMEMBER TO SET A SYSTEM RESTORE, OR GET A BACKUP OF THE REGISTRY KEYS AS YOU REMOVE THEM
Launch Regedit, and navigate to "HKEY_LOCAL_MACHINE\SYSTEM\CurrentControlSet\Services" , and delete the "ati2mtag" (specified from the Device Details>Service property above) service. Actually in most cases, you will be denied access. You will need to "Right Click" >Permissions, and make sure that YOUR UserID has "FULL CONTROL" over the key (may have to hit the Advanced Button, and click the "Replace permission entries on all child objects with entries shown here that apply to child objects" (pushes the permissions down the tree).
Next, you will go to where the Hardware Configurations are stored in the Registry, which is "HKEY_LOCAL_MACHINE\SYSTEM\CurrentControlSet\Enum" . You can easily do a search for the name of the device, as it is shown in the Device Manager, or navigate to the PCI section (most cases) and find the SubKey that matches your Device instance ID.
![Driver Registry Entry - Figure3]()
To remove the device, you will delete the key (pushing down the permissions as above if needed), that matches the first 3 sections of the Device instance ID, up to the REV_00. In the case of my ATI Card not working properly, and handling a decent resolution, I also removed all the monitors under the Display SubKey under "HKEY_LOCAL_MACHINE\SYSTEM\CurrentControlSet\Enum" . In my case, I had about 26 entries, some of which are ghosts from previous installs. I didn't want ANYTHING interfering with my fresh installation once I was done. This can be done with any device that relies on another piece of hardware (USB Mouse, USB Ports etc...)
OK, now that the Devices Registry information was removed, you are about ready to reboot the machine to free up the actual Driver files that need to be removed. Once you are logged back in, cancel the PNP Hardware Wizard, and go to a Command Shell. In our case here, most every file started with ATI , so they will be easy to remove. Navigate to c:\windows and do a search for "ATI*.*", and once you verify that they are all ATI related files, you can delete them by using the "del ATI*.*" command. Repeat the same process for both the "C:\Windows\System32" and "C:\Windows\System32\Drivers" .
You might get denied on a few of these files, which for the most part, shouldn't be a problem. If you really want to get to the root of those, you can use apps like FFUnlocker or Unlocker, to find what has a Handle Lock on it, and then proceed to remove them. Make sure that all the files you found in the Driver Details tab are gone (if possible, as you might have a few stubborn ones to work through).
If you would prefer to use the Windows Search, so be it, as the Command Line is just my preference.
Next, navigate to "C:\Program Files\ATI Technologies" and rename this directory to "C:\Program Files\ATI Technologies-OLD". This will allow the Driver reinstall to lay down fresh files. This step might not be needed with all Devices, as some of them don't have Helper Apps that go along with the hardware. This is most common with Video Cards, Sound Cards and even some Network Cards. You can also check the same thing in the Registry, for SubKeys that are DIRECTLY related to your device. In my case, I went in and renamed the entries under HKCU and HKLM both. Again, this makes sure that the Driver install doesn't have to overwrite any previous data, and gets a fresh playing field for the reinstallation.
Now that the remnants are for the most part gone, you can reboot once more to make sure you don't have any errors, and proceed with the Driver installation with your OEM/Vendor's latest stable Driver Version. Hopefully, the device will work just fine once this is done. Portions of this process can also be used to remove stubborn Devices installed by Software, like AV Drivers. You can use the Non Plug and Play Drivers section to remove these types of Drivers, to allow for the app to reinstall them.
Symantec especially uses several of these types of Drivers that can be left behind during an uninstall. Additionally, I have also used the methods of removing the hardware from the Registry DIRECTLY, as the Device Manager showed an error that it was "Unable to remove the device". Although the Device Manager shouldn't read the Registry configuration in Real Time, it will register and prompt for a reinstall upon next reboot/login.
As a side note, you can also use the portions above in Figures 1 and 2, to find the drivers needed to backup in the event you have some Legacy Hardware you need to reinstall on another PC/Reinstalled OS.
Hopefully this has been an easy to follow guide on removing Hardware Manually. Please remember that "due diligence" before you begin.
Please keep in mind that this is an ADVANCED method that requires renaming files in the System Directory, and removing keys from the Registry. If you are not comfortable doing this, please do not attempt this process.
For this scenario, let's use my Video Driver, an ATI Mobility Radeon HD 2600. Please, make sure that you are doing this for the proper device installed on YOUR system, as this is only an example. This device was in a laptop, so it was not needed to actually remove the device.
If you are working on a Desktop PC, then once the device is removed, it *should* remove some of the configuration details from the Registry on its own. So as long as you do your "due diligence" in documentation before you start, you should have a little bit less to go through. Part of that "due diligence" might also involve taking backups and creating a "recovery" disk - depends on what you are removing. Keep in mind, less complex Devices aren't quite as hard to remove, as there is less configuration information in the Registry, as well as installed apps and less Driver files.
First of all, go to (Start>Run>) MSConfig, and uncheck ALL items under both the Services and the Startup Tabs (if any exist) for your device in question. This will ensure that the needed files won't be in memory next boot up, can be deleted after the upcoming reboot. If there is a problem down the road, these can always be enabled again....
You can even go as far as to use the freeware ShellExView (available from here ), to remove any Shell Extensions, related to your Device. Launch the app, and search/sort by your Device Vendor's name, and you can delete the associated files.
Next, remove any other Devices form the hardware category that you are dealing with, just in case they are interfering with YOUR device. In my case, the LANDesk Mirror Driver, and the Logmein Display Driver were the only other two items in the Display category.
First of all, you need to go into the device properties, and get the Driver details. From the Device Properties>Driver Tab>Driver Details, and make note of all the .SYS, and .DLL files (and in some cases .EXE files) from that window.
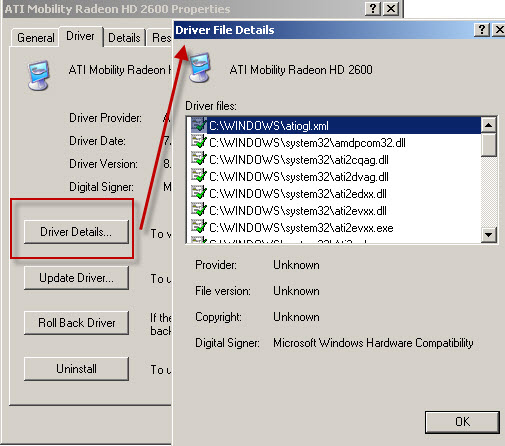
They will normally reside in "C:\Windows", "C:\Windows\System32" and "C:\Windows\System32\Drive
For the Device instance ID, it will be a long string of alpha numeric digits, broken into sections. Highlight it, and hit "CTRL+C" to copy it. Hit the drop down menu, to select the Service as well. That is going to be the actual registered name of the service.
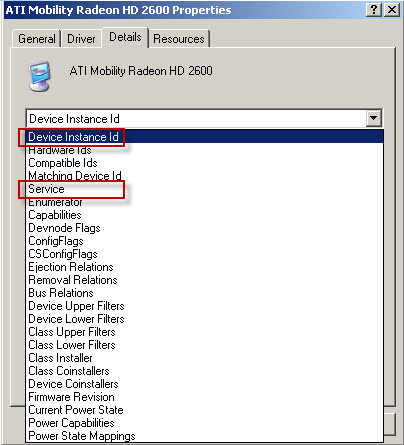
For our ATI video card,
Device instance ID - PCI\VEN_1002&DEV_9581&SUBS
Service - ati2mtag
To start with, you are going to need to get rid of the .INF's responsible for installing the device, once it is removed after the reboot. If there is no .INF, the device can't be reinstalled by the PnP Service. Take the first 2 sections of the Device instance ID, the PCI\VEN and the DEV sections and use those as your search term. Go to Windows Search, and use the "Containing text:" search for "PCI\VEN_1002&DEV_9581" (no quotes of course), to search in "C:\Windows\INF". You might get multiple .INF, which is fine. Rename all the ones you find from an .INF extension, to a .OLD extension (or whatever you like to use for renamed files). Once those are renamed, then Windows will simply pop up the "New Hardware Wizard" shortly, once you have removed the device from the Registry and rebooted.
*Windows Vista makes it easy by listing the INF name directly on the Device Details Tab in Figure2
You can also verify you don't have any possible remnants of some older Drivers in the Device Manager, under the Non Plug and Play Drivers (if you don't see this, click View from the top of the window, and select "Show Hidden Devices"). If you don't see this option above, see the following KB article "Device Manager does not display Devices that are not connected to the Windows XP-based computer" to enable the feature.
In this case I had to remove an older LogMeIn device that was left behind when the app was uninstalled.
Now the fun part.
PLEASE REMEMBER TO SET A SYSTEM RESTORE, OR GET A BACKUP OF THE REGISTRY KEYS AS YOU REMOVE THEM
Launch Regedit, and navigate to "HKEY_LOCAL_MACHINE\SYSTEM
Next, you will go to where the Hardware Configurations are stored in the Registry, which is "HKEY_LOCAL_MACHINE\SYSTEM
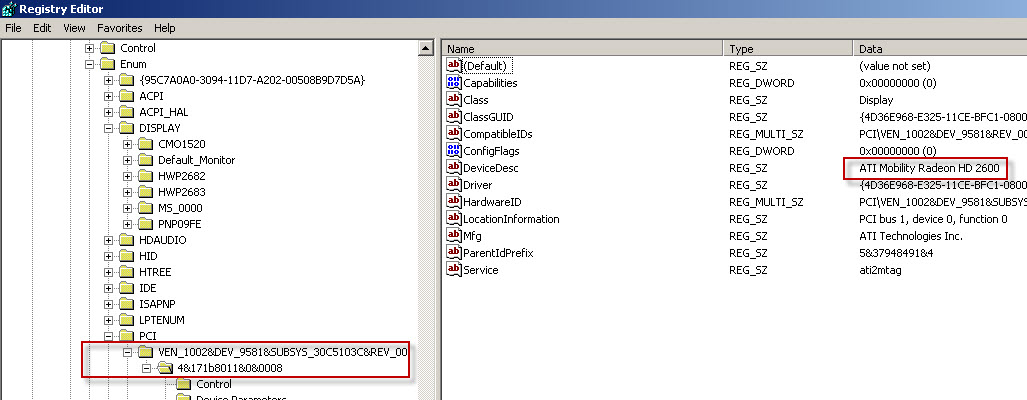
To remove the device, you will delete the key (pushing down the permissions as above if needed), that matches the first 3 sections of the Device instance ID, up to the REV_00. In the case of my ATI Card not working properly, and handling a decent resolution, I also removed all the monitors under the Display SubKey under "HKEY_LOCAL_MACHINE\SYSTEM
OK, now that the Devices Registry information was removed, you are about ready to reboot the machine to free up the actual Driver files that need to be removed. Once you are logged back in, cancel the PNP Hardware Wizard, and go to a Command Shell. In our case here, most every file started with ATI , so they will be easy to remove. Navigate to c:\windows and do a search for "ATI*.*", and once you verify that they are all ATI related files, you can delete them by using the "del ATI*.*" command. Repeat the same process for both the "C:\Windows\System32" and "C:\Windows\System32\Drive
You might get denied on a few of these files, which for the most part, shouldn't be a problem. If you really want to get to the root of those, you can use apps like FFUnlocker or Unlocker, to find what has a Handle Lock on it, and then proceed to remove them. Make sure that all the files you found in the Driver Details tab are gone (if possible, as you might have a few stubborn ones to work through).
If you would prefer to use the Windows Search, so be it, as the Command Line is just my preference.
Next, navigate to "C:\Program Files\ATI Technologies" and rename this directory to "C:\Program Files\ATI Technologies-OLD". This will allow the Driver reinstall to lay down fresh files. This step might not be needed with all Devices, as some of them don't have Helper Apps that go along with the hardware. This is most common with Video Cards, Sound Cards and even some Network Cards. You can also check the same thing in the Registry, for SubKeys that are DIRECTLY related to your device. In my case, I went in and renamed the entries under HKCU and HKLM both. Again, this makes sure that the Driver install doesn't have to overwrite any previous data, and gets a fresh playing field for the reinstallation.
Now that the remnants are for the most part gone, you can reboot once more to make sure you don't have any errors, and proceed with the Driver installation with your OEM/Vendor's latest stable Driver Version. Hopefully, the device will work just fine once this is done. Portions of this process can also be used to remove stubborn Devices installed by Software, like AV Drivers. You can use the Non Plug and Play Drivers section to remove these types of Drivers, to allow for the app to reinstall them.
Symantec especially uses several of these types of Drivers that can be left behind during an uninstall. Additionally, I have also used the methods of removing the hardware from the Registry DIRECTLY, as the Device Manager showed an error that it was "Unable to remove the device". Although the Device Manager shouldn't read the Registry configuration in Real Time, it will register and prompt for a reinstall upon next reboot/login.
As a side note, you can also use the portions above in Figures 1 and 2, to find the drivers needed to backup in the event you have some Legacy Hardware you need to reinstall on another PC/Reinstalled OS.
Hopefully this has been an easy to follow guide on removing Hardware Manually. Please remember that "due diligence" before you begin.
Have a question about something in this article? You can receive help directly from the article author. Sign up for a free trial to get started.
Comments (5)
Author
Commented:Author
Commented:Actually, I havent seen the newsletters. Everytime I go in to set my preferences, I just never get them. Of course it can probably be remedied by an email to the customer support staff, just never thought of it....
Thanks for the help.....
Author
Commented:Commented:
Have you considered revamping this excellent tutorial to show what is required in windows 7 to achieve the same result?
Rgds
Loneaussie
Commented: