HOW TO: Add an iSCSI Software Adaptor and Create an iSCSI Multipath Network in VMware vSphere Hypervisor ESXi 4.1

Andrew Hancock (VMware vExpert PRO / EE Fellow/British Beekeeper)![]() VMware and Virtualization Consultant
VMware and Virtualization Consultant
 VMware and Virtualization Consultant
CERTIFIED EXPERT
EE Fellow, MVE, Expert of the Year 2021,2017-11, Scribe 2016-2012, Author of the Year 2018-6,2013-2012 VMware vExpert Pro, vExpert 2022-2011
Published:
Browse All Articles > HOW TO: Add an iSCSI Software Adaptor and Create an iSCSI Multipath Network in VMware vSphere Hypervisor ESXi 4.1
Using a software based iSCSI solution, there is no requirement to purchase an hardware iSCSI initiator or TOE (TCP/IP Offload Engine) interface card. A standard network interface card, can be used to connect and existing ESXi server to a remote iSCSI target or iSCSI SAN on the TCP/IP storage network. The iSCSI Software Adapter built into the VMKenerl interface, completes the communication between the network interface card and the host server network stack.
This tutorial can be used to add an iSCSI Software Adapter and create an iSCSI Multipath Network in VMware vSphere Hypervisor ESXi 4.1.
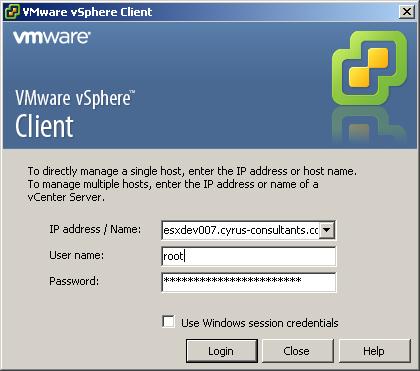
Using the VMware vSphere Client, login and connect to the ESXi 4.1 server, using IP address or hostname of the ESXi 4.1 server, using root username and password credentials. If you have a VMware vSphere vCenter server, you could also specify IP address or hostname of the vCenter server which manages your vSphere 4 ESXi 4.1 server.
![Using the VMware vSphere Client, login and connect to the ESXi 4.1 server]()
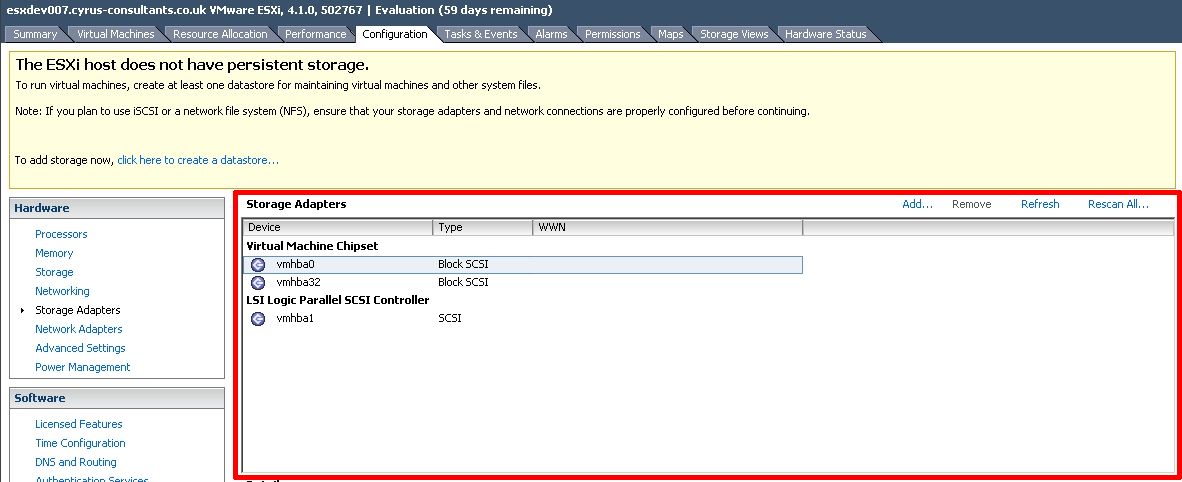
When connected to the ESXi server, select the Host Server, Configuration tab, and select Storage Adapters. Please note, if you do not have any persistent storage connected to the ESXi server, a yellow warning configuration box will appear. This example server used in this tutorial does not have any local SAS or SATA storage connected. Once the iSCSI Software Adapter has been added, iSCSI storage can be added, and this yellow warning configuration box will disappear.
![select Storage Adaptors]()
the procedure for adding and configuring the iSCSI Software Adapter is slightly different, depending upon which version of the vSphere Client (version 4.1.0 or version 5.0.0) you have installed, if the iSCSI Software Adapter is not visible as shown in the following screenshot, it's likely you have connected using the vSphere Client version 5.0.0. Skip Step 3 and proceed to Step 4.
![Storage Adaptors iSCSI software Adaptor not visible]()
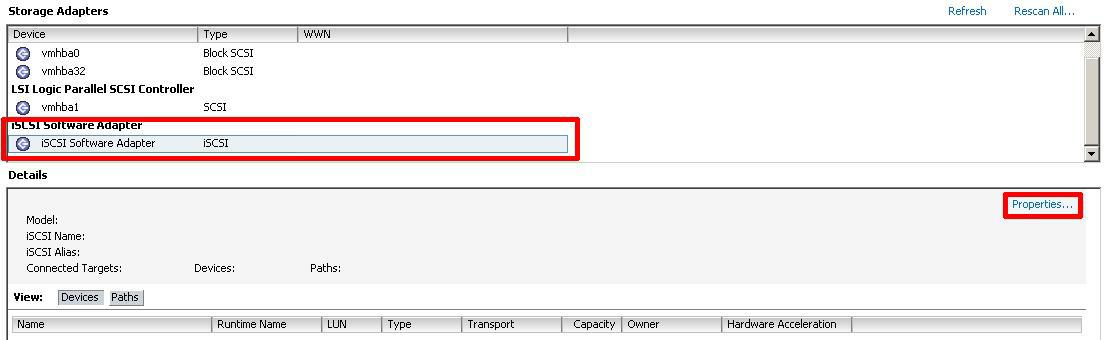
Scroll down, and select iSCSI Software Adapter, and Select Properties
![elect iSCSI Software Adaptor, and Select Properties]()
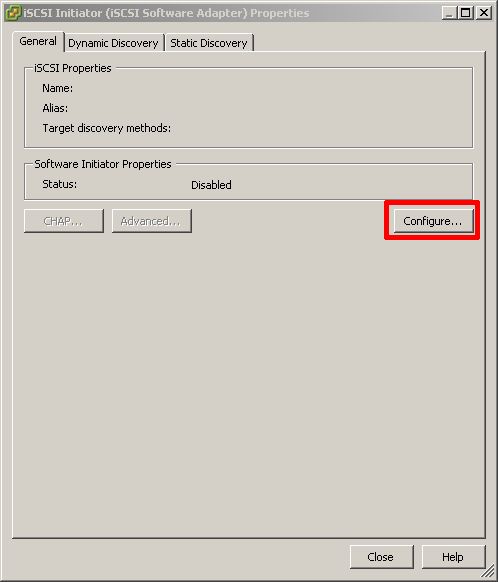
The iSCSI Initiator (iSCSI Software Adapter) Properties dialogue page will appear. Please note the status of the current Software Initiator is Disabled.
Select Configure
![Select Configure]()
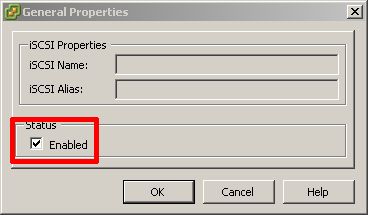
The General Properties diaglogue box, will appear, select, click and ensure a Tick is present next to Enabled, to Enable the iSCSI Software Adapter and Click OK.
![Tick is present next to Enabled]()
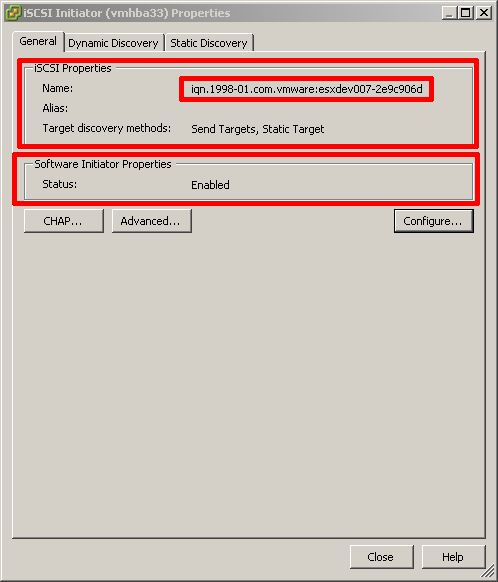
The iSCSI Initiator (vmba33) Properties will appear. Note that Software Initiator Properties should have changed to Enabled, and the iSCSI Properties Name is populated with an iSCSI Initiator Name.
![iSCSI Initiator (vmba33) Properties]()
In this example the iSCSI initiator name is
iqn.1998-01.com.vmware:esxdev007-2e9c906d
The iSCSI initiator adapter name is vmba33.
Please record both the iSCSI Initiator Name and the adapter name, these will be important for you in the future, it will be needed when you assign storage to this initiator. The adapter name is required later in this procedure to complete VMKernel bindings.
Click Close to proceed. Skip Step 4, and Proceed to Step 5.
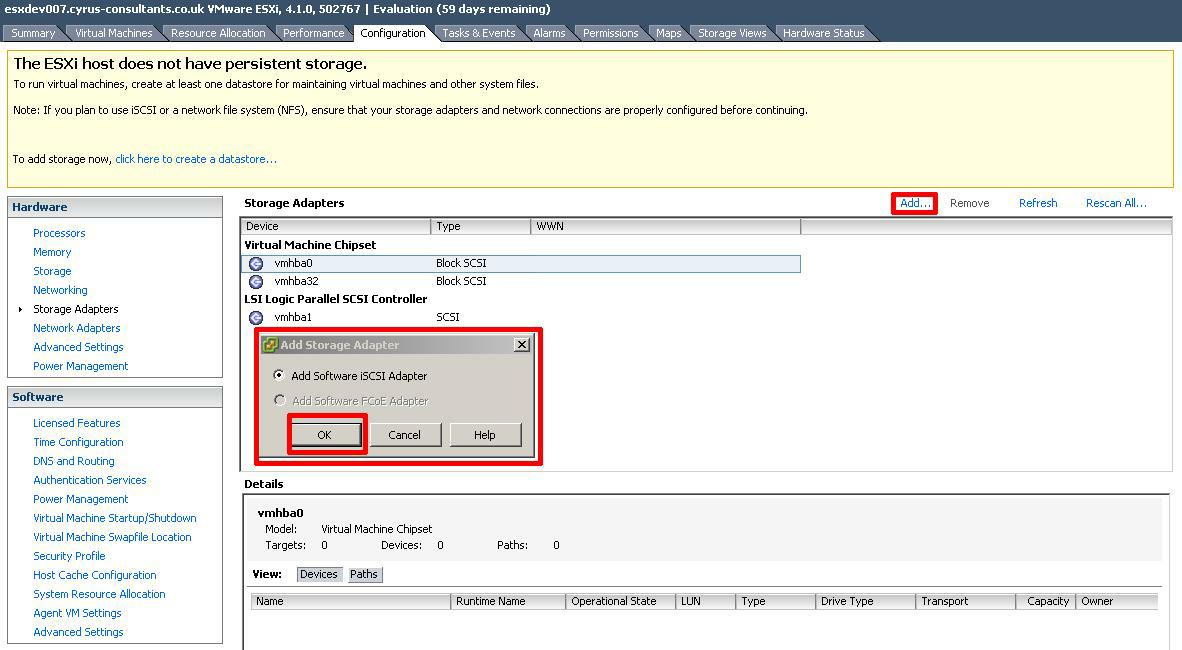
Click Add in Storage Adapters
![Select Add Software iSCSI Adapter and Click OK]()
Select Add Software iSCSI Adapter and Click OK. The following prompt will be displayed.
![Software iSCSI Adapter added]()
Scroll down, and select iSCSI Software Adapter, and Select Properties
![elect iSCSI Software Adaptor, and Select Properties]()
The iSCSI Initiator (iSCSI Software Adapter) Properties dialogue page will appear. Please note the status of the current Software Initiator is Disabled.
Select Configure
![Select Configure]()
The General Properties diaglogue box, will appear, select, click and ensure a Tick is present next to Enabled, to Enable the iSCSI Software Adapter and Click OK.
![Tick is present next to Enabled]()
The iSCSI Initiator (vmba33) Properties will appear. Note that Software Initiator Properties should have changed to Enabled, and the iSCSI Properties Name is populated with an iSCSI Initiator Name.
![iSCSI Initiator (vmba33) Properties]()
In this example the iSCSI initiator name is
iqn.1998-01.com.vmware:esxdev007-2e9c906d
The iSCSI initiator adapter name is vmba33.
Please record both the iSCSI Initiator Name and the adapter name, these will be important for you in the future, it will be needed when you assign storage to this initiator. The adapter name is required later in this procedure to complete VMKernel bindings.
Click Close to proceed. .
The VMKernel TCP/IP stack Portgroup handles traffic for the following ESXi services iSCSI, NFS, VMware vMotion and host management. To create a multipath iSCSI network at least two VMKernel TCP/IP stack Portgroups needed to be created on a virtual switch.
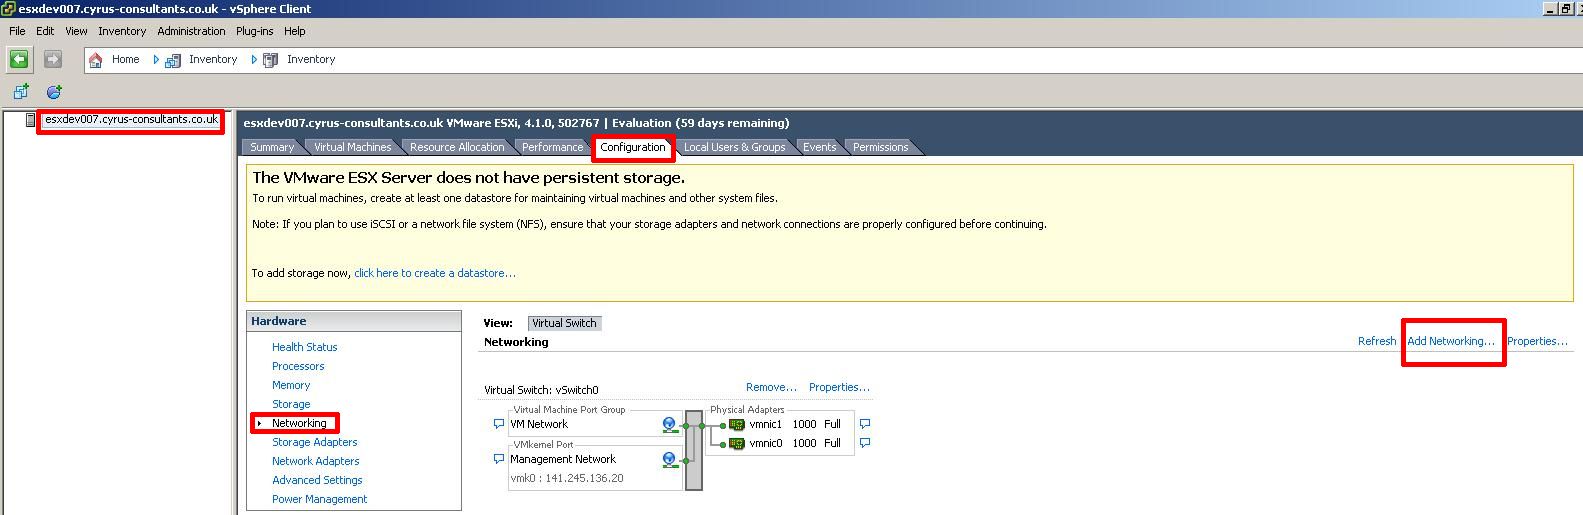
Select the Host Server, Configuration tab, and select Networking.
![Add new vSwitch]()
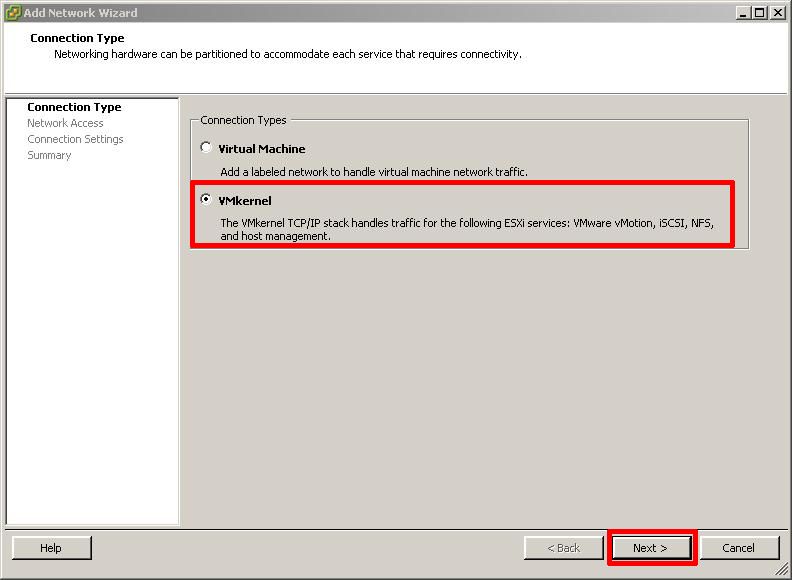
Select Add Networking to add a new vSwitch (virtual switch). Select VMKernel followed by Next
![Add Networking Wizard]()
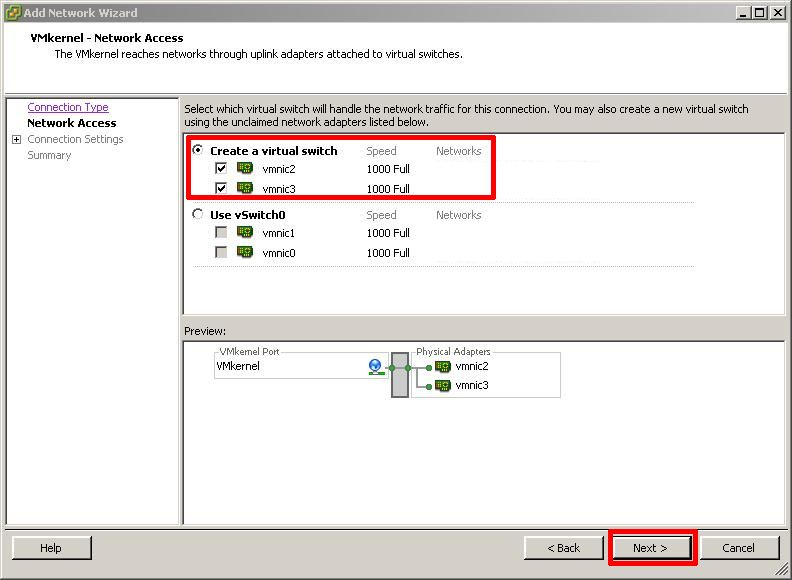
Create a new virtual switch with at least two physical network interfaces connections for use with multipath. I've selected vmnic2 and vmnic3, followed by Next.
![new virtual switch]()
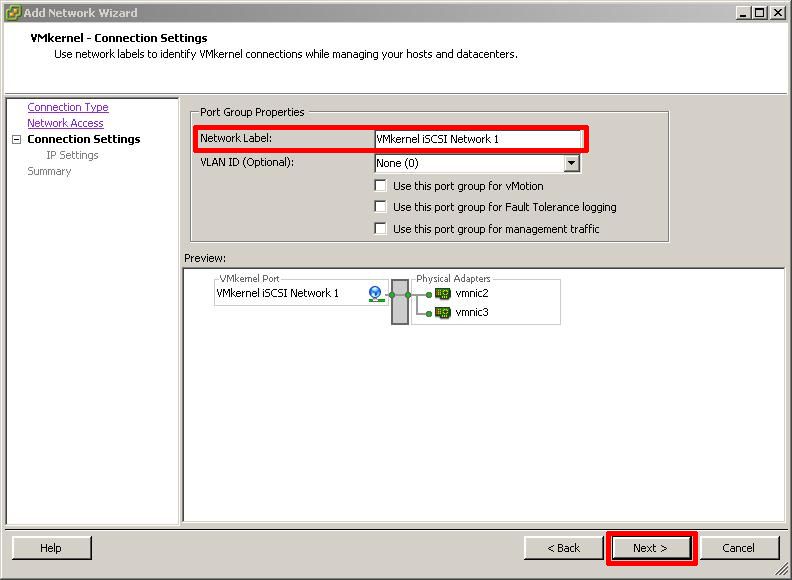
Enter a network friendly network label for the VMkernel iSCSI Portgroup 1 - VMkernel iSCSI Network 1, followed by Next
![VMkernel Connection Settings]()
Enter an IP address for the first VMkernel iSCSI Portgroup 1, followed by Next
![VMkernel - IP Connecting Settings]()
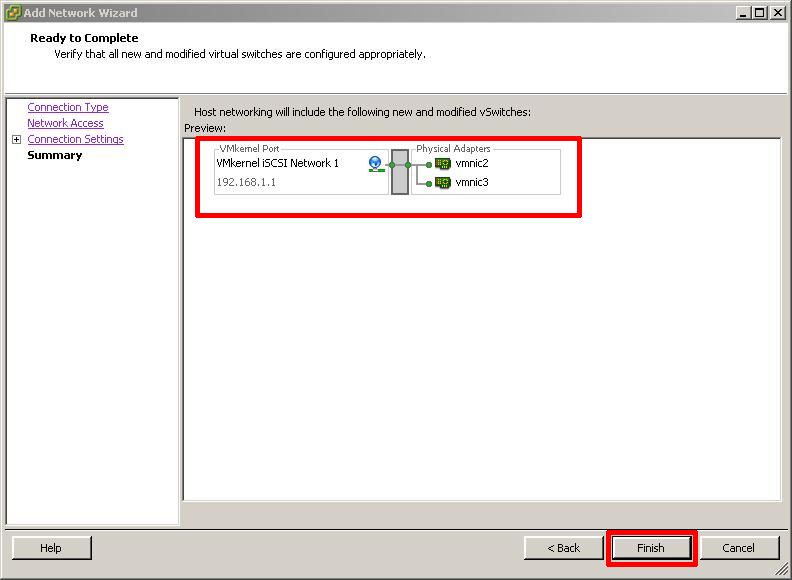
Review the vSwitch configuration is correct and click Finish
![Review the vSwitch configuration]()
Review the vSwitch created
![New vSwitch1 created]()
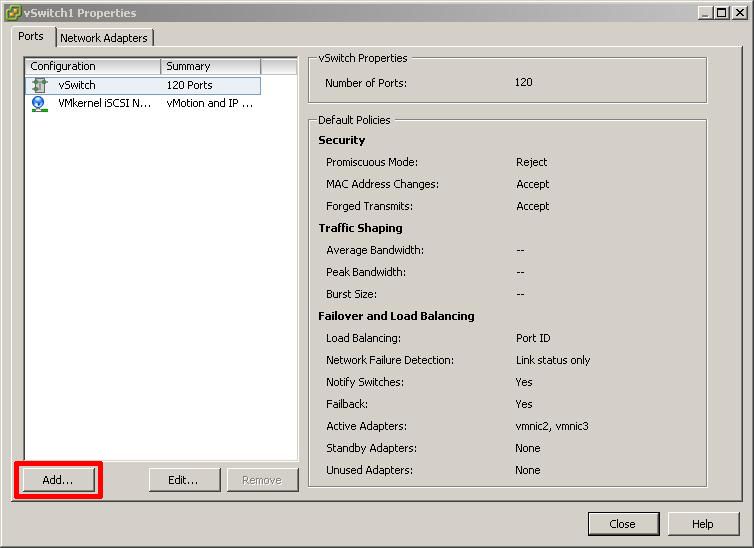
Select Properties of the vSwitch and Click Add
![vSwitch1 Properties]()
Add another VMkernel Portgroup, Select VMKernel followed by Next
![Add Networking Wizard]()
Enter a network friendly network label for the VMkernel iSCSI Portgroup 2 - VMkernel iSCSI Network 2, followed by Next
![VMkernel Connection Settings]()
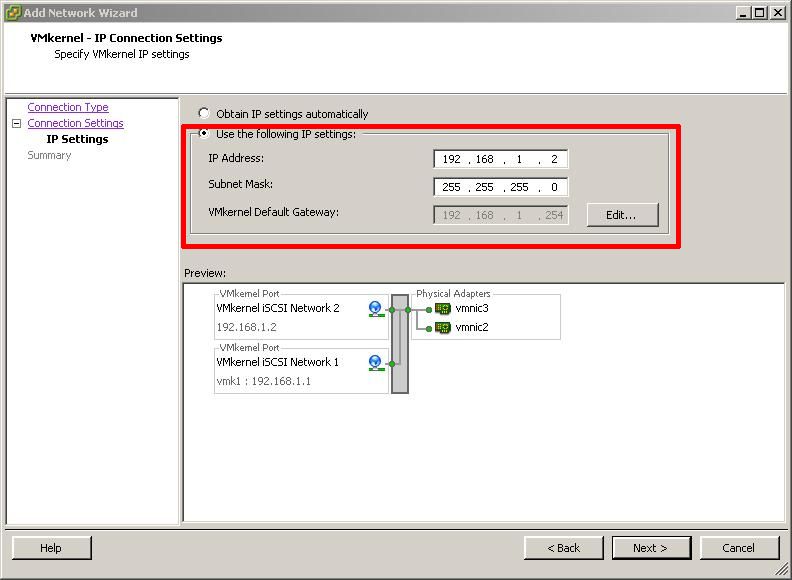
Enter an IP address for the first VMkernel iSCSI Portgroup 2, followed by Next
![VMkernel - IP Connecting Settings]()
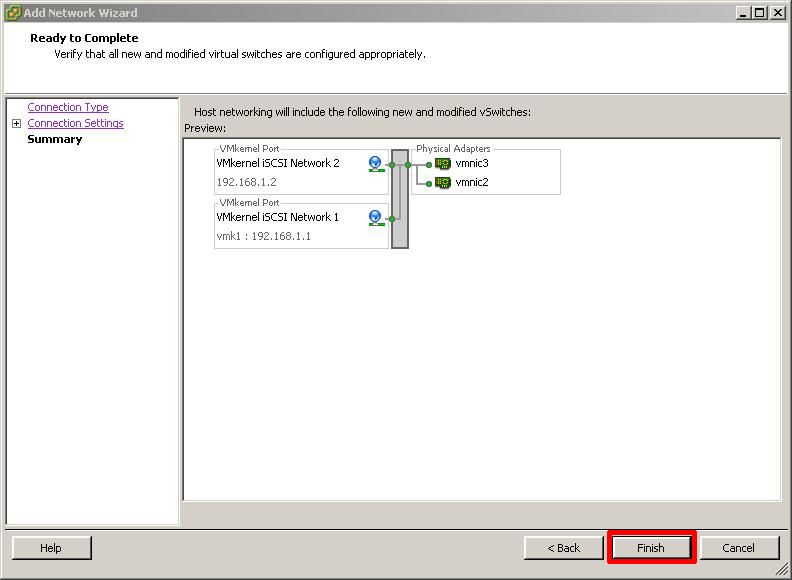
Review the vSwitch configuration is correct and click Finish and Close.
![Review the vSwitch configuration]()
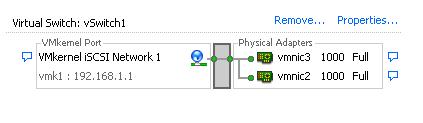
Review the Final vSwitch created, with two VMkernel Portgroups
![vSwitch1 complete with two VMkernel Portgroups]()
The two VMkernel portgroups have been added, and the vSwitch configuration is almost complete.
In this section we need to override the switch failover order for each VMkernel portgroup as follows
VMkernel iSCSI Network 1 - Active Network interface vmnic2 - Unused Network Interface vmnic3
VMkernel iSCSI Network 2 - Active Network interface vmnic3 - Unused Network Interface vmnic2
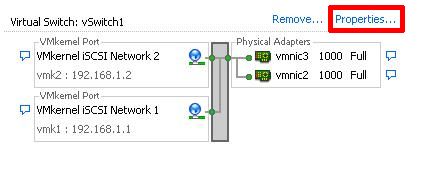
Select Properties of the vSwitch created in Step 5.
![Select Properties of vSwitch1]()
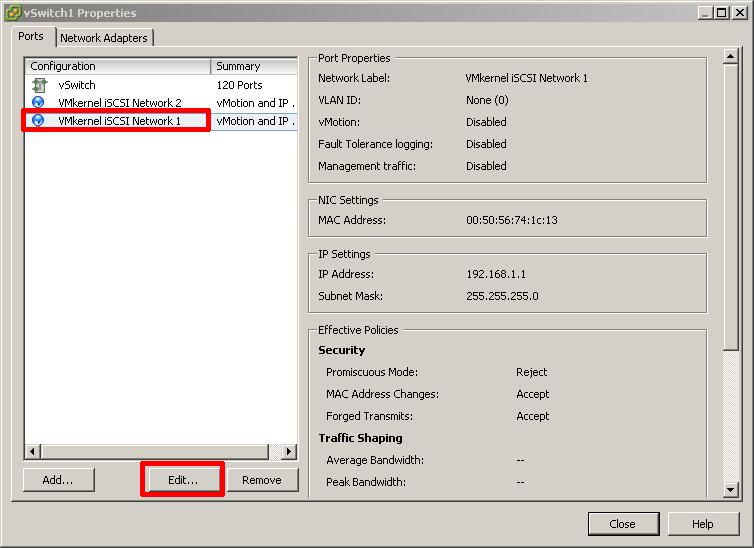
vSwitch1 properties will be displayed. Select the VMkernel iSCSI Network 1 portgroup to edit
![edit VMkernel portgroup]()
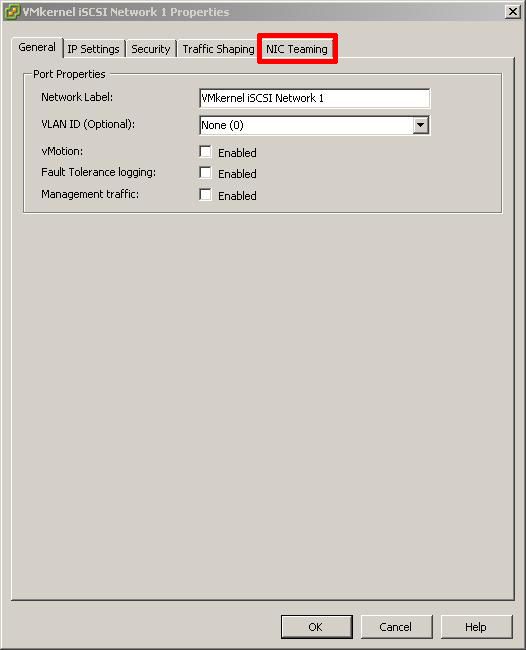
Select NIC Teaming
![Select NIC Teaming]()
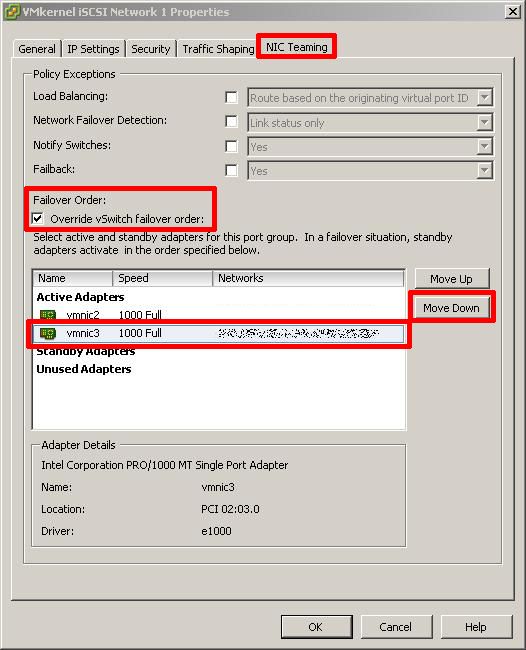
Select and put a tick in Override vSwitch Failover order and select the network interface e.g. vmnic3 to move down to Unused adapters
![vSwitch Override]()
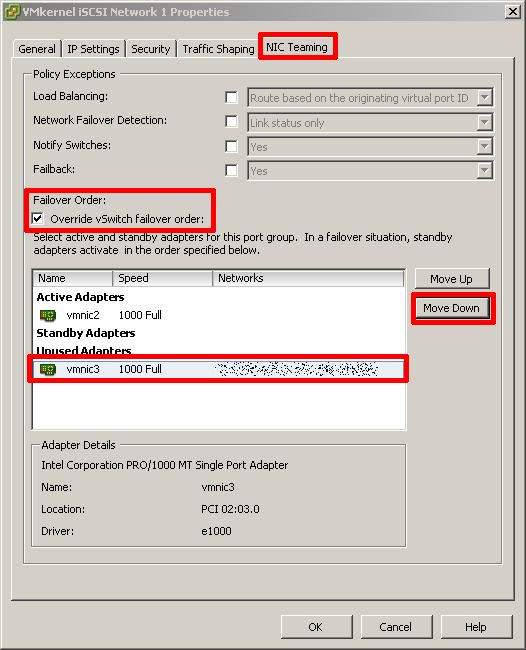
This is how override vSwitch failover should look for VMkernel iSCSI Network 1
![vSwitch Override for VMkernel iSCSI Network 1]()
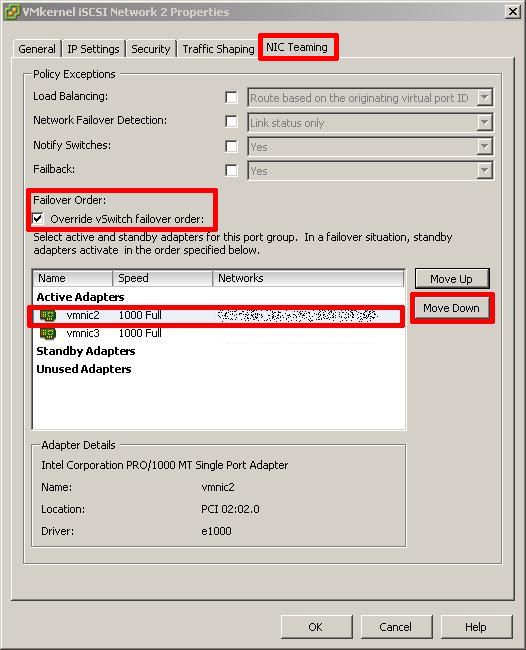
Click OK. We now need to repeat the same steps for VMkernel iSCSI Network 2 Select the VMkernel iSCSI Network 2 portgroup to edit
![vSwitch Override for VMkernel iSCSI Network 2]()
Select NIC Teaming
![Select NIC Teaming]()
Select and put a tick in Override vSwitch Failover order and select the network interface e.g. vmnic2 to move down to Unused adapters
![vSwitch Override for VMkernel iSCSI Network 2]()
This is how override vSwitch failover should look for VMkernel iSCSI Network 2
![vSwitch Override for VMkernel iSCSI Network 2]()
Click OK, followed by close, override vSwitch failover has been completed for the vSwitch. VMKernels are now bound to specific network interfaces, as follows
VMkernel iSCSI Network 1 - Active Network interface vmnic2 - Unused Network Interface vmnic3
VMkernel iSCSI Network 2 - Active Network interface vmnic3 - Unused Network Interface vmnic2
The final and remaining step is to bind these with the software iSCSI iniatiator (adapter). The The iSCSI Initiator adapter name is vmba33. (from Step 3).
.
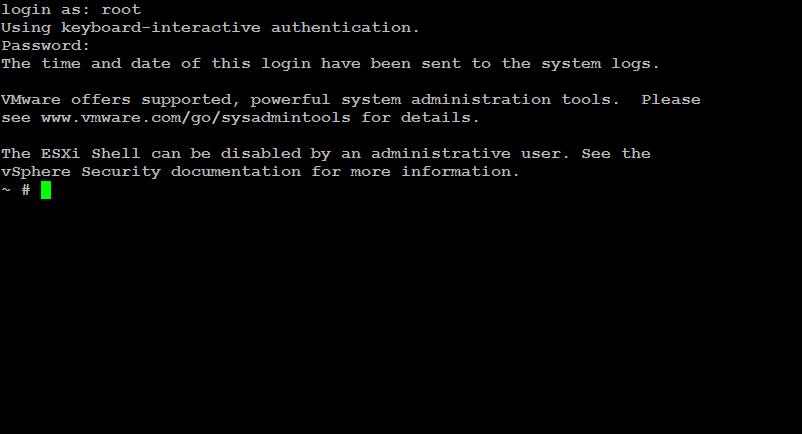
This step is often forgotten, and requires login at the console or remotely via SSH to the ESXi server. The VMware vSphere CLI can also be used with the esxcli.exe command to set the bindings if you prefer to use the vSphere CLI.
Using PuTTY a free telnet and SSH client or another SSH client Login and Connect to the VMware Hypervisor ESXi server, using IP address or hostname of the VMware Hypervisor ESXi server, using root username and password credentials.
![putty SSH terminal session]()
![logged in as root to ssh terminal session]()
at the console or SSH session type the following commands
esxcli swiscsi nic add -n vmk1 -d vmhba33
esxcli swiscsi nic add -n vmk2 -d vmhba33
No syntax is output if the commands are correct
![esxcli swiscsi]()
You have added an iSCSI Software Adapter and Created an iSCSI Multipath network for your iSCSI storage.
*******************************************************************************************************************************************
Thank you for reading my article, please leave valuable feedback. If you liked my VMware article and would like to see more VMware Articles from me, please click the Yes button near the: Was this article helpful? at the Top of this article to the right of the Article title. Thank You.
*******************************************************************************************************************************************
This tutorial can be used to add an iSCSI Software Adapter and create an iSCSI Multipath Network in VMware vSphere Hypervisor ESXi 4.1.
1. Connect to the VMware vSphere Hypervisor (ESXi 4.1) Server
Using the VMware vSphere Client, login and connect to the ESXi 4.1 server, using IP address or hostname of the ESXi 4.1 server, using root username and password credentials. If you have a VMware vSphere vCenter server, you could also specify IP address or hostname of the vCenter server which manages your vSphere 4 ESXi 4.1 server.
2. Select and Configure the Storage Adapters for the ESXi server
When connected to the ESXi server, select the Host Server, Configuration tab, and select Storage Adapters. Please note, if you do not have any persistent storage connected to the ESXi server, a yellow warning configuration box will appear. This example server used in this tutorial does not have any local SAS or SATA storage connected. Once the iSCSI Software Adapter has been added, iSCSI storage can be added, and this yellow warning configuration box will disappear.

the procedure for adding and configuring the iSCSI Software Adapter is slightly different, depending upon which version of the vSphere Client (version 4.1.0 or version 5.0.0) you have installed, if the iSCSI Software Adapter is not visible as shown in the following screenshot, it's likely you have connected using the vSphere Client version 5.0.0. Skip Step 3 and proceed to Step 4.
3. Configuring the iSCSI Software Adapter using the vSphere Client version 4.1.0
Scroll down, and select iSCSI Software Adapter, and Select Properties
The iSCSI Initiator (iSCSI Software Adapter) Properties dialogue page will appear. Please note the status of the current Software Initiator is Disabled.
Select Configure
The General Properties diaglogue box, will appear, select, click and ensure a Tick is present next to Enabled, to Enable the iSCSI Software Adapter and Click OK.
The iSCSI Initiator (vmba33) Properties will appear. Note that Software Initiator Properties should have changed to Enabled, and the iSCSI Properties Name is populated with an iSCSI Initiator Name.
In this example the iSCSI initiator name is
iqn.1998-01.com.vmware:esx
The iSCSI initiator adapter name is vmba33.
Please record both the iSCSI Initiator Name and the adapter name, these will be important for you in the future, it will be needed when you assign storage to this initiator. The adapter name is required later in this procedure to complete VMKernel bindings.
Click Close to proceed. Skip Step 4, and Proceed to Step 5.
4. (Adding) and Configuring the iSCSI Software Adapter using the vSphere Client version 5.0.0
Click Add in Storage Adapters
Select Add Software iSCSI Adapter and Click OK. The following prompt will be displayed.

Scroll down, and select iSCSI Software Adapter, and Select Properties
The iSCSI Initiator (iSCSI Software Adapter) Properties dialogue page will appear. Please note the status of the current Software Initiator is Disabled.
Select Configure
The General Properties diaglogue box, will appear, select, click and ensure a Tick is present next to Enabled, to Enable the iSCSI Software Adapter and Click OK.
The iSCSI Initiator (vmba33) Properties will appear. Note that Software Initiator Properties should have changed to Enabled, and the iSCSI Properties Name is populated with an iSCSI Initiator Name.
In this example the iSCSI initiator name is
iqn.1998-01.com.vmware:esx
The iSCSI initiator adapter name is vmba33.
Please record both the iSCSI Initiator Name and the adapter name, these will be important for you in the future, it will be needed when you assign storage to this initiator. The adapter name is required later in this procedure to complete VMKernel bindings.
Click Close to proceed. .
5. Create a new vSwitch (virtual switch) and add VMKernel Portgroups
The VMKernel TCP/IP stack Portgroup handles traffic for the following ESXi services iSCSI, NFS, VMware vMotion and host management. To create a multipath iSCSI network at least two VMKernel TCP/IP stack Portgroups needed to be created on a virtual switch.
Select the Host Server, Configuration tab, and select Networking.
Select Add Networking to add a new vSwitch (virtual switch). Select VMKernel followed by Next
Create a new virtual switch with at least two physical network interfaces connections for use with multipath. I've selected vmnic2 and vmnic3, followed by Next.
Enter a network friendly network label for the VMkernel iSCSI Portgroup 1 - VMkernel iSCSI Network 1, followed by Next
Enter an IP address for the first VMkernel iSCSI Portgroup 1, followed by Next

Review the vSwitch configuration is correct and click Finish
Review the vSwitch created
Select Properties of the vSwitch and Click Add
Add another VMkernel Portgroup, Select VMKernel followed by Next
Enter a network friendly network label for the VMkernel iSCSI Portgroup 2 - VMkernel iSCSI Network 2, followed by Next

Enter an IP address for the first VMkernel iSCSI Portgroup 2, followed by Next
Review the vSwitch configuration is correct and click Finish and Close.
Review the Final vSwitch created, with two VMkernel Portgroups
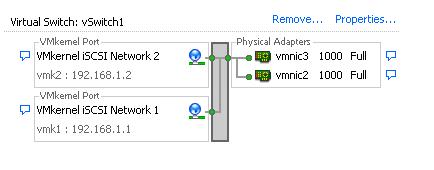
The two VMkernel portgroups have been added, and the vSwitch configuration is almost complete.
6. VMkernel Portgroup - Override vSwitch failover order
In this section we need to override the switch failover order for each VMkernel portgroup as follows
VMkernel iSCSI Network 1 - Active Network interface vmnic2 - Unused Network Interface vmnic3
VMkernel iSCSI Network 2 - Active Network interface vmnic3 - Unused Network Interface vmnic2
Select Properties of the vSwitch created in Step 5.
vSwitch1 properties will be displayed. Select the VMkernel iSCSI Network 1 portgroup to edit
Select NIC Teaming
Select and put a tick in Override vSwitch Failover order and select the network interface e.g. vmnic3 to move down to Unused adapters
This is how override vSwitch failover should look for VMkernel iSCSI Network 1
Click OK. We now need to repeat the same steps for VMkernel iSCSI Network 2 Select the VMkernel iSCSI Network 2 portgroup to edit

Select NIC Teaming

Select and put a tick in Override vSwitch Failover order and select the network interface e.g. vmnic2 to move down to Unused adapters
This is how override vSwitch failover should look for VMkernel iSCSI Network 2

Click OK, followed by close, override vSwitch failover has been completed for the vSwitch. VMKernels are now bound to specific network interfaces, as follows
VMkernel iSCSI Network 1 - Active Network interface vmnic2 - Unused Network Interface vmnic3
VMkernel iSCSI Network 2 - Active Network interface vmnic3 - Unused Network Interface vmnic2
The final and remaining step is to bind these with the software iSCSI iniatiator (adapter). The The iSCSI Initiator adapter name is vmba33. (from Step 3).
.
7. Bind physical network interfaces (pNIC) to the iSCSI VMKernel
This step is often forgotten, and requires login at the console or remotely via SSH to the ESXi server. The VMware vSphere CLI can also be used with the esxcli.exe command to set the bindings if you prefer to use the vSphere CLI.
Using PuTTY a free telnet and SSH client or another SSH client Login and Connect to the VMware Hypervisor ESXi server, using IP address or hostname of the VMware Hypervisor ESXi server, using root username and password credentials.

at the console or SSH session type the following commands
esxcli swiscsi nic add -n vmk1 -d vmhba33
esxcli swiscsi nic add -n vmk2 -d vmhba33
No syntax is output if the commands are correct

You have added an iSCSI Software Adapter and Created an iSCSI Multipath network for your iSCSI storage.
**************************
Thank you for reading my article, please leave valuable feedback. If you liked my VMware article and would like to see more VMware Articles from me, please click the Yes button near the: Was this article helpful? at the Top of this article to the right of the Article title. Thank You.
**************************
EE Fellow, MVE, Expert of the Year 2021,2017-11, Scribe 2016-2012, Author of the Year 2018-6,2013-2012 VMware vExpert Pro, vExpert 2022-2011
Have a question about something in this article? You can receive help directly from the article author. Sign up for a free trial to get started.
Comments (2)
Commented:
Great article :) But the last commands to bind the adapter is realy tricky:
esxcli swiscsi nic add -n vmk1 -d vmhba33
esxcli swiscsi nic add -n vmk2 -d vmhba33
First check the NIC's with:
esxcfg-vmknic -l
My Output:
vmk2 VMkernel iSCSI Network 1IPv4 172.16.238.10 255.255.255.0 172.16.238.255 00:50:56:75:01:55 1500 65535 true STATIC
vmk3 VMkernel iSCSI Network 2IPv4 172.16.239.10 255.255.255.0 172.16.239.255 00:50:56:71:4a:1f 1500 65535 true STATIC
So the commands to bind in my situation is:
esxcli swiscsi nic add -n vmk2 -d vmhba33
esxcli swiscsi nic add -n vmk3 -d vmhba33
Author
Commented: