phoffric
asked on
Excel Spreadsheet Error when moving rows one column to the right
I have a very large Excel table. I want to move some row regions one column to the right, but get an error when I cut and paste. See attached the spreadsheet.
Excel_Too_Many_Cells_Rev_A.xlsx
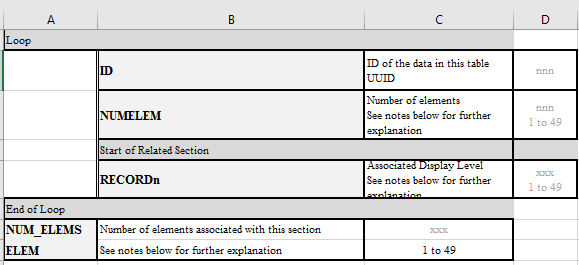
This is what I am given:
I would like to move all the rows between "Loop" (Row 1), and "End of Loop" (Row 11) to the right by one column. Here is my end goal:
I try to cut the region A2:C7 (which includes B8), and paste it at B2, then I get the error message:
Since I have a very large number of rows, and have nested structures (e.g., nested loops, or if statements), to do this manually would take a very long time. Can you please advise how to accomplish this more efficiently.
And there are many nested conditions:
Loop on N1
...
If A33 = 1
...
Loop on N2
...
Loop on N3
...
End Loop on N3
...
End Loop on N2
end if A33 = 1
...
End repeat on N1
Thanks,
Paul
Excel_Too_Many_Cells_Rev_A.xlsx
This is what I am given:
I would like to move all the rows between "Loop" (Row 1), and "End of Loop" (Row 11) to the right by one column. Here is my end goal:
I try to cut the region A2:C7 (which includes B8), and paste it at B2, then I get the error message:
This operation will cause some merged cells to unmerge. Do you wish to continue?If I continue, then I lose some text.
Since I have a very large number of rows, and have nested structures (e.g., nested loops, or if statements), to do this manually would take a very long time. Can you please advise how to accomplish this more efficiently.
And there are many nested conditions:
Loop on N1
...
If A33 = 1
...
Loop on N2
...
Loop on N3
...
End Loop on N3
...
End Loop on N2
end if A33 = 1
...
End repeat on N1
Thanks,
Paul
ASKER
I have edited the question to make it clearer what the problem is. I added the revised Rev.A spreadsheet that illustrates the problem.
By indenting, I meant to move rows one column to the right.
Given the degree of nested conditions (loops, if conditions), some row sections will be moved more than one column to the right.
Thanks,
Paul
By indenting, I meant to move rows one column to the right.
Given the degree of nested conditions (loops, if conditions), some row sections will be moved more than one column to the right.
Thanks,
Paul
The workbook you attached looks similar to the original one. This is what I see.
 Could you attach one that has a larger sample and include a second sheet that shows the desired results?
Could you attach one that has a larger sample and include a second sheet that shows the desired results?
Try this. Run the IndentAll sub.
29130882a.xlsm
29130882a.xlsm
ASKER
Travelling home - will review this week. BTW - how to run the IndentAll sub?
Here's a version where you just have to press Ctrl+Shift+I, or in either version you can go to Visual Basic via Alt+f11 and in the right-hand window you'll see Module1. Double-clicking Module1 will open it up and you'll see the IndentAll sub. Place your cursor in the sub and press f5. I could also add a button if you like.
29130882b.xlsm
29130882b.xlsm
ASKER
Thank you for the macro. If I make a mistake, the ctrl/Z doesn't seem to undo.
>> The workbook you attached looks similar to the original one
The big difference is that now A2;A3, C2:C3, A7:A8, and C7:C8 are merged. This makes transferring over rows over to the row to the right resulting in an error message and loss of data.
>> Could you attach one that has a larger sample and include a second sheet that shows the desired results?
I have attached nested sheets - before and after versions (includes your macro).
NestedLoopAndConditions-Before.xlsm
NestedLoopAndConditions-After.xlsm
Here are the pictures:
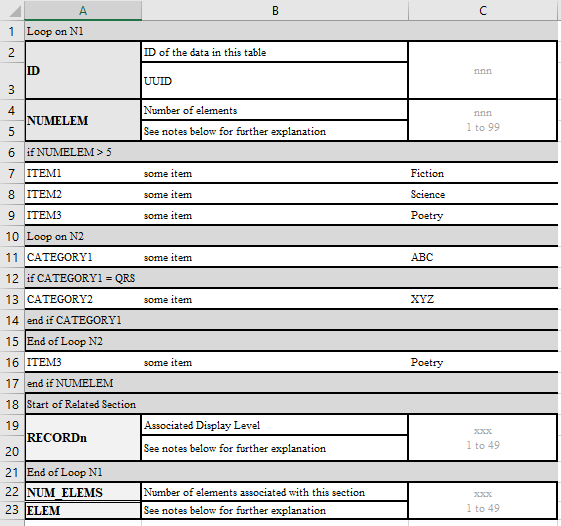
Before:
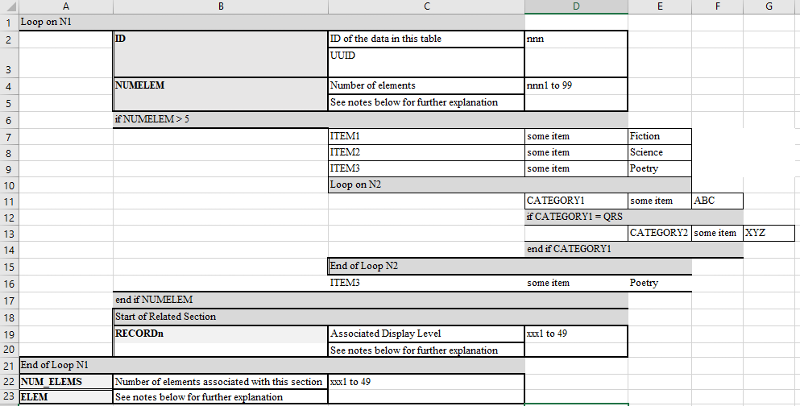
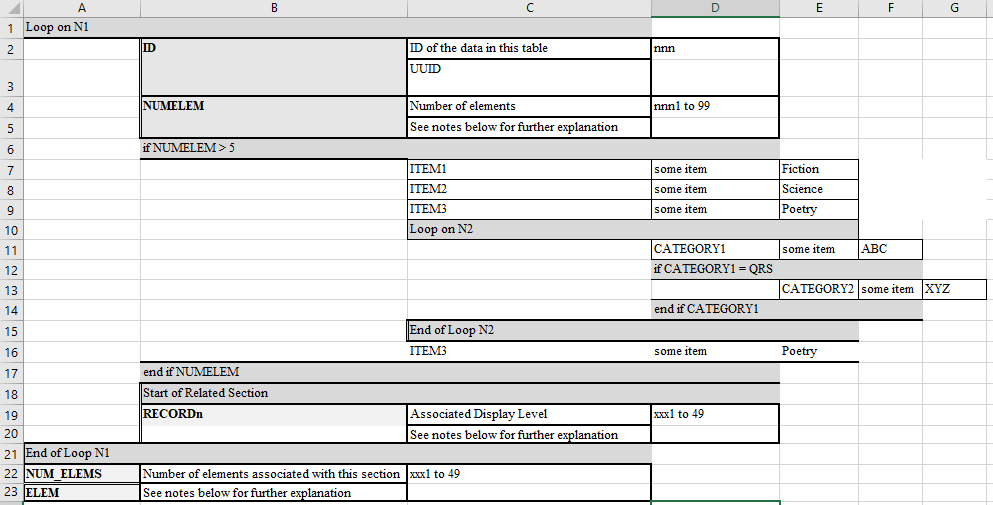
After:
By selecting sections manually in the Before sheet, the After version is achieved. Different manual approaches can lead to the same result. Here is one approach of manual selection:
1. selecting rows A2:A20 and moving them to the right one col
2. selecting rows A13 and moving it to the right one col
3. selecting rows A11:A14 and moving them to the right one col
4. selecting rows A7::A16 and moving them to the right one col
I think I should highlight a section, and then be able to move that section one column to the right.
Afterwards I tried to clean it up with borders and with shrink to fit, which mostly made it look prettier. But the key is the indentation.
The table is very long and I don't think I can rely on finding key words to know where to indent, so I guess I will have to make the selections manually, and move them to the right. (When I get through the basics, maybe I'll find some key begin/end words and be able to automatically indent at least some rows, but that may be tricky since the conditions are nested.
Thanks,
Paul
>> The workbook you attached looks similar to the original one
The big difference is that now A2;A3, C2:C3, A7:A8, and C7:C8 are merged. This makes transferring over rows over to the row to the right resulting in an error message and loss of data.
>> Could you attach one that has a larger sample and include a second sheet that shows the desired results?
I have attached nested sheets - before and after versions (includes your macro).
NestedLoopAndConditions-Before.xlsm
NestedLoopAndConditions-After.xlsm
Here are the pictures:
Before:
After:
By selecting sections manually in the Before sheet, the After version is achieved. Different manual approaches can lead to the same result. Here is one approach of manual selection:
1. selecting rows A2:A20 and moving them to the right one col
2. selecting rows A13 and moving it to the right one col
3. selecting rows A11:A14 and moving them to the right one col
4. selecting rows A7::A16 and moving them to the right one col
I think I should highlight a section, and then be able to move that section one column to the right.
Afterwards I tried to clean it up with borders and with shrink to fit, which mostly made it look prettier. But the key is the indentation.
The table is very long and I don't think I can rely on finding key words to know where to indent, so I guess I will have to make the selections manually, and move them to the right. (When I get through the basics, maybe I'll find some key begin/end words and be able to automatically indent at least some rows, but that may be tricky since the conditions are nested.
Thanks,
Paul
I just wanted to let you know that I'm still working on this and I'm almost there.
Should there be an "End of Related Section" between lines 20 and 21?
Give this a try. It works but note that the best thing I could do about the width of the columns was to autofit them.
29130882c.xlsm
29130882c.xlsm
ASKER
Yes, it did work for that specific case. thanks! I see that you tried to automate the entire effort based on colors. More than I bargained for.
>> Should there be an "End of Related Section"
Well, maybe. I see where you are coming from since it is shaded. For now, I am assuming that there is no "end of Related Section". (But you might be right.) And if the macro works pretty well, even if not perfect, that would be great!
To see if this would work on a more general 60 page word table copied to excel, I inserted two lines at the top, which should have remained intact; and one extra if condition at lines 10, 11, 12 (if, variable, end if), which resulted in a nested if. Here is the file with the 5 lines inserted:
Nested-Macro-29130882c.xlsm
Ran the macro.
Line 2 should not have moved.
Line 11 should have indented another time since line 10 and 12 are an if, and end if.
I'll be back at work next Wednesday, and can try out this macro then. I appreciate your trying to automate everything. That would be awesome if that were to happen. To be on the safe side, though, I wonder whether the macro could just move a selected set of rows over one column. I select the rows manually, and hit a button, and they move. Is that possible?
I expect I'll be getting a bunch of large tables that have something like:
begin loop
end loop
begin if
end if
and within those two cases can be more nested loops and if's; and within those, there can be more; and so on...
More than I bargained for.Is that a good thing or a bad thing? If the latter there might be another way to do it.
Please do me a favor at this point and select one or of my posts as the answer(s) since I believe I've answered the original question.
I have a question about rows 10 and 12. They are a different color than, say, row 3. Is it meant to be that way?
ASKER CERTIFIED SOLUTION
membership
This solution is only available to members.
To access this solution, you must be a member of Experts Exchange.
ASKER
>> More than I bargained for.
>> Is that a good thing or a bad thing?
I guess I didn't realize it could be take either way till I checked online. So, to clarify..
It's a good thing. :)
>> Is that a good thing or a bad thing?
I guess I didn't realize it could be take either way till I checked online. So, to clarify..
It's a good thing. :)
ASKER
I ran the d version and it looked good. So, I added another nested item inserted right after line 10: if NUMELEM > 10
29130882d-revised.xlsm
I added those extra lines since the huge table has all sorts of nested items.
I tried to look at the vba code, but at the moment, it is greek; so I asked this question:
https://www.experts-exchange.com/questions/29131266/Macro-comments-for-understanding-VBA.html
Loop on N3
ITEM4
End of Loop N3
Those 3 lines seemed to mess up further indentation. Maybe I messed up when I inserted them - please let me know if I did.ITEM4
End of Loop N3
29130882d-revised.xlsm
I added those extra lines since the huge table has all sorts of nested items.
I tried to look at the vba code, but at the moment, it is greek; so I asked this question:
https://www.experts-exchange.com/questions/29131266/Macro-comments-for-understanding-VBA.html
ASKER
>> I have a question about rows 10 and 12. They are a different color than, say, row 3. Is it meant to be that way?
Frankly, since I am home for the week, I have no idea what the colors are at work. Hopefully, they are all the same color, but will only know if I try and it works.
Frankly, since I am home for the week, I have no idea what the colors are at work. Hopefully, they are all the same color, but will only know if I try and it works.
ASKER
Since I created this simulated file at home, I just picked a color, and I may not have been consistent because I never considered color as a basis for indentation. And it is highly unlikely that the color at work will match the color I selected. How do I determine the grayish color in the table? How do I verify that this color is unique, or at least get a list of grayish colors.
I only ask this because I see the macros are based upon colors.
I only ask this because I see the macros are based upon colors.
SOLUTION
membership
This solution is only available to members.
To access this solution, you must be a member of Experts Exchange.
ASKER
Here's a new question as a backup in case the color scheme varies too much at work.
Thanks again! I appreciate your help.
https://www.experts-exchange.com/questions/29131272/Move-excel-selected-rows-one-column-to-the-right.html
Thanks again! I appreciate your help.
https://www.experts-exchange.com/questions/29131272/Move-excel-selected-rows-one-column-to-the-right.html
ASKER
Thank you Martin for your great posts. I am looking forward in learning a little about VBA from your examples.
SOLUTION
membership
This solution is only available to members.
To access this solution, you must be a member of Experts Exchange.
ASKER
You are right about needing keywords or selections - I did mention selection approach above as what could be a simpler approach.
Your version looks good and got me thinking. Since the color scheme is untestable until next Wed-Thurs, I got the idea that I can combine the colors and selection. That is, I can select a set of rows and then run the color macro. If problems, I can revert using "left" on the new macro; and then select the problem area and use "right". These two macros should help me get through the 60 pages (if table is in Word). Thanks again.
In my other question I was given this macro which seems to work with the restriction (I think) that I select from Column A.
I think I will write a question giving my best shot of keywords. I'll give enough keywords so that when I get back to work, I might be able to modify the scripts to adjust to the actual expressions. I'm still hoping that the color coding solves the entire problem.
Thanks again, Martin.
Your version looks good and got me thinking. Since the color scheme is untestable until next Wed-Thurs, I got the idea that I can combine the colors and selection. That is, I can select a set of rows and then run the color macro. If problems, I can revert using "left" on the new macro; and then select the problem area and use "right". These two macros should help me get through the 60 pages (if table is in Word). Thanks again.
In my other question I was given this macro which seems to work with the restriction (I think) that I select from Column A.
Selection.Insert Shift:=xlToRight, CopyOrigin:=xlFormatFromLeftOrAboveI think I will write a question giving my best shot of keywords. I'll give enough keywords so that when I get back to work, I might be able to modify the scripts to adjust to the actual expressions. I'm still hoping that the color coding solves the entire problem.
Thanks again, Martin.
Selection.Insert Shift:=xlToRight, CopyOrigin:=xlFormatFromLeYes that does work, and I use it, but it can't be used on rows that have merged cells unless you can tolerate data loss.ftOrAbove
Did I miss any other features?No.
The basic problem that need to be overcome is that while a "symmetrical"l structure like this easy to indent
H1
data
data
H2
data
H3
data
data
F3
data
F2
data
data
F1
one like this (I believe this is the structure in the workbook) is difficult
H1
data
data
data
data
H2
data
H3
H3a
data
H3a
data
F3
data
data
H4
data
H4a
data
F41
F4
data
F2
data
data
data
F1
And while I don't think color will help much, if there were headers and footers like the ones above (the names don't matter as long as they are at least partially unique) I think it would be pretty easy.
Having said all that, I just realized that I never said that you’re welcome and I’m glad I was able to help.
If you expand the “Full Biography” section of my profile you’ll find links to some articles I’ve written that may interest you.
Marty - Microsoft MVP 2009 to 2017
Experts Exchange Most Valuable Expert (MVE) 2015, 2017
Experts Exchange Top Expert Visual Basic Classic 2012 to 2018
Experts Exchange Top Expert VBA 2018
ASKER
>> is difficult
I wrote the keyword variation. An expert is talking about a stack to solve the problem and indenting as the algorithm moves along. Does that idea help make the problem less difficult?
https://www.experts-exchange.com/questions/29131489/Use-keywords-to-indent-nested-structures-in-Excel.html
I wrote the keyword variation. An expert is talking about a stack to solve the problem and indenting as the algorithm moves along. Does that idea help make the problem less difficult?
https://www.experts-exchange.com/questions/29131489/Use-keywords-to-indent-nested-structures-in-Excel.html
I don't know but I'll look into it. I also saw your new question and plan on tackling it.
ASKER
H1
data
data
data
data
H2
data
H3
H3a
data
H3a  -- did I have 2 identical headers? I have so many variations, not sure which one to look at.
data
F3 -- If this F3 is the end of H3, then this is a mistake on my part. H3
H3a
data
H3b
data
F3b
F3a
F3ASKER
I thought a little about using a stack in C++ (my preferred language). If H keywords are just "begin", "loop", or "if", and if F keywords are just "end", then push row numbers of H keywords onto stack, and when an "end" appears, pop the H off the stack. Now you have H row # and F row #, and indent in between those two row numbers.
That can be made more general if you can tell me how to know which rows to indent.
29130882.xlsm