How to OCR pages in a PDF with free software - PDF-XChange Editor
Posted on
60,922 Points
5:14
 Joe Winograd
50+ years in computers
EE FELLOW 2017 — first ever recipient of Fellow award
MVE 2015,2016,2018
CERTIFIED GOLD EXPERT
DISTINGUISHED EXPERT
EE FELLOW 2017 — first ever recipient of Fellow award
MVE 2015,2016,2018
CERTIFIED GOLD EXPERT
DISTINGUISHED EXPERT
We often encounter PDF files that are pure images, that is, they do not have text characters, but instead contain only raster graphics. The most common causes of this are document scanning software and faxing software/services that create image-only PDF files rather than PDF searchable image files, the latter having the scanned or faxed images and text created by Optical Character Recognition (OCR). The solution is to perform OCR on the image-only PDFs to create text. Many software products can do this, such as ABBYY FineReader, Adobe Acrobat (but not Adobe Reader) and Nuance's OmniPage, PaperPort, and Power PDF. Some can even do it in batch mode via a command line interface. But they are all non-free products, many quite expensive. This video Micro Tutorial shows how to OCR the pages of an image-only PDF, thereby creating searchable/copyable text, with excellent, free software called PDF-XChange Editor from Tracker Software Products.
Update on 17-Nov-2022: I just downloaded the latest stable release (9.4.364.0) of the PDF-XChange Editor from their website:
https://www.tracker-software.com/product/downloads
There are a few changes from the version that I used in the video:
(1) Before the screenshot shown in Video Steps #2 below, there is a new dialog that asks if you want to do a Custom or a Complete installation. I suggest clicking Complete.
(2) The menu and ribbon picks to run OCR are different:
Click Convert menu
Click OCR Pages icon on ribbon
(3) There is a new dialog after doing the clicks in item (2) above that asks if you want to try the Enhanced OCR feature, which is not free. If you click No, it will run the free OCR, which works well.
One other point: If you want to extract the text created by the OCR, see these other five-minute EE video Micro Tutorials:
Xpdf - Command Line Utilities for PDF Files
Xpdf - PDFtoText - Command Line Utility to Convert PDF Files to Plain Text Files
xpdfrc - Configuration File for All Xpdf Utilities
Video Steps
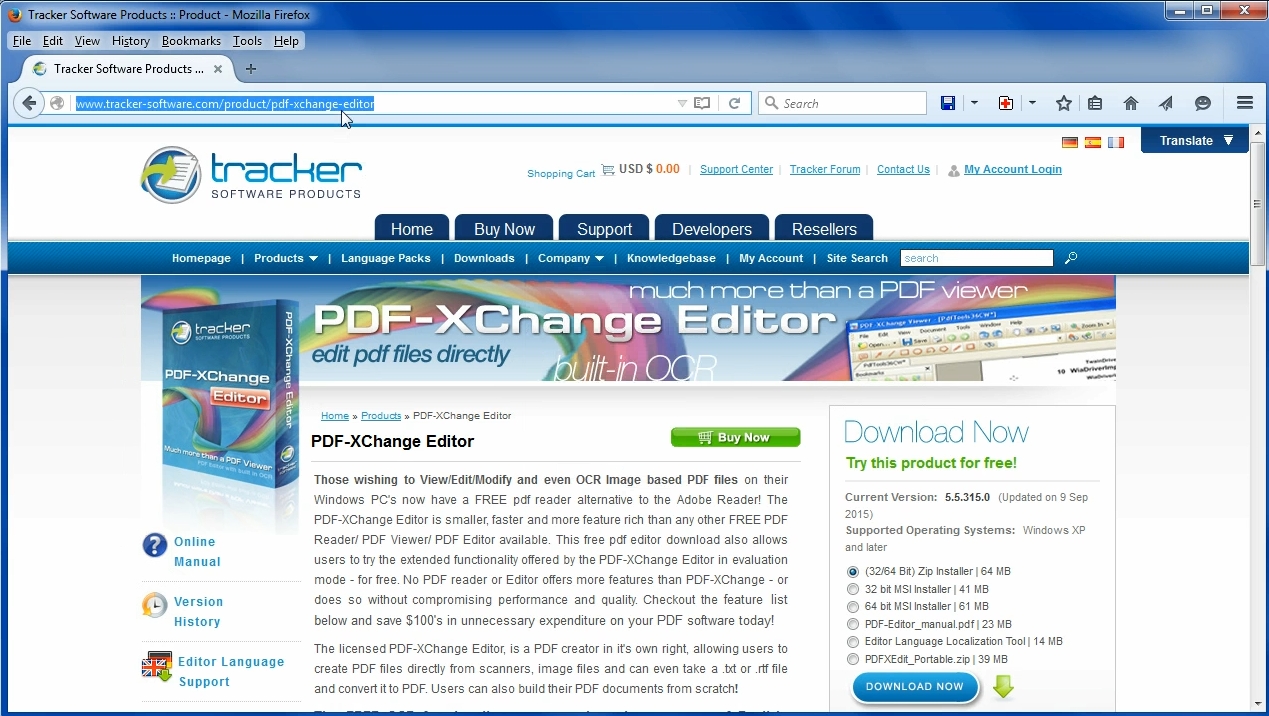
1. Download the Free Version of PDF-XChange Editor
Visit the website for PDF-XChange Editor at Tracker Software Products:
http://www.tracker-software.com/product/pdf-xchange-editor
Tick the radio button for the installer you prefer and then click the DOWNLOAD NOW button.
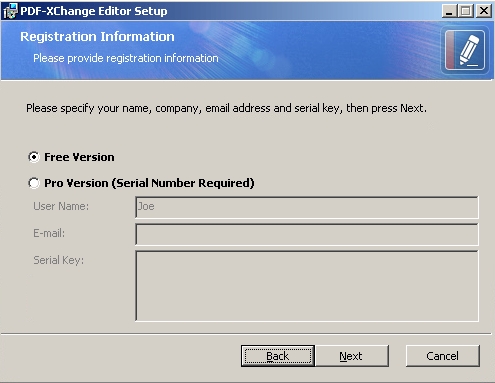
2. Run the downloaded installer
Run the installer that you downloaded and select the Free Version (unless, of course, you want more features and would like to purchase the Pro Version).
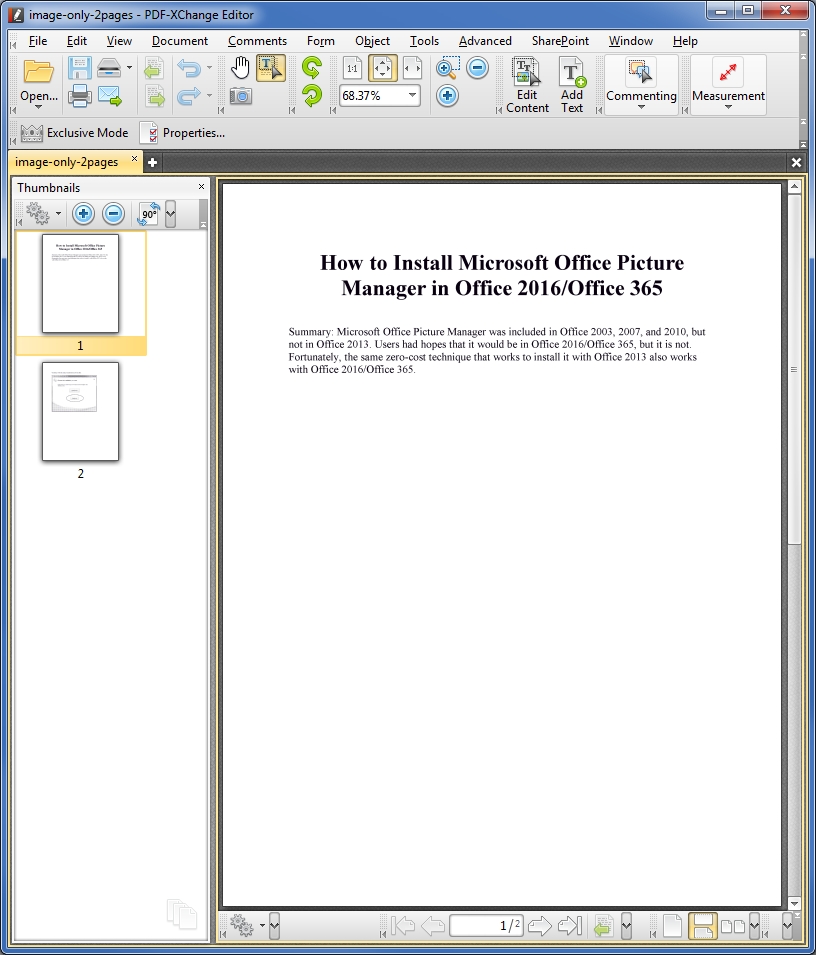
3. Open the document in PDF-XChange Editor
The installer creates a program group called PDF-XChange with a shortcut in it for PDF-XChange Editor. Click the shortcut to run it and then open an image-only PDF document in it.
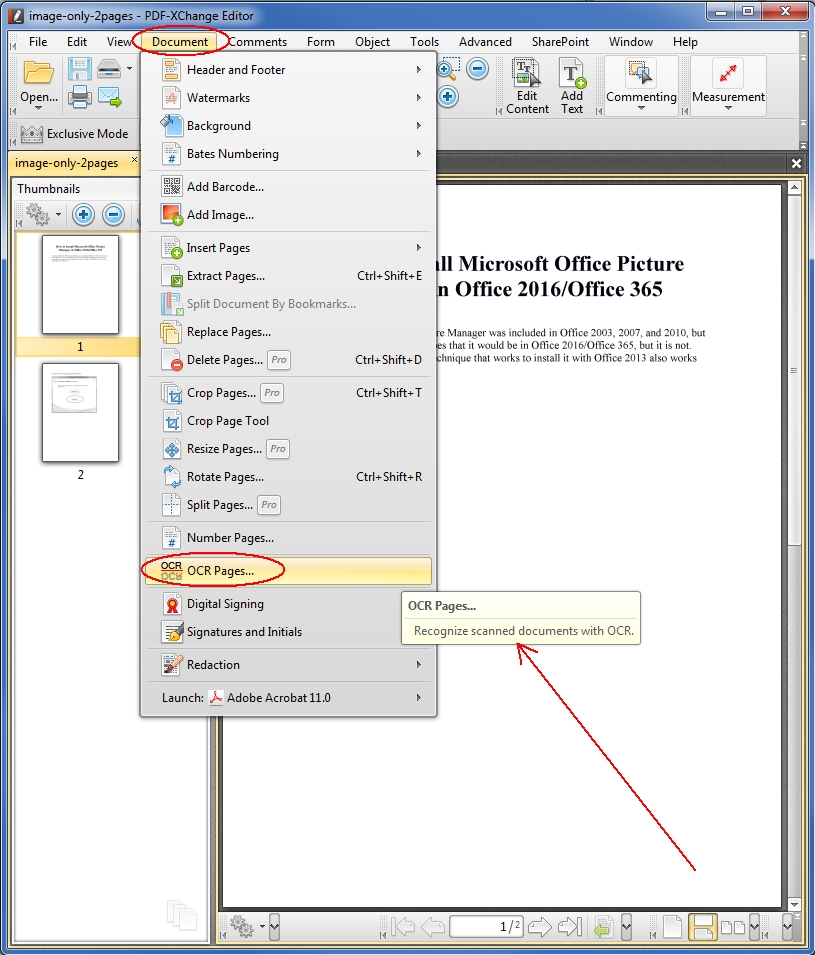
4. Run the OCR feature
Click Document menu.
Click OCR Pages.
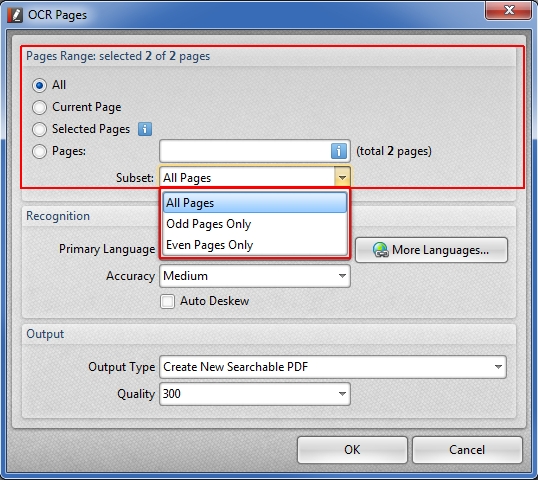
5. Enter page range to OCR
Specify page range in the first section of the OCR Pages dialog. Choices are All, Current Page, Selected Pages, Pages, All Pages, Odd Pages Only, Even Pages Only.
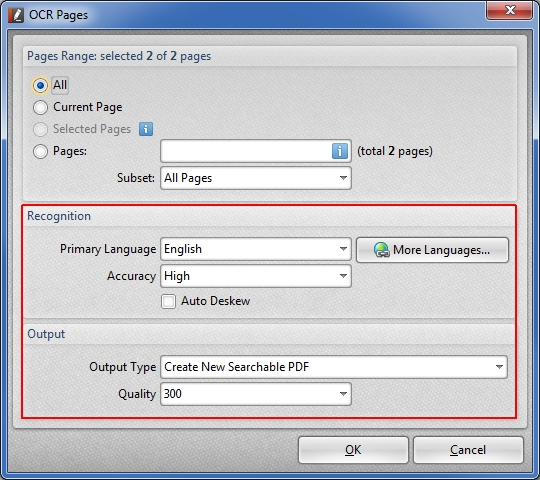
6. Enter language, accuracy, output type/quality
Specify primary language. Immediately available are English, French, German, Spanish. Click More Languages to visit the web for others.
Specify accuracy: Low (fastest), Medium, High (slowest).
Select Create New Searchable PDF or Preserve Original Content and Add Text Layer. If choosing the former, you may select a Quality (300 is usually fine for a typical PDF) and/or Auto Deskew (straighten).
Click OK.
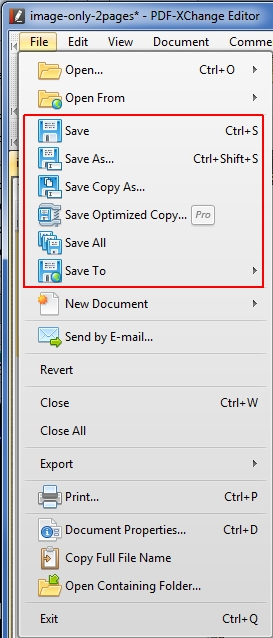
7. Save the OCR'ed document
Do a File>Save or File>Save As or another Save choice on the File menu to save the PDF with the text from OCR (but Save Optimized Copy is not available in the Free Version).
That's it! You now have a PDF with text from the OCR process. You may search for this text in any PDF reader/viewer, copy/paste it into Word or a text editor, etc.
If you find this video to be helpful, please click the thumbs-up icon below. Thank you for watching!
-
3
 2
2
6 Comments
Brilliant Heads Up
I have used their Viewer for years, and for many of those years I was confused by their various programs and downloads. Difficult to ensure that you were getting the free viewer. Hasn't been quite as difficult for the last year.
With that history behind me, I strongly doubt that I could have worked out that they had a free Editor.
If you are just viewing PDFs and you had both the editor and the viewer installed - Do you just use the editor program all the time, or do you fell the viewer has extra viewing options ?
Rob
Active today
Hi Rob,
I agree — their downloads have always been confusing!
My recollection is that I received an email from them saying, essentially, that the free PDF-XChange Viewer (which I had been using for a long time) was being replaced/superseded by the free PDF-XChange Editor. In other words, there was no reason to have both products on the same system. However, I recollect keeping both for a while, until I was comfortable that the free Editor was all I needed. Once I made that determination, I uninstalled the Viewer and have used only the Editor ever since.
I see at their website that they still offer the Viewer, but note this comment at that link:
Btw, here's another video that I did about the free version of the Editor:
How to rotate pages in a PDF with free software
Regards, Joe
I agree — their downloads have always been confusing!
My recollection is that I received an email from them saying, essentially, that the free PDF-XChange Viewer (which I had been using for a long time) was being replaced/superseded by the free PDF-XChange Editor. In other words, there was no reason to have both products on the same system. However, I recollect keeping both for a while, until I was comfortable that the free Editor was all I needed. Once I made that determination, I uninstalled the Viewer and have used only the Editor ever since.
I see at their website that they still offer the Viewer, but note this comment at that link:
STOP PRESS STOP PRESS STOP PRESSSo even Tracker Software is saying that there's no reason to use the free Viewer — use the free Editor instead!
The PDF-XChange Editor is now available and supersedes the PDF-XChange Viewer !
STOP PRESS STOP PRESS STOP PRESS
Btw, here's another video that I did about the free version of the Editor:
How to rotate pages in a PDF with free software
Regards, Joe
Comment

Hi Joe, I actually own the Pro Version of PDF-XChange Editor, along with several other editors such as Adobe Acrobat Pro X, PDFelements and a couple of others that slip my mind at the moment. I've experimented with the OCR capabilities of all of the editors and can say from experience, that even the free version that you've used here in your video, outperforms the genuine Adobe Acrobat Pro X that I own with regards to accuracy. This is particularly evident when you OCR several page documents, which have a lot of Images in them. Adobe Acrobat Pro X tends to screw up the formatting of such documents after an OCR process, far more than PDF-Xchange editor does.
In so far as the best OCR engine I've used, that would have to be PDFelements by a company called Wondershare. You can google it quite easily. The one negative however is that it does [not] provide OCR capabilities without a purchase of the Pro version, but it does indeed outperform every other OCR engine that I've tried, and I've tried a lot.
Hope this info is useful to your viewers of this video.
Regards, Andrew
Edited to correct a typo...
Active today
Hi Andrew,
I also have the Pro version (and I purchased the 3-year upgrade period with it), but I wanted to do the video Micro Tutorials with the free version for those EE members who don't want to purchase additional software (true of my latest video, too). Like you, I have a ton of PDF products, including ABBYY FineReader 14, Acrobat X Std, Acrobat XI Pro, Acrobat Pro DC (the latest), Nuance OmniPage Ultimate, Nuance PaperPort 14.5, Nuance Power PDF Advanced 3.0, and lots more — but not Wondershare PDFelement, so that intrigues me. :)
It doesn't surprise me that your OCR experiments place Acrobat at the bottom...I've had the same experience. My best OCR results come from FineReader and OmniPage (OP is the OCR engine in PaperPort and Power PDF).
> The one negative however is that it does provide OCR capabilities without a purchase of the Pro version
I presume there's a typo in there...pretty sure you meant to say:
The one negative however is that it does NOT provide OCR capabilities without a purchase of the Pro version
> Hope this info is useful to your viewers of this video.
I have no doubt! Thanks for taking the time to provide your feedback. Regards, Joe
Comment
The one negative however is that it does NOT provide OCR capabilities without a purchase of the Pro versionAbsolutely a typo Joe, thank you for correcting it, and do give PDFelements a try. It truly is a great product.
Suggested Videos

Post purchasing a portable SSD recently, I ran into several performance issues. Namely, the new SSD (SanDisk Xtreme Pro 1TB) having slow speeds on data copy and the files (on disk) taking a lot of disk space. These issues are now sorted but I want t…
- Windows 10
- Software
- Storage Software
- Windows OS
- Storage Hardware
- *archiving, *SSD, *Disk partitioning, *recovery, *Hard Disk

Email retention plays an important role in fulfilling the organizations compliance requirements, especially if you are in the financial or other regulated industries. Demand from regulators and investigation agencies for emails of an employee long g…