PaperPort Send To Bar - Part 1
Posted on
24,683 Points
5:22
 Joe Winograd
50+ years in computers
EE FELLOW 2017 — first ever recipient of Fellow award
MVE 2015,2016,2018
CERTIFIED GOLD EXPERT
DISTINGUISHED EXPERT
EE FELLOW 2017 — first ever recipient of Fellow award
MVE 2015,2016,2018
CERTIFIED GOLD EXPERT
DISTINGUISHED EXPERT
This video is the first in a two-part series that discusses PaperPort's "Send To Bar" feature . This first video tutorial explains the purpose of the Send To Bar, how to use it, and how to hide unwanted items that are automatically created on it when PaperPort is installed. The second video tutorial in the series discusses how to add a custom icon/program to the Send To Bar.
Video Steps
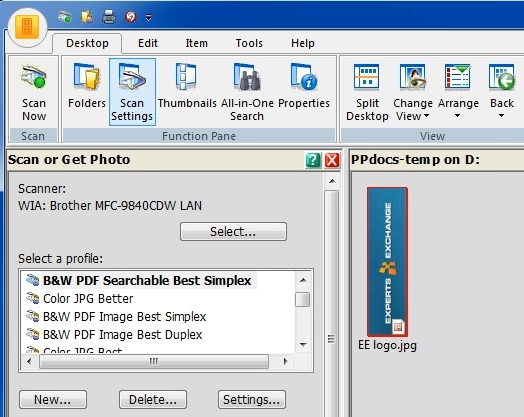
1. Locate the Send To Bar at the bottom of the PaperPort app
Run PaperPort.
Look at the bottom of the PaperPort app and you will see something like this (depending on the version of PaperPort, the other apps that are installed, and the viewing options for the Send To Bar):

2. Send an item to the Send To Bar
There are two ways to do this:
(i) Click on a desktop item (for example, a JPG file) and then click an icon on the Send To Bar (for example, Microsoft Paint).
(ii) Drag-and-drop an item (for example, a JPG file) onto an icon on the Send To Bar (for example, Microsoft Paint).

3. Perform an operation on the item in the program that was launched
Continuing the example from above, let's say you have a JPG in Microsoft Paint:
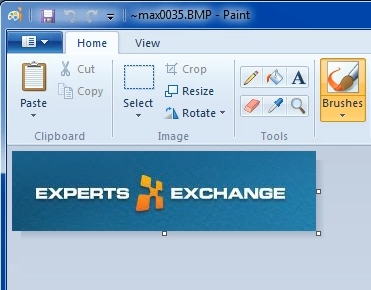 Rotate it and save it:
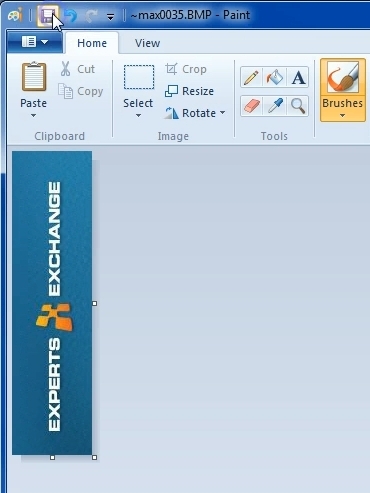
4. Confirm that the item was changed in PaperPort
After saving the file in Step 3, you will be returned to PaperPort, where you should see that the item was changed (such as a rotated image).
5. Hide unwanted icons on the Send To Bar
Right-click any icon on the Send To Bar and then click Send To Options.
Starting at the top of the vertical pane of icons, click on each one that you want to hide and un-check the box that says "Include icon on Send To bar".
Click OK.
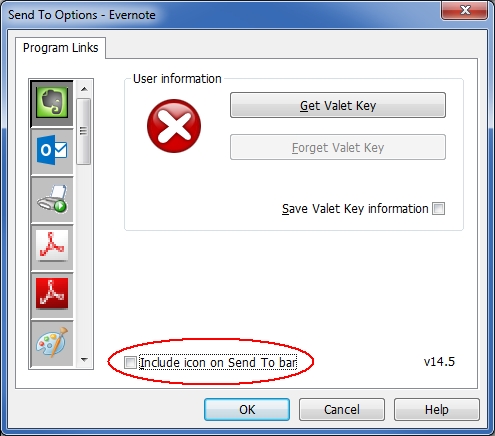
6. Confirm that unwanted icons have been removed from Send To Bar
The icons that you chose to hide should no longer appear on the Send To Bar. For example, in the video, I removed the Evernote and SharePoint icons:

That's the end of Part 1 — I hope you join me for Part 2.
If you find this video to be helpful, please click the thumbs-up icon below. Thank you for watching, Joe
0 Comments
Suggested Videos

Data compression is a feature offered by many modern databases like Db2, Oracle, MySQL, MariaDB and SQLServer. However, many companies do not use this feature in their database systems. Either they lack the knowledge of its existence in the applicat…

Generally, a Service Code of SC899-00 will be caused by incorrect drivers on a Windows computer. Ensuring you have correct drivers installed and are not using Microsoft IPP Class Drivers and are not using a WSD port, are the most common solutions. …
Document Imaging: PaperPort Send To Bar
Total Time: 10:49
Suggested Courses


Next Video:PaperPort Send To Bar - Part 2