A trick to move NTFS System Files (Also known as Metadata and MFT Zone) to the beginning of the volume


Always looking for challenges and problems to solve !
This has made me more and more strong . . .
This has made me more and more strong . . .
Published:
Browse All Articles > A trick to move NTFS System Files (Also known as Metadata and MFT Zone) to the beginning of the volume
Introduction
This article helps you make a NTFS volume that can be shrinked down to more than 50% of its original size and regain some performance because of the fragmentation of big data due to peresence of NTFS Metadata in the middle of partition. Third party software mentioned in this article includes:
1- MiniTool Partition Wizard Home Edition (Freeware) : To do the main part of the trick. You can download it here.
2- PerfectDisk (Trial): A great software from Raxco company which can be downloaded as a trial version. It has been used to show the NTFS structure before and after doing the trick. It should also be mentioned that it's one of the best softwares to defragment Metadata , MFT and other system files (In an offline method which is called Boot time defragmention). You can download it here.
Note1: This article only applies to newly created partitons. For existing partitions with data on them you have two options:
1- Move the files on the partition to another storage location and create your new partition based on this article to prevent future problems. Then you can move the files back to the newly created partition.
2- Use the old methods to shrink your partition. A brief description of old methods can be found the Resolution section of this article.
Note2: The shrink process can be either done by the windows Disk Management snap-in or 3rd Party Disk management software.
Note3: This trick doesn't work with the built-in Disk Management in Windows because it doesn't extend the MFT zone after Extending the partition so it may cause MFT fragmentation.
Symptoms
- You can’t shrink a NTFS volume more than 50% of it’s size under the best conditions (if no more file chunks are present after Metadata). If you use windows Disk Management you'll get the following warning:
You cannot shrink a volume beyond the point where any unmovable files are located. See the “defrag” event in the Application log for detailed information about the operation when it has completed.
- In case you have big files on the volume they get fragmented because half of them have to be written before MFT and half of them after.
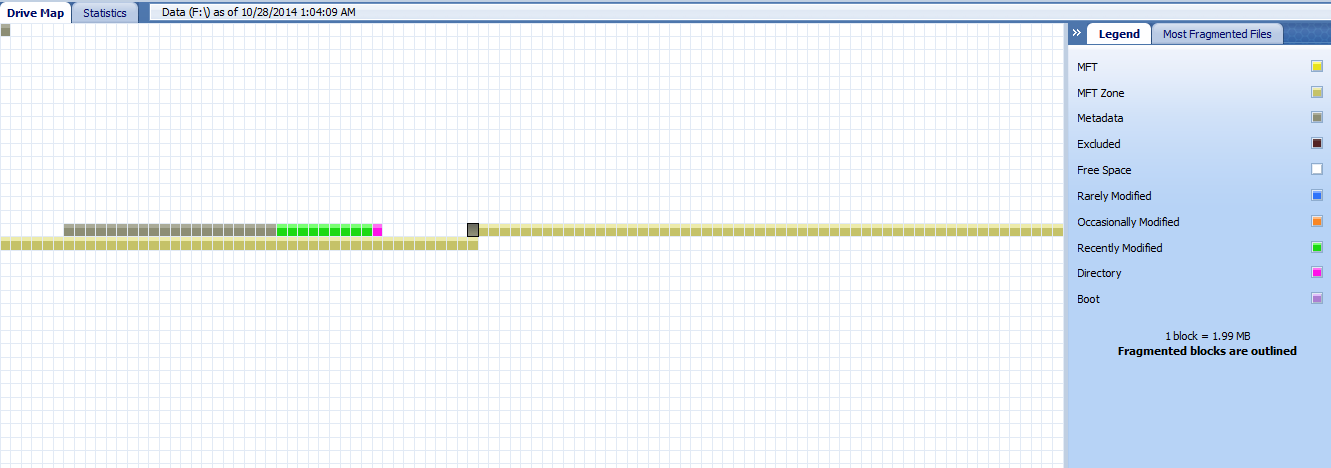
- An analysis of a newly created and formatted NTFS partitions via PerfectDisk software shows the discussed condition very well:
Cause
Most NTFS volumes contain some Metadata (system files) in the middle of the partition; such as, $MFTMirr (a backup copy of the first four $MFT records) and $LogFile (which is the NTFS journal and can be many megabytes in size). The reason Windows puts those files in the middle is for security1 and performance2. If the first MFT record is corrupted, NTFS reads the second record to find the MFT mirror file which is somewhere in the middle of the volume. But it doesn’t have to be exactly in the middle. So we can safely relocate it.
Resolution
There has been a lot of discussion in forums and tech websites to get around this problem. Some common solutions to this, include:
- Using the “Prep for shrink” in newer versions of PerfectDisk to move the present files after the Metadata to a region before that.
- Subsequent shrink and defragment by using 3rd party software (Like PerfectDisk or Diskeeper) to reach the desired volume size.
Read here for more info on different methods of shrinking.
The disadvantage of the above solutions is that first, it’s time consuming, second, it should be done in several steps to reach the desired results, and third, the Metadata region still causes fragments between your big data. To get around this I invented the below method to move this nuisance parts of NTFS to the beginning of the partition. Here we go:
1- After downloading and installing the MiniTool Partition Wizard, open it from the desktop icon.
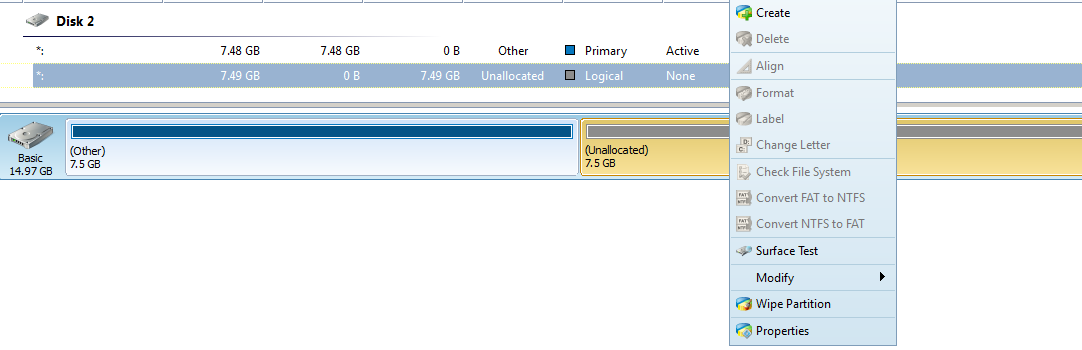
2- In the Right pane you can see the list of your storage disks and their structure below them. Find the "Unallocated space" you want to use for your new partition or delete one of your unused partitions to make some free space. To delete a partition right click on it and select "Delete".

3- Right click on the "Unallocated space" and click "Create".
4- In the opened window set the parameters like the below picture and then click OK:
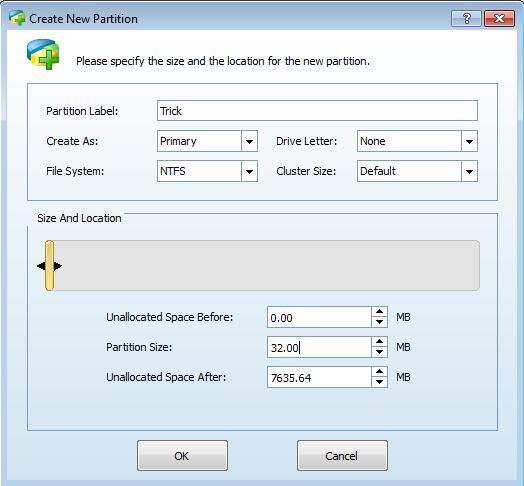
Note: Be sure to enter 32 as the partition size.
Note: Be sure to set the "Drive letter" box to "None". Windows will create some files and directories on the volume (e.g. System volume information and Recycler) as soon as the volume is mounted.
5- Now right click on the newly created partition (32MB patition) and click "Move/Resize".
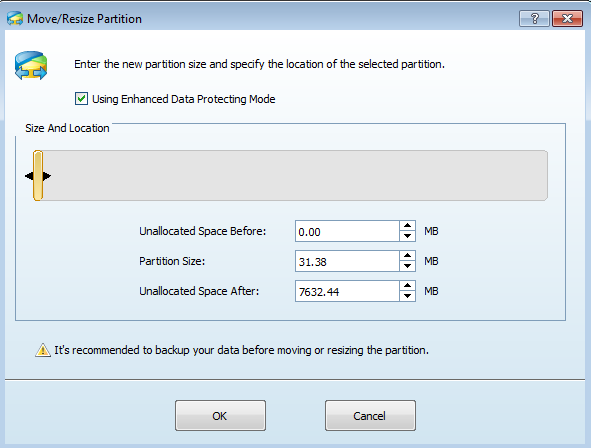
6- Drag and move the second slider to resize the partiton to your desired partition size, or simply drag it to the end of free space.
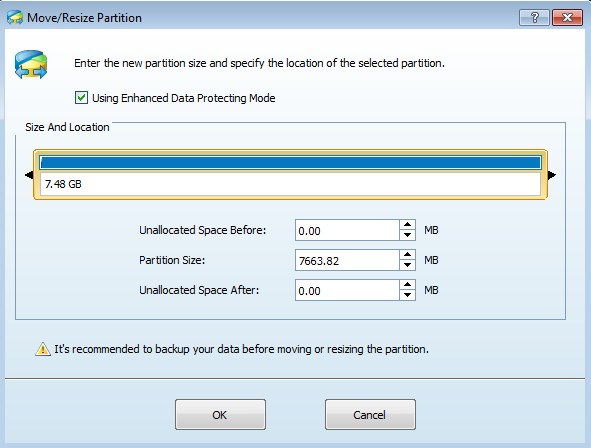
7- Click on the "Apply" button on the top left of the screen below the "General" menu item.

8- Wait for the process to finish.
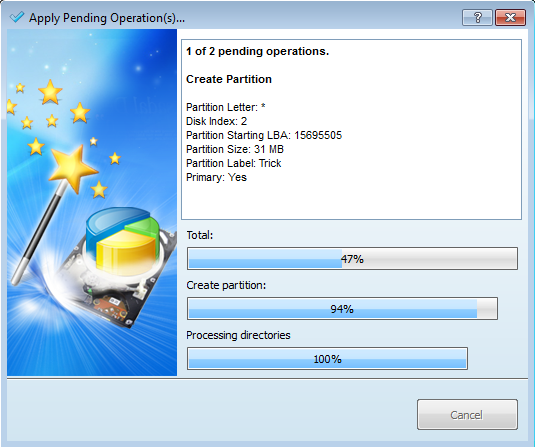
All done!
Now to check the condition of the NTFS system files on the partiton I have analyzed the partition with PerfectDisk:
Before the trick:

After the Trick:

As you can see all of them are relocated to the beginning!
References
1- http://technet.microsoft.c
2- http://www.howtogeek.com/f
Always looking for challenges and problems to solve !
This has made me more and more strong . . .
This has made me more and more strong . . .
Have a question about something in this article? You can receive help directly from the article author. Sign up for a free trial to get started.
Comments (0)