Power Automate – How to export attachments from SharePoint List Item


Microsoft MVP Office Dev focussed on Azure services, M365, SharePoint On-Premise & SharePoint Online, Power Automate, Power Apps, LiveTiles
Published:
Browse All Articles > Power Automate – How to export attachments from SharePoint List Item
How can we use Power Automate to export attachments from SharePoint List item
Introduction
Hi Friends, let us examine how we can use Power Automate to export attachments from the SharePoint List item. To explain the usage of this scenario, let us extend this Cloud Flow to send the attachments in Email. Perhaps you can use the same concept of exporting the attachments and do the following
Focus on the Flow
Consider a sample list with only the Title field and the attachments for the list has to be enabled. Add an item with a single or multiple attachments.
Let us start designing the flow
 See how easy it is. Are you expecting anything? we are done with the flow. Execute the flow and enjoy the outcome.
 Happy Flowing...
Hi Friends, let us examine how we can use Power Automate to export attachments from the SharePoint List item. To explain the usage of this scenario, let us extend this Cloud Flow to send the attachments in Email. Perhaps you can use the same concept of exporting the attachments and do the following
- Send the attachment over an email (will see in this post)
- Store all the attachments in a document library.
- Store all the attachments in an Onedrive folder.
Focus on the Flow
Consider a sample list with only the Title field and the attachments for the list has to be enabled. Add an item with a single or multiple attachments.
Let us start designing the flow
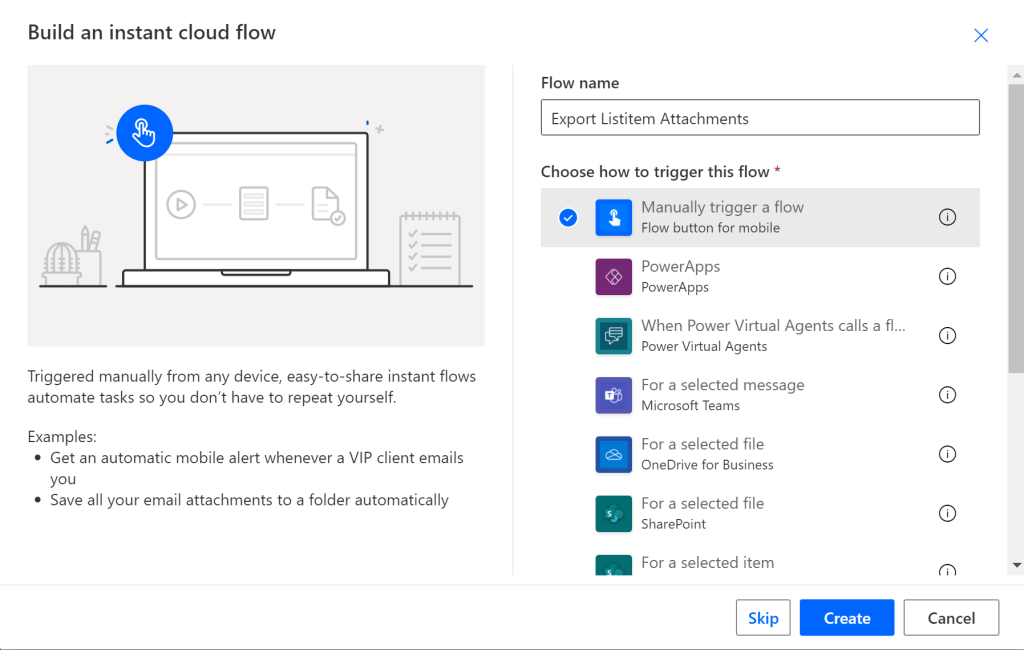
- Create an Instant cloud flow, give a unique name and select the trigger Manual trigger a flow
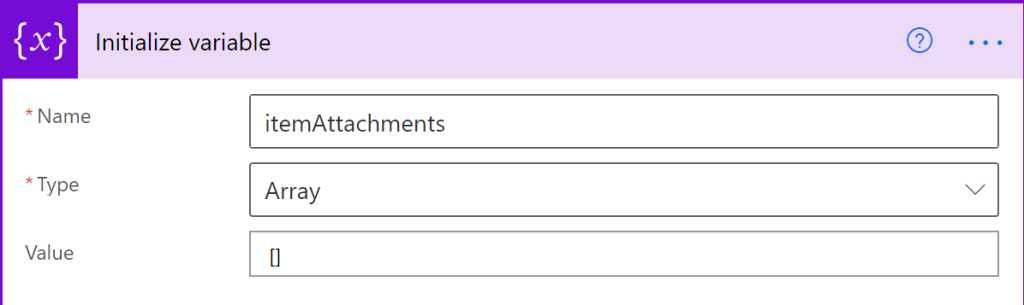
- Add an action named Initialize Variable as an array to store all the attachments from a list item.
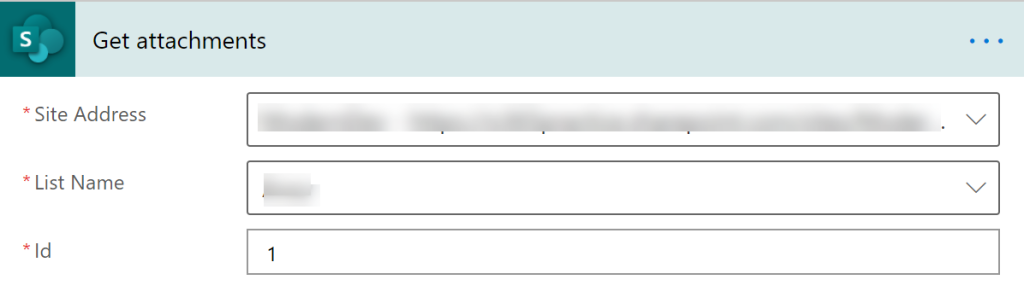
- Add an action named Get attachments and fill in the following properties
- Site Address - SharePoint site where the list exists
- List Name - Name of the list
- Id - List item ID to export the attachment(s)
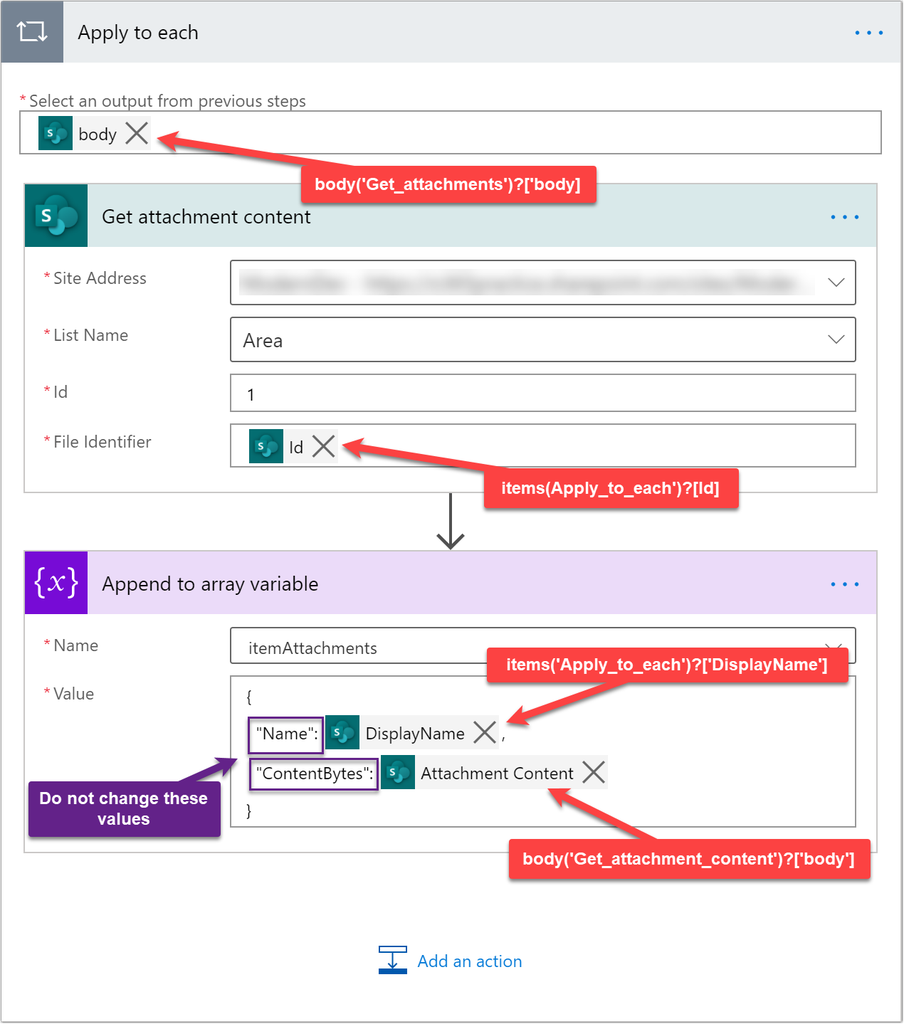
- Add an action named Apply to each to traverse through the attachments and store the result in an array that is initialized in the above action.
- Inside the Apply to each action add actions one below the other
- Get attachment content - The above action Get attachments will not return the contents, but it returns the File Identifier and other metadata information. Using File Identifier we can get the attachment content.
- Append to array variable - Append the Attachment name and Attachment content in the below format as a JSON array. The format mentioned below should be as it is without changing the key names. The same format is expected in the email action which we will add below the Apply to each action.
{   "Name": <Attachment Name>,   "ContentBytes": <Attachment content>
}- Add an action named Send an email (v2) to send the exported attachments to any user. Fill in the following properties. You have to collapse the advanced option for the attachments property.
- To - To email of the user
- Subject - Email subject
- Body - Some email content
- Attachments - Change it to dynamic values and pass the array variable as shown below
See how easy it is. Are you expecting anything? we are done with the flow. Execute the flow and enjoy the outcome. Happy Flowing...
Microsoft MVP Office Dev focussed on Azure services, M365, SharePoint On-Premise & SharePoint Online, Power Automate, Power Apps, LiveTiles
Have a question about something in this article? You can receive help directly from the article author. Sign up for a free trial to get started.
Comments (0)