Controlling mail-flow with Message Classifications and Transport Rules in Exchange 2010


Published:
Browse All Articles > Controlling mail-flow with Message Classifications and Transport Rules in Exchange 2010
Introduction
Exchange 2010 brings us the ability to add different message classifications to outlook and outlook web app (OWA). This in turn allows us to determine how messages that are given these classifications are handled by Exchange.A perfect example of this would be the CEO has emailed a confidential document to all staff regarding an imminent take over. This is not public knowledge yet and any leaks to the press could cause the whole deal to fall through but you want to keep your staff informed so it’s not a surprise to them when they find out.
You therefore put as much detail as you are able to into a global staff email and of it goes. Of course there is always one disgruntled employee who remembers the day 25 years ago when you walked past and didn’t say “Hello” so they forward the email you have sent onto editor@thelocaltimes.com
Well, with Message Classifications and Transport rules in Exchange 2010 we can now prevent this email from leaving the organisation, and below I will show you how.
Exchange Server Configuration
The first thing we need to do is create the message classification on the Exchange Server. Using the Exchange Management Shell we need to execute the New-MessageClassification commandlet.
An example command for creating a message classification with the following settings:
Identity: InternalConfidential
Display Name: Internal Only Confidential
Sender Description: This classification is for Internal Only Confidential Messages
 New-MessageClassification -Name InternalConfidential -DisplayName "Internal Only Confidential"
-SenderDescription "This classification is for Internal Only Confidential Messages"Whilst we are using the Exchange Management Shell we also need to create a custom NDR message called a DSNCode. To do this run the following command:
 New-SystemMessage -DSNCode 5.7.100 -Text "The message you have
just forwarded is restricted for internal confidential use only." -Internal $True -Language ENThis will create an NDR with an error code of 5.7.100 and a text of “The message you have just forwarded is restricted for internal confidential use only” this will be the code and text that is returned to the end user in the form of an NDR message.
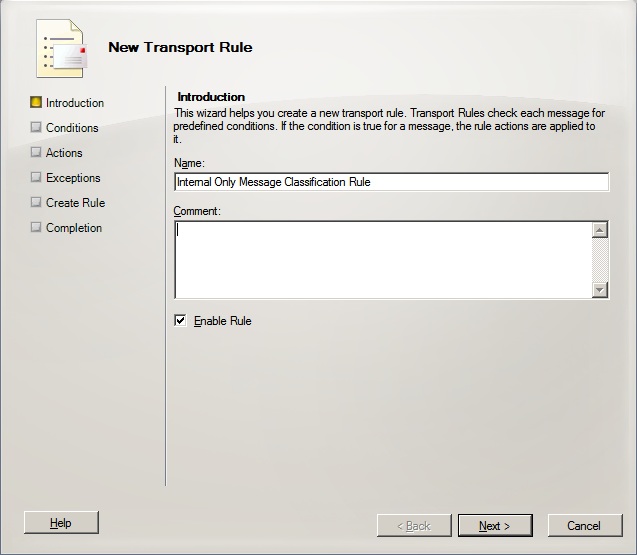
Once we have done this we then need to create the Transport Rule. To do this using the Exchange Management Console navigate to Organisation Configuration > Hub Transport and select New Transport Rule. This will start the transport rule wizard (see image below). On the opening screen give the transport rule a name, it doesn’t matter what you call the rule but I like to give them names that makes them easily identifiable.
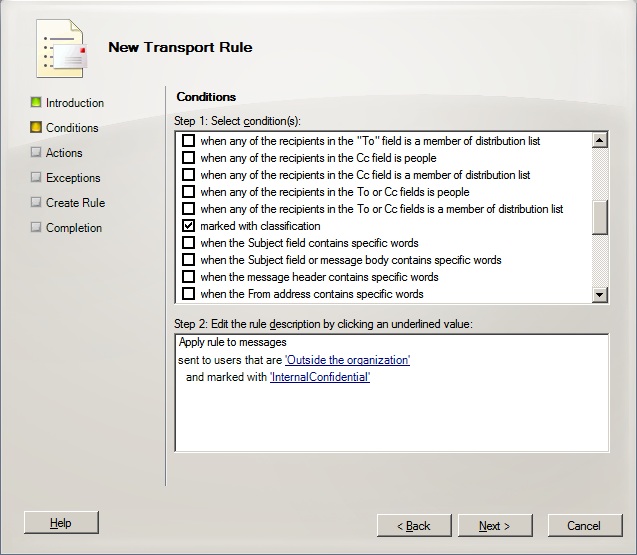
 Once you have given your rule a name click Next. On the conditions screen select the sent to users inside or outside the organisation or partners and the marked with classification option. Once done using the hyperlinks in the lower section of the dialogue box click the inside the organisation and from the drop down box select Outside the organisation and click OK. Then click the Classification and select the classification created earlier (see image below).
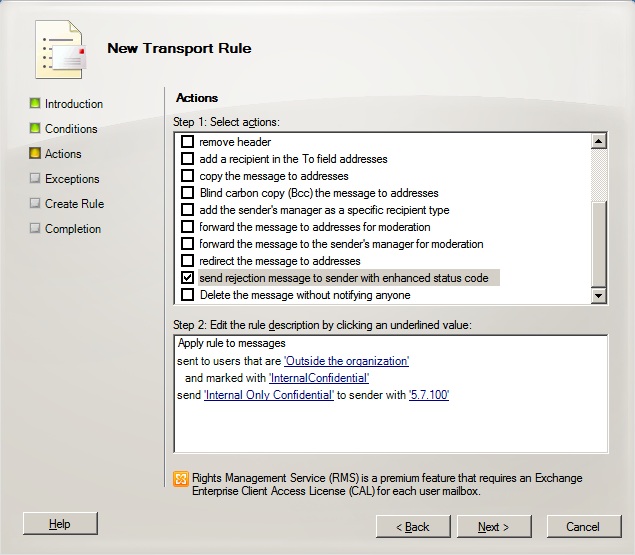
 Once these selections have been made click Next. From the Actions screen put a check in the send rejection message to sender with enhanced status code. Then in the lower section of the screen click the hyperlink for rejection message and enter text for the NDR message to be sent back to the user. Click the enhanced status code and enter the 5.7.100 code that was used to create the DSNCode earlier (see image below).
 Once this has been completed click Next, if you want to add exceptions to this rule then do so on the Exceptions screen and click Next. And then click New to create the rule.
Outlook Configuration
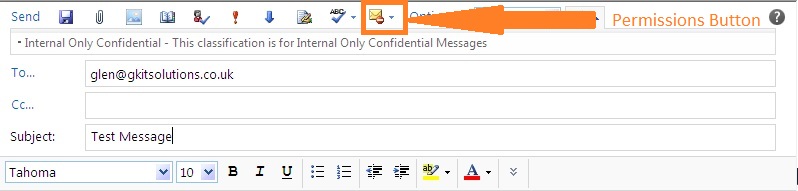
We can use message classifications in Outlook 2007/2010 and Outlook Web App. With Outlook Web App there is no further configuration required.From within Outlook Web App, open the new message window. From within this window select the permissions button (shown below) and chose the Internal Only Confidential option.
 Enter an external email address and a subject and click Send.
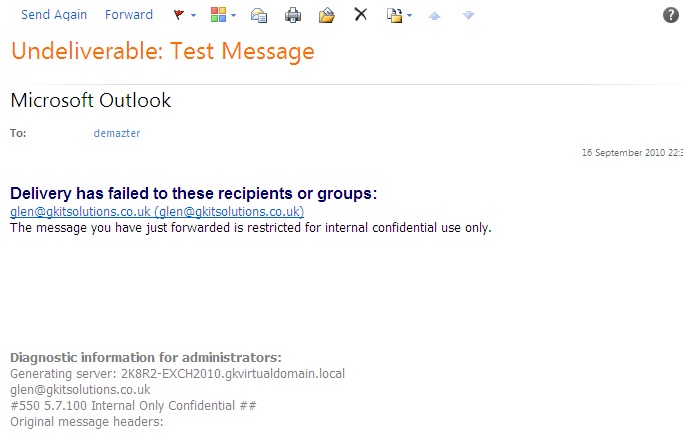
You will then receive the following message back from the Exchange Server and your e-mail will be dropped.
 The same thing would happen if you were sent this message from an internal user and then tried to forward it to an external recipient.
Getting this to work with the full outlook the first thing that is needed is to export the classifications from Exchange. Using the Exchange Management Shell navigate to C:\Program Files\Microsoft\Exchange Server\V1\Scripts and execute the following command:
”./Export-OutlookClassification.ps1 > C:\Classifications.xml”Once the file has been copied to the client machine. Launch regedit, navigate to HKEY_CURRENT_USER\Software
Create a new key called Policy
Then under here create a new String Value with the following configuration:
Name: AdminClassificationPath
Value: C:\Classifications.xml”
This assumes the XML you exported from the Exchange Server has been copied to the C:\ on the client machine.
You also need to create 2 DWORD Values as follows:
Name: EnableClassifications
Value: 1
Name: TrustClassifications
Value: 1
Once you have completed these tasks restart Outlook if you have it open and then open the new message windows. Under Options click the permissions button and your new message classification should appear.
Of course if we need to make these changes en masse then there are a number of deployment methods available to us, including the use of login scripts & Group Policy Preferences. Some of these methods are discussed here: http://technet.microsoft.com/en-us/library/bb727154.aspx
Further Reading
Managing Message Classifications: http://technet.microsoft.com/en-us/library/ee861122.aspxHave a question about something in this article? You can receive help directly from the article author. Sign up for a free trial to get started.
Comments (0)