Some Hyper-V Hardware and Software Best Practices


Note (2018-01-05): This article is now augmented by my EE article Practical Hyper-V Performance Expectations.
We've been building standalone virtualization solutions since Microsoft Virtual Server 2005.
We've been building Hyper-V virtualization solutions since Longhorn (Server 2008 Pre-Release bits). We built out our first cluster not long after 2008 RTMd on the Intel Modular Server platform though it took about 6-9 months of life to figure the whole setup out!
Here are some points to consider when looking to build a virtualization solution whether standalone or clustered on Hyper-V.
- Server Management: Always install an RMM, iLO Advanced, or iDRAC Enterprise
- Out of band KVM over IP can save time in the event of an emergency
- Keep a USB flash drive plugged in that is bootable and is kept up to date with OS install files
- Rebuild the server host OS and settings without leaving the shop
- CPU: GHz over Cores
- Memory: Largest, fastest for CPU, prefer one stick per channel, and same size/speed on all channels
- 32GB ECC Sticks are about the best value for the money as of this writing (2017-05-12)
- BIOS: Enable all Intel/AMD Virtualization Settings
- BIOS: Disable C3/C6 States
- BIOS: Enable High Performance Profile
- Server performance and fan performance
- Disk subsystem: Hardware RAID, 1GB Cache, Non-Volatile or Battery backed
- Disk subsystem: SAS only, 10K spindles to start, and 8 or more preferable
- Go smaller sizes with higher quantities of disks
- RAID 6 with 90GB Logical Disk for OS and Balance for VHDX and ISO files
- Networking: Intel only, 2x Dual-Port NICs at the minimum
- We always install at least two Intel i350-T4 Gigabit NICs
- In cluster settings at least one x540-T2 for 10GbE Live Migration
- Two node clusters can have direct connect thus eliminating the expense of a 10GbE switch
- Networking: Teaming
- Team Port 0 on both NICs for management
- Team Port 1on both NICs for vSwitch (Not shared with host OS)
- OPTION: Team Port 0 for Management and bind one vSwitch per port to team _within_ VM OS
- Port 2: Live Migration Standalone
- Port 3: Live Migration Standalone
- Networking: Broadcom NICs Disable VMQ for ALL physical ports
- Hyper-V: Server Core has a reduced attack surface plus lower update count thus requiring fewer reboots
- Hyper-V: Fixed VHDX files preferred unless dedicated LUN/Partition
- We set a cut-off of about 12 VMs before we look to deploy one or two LUNs/Partitions for VHDX files
- We deploy one 75GB fixed VHDX for guest OS
- We deploy one 150GB+ dynamic VHDX for guest Data with a dedicated LUN/partition
- Hyper-V: Max vCPUs to Assign = # Physical Cores on ONE CPU - 1
- Hyper-V: Leave ~1.5GB physical RAM to the host OS
- Hyper-V: Set a 4192MB static Swap File for host OS on C:
- Hyper-V: Standalone preferred to keep Workgroup
- Use RMM, iLO Advanced, iDRAC Enterprise, or if needed RDP to manage
BIOS and Firmware Updates
It's important to note two things as far as the BIOS and firmware for all components in a system build along with any external components and systems that would be a part of the solution set such as switches:
- All BIOS and Firmware ReadMe.TXT and ReleaseNotes.TXT files are read
- All BIOS and Firmware is updated prior to deployment
Once all of the system components are updated the next step is to burn-in the solution for 72 hours. This usually brings out any bugs or hardware problems in the setup allowing us to address them prior to delivery.
As far as updating the BIOS and firmware post-delivery we are of the mind that it should not be done. There have been instances of systems and/or components being bricked as a result of a bad BIOS/Firmware update or the new firmware introduced wouldn't play nice with the other components and systems in the solution. This practice is purely based on our many years of building systems and solutions both small and large.
BIOS Settings
The C3/C6 states can actually impact Live Migration performance, Storage Performance, and more so it is best to disable them from get-go.
It is a good idea to enable High Performance mode for the server. Doing so enables a number of settings that improves data flow throughout the system as well as cooling profiles that help keep the system temperatures down.
Hyper-Threading
In our testing Hyper-Threading has not made much of a difference. Think of it this way: The 401/Interstate with 8 lanes (physical cores on CPU) spreads out to 16 lanes (8 cores + virtual cores/Hyper-Threads = 16). At some point those extra eight lanes of traffic need to merge back in!
Memory and Performance
When it comes to setting up a hardware configuration there are many considerations. One important one is how memory is configured in the server. Shown below is the Intel Server Board S2600WT for Intel Xeon Processor E5-2600 v3/v4 series CPUs.
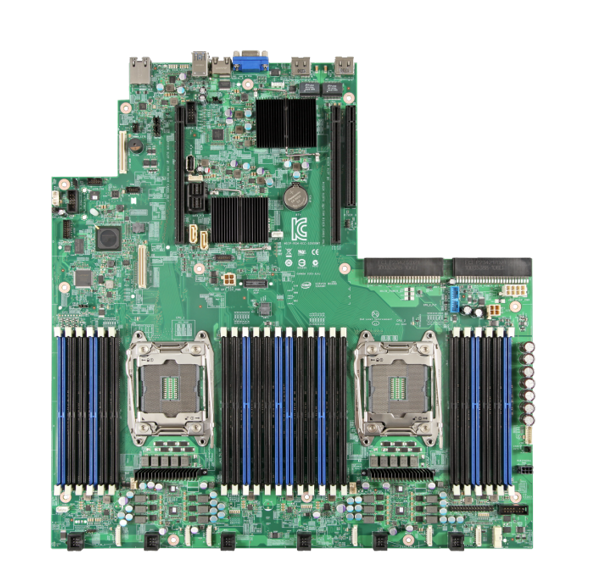 As can be seen in the image above, each E5-2600 v3/v4 CPU has four channels while the new Intel Xeon Scalable Processors have six channels per processor.
Rule of Thumb: Always populate all primary channel slots available in a server.
In the case of the Intel Server Board S2600WT shown above we'd populate with four 16GB or 32GB Dual Rank ECC per CPU for a total of eight DIMMs. For an Intel Xeon Scalable Processor setup we'd be populating with six 16GB or 32GB Dual Rank ECC per CPU for a total of 12 DIMMs.
Why do we do so? The principle reason is in the way the memory controllers stripe needed memory across each channel. Only populating one DIMM per CPU would put a _huge_ crimp on performance! Some servers also offer memory mirroring to provide some redundancy.
A few points to consider:
- Each memory channel can hold a total of eight (8) ranks
- DIMMS come in Dual Rank and Quad Rank configurations
- Always populate every primary channel slot on a server board
- It is preferable to populate with identical DIMMs for the best performance
- Make sure the match memory speed with the CPU's required speed
- As a rule, faster speed DIMMs can down-speed to match bus requirements
When we are configuring a server we make sure to follow the above guidelines. All primary slots are filled with the same size and speed DIMMs. We always try to populate with Dual Rank DIMMs even if they are a bit more expensive. In a situation where the primary and secondary channel slots are already filled with Dual Rank DIMMs we then have the option to add another set at a later date. This could not be done if the primary and secondary slots were filled with Quad Rank DIMMs.
Crash Dump Setting
We used to tweak the page file setup. Now, we just set the following crash dump setting and reboot the host/node:The Microsoft Docs page explaining the above setting: Configure system failure and recovery options in Windows.
It's important to note that if there is a situation where Microsoft Support gets involved, they will want the above setting configured. If the host/node is not cooperating, things get that much more difficult.
Network Adapters
Our preference is for Intel NICs since they tend to run a lot more stable than the Broadcom NICs do. Witness the issues with Broadcom Gigabit firmware and drivers and VMQ. If Broadcom is in place then make sure to disable VMQ to improve network access performance to the VMs.
NOTE: For Broadcom Gigabit drivers one needs to verify that VMQ is still set to DISABLED after a driver update.
A minimum of 2 NICs should be in place. A pair of teams, one for management and one for the vSwitch, utilizing one port each on a dual-port NIC setup is best to protect against NIC failure. If using quad-port NICs then team port 0 on both NICs for management and team port 1-3 for the vSwitch on both NICs. It is preferable to _never_ use one NIC port dedicated to a VM. This defeats the redundancy virtualization brings to the table.
As an option team port 0 on the NIC pair for management of the host server. Then bind a vSwitch for each physical port on the NICs to utilize vNIC teaming from within the guest OS. A guest OS of Windows Server 2012 and up is required for vNIC teaming.
- Microsoft Download: Windows Server 2012 R2 NIC Teaming (LBFO) Deployment and Management
- This Word document steps through all aspects of teaming in the host and guest OS
If there are on board Broadcom NICs they could be used for management but it is preferable to disable them in the BIOS.
Storage and VHDX Files
We utilize both dynamic and fixed VHDX files. What file configuration we use depends on how our storage is set up.
Rule of Thumb: 80GB Fixed VHDX File for Guest OS Install
Rule of Thumb: 50GB-500GB Fixed VHDX for guest's second partition for apps/data
Rule of Thumb: The largest VHDX file gets a dynamic VHDX file (Gigabytes into Terabytes into Petabytes)
We tend to setup our storage with smaller VHDX files getting a fixed VHDX with the last VHDX to get created being the huge dynamic VHDX file attached to the file services or other LoB VM.
We do this to save on fragmentation. By creating our fixed VHDX files first we have a set of contiguous files on our storage that won't get fragmented across their lifetime. By leaving the big one dynamic we don't have to worry about moving a huge fixed VHDX file around if we're in a migration scenario or a disaster recovery scenario.
Hyper-V and Snapshots/Checkpoints
Snapshots/Checkpoints are a point-in-time image, if you will, of a VM. They can be great in a testing environment when something goes awry thus making it a simple process to back the VM off.
However, there are two very important host caveats we need to keep in mind when using them.
- A new parent file is created once the merge completes. This means that there needs to be enough free space available for the process to complete successfully.
- The differencing disk (.AVHDX) keeps growing in size thus the risk of running out of storage is there.
- This leads to a Paused-Critical condition for any VMs that have their VHDX file(s) hosted on the now filled partition/LUN!
One other thing to keep in mind if snapshots/checkpoints are being used with domain controllers: A USN Rollback condition may occur if a DC gets stepped back in time. This can be quite messy to deal with.
My suggestion: Don't do it. Use a good backup product and test recovery the images regularly.
Manually Merge CheckPoints/SnapShots
How-To: Manually merge the Snapshot/Checkpoint differencing disk (.AVHDX) file into the parent: Microsoft TechNet: Manually Merge .avhd to .vhd in Hyper-V.
NOTE: The manual merge process creates an entirely new parent VHDX file. This means that there needs to be enough storage free on the Hyper-V host to do that! If not, then the parent and the first differencing disk will need to be copied onto a system with enough room, and preferrably enough horsepower, to run the process.
Hyper-V and VSS (Volume Shadow Copy)*
The Volume Shadow Copy (VSS) service has a long history of being an awesome fallback or a real pain with the potential for data corruption and/or loss.
With Hyper-V, VSS reaches in from the host to pull VSS snapshots out of the guests. Because of that, one needs to be very careful about VSS scheduling both on the host and on the guests to avoid any simultaneous VSS snapshots. This is where data corruption and/or loss can happen. That means being aware of what software products running in-guest are VSS aware and utilizing it.
When managing a VM's backup there's three levels to consider as far as scheduling that backup goes:
1: VSC Snapshot (Previous Versions - In-Guest OS)
2: Backup (In this case ShadowProtect - In-Guest OS)
3: Replication (Hyper-V - Host OS if used)
Never the twain shall meet! It's absolutely imperative that all three levels are scheduled in such a way as to not walk over each other. Data corruption and/or full-on loss is a possibility here and that's not a remote one. BTDT
Process would be to:
1: Time VSC Snapshot
2: Time Backup snapshot (CPU & I/O Dependent in-guest but also at the destination)
3: Time replica snapshot and delivery time to destination
VSS taxes the disk subsystem. Whether the VMs reside on a physical RAID array or on storage whether controlled by Storage Spaces via DAS (Direct Attached SAS) or Scale-Out File Server cluster (SOFS) a VSS snapshot configuration can bring both compute (Hyper-V) and storage (DAS/SOFS) to it's knees. In some cases to the point where folks are calling in because they are directly impacted by the slowdown.
As a rule, we _never_ run any kind of VSS process on the host with one exception: Veeam Backup. We always configure VSS within the guest for those that are hosting flat file storage (Previous Versions), or key LoBs that would allow us to spot restore files or databases.
Important NOTE: The Volume Shadow Copy (VSS) services have a 64TB limit! Keep this in mind when planning out a large storage repository.
How do I Back Up the VMs?
Just how do we do that?
We've run the gamut as far as working with Windows Server Backup on the host (I highly suggest _never_ going there) along with BDR style setups (Meh) and so much more. The setups we have settled on have been rock solid.
In our I.T. practice we have two products we work with and have been for years now:
- Veeam Backup: Awesome host based product
- StorageCraft Backup: Excellent in-guest product
Both offer similar features and advantages. As a rule we always encrypt the backup repository and always isolate the backup setup from the production environment (MPECS Inc. Blog Post).
The delimiter between the two products is either client request or VM count. ShadowProtect becomes a bit of a bear to manage when VM counts get up there so we deploy Veeam at the host level. We almost exclusively deploy Veeam in a cluster setting.
Note that both mentioned backup products are image based. That means that "Garbage In = Garbage Out". Always bare metal or bare hypervisor restore the backup set to make sure it is viable. We provide a backup management and rotation service with quarterly restores to our clients. As a result, any client on the service can be assured that their backups are good when things go south.
As far as the "where" to back up to we back up to an external USB drive, small USB drive dock setup, or High-Rely with RAIDPac configuration for rotation. A set of small NAS units is also an option for larger repositories. For USB drives we decided to put together our own enclosure setup based on a StarTech 3.5" and a WD Black drive. We found that many off the shelf USB drives had some sort of funky power management that would cause a failed backup or backups.
Note that cloud based backups are fine for spot restores but in most cases the bandwidth is not there to run a full disaster recovery. Please keep in mind that Disaster Recovery Planning (DRP) includes the possibility of a total loss of the current location or locations.
CLUSTER BACKUP TIP: In a cluster setting, always make sure the VM is running on the same node as its storage owner. This helps to reduce the amount of I/O that has to hit the storage to compute fabric.
Virtual CPUs and CPU Cores
The best image for how the CPU pipeline works is an Interstate with 1 Lane = 1 Physical Core. We don't count Hyper-Threading, as mentioned above, because that's like spreading 8 lanes out to 16 but having to merge all that traffic back down to 8 at some point. There is no real performance gain to be had there.
Now, there is a concrete barrier between the eight lanes in 1 CPU and the eight lanes in the CPU in a dual CPU system. That path between the two sets of lanes is call the InterConnect on Intel CPUs.
To the physical CPU, (1) one virtual CPU = 1 Thread = 1 Core
Rule of thumb: The physical CPU pipeline must process all vCPU Threads in parallel.
So, a VM with two vCPUs = 2 Threads side-by-side.
So, a VM with four vCPUs = 4 Threads side-by-side.
So, a VM with six vCPUs = 6 Threads side-by-side.
ETC.
If we assign 9 vCPUs to a VM in a dual 8 core system the physical CPU pipeline ends up having to juggle the extra thread across the InterConnect path in order to have them all in parallel. This costs big time.
Rule of thumb: Adding more vCPUs does not = more performance!
Our Rule of Thumb: Maximum # vCPUs for 1 VM = # Physical Cores - 1.
So, in the case of a dual eight core server we'd assign a maximum of 7 vCPUs to a VM.
Rule of Thumb: The more vCPUs = Wider parallel thread count = Harder to get into the CPU pipeline!
That 7 vCPU VM leaves 1 core for either an OS thread or a single vCPU VM thread.
vRAM and Memory (NUMA)
Here’s a simple way to look at NUMA: Each processor has at least one memory controller. One memory controller = one NUMA node. Higher end processors have more than one memory controller built-in to the CPU.
So, how do we look at it?
If a dual processor system with one memory controller per processor has 256GB of RAM then 128GB belongs to each NUMA node.
If a dual processor system with two memory controllers per processor has 256GB of RAM then 64GB belongs to each NUMA node.
An analogy: One NUMA node = One Room in a house.
We can only fit so much in the one room.
A VM with no NUMA awareness must have its vRAM fit in that one room plus there must be enough free space in that room to fit its vRAM.
A VM with NUMA awareness can have more vRAM assigned to it than is available in one NUMA node.
That VM can have its stuff spread across two or more rooms (NUMA Nodes) depending on the amount of vRAM assigned to it.
Now one catch: Having more vRAM assigned to the VM than is available in one room means having to juggle things between rooms. There is a performance hit for that. Moving stuff between rooms costs CPU cycles. To the CPU, that means moving memory bits across the bus between CPUs and memory controllers.
Now another catch: Having VMs with large amounts of vRAM assigned to them can cause “out of memory” errors when the physical server is not able to juggle free space in the rooms to allow it to start. There may indeed be more than enough “free” physical RAM in the box but the VM won’t start because of the way that free RAM is distributed across NUMA nodes.
VM Testing
Finally, it is our preference to run several configuration tests for a VM setup on a host we have just built. We run an assortment of tests to verify a setup prior to sending it out to a client. In fact, it is our policy to build the server configuration in-house, burn it in, and then test it with several VM setups before ever selling that configuration to a client.
SAS Connectivity
I have published a SAS Connectivity Guideon our blog. It includes pictures of how we cable up two nodes and one JBOD with directions for adding further nodes and JBODs.
iSCSI
We don't do it as a rule. However, make sure the network fabric is at least 10GbE with Jumbo Frames enabled on both switches (two required at the minimum) and on the 10GbE NIC ports.
Virtualization and Time
We have a number of time related posts on our blog that are important to note when setting up a virtualization platform or cluster:
- MPECS Inc. Blog: Hyper-V VM: Set Up PDCe NTP Time Server plus other DC's time service.
- All the required steps to properly set up domain time services in a virtualization or even physical server setting
- MPECS Inc. Blog: Hyper-V: Preparing A High Load VM For Time Skew
- MPECS Inc. Blog: Cluster: Why We Always Deploy a Physical DC in a Cluster Setting
Time is absolutely critical on any Windows domain. When time goes out of whack the whole network or workloads running on the network can go offline.
In a virtualization setting the operating system environment (OSE) has no physical point of reference for time like the CMOS clock. In a standalone or even a clustered setting one must disable time sync between the host and guests. This is critical since on a Windows domain there should only be one time source: The PDCe.
In a standalone setting we tend to set up the Hyper-V host as the time source for the guest PDCe. In a cluster setting we _always_ deploy a physical DC that holds all FSMO Roles and is the domain time authority.
P2V or V2V
When migrating an OS installed on bare metal or installed on a different hypervisor than the destination hypervisor it's important to make sure to clean up any "ghost" devices after the move.- Start a command prompt
- set devmgr_show_nonpresent_devices=1 [Enter]
- start devmgmt.msc [Enter]
- View --> click on Show hidden devices

Once they are removed reboot.
Once the reboot comes up, you can set up networking. Once done, close out the networking windows but then reopen them to get to the Gateway setting as it tends to come up blank when we go through a network adapter change in the OS.
Resources
We've published a number of PowerShell and CMD based guides with more to come.
- PowerShell Guide: Standalone Hyper-V Server
- PowerShell Guide: S2D Node – Kepler-47 Series
- PowerShell Guide: VM Creation PowerShell
- .WIM File Management: OS Guide: Slipstream Updates Using DISM and OSCDImg
Please check them out as they should be quite helpful.
Philip Elder
Have a question about something in this article? You can receive help directly from the article author. Sign up for a free trial to get started.
Comments (0)