Windows based Counter Strike Psycho Stats Server deployment

Muhammad Farjad Arshad![]() IT Service Manager | System & Security Engineer | SEO Technical Writer | Blogger | Article Writer
IT Service Manager | System & Security Engineer | SEO Technical Writer | Blogger | Article Writer
 IT Service Manager | System & Security Engineer | SEO Technical Writer | Blogger | Article Writer
CERTIFIED EXPERT
An IT professional passionate about learning new technologies and enthusiastic to help people for their tech problems in timely manner.
Published:
Browse All Articles > Windows based Counter Strike Psycho Stats Server deployment
As we all know Counter Strike is a very popular computer game. Usually it is played over a network for which people create a server and users join it but it is interesting to know that one can creates a dedicated server which not only hosts the game but also provides you with the statistics of players like stats of kills and deaths of all the gamers. So here I would like to tell you that how to install Windows Based Psycho Stats server
INTRODUCTION:
Firstly we have to know that what a Psycho Stats server is and why we need it. The answer is very simple in that Psycho Stats is an open source software that creates comprehensive gaming statistics for players and clans for Half-Life and and Half-Life 2. The main advantage of installing such a special database server (Psycho Stats server) over the standard CS server package is it will give you the exact stats of every single death with complete information such as which gun you have used, how many bullets you have used, where you actually hit the player and the accuracy of your shot. It will not only gives you these stats but also store them as long as you want.
Before the installation of Psycho Stats we need to make sure that the server meets the minimum requirements:
Minimum Requirement
1. Processor 3.06 GHz P4
2. HDD with 20GB of free space
3. RAM 1GB
4. Graphics card 512MB 128bits
{I have installed it on a virtual machine so I could use it time and again and none of my hardware gets occupied just only for this server. But the host machine has above mentioned specifications)
1. Windows XP or 7
2.Counter Strike 1.6
3. Active Perl 5.8 or above for Windows
4. Perl Modules DBI and DBD::mysql v4.011 or above
5. Web server (IIS or APACHE) {I have used Apache server 2.2.11}
6. MySQL 4.1.11 or above
7. PHP v4.3
8. Psycho Stats v 3.1
9. AMX-MODX 1.4.3 {For Scripting}
{If you do not want to install Apache, MySQL and PHP separately then Install the WAMP package it includes all the three of them it means Windows Apache Mysql and PHP}
INSTALLATION
Now here we begin with the installation of Psycho Stats server
STEP # 1
Firstly we have to install Active Perl 5.10 (which can be downloaded from http://www.activestate.com/downloads) by double-clicking, start the installation for ActivePerl. Accept all the default options. After the setup finishes reboot the server.
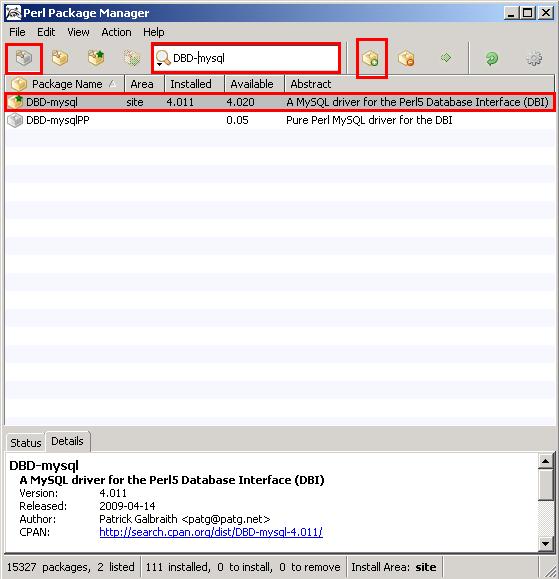
After finishing with the perl installation we need to install its modules. For this open active pearl, which we have just installed, by going into Start > Programs > Active Perl 5.10.0 It will open a window from here in the search bar type your required packages for e.g DBD-mysql it will generate a list of available modules with the name now right click on the module and press install. This will install the DBD-mysql 4.0.20.
![Perl Package Installation]() You can install the modules through command line as well in the following manner
You can install the modules through command line as well in the following manner
C:\Document and settings\xyz>ppm install DBD-mysql
STEP # 2
Secondly we have to install a Webserver (Apache), MySql and PHP. So I would recommend you to install the WAMP package instead of installing all the three applications independently. WAMP is a complete package which contains all the three applications and PHPmyadmin {which can be downloaded from http://www.wampserver.com/} so here I have installed WAMP version 2.0 because I have created this server some time ago and at that time the available version of WAMP was 2.0 {wamp version 2.2 is also available which includes Apache 2.2.22 – Mysql 5.5.24 – PHP 5.3.13 XDebug 2.1.2 XDC 1.5 PhpMyadmin 3.4.10.1 SQLBuddy 1.3.3 webGrind 1.0 you can install it as well}
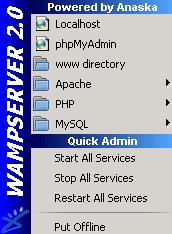
After the installation finishes now goto Start > Programs > Wamp Server > Start Wamp Server. This will add a meter-kind of icon in bottom right of the task bar just single click it and it will display the Wamp server menu
![Wamp Server Menu]()
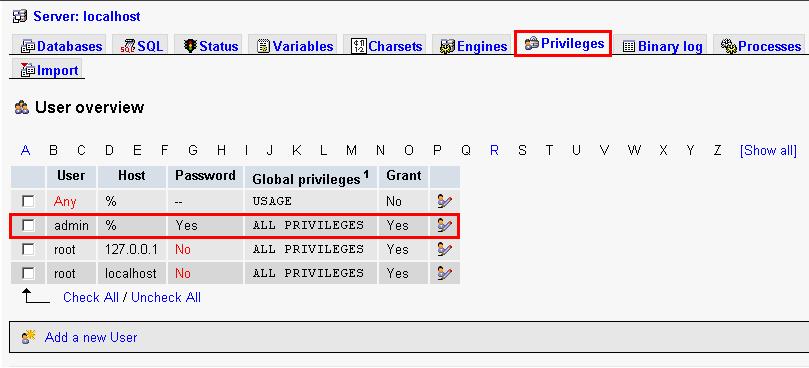
Once the server starts goto “phpMyAdmin” and select privileges now create a user by clicking on “Create a New User” and provide full access {This is to create the database}
![User]()
STEP # 3
Psycho stats Installation
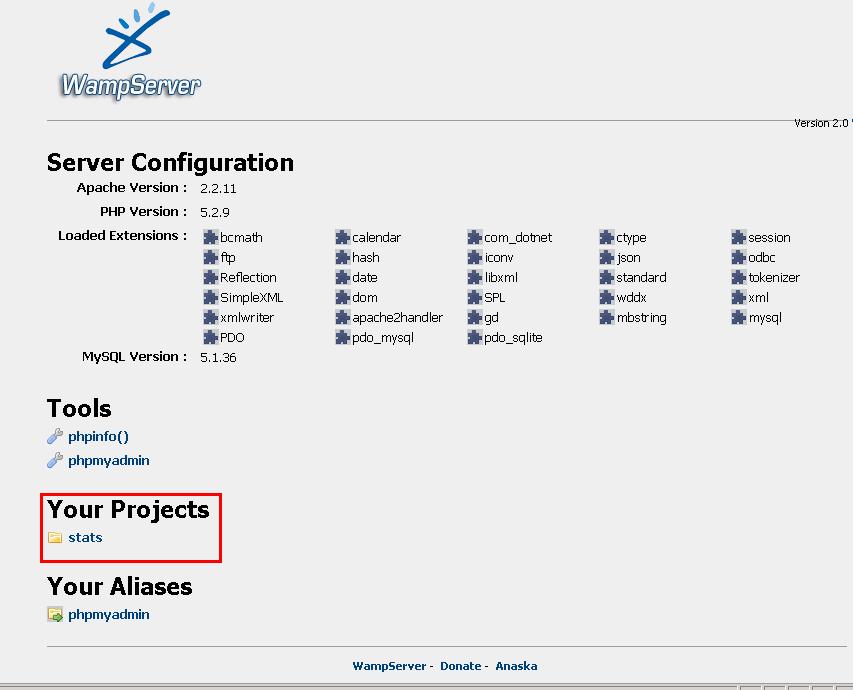
Now install psycho stats {which can be downloaded from here unrar it, now copy its "upload" folder into "c:\wamp\www" for Apache server, {people who are using IIS then they will copy on c:\Inetpub\wwwroot }, and rename it to "stats" after this move on to the wamp menu and select "LocalHost" it will open the wamp server page in the browser which looks like this:
![Local host {Wamp webpage}]()
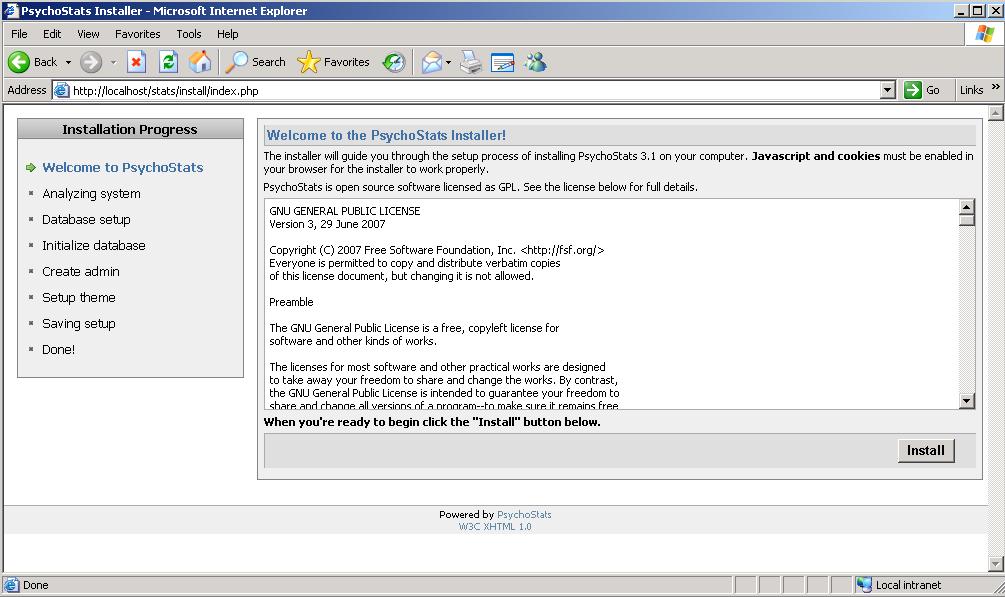
Here you can see your placed folder named "stats". From here we start the installation for which we use the link {http://localhost/stats/installs/index.php} it will start a wizard which will drive you to the installation:
![Installation Wizard]()
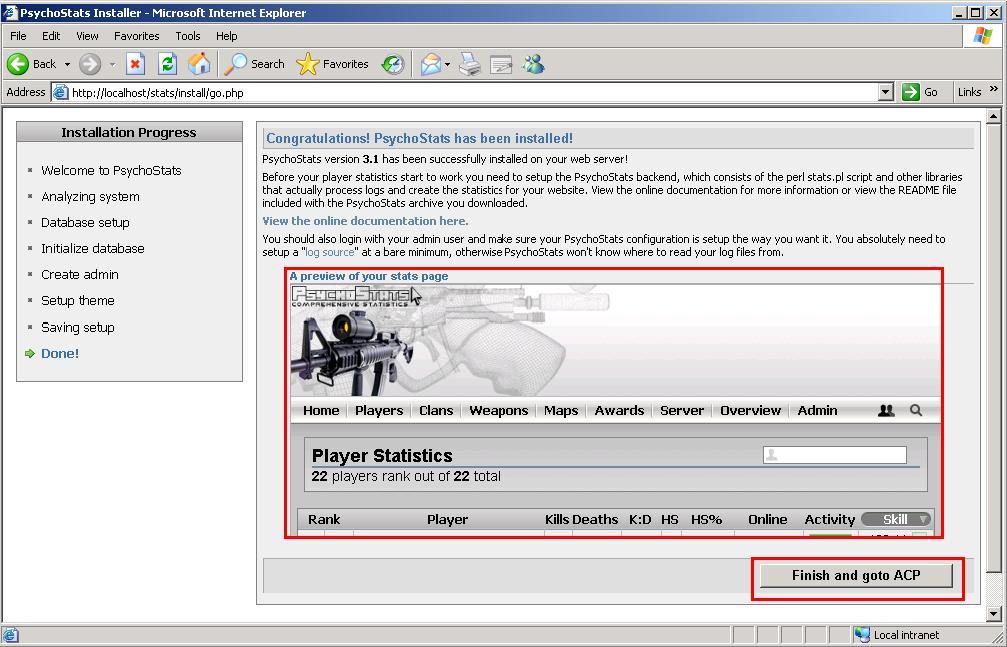
from here select "install" button now give the mysql user & password detail which we have set in mysql database earlier. After this, initialize the database which will create the database in mysql and press next. Now set the user name and password for "Administrative Control Panel" which will help you to modify your settings in future {I would recommend you to set the username and password same as we have set earlier for the database}. Now press next it will show you following page
![Finishing installation]()
Press Finish. Congratulations you have successfully installed the stats server now move on to the post-installation setup
STEP # 4
Post Installation Configuration
As you press the "Finish and goto ACP" button it will drive you to the "Administrative Control Panel" now enter the username and password which we have set during the installation and it will open a page like below.
![ACP credentials]()
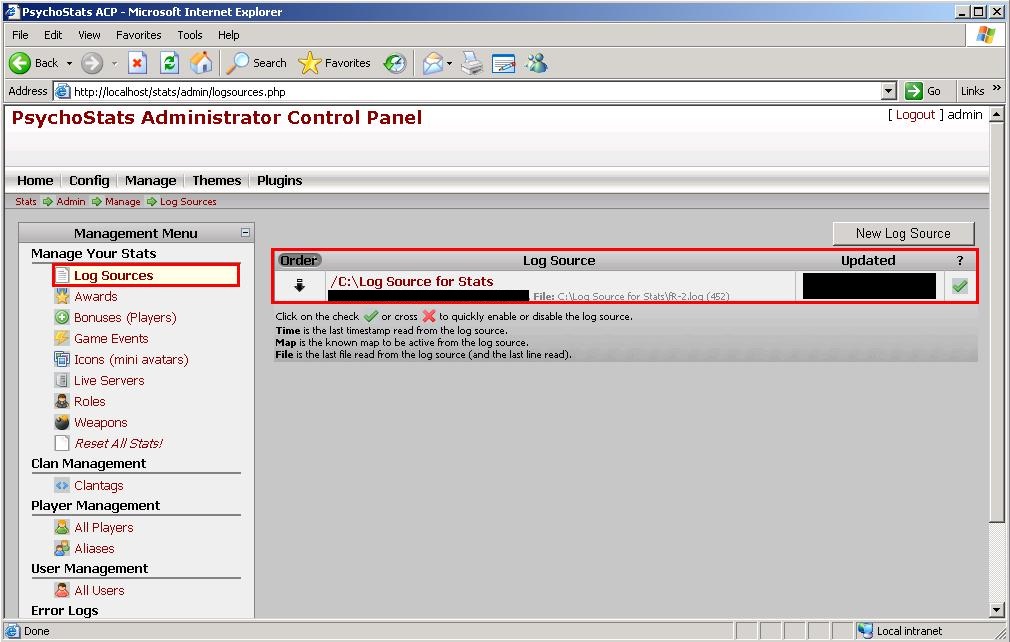
Once we log in to the Administrative Control Panel we have to set the path for Logs for which we have to select "Manage" then from left side in Management Menu select "Log Source" it will look like:
![Log Source]()
I have set my Log source folder in "c:\Log Source for Stats", Now from config menu set the appropriate settings as per your requirement and press the save button to save the configuration.
AMX-MODX Installation
In last we have to install AMX-MODX. It is a meta mod plugin which allows to write modification for Half life with small scripting language. It can be downloaded from http://www.amxmodx.org/ {It is optional, if one want to do some modification with half life then only it can be used}.
Hurray!!!! Your Psycho stats server has been successfully created now we only have to run a Counter Strike map and once the game is over move on to the folder names logs which contains the log of every counter strike map and can be found on following path
C:\Program Files\Counter-Strike\cstrike\logs
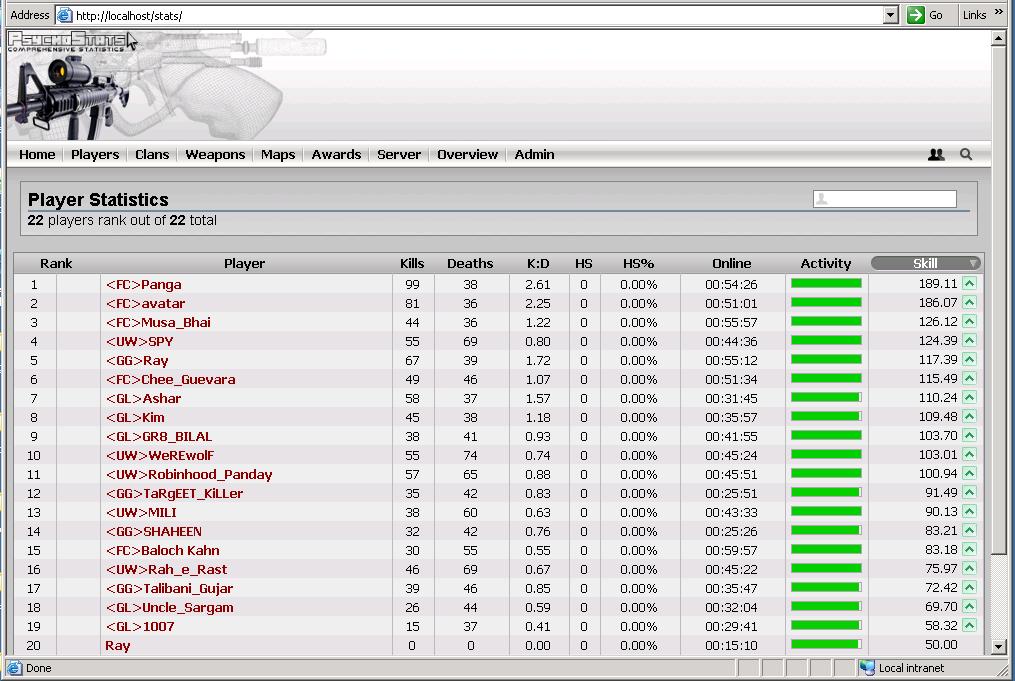
from here copy the log into "C:\Log Source for Stats" {Which we have setup for log analysis in ACP earlier} and run stats.pl file which can be found in psycho stats folder. After this move on to the browser and browse to the link "http://localhost/stats" this will show you the stats for last played game as below
![Stats of the server]()
Hurray!!!! all set above is the sample Log report from Psycho Stats server which will give you the actual and detailed stats of the played game.
Hope this tutorial will help you understand and you can enjoy Counter Strike more.
External Links
http://www.activestate.com/downloads
http://www.wampserver.com/
https://www.rapidshare.com/files/2810054540/psychostats3.1.zip
http://www.amxmodx.org/
INTRODUCTION:
Firstly we have to know that what a Psycho Stats server is and why we need it. The answer is very simple in that Psycho Stats is an open source software that creates comprehensive gaming statistics for players and clans for Half-Life and and Half-Life 2. The main advantage of installing such a special database server (Psycho Stats server) over the standard CS server package is it will give you the exact stats of every single death with complete information such as which gun you have used, how many bullets you have used, where you actually hit the player and the accuracy of your shot. It will not only gives you these stats but also store them as long as you want.
Before the installation of Psycho Stats we need to make sure that the server meets the minimum requirements:
Minimum Requirement
Hardware Requirement
1. Processor 3.06 GHz P4
2. HDD with 20GB of free space
3. RAM 1GB
4. Graphics card 512MB 128bits
{I have installed it on a virtual machine so I could use it time and again and none of my hardware gets occupied just only for this server. But the host machine has above mentioned specifications)
Software Requirement
1. Windows XP or 7
2.Counter Strike 1.6
3. Active Perl 5.8 or above for Windows
4. Perl Modules DBI and DBD::mysql v4.011 or above
5. Web server (IIS or APACHE) {I have used Apache server 2.2.11}
6. MySQL 4.1.11 or above
7. PHP v4.3
8. Psycho Stats v 3.1
9. AMX-MODX 1.4.3 {For Scripting}
{If you do not want to install Apache, MySQL and PHP separately then Install the WAMP package it includes all the three of them it means Windows Apache Mysql and PHP}
INSTALLATION
Now here we begin with the installation of Psycho Stats server
STEP # 1
Firstly we have to install Active Perl 5.10 (which can be downloaded from http://www.activestate.com/downloads) by double-clicking, start the installation for ActivePerl. Accept all the default options. After the setup finishes reboot the server.
After finishing with the perl installation we need to install its modules. For this open active pearl, which we have just installed, by going into Start > Programs > Active Perl 5.10.0 It will open a window from here in the search bar type your required packages for e.g DBD-mysql it will generate a list of available modules with the name now right click on the module and press install. This will install the DBD-mysql 4.0.20.
 You can install the modules through command line as well in the following manner
C:\Document and settings\xyz>ppm install DBD-mysql
STEP # 2
Secondly we have to install a Webserver (Apache), MySql and PHP. So I would recommend you to install the WAMP package instead of installing all the three applications independently. WAMP is a complete package which contains all the three applications and PHPmyadmin {which can be downloaded from http://www.wampserver.com/} so here I have installed WAMP version 2.0 because I have created this server some time ago and at that time the available version of WAMP was 2.0 {wamp version 2.2 is also available which includes Apache 2.2.22 – Mysql 5.5.24 – PHP 5.3.13 XDebug 2.1.2 XDC 1.5 PhpMyadmin 3.4.10.1 SQLBuddy 1.3.3 webGrind 1.0 you can install it as well}
After the installation finishes now goto Start > Programs > Wamp Server > Start Wamp Server. This will add a meter-kind of icon in bottom right of the task bar just single click it and it will display the Wamp server menu
Once the server starts goto “phpMyAdmin” and select privileges now create a user by clicking on “Create a New User” and provide full access {This is to create the database}
STEP # 3
Psycho stats Installation
Now install psycho stats {which can be downloaded from here unrar it, now copy its "upload" folder into "c:\wamp\www" for Apache server, {people who are using IIS then they will copy on c:\Inetpub\wwwroot }, and rename it to "stats" after this move on to the wamp menu and select "LocalHost" it will open the wamp server page in the browser which looks like this:
Here you can see your placed folder named "stats". From here we start the installation for which we use the link {http://localhost/stats/installs/index.php} it will start a wizard which will drive you to the installation:
from here select "install" button now give the mysql user & password detail which we have set in mysql database earlier. After this, initialize the database which will create the database in mysql and press next. Now set the user name and password for "Administrative Control Panel" which will help you to modify your settings in future {I would recommend you to set the username and password same as we have set earlier for the database}. Now press next it will show you following page
Press Finish. Congratulations you have successfully installed the stats server now move on to the post-installation setup
STEP # 4
Post Installation Configuration
As you press the "Finish and goto ACP" button it will drive you to the "Administrative Control Panel" now enter the username and password which we have set during the installation and it will open a page like below.

Once we log in to the Administrative Control Panel we have to set the path for Logs for which we have to select "Manage" then from left side in Management Menu select "Log Source" it will look like:
I have set my Log source folder in "c:\Log Source for Stats", Now from config menu set the appropriate settings as per your requirement and press the save button to save the configuration.
AMX-MODX Installation
In last we have to install AMX-MODX. It is a meta mod plugin which allows to write modification for Half life with small scripting language. It can be downloaded from http://www.amxmodx.org/ {It is optional, if one want to do some modification with half life then only it can be used}.
Hurray!!!! Your Psycho stats server has been successfully created now we only have to run a Counter Strike map and once the game is over move on to the folder names logs which contains the log of every counter strike map and can be found on following path
C:\Program Files\Counter-Strike\cstri
from here copy the log into "C:\Log Source for Stats" {Which we have setup for log analysis in ACP earlier} and run stats.pl file which can be found in psycho stats folder. After this move on to the browser and browse to the link "http://localhost/stats" this will show you the stats for last played game as below
Hurray!!!! all set above is the sample Log report from Psycho Stats server which will give you the actual and detailed stats of the played game.
Hope this tutorial will help you understand and you can enjoy Counter Strike more.
External Links
http://www.activestate.com/downloads
http://www.wampserver.com/
https://www.rapidshare.com/files/2810054540/psychostats3.1.zip
http://www.amxmodx.org/
An IT professional passionate about learning new technologies and enthusiastic to help people for their tech problems in timely manner.
Have a question about something in this article? You can receive help directly from the article author. Sign up for a free trial to get started.
Comments (1)
Author
Commented: