

Browse All Articles > PXE deployment in home network
This tutorial shows how to deploy a Pre-Execution Environment (PXE) under home or small business conditions, where you have some basic infrastructure but you are not running server(s) with enterprise deployment technology.
First, we should say why you might want to deploy such an environment, and what it is good for. It's not likely that the standard home user will take advantage of every feature a PXE can offer; what is described here is dedicated to home and small business environments.
By deploying PXE you can install operating system (MS Windows, linux distributions) in an automated way or boot various admin tools. That means if you are someone who occasionally receives a computer from friend to diagnose, backup, reinstall or repair, then PXE is the way how to make your work more easy.
For example:
You have PC in your hands that is obviously infected. That´s why you decide to make data backup, reinstall MS Windows, restore data and to be sure the restored data are not infected, do antivirus scan.
If you have PXE Deployment prepared you can do that all by itself. From the network boot Acronis True Image and make a data backup, then deploy suitable MS Windows version (with desired applications like Adobe Reader, codecs, Firefox/Chrome, Skype, 7zip, and so on). Restore the data by Acronis and boot Comodo rescue disk because of AV scan.
There are more options for what to boot – Memtest for RAM testing, Ubuntu Live to check wifi adapter functionality, CPU and HDD tests, and so on. The advantage is that all of your tools are in one place and you do not need to look for a CD/USB with Ubuntu Live on it. The gigabit LAN transfer of files will be fast (Acronis backup, OS install) as well.
No doubt there are many approaches for how to implement PXE deployment in various combinations based on the local network infrastructure. In this case I will demonstrate with this hardware:
1. NAS configuration
2. DHCP configuration
3. Creation of images for deployment
1. NAS configuration
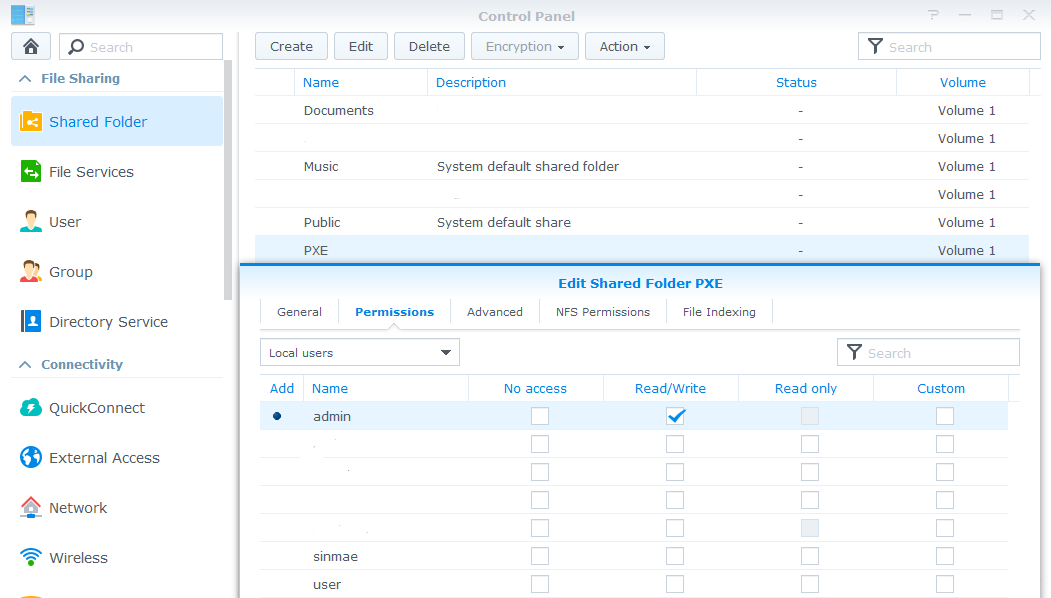
For PXE implementation you will require DiskStation Manager (DSM) in version at least 4.2. In Control panel>Shared folder create new folder (furthermore I will assume PXE as that folder) and set permissions for admin user to read/write; for other users, if any, on demand (ideally just read).
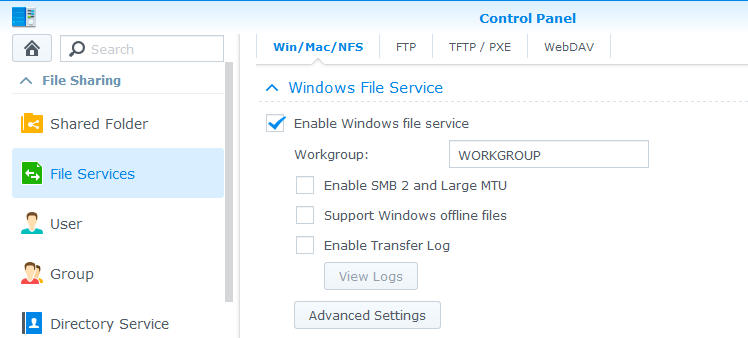
![01]() We will enable NFS service in Control panel>File services>Win/Mac/NFS and tick Enable windows file service option.
We will enable NFS service in Control panel>File services>Win/Mac/NFS and tick Enable windows file service option.
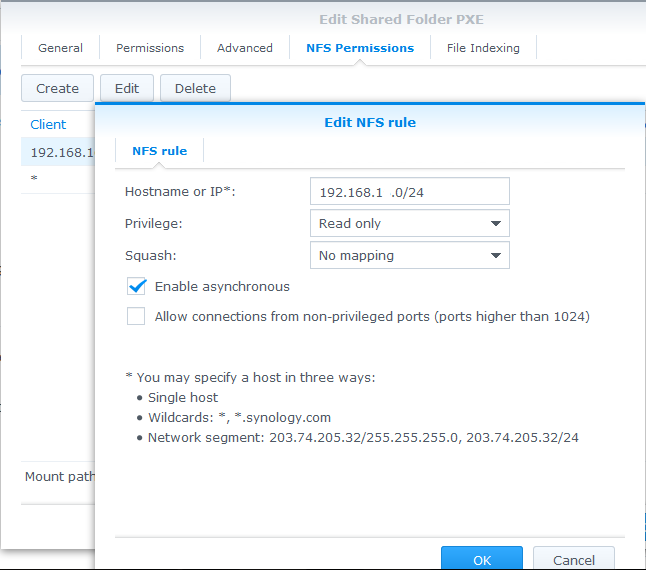
![02]() Next is necessary to set NFS permissions for PXE folder. Right click>Edit>NFS permissions>Create:
Next is necessary to set NFS permissions for PXE folder. Right click>Edit>NFS permissions>Create:
![03]() We will download TFTP-PXE-Boot-Server (ZIP) and its content save to PXE folder (so PXE folder will contain folder pxelinux.cfg, files chain.32, mboot.c32 etc).
We will download TFTP-PXE-Boot-Server (ZIP) and its content save to PXE folder (so PXE folder will contain folder pxelinux.cfg, files chain.32, mboot.c32 etc).
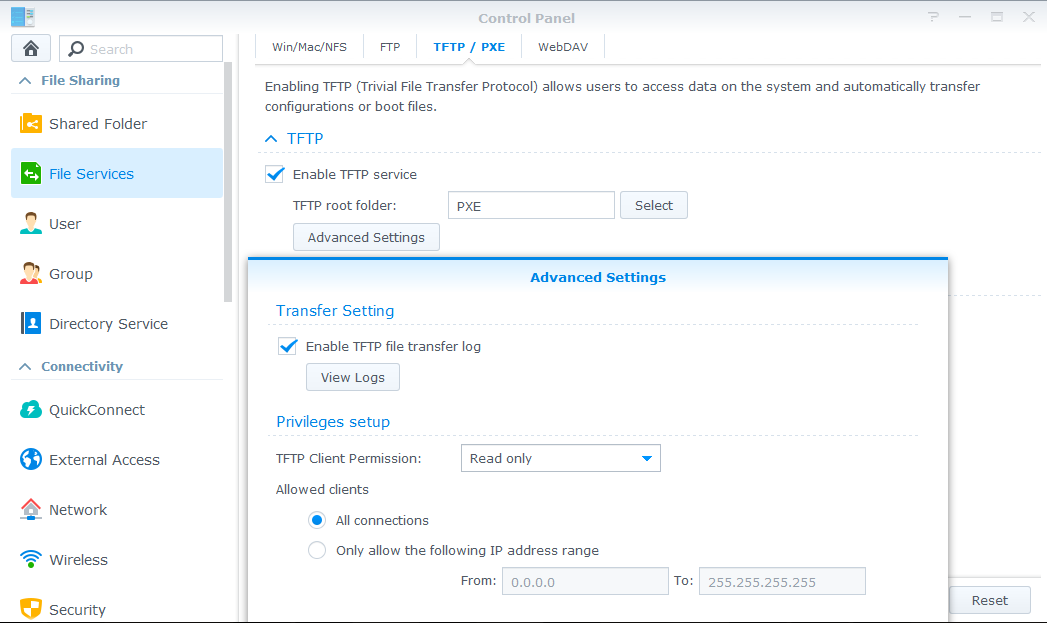
We will set TFTP/PXE server:
![04]() 2. DHCP configuration
2. DHCP configuration
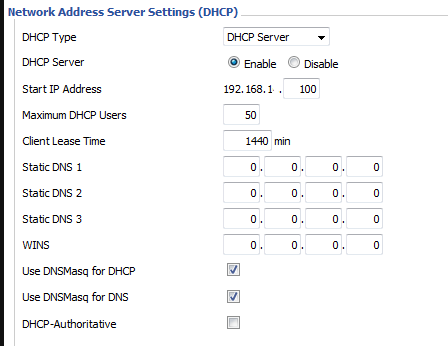
Log into the router (with dd-wrt firmware) and in part Setup>Basic setup>Network setup tick Use DNSMasq for DHCP.
![05]() Next in Services>Services> Additional DNSMasq Options type boot file name, server hostname and its IP address. Command will see like this:
Next in Services>Services> Additional DNSMasq Options type boot file name, server hostname and its IP address. Command will see like this:
dhcp-boot=pxelinux.0,,192.168.1.10
where pxelinux.0 is a file that will boot, hostname I left blank (two commas) and IP address of TFTP server (in this case IP of NAS)
![06]() PXE boot test
PXE boot test
Let’s do a test if PXE boot is working properly. We can use a desktop/laptop and its ethernet adapter (it won´t work wirelessly; only a wired connection is supported) or virtual machine (VMware, Hyper-V). Network boot you have to set in BIOS or use Quick Boot (keyboard shortcut depends motherboard to motherboard). If all previous steps were configured properly DHCP assigns IP address and system boots to PXELINUX menu (blue table).
3. Creation of images dedicated for deployment
a) Windows
For creation of images we will use Microsoft Deployment Toolkit (MDT) 2013 (Deployment Workbench), which after install will ask for Windows Automated Installation Kit (through Components in Deployment Workbench or manually as a part of Windows ADK).
We will create Deployment Share (I recommend into separate subfolder in PXE (e.g. PXE\Deployment). In Operating Systems import new operating system (point wizard to folder with OS installation files or DVD with OS or unpacked ISO file).
In Task sequences create a new Task sequence. At the end right click on created Deployment share and choose Update Deployment Share.
Notice: Detailed description of Deployment workbench is beyond of scope of this tutorial. In case of questions do not hesitate to ask me in comments.
In PXE\Deployment we will find newly created folder structure created by Deployment Workbench processes. In the Boot folder are files LiteTouchPE_x64.iso, LiteTouchPE_x64.wim, LiteTouchPE_x64.xml, LiteTouchPE_x86.iso, LiteTouchPE_x86.wim, LiteTouchPE_x86.xml.
Next we have to edit default file (PXE\pxelinux.cfg) and add new record (or edit existing one) in a way to point to .iso . In this example to x64:
In Deployment Workbench we can create as many images as we want with different OS versions (also with service packs, drivers, applications, etc.). After every change made in Deployment Workbench do a Update Deployment Share so changes you made will be applied in LiteTouchPE_x64.iso/ LiteTouchPE_x86.iso
b) Another bootable software
For deployment we can use also different software, not only MS Windows. It could be linux distributions, recovery software, admin tools etc. Below I will describe some of them with code in default file (PXE\pxelinux.cfg)
Memtest 86
Download Memtest (Pre-compiled bootable binary (.zip)), unpack it and file memtest86+-5.01.bin (current version is 5.01, version could be different lately) rename to memtest86 (file must be without extension .bin!). This file save to PXE\images\memtest and create new record in default file:
Download .iso from page and copy it into PXE\images\ubcd. Rename it to ubcd.iso and create new record in default file:
Download bootable ISO from page. Copy ISO into PXE\images\pwhe and rename it to pwhe.iso. Create new record in default file:
Download Ubuntu ISO file from page and unpack it (7zip, WinRAR, ...). Folders copy into PXE\images\ubuntu and create new record in default file:
Comodo
Download ISO file from page and unpack it (7zip, WinRAR, ...). Folders save into PXE\images\comodo and create new record in default file:
Acronis True Image
For those who have Acronis True Image there is possibility to add also this software into deployment share. Make bootable USB(!) media and copy content into PXE\images\acronis with new record in default file:
- helpfinder -
First, we should say why you might want to deploy such an environment, and what it is good for. It's not likely that the standard home user will take advantage of every feature a PXE can offer; what is described here is dedicated to home and small business environments.
By deploying PXE you can install operating system (MS Windows, linux distributions) in an automated way or boot various admin tools. That means if you are someone who occasionally receives a computer from friend to diagnose, backup, reinstall or repair, then PXE is the way how to make your work more easy.
For example:
You have PC in your hands that is obviously infected. That´s why you decide to make data backup, reinstall MS Windows, restore data and to be sure the restored data are not infected, do antivirus scan.
If you have PXE Deployment prepared you can do that all by itself. From the network boot Acronis True Image and make a data backup, then deploy suitable MS Windows version (with desired applications like Adobe Reader, codecs, Firefox/Chrome, Skype, 7zip, and so on). Restore the data by Acronis and boot Comodo rescue disk because of AV scan.
There are more options for what to boot – Memtest for RAM testing, Ubuntu Live to check wifi adapter functionality, CPU and HDD tests, and so on. The advantage is that all of your tools are in one place and you do not need to look for a CD/USB with Ubuntu Live on it. The gigabit LAN transfer of files will be fast (Acronis backup, OS install) as well.
No doubt there are many approaches for how to implement PXE deployment in various combinations based on the local network infrastructure. In this case I will demonstrate with this hardware:
NAS (Synology DS110j with DSM 5.0-4482)
deployment share (PXE/TFTP feature)
Router (Linksys E2000 with dd-wrt firmware)
DHCP
Steps I will describe:
1. NAS configuration
2. DHCP configuration
3. Creation of images for deployment
1. NAS configuration
For PXE implementation you will require DiskStation Manager (DSM) in version at least 4.2. In Control panel>Shared folder create new folder (furthermore I will assume PXE as that folder) and set permissions for admin user to read/write; for other users, if any, on demand (ideally just read).
 We will enable NFS service in Control panel>File services>Win/Mac/NFS and tick Enable windows file service option.
 Next is necessary to set NFS permissions for PXE folder. Right click>Edit>NFS permissions>Create:
hostname or IP = 192.168.1.0/24 (I do not want to set any IP limitation in my own network, that´s why I allow entire – if you are using different IP range, use yours)
Privilege = Read only
Squash = No mapping
Enable asynchronous = ticked
Allow connections from non-privileged ports = unticked
 We will download TFTP-PXE-Boot-Server (ZIP) and its content save to PXE folder (so PXE folder will contain folder pxelinux.cfg, files chain.32, mboot.c32 etc).
We will set TFTP/PXE server:
Control panel>File services>TFTP/PXE
Tick Enable TFTP service
For TFTP root folder choose PXE shared folder
In Advanced Settings set TFTP Client permissions to Read only, and for Allowed clients All connections, Timeout leave on default value 3 (optionally you can tick Enable TFTP file transfer log)
 2. DHCP configuration
Log into the router (with dd-wrt firmware) and in part Setup>Basic setup>Network setup tick Use DNSMasq for DHCP.
 Next in Services>Services> Additional DNSMasq Options type boot file name, server hostname and its IP address. Command will see like this:
dhcp-boot=pxelinux.0,,192.
where pxelinux.0 is a file that will boot, hostname I left blank (two commas) and IP address of TFTP server (in this case IP of NAS)
 PXE boot test
Let’s do a test if PXE boot is working properly. We can use a desktop/laptop and its ethernet adapter (it won´t work wirelessly; only a wired connection is supported) or virtual machine (VMware, Hyper-V). Network boot you have to set in BIOS or use Quick Boot (keyboard shortcut depends motherboard to motherboard). If all previous steps were configured properly DHCP assigns IP address and system boots to PXELINUX menu (blue table).
3. Creation of images dedicated for deployment
a) Windows
For creation of images we will use Microsoft Deployment Toolkit (MDT) 2013 (Deployment Workbench), which after install will ask for Windows Automated Installation Kit (through Components in Deployment Workbench or manually as a part of Windows ADK).
We will create Deployment Share (I recommend into separate subfolder in PXE (e.g. PXE\Deployment). In Operating Systems import new operating system (point wizard to folder with OS installation files or DVD with OS or unpacked ISO file).
In Task sequences create a new Task sequence. At the end right click on created Deployment share and choose Update Deployment Share.
Notice: Detailed description of Deployment workbench is beyond of scope of this tutorial. In case of questions do not hesitate to ask me in comments.
In PXE\Deployment we will find newly created folder structure created by Deployment Workbench processes. In the Boot folder are files LiteTouchPE_x64.iso, LiteTouchPE_x64.wim, LiteTouchPE_x64.xml, LiteTouchPE_x86.iso, LiteTouchPE_x86.wim, LiteTouchPE_x86.xml.
Next we have to edit default file (PXE\pxelinux.cfg) and add new record (or edit existing one) in a way to point to .iso . In this example to x64:
LABEL winpe
                      		MENU LABEL WinPE x64
                      		LINUX memdisk
                      		APPEND iso raw
INITRD images/Deployment/boot/LiteTouchPE_x64.isoIn Deployment Workbench we can create as many images as we want with different OS versions (also with service packs, drivers, applications, etc.). After every change made in Deployment Workbench do a Update Deployment Share so changes you made will be applied in LiteTouchPE_x64.iso/ LiteTouchPE_x86.iso
b) Another bootable software
For deployment we can use also different software, not only MS Windows. It could be linux distributions, recovery software, admin tools etc. Below I will describe some of them with code in default file (PXE\pxelinux.cfg)
Memtest 86
Download Memtest (Pre-compiled bootable binary (.zip)), unpack it and file memtest86+-5.01.bin (current version is 5.01, version could be different lately) rename to memtest86 (file must be without extension .bin!). This file save to PXE\images\memtest and create new record in default file:
LABEL memtest86
                              MENU LABEL Memtest86
KERNEL images/memtest/memtest86Download .iso from page and copy it into PXE\images\ubcd. Rename it to ubcd.iso and create new record in default file:
LABEL UBCD
                              MENU LABEL Ultimate Boot CD
                              KERNEL memdisk
APPEND iso initrd=images/UBCD/ubcd.isoDownload bootable ISO from page. Copy ISO into PXE\images\pwhe and rename it to pwhe.iso. Create new record in default file:
LABEL PWHE
                      		MENU LABEL Partition Wizard Home Edition
                      		KERNEL memdisk
APPEND iso initrd=images/pwhe/pwhe.isoDownload Ubuntu ISO file from page and unpack it (7zip, WinRAR, ...). Folders copy into PXE\images\ubuntu and create new record in default file:
LABEL Ubuntu
                      		MENU LABEL Ubuntu Live 14.04 x64
                      		KERNEL images/ubuntu/casper/vmlinuz.efi
                      		INITRD images/ubuntu/casper/initrd.lz
APPEND root=/dev/nfs boot=casper netboot=nfs nfsroot=192.168.1.10:/volume1/PXE/images/ubuntu ip=dhcp rw only-ubiquity –Comodo
Download ISO file from page and unpack it (7zip, WinRAR, ...). Folders save into PXE\images\comodo and create new record in default file:
LABEL Comodo
                      		MENU LABEL Comodo
                      		KERNEL images/comodo/boot/vmlinuz
                      		INITRD images/comodo/boot/rootfs.gz
APPEND root=/dev/nfs boot=boot netboot=nfs nfsroot=192.168.1.10:/volume1/PXE/images/comodo ip=dhcp rw only-ubiquity –Acronis True Image
For those who have Acronis True Image there is possibility to add also this software into deployment share. Make bootable USB(!) media and copy content into PXE\images\acronis with new record in default file:
LABEL ACRONIS2012
                      		MENU LABEL Acronis True Image 2011
                      		KERNEL images/acronis/dat3.dat
                      		INITRD images/acronis/dat2.dat
APPEND vga=791 ramdisk_size=32768 acpi=off quiet noapic- helpfinder -
Have a question about something in this article? You can receive help directly from the article author. Sign up for a free trial to get started.
Comments (2)
Commented:
I've followed your tutorial and it works perfectly for BIOS machines but for UEFI I needed to switch off secure boot and change it to CSM.
Brilliant tutorial :)
Author
Commented: