Notify External Recipient of email arrival


Published:
Browse All Articles > Notify External Recipient of email arrival
N.B. This process will work with Exchange 2007 running on Windows 2008, Small Business Server 2008, Essential Business Server 2008 & Exchange 2010 only.
You may have reason to send a notification to an external recipient informing them that they have received an e-mail in their internal mailbox. Why would you want to? There could be a policy in place that prevents forwarding of e-mails or that prevents the use of direct connect mobile devices and you want to alert mobile staff that they need to check their email via webmail.
To achieve this, you need to do the following:
Create a receive connector
By default unless you are using Small Business Server 2008 the exchange server will not be able to relay to itself. You therefore need to configure a Receive Connector to allow the local host to relay to itself. To do this using the Exchange Management Console navigate to Server Configuration > Hub Transport. Ensure you have the server highlighted that will host the scheduled tasks and click New Receive Connector in the Actions pane on the right hand side.
This will start the New Receive Connector wizard.
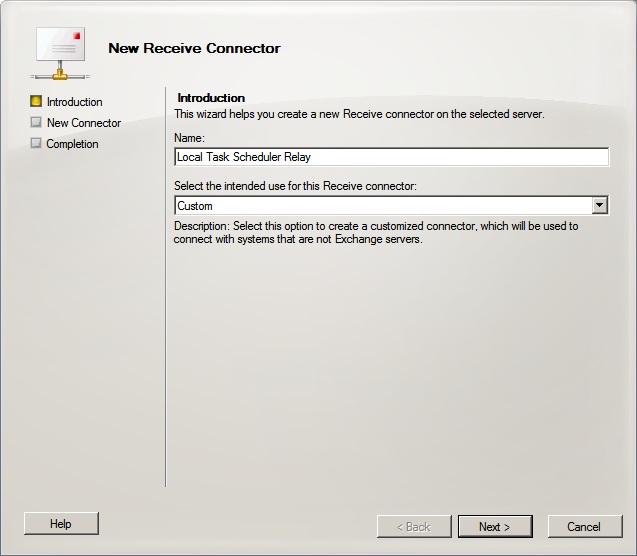
![receive_connector_01]() Give the new Receive Connector a name and ensure that Custom is selected from the drop down list. Click Next.
Give the new Receive Connector a name and ensure that Custom is selected from the drop down list. Click Next.
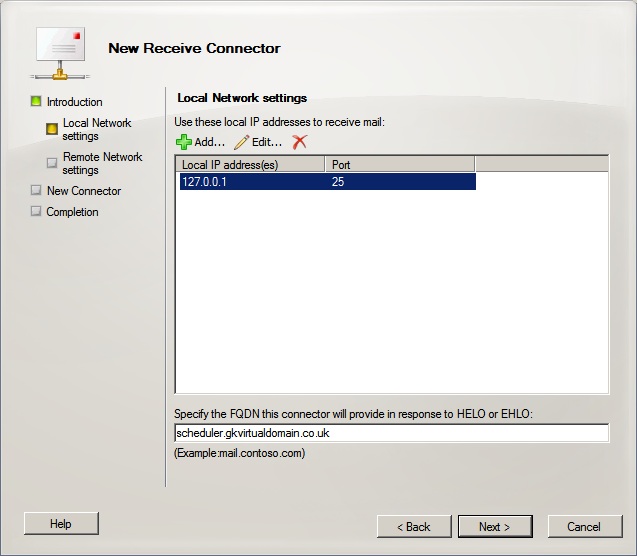
![receive_connector_02]() Enter the details for the FQDN of the Receive Connector, since all we will be using this for is the Task Scheduler it doesn't make any difference what you enter here. Highlight the IP address which will say All Unassigned and click Edit, enter the local loopback address which is 127.0.0.1 and make sure the port is 25. Click Next.
Enter the details for the FQDN of the Receive Connector, since all we will be using this for is the Task Scheduler it doesn't make any difference what you enter here. Highlight the IP address which will say All Unassigned and click Edit, enter the local loopback address which is 127.0.0.1 and make sure the port is 25. Click Next.
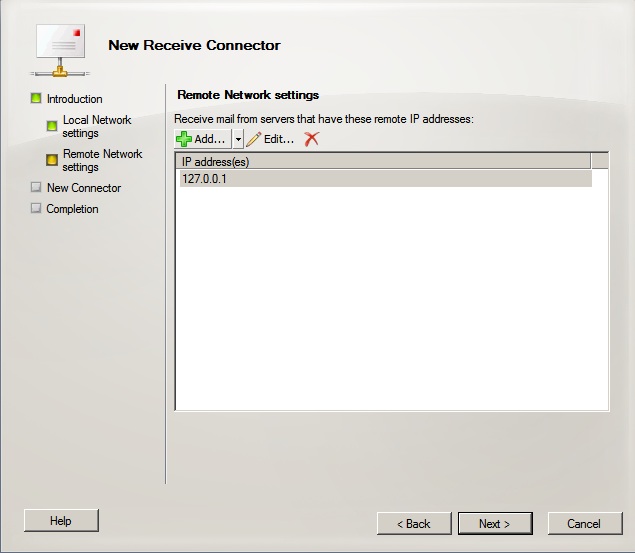
![receive_connector_03]() On the following screen remove any entries that appear in the IP address list and then click Add and enter the local loopback address again of 127.0.0.1. This will prevent any other systems using this connector to relay mail. Click Next.
On the following screen remove any entries that appear in the IP address list and then click Add and enter the local loopback address again of 127.0.0.1. This will prevent any other systems using this connector to relay mail. Click Next.
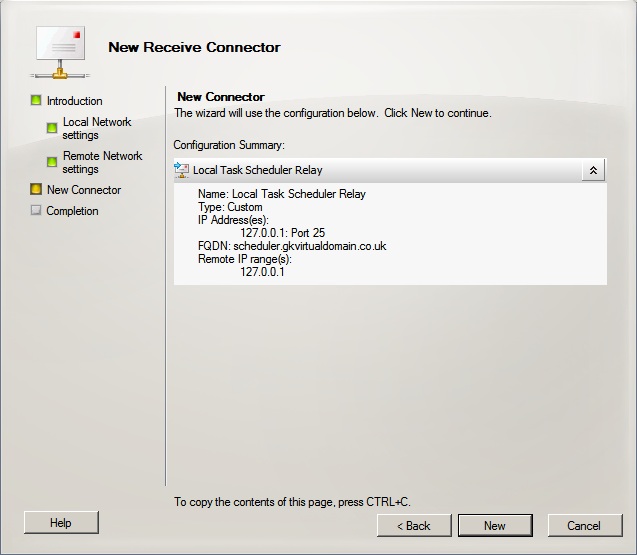
![receive_connector_04]() The screen above is confirming the details you have entered in the previous screens. If anything needs to be changed click Back and make the required changes, otherwise click Next. And then Finish on the Confirmation Screen.
The screen above is confirming the details you have entered in the previous screens. If anything needs to be changed click Back and make the required changes, otherwise click Next. And then Finish on the Confirmation Screen.
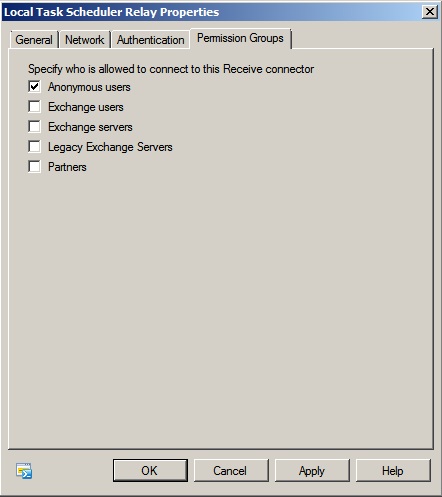
Once you have created the connector in the Exchange Management Console right click on it and select properties (you may need to refresh the screen for the connector to appear by pressing F5 or the refresh link in the Action pane on the right) and navigate to the Permission Groups tab and put a check box in the Anonymous Users box as illustrated below. Click OK to confirm.
![receive_connector_05]()
Create contact
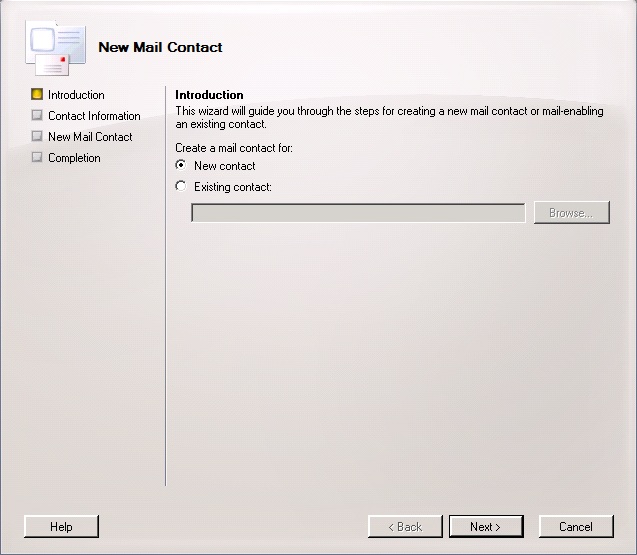
Using Exchange Management Console, navigate to User Configuration > Mail Contact and then from the action pane on the right hand side select New Mail Contact. This will start the wizard to create a new contact.
![mail_contact_01]() There are 2 options on the first screen. The first is to create a new contact the second is to mail enable an existing Active Directory Contact. For this example, we will use the New contact option. Click Next
There are 2 options on the first screen. The first is to create a new contact the second is to mail enable an existing Active Directory Contact. For this example, we will use the New contact option. Click Next
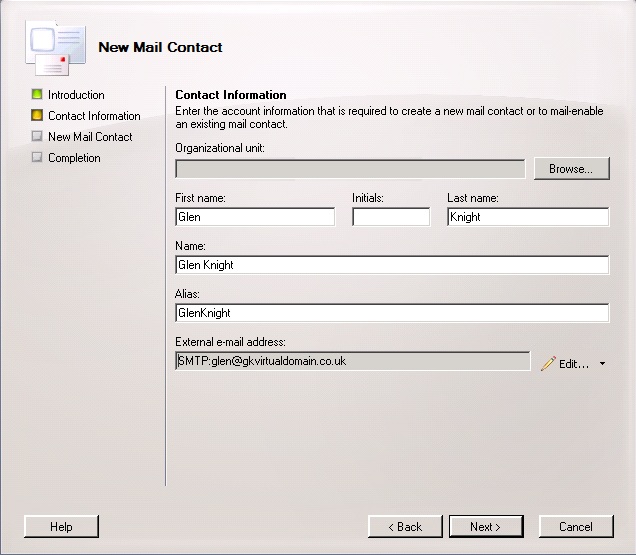
![mail_contact_02]() Complete the user details, selecting the Active Directory Organisational Unit if required. Click the Edit button next to Extenal e-mail address and enter the external address you want the notifications to be sent to. Click Next.
Complete the user details, selecting the Active Directory Organisational Unit if required. Click the Edit button next to Extenal e-mail address and enter the external address you want the notifications to be sent to. Click Next.
![mail_contact_03]() The confirmation screen will confirm the information you entered in the previous screen, if you need to change the details click Back, otherwise Click New to create the contact.
The confirmation screen will confirm the information you entered in the previous screen, if you need to change the details click Back, otherwise Click New to create the contact.
Create the Transport Rule
A Transport Rule now needs to be created to raise an event when the Exchange Organisation delivers a message to the mailbox of the user you want notified.
Using Exchange Management Console, navigate to Organisation Configuration > Hub Transport and then from the action pane on the right hand side select New Transport Rule. This will start the wizard to create a new transport rule.
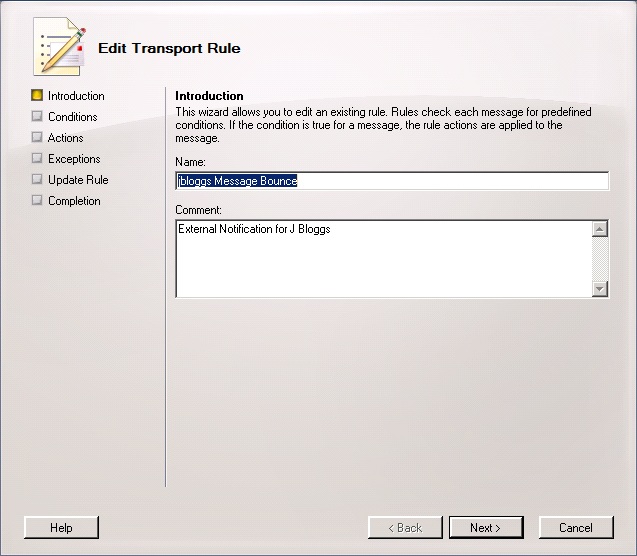
![transport_rule_01]() Enter a name for the rule. If you are likely to do this for more than one user then I would suggest entering the mailbox alias or username in the name so that it can be easily identified. Click Next.
Enter a name for the rule. If you are likely to do this for more than one user then I would suggest entering the mailbox alias or username in the name so that it can be easily identified. Click Next.
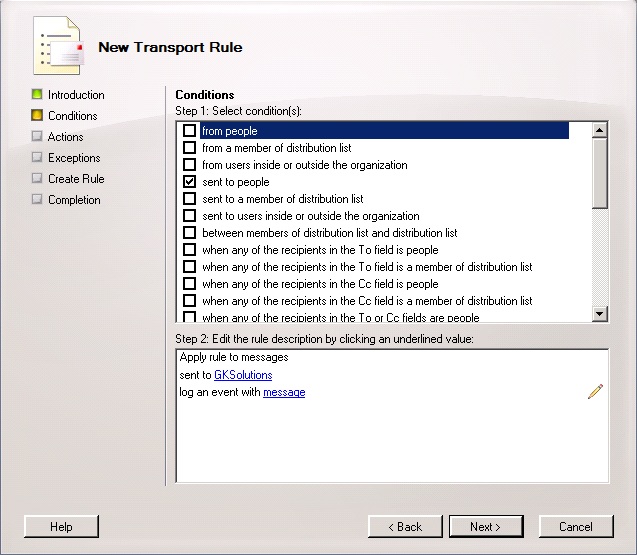
![transport_rule_02]() On the condition select the sent to people option in the top box then click the people link in the bottom box and select the internal mailbox you require the notifications for. Click Next.
On the condition select the sent to people option in the top box then click the people link in the bottom box and select the internal mailbox you require the notifications for. Click Next.
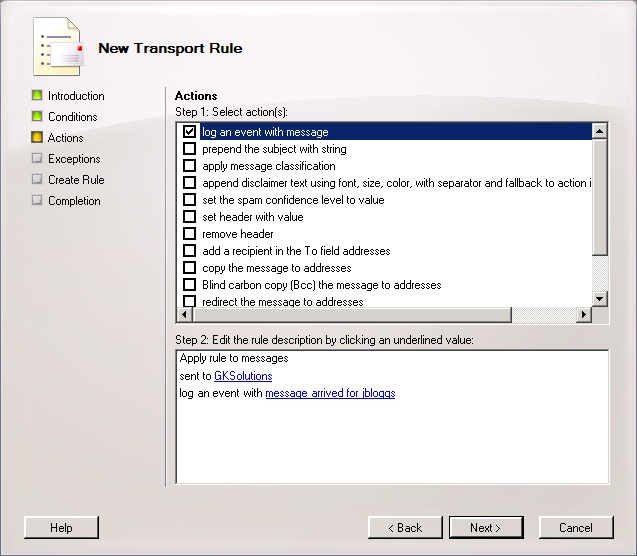
![transport_rule_03]() On the Actions screen in the top box select log an event with message then in the bottom screen click the message link and enter the message you will have created in the detail screen of the event viewer. If you will be doing this for more than one user it is important this part is unique. Click Next.
On the Actions screen in the top box select log an event with message then in the bottom screen click the message link and enter the message you will have created in the detail screen of the event viewer. If you will be doing this for more than one user it is important this part is unique. Click Next.
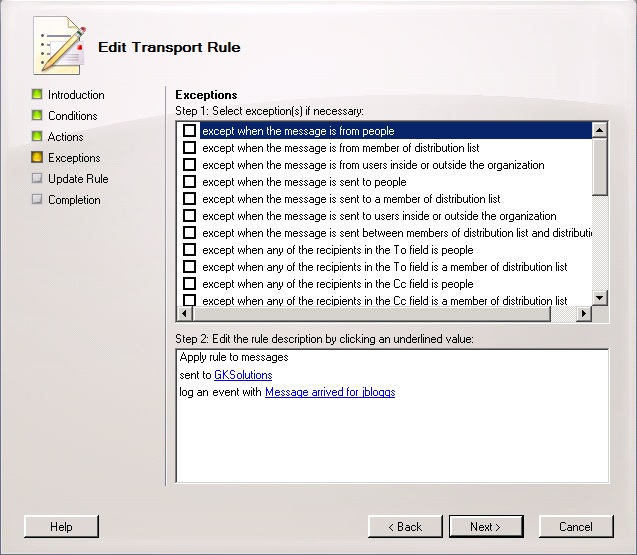
![transport_rule_04]() On the Exception screen this is where you would add exceptions to the rule ranging from people sent from, to people/groups sent to. If you need to add an exception then select one from the list and then click the link created in the bottom box. Click Next.
On the Exception screen this is where you would add exceptions to the rule ranging from people sent from, to people/groups sent to. If you need to add an exception then select one from the list and then click the link created in the bottom box. Click Next.
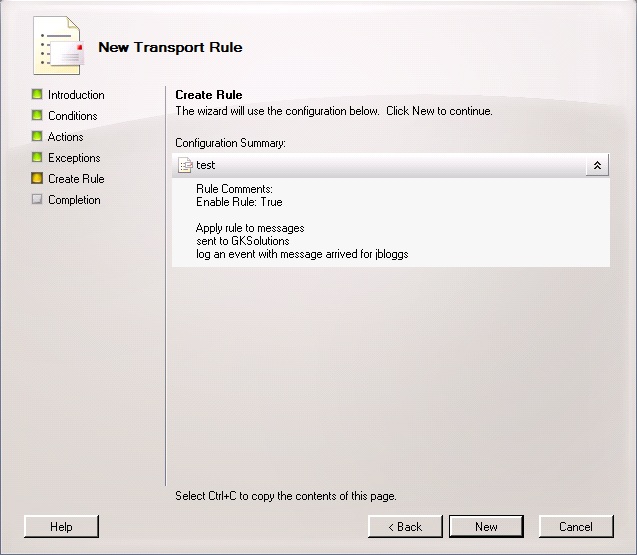
![transport_rule_05]() This screen provides final confirmation of the details entered. Check the information and if it needs changing click Back and make the required modifications, otherwise Click New to create the rule.
This screen provides final confirmation of the details entered. Check the information and if it needs changing click Back and make the required modifications, otherwise Click New to create the rule.
Create an Event Trigger
In Windows 2008 and Windows 2008 R2 we have the ability to create a scheduled task that runs on a trigger. One of the triggers available is the On an event trigger. This is triggered by an event being written to the event logs.
The first thing we need to do in this process is to have an event raised. Now that the transport rule has been created, send an e-mail to the mailbox you have created the rule for. This will trigger an event to be raised in the Application log.
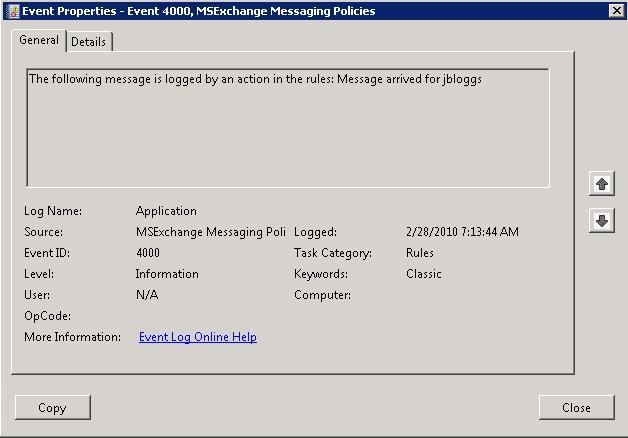
Click Start > Administrative Tools > Event Viewer. Navigate to Windows Logs and then Application log. There should be an event with an Event ID of 4000 as illustrated below.
![event_id_01]() Right click on the event in the Application Log list and select Attach task to this event this will start the create task wizard.
Right click on the event in the Application Log list and select Attach task to this event this will start the create task wizard.
![create_task_01]() Give your task a name and description. If you will be performing this process for more than one user it is important that the name is unique to make it easy to identify later if you ever need to make changes. Click Next then Click Next on the Event Details page.
Give your task a name and description. If you will be performing this process for more than one user it is important that the name is unique to make it easy to identify later if you ever need to make changes. Click Next then Click Next on the Event Details page.
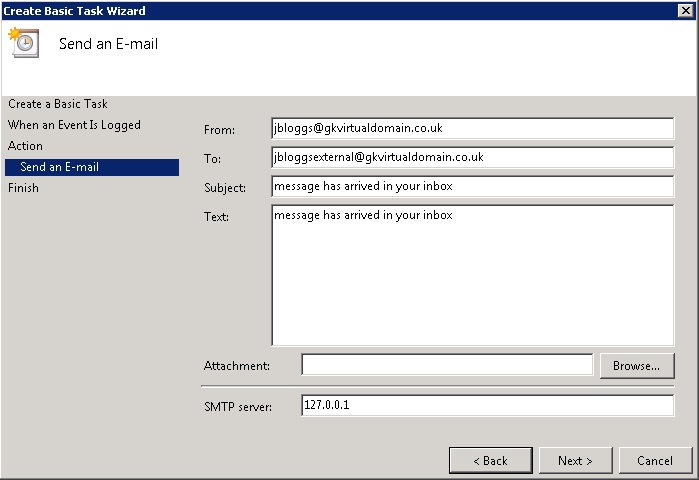
![create_task_03]() On the next screen, the From field must be a valid internal e-mail address (the mailbox doesn’t need to exist) and the To field is the internal e-mail address of the contact you created earlier.
On the next screen, the From field must be a valid internal e-mail address (the mailbox doesn’t need to exist) and the To field is the internal e-mail address of the contact you created earlier.
The subject and text fields can be whatever you want them to be. You also have the option of adding an attachment. The SMTP Server is the IP address of the Exchange Server that has the Hub Transport role, in my example this was the local server so I have used the loopback address. Click Next.
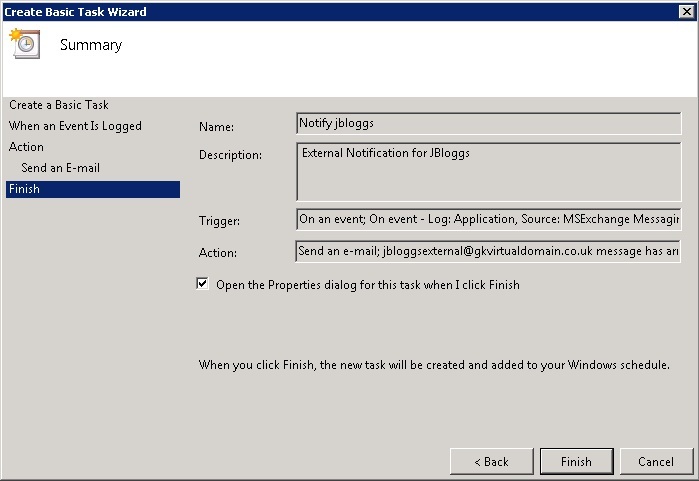
![create_task_04]() The final screen of the wizard is the confirmation of what you have entered on the previous screens. If you need to make any changes, then press the Back button and make the required changes.
The final screen of the wizard is the confirmation of what you have entered on the previous screens. If you need to make any changes, then press the Back button and make the required changes.
Before clicking Finish check the box that reads “Open the Properties dialog for this task when I click Finish” this will open the event for editing. Click Finish
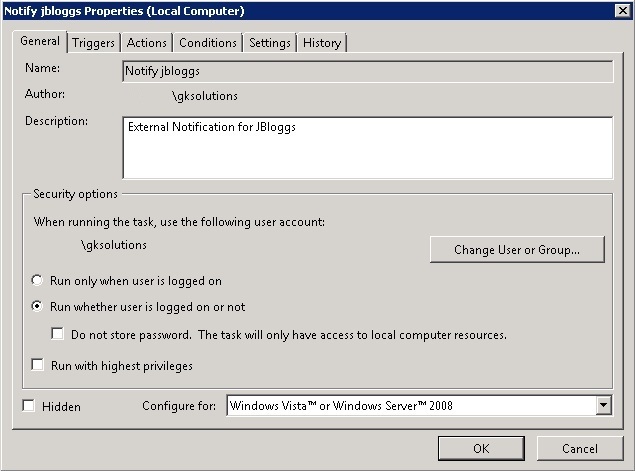
![create_task_05]() Once the task opens on the General tab you need to select the Run whether user is logged on or not. This will allow the task to run even if no user is logged on to the console. Select the Triggers tab. Here you will see the On an Event trigger, highlight this and select properties. On the following screen check the radio box for Custom and then click the New Event Filter button.
Once the task opens on the General tab you need to select the Run whether user is logged on or not. This will allow the task to run even if no user is logged on to the console. Select the Triggers tab. Here you will see the On an Event trigger, highlight this and select properties. On the following screen check the radio box for Custom and then click the New Event Filter button.
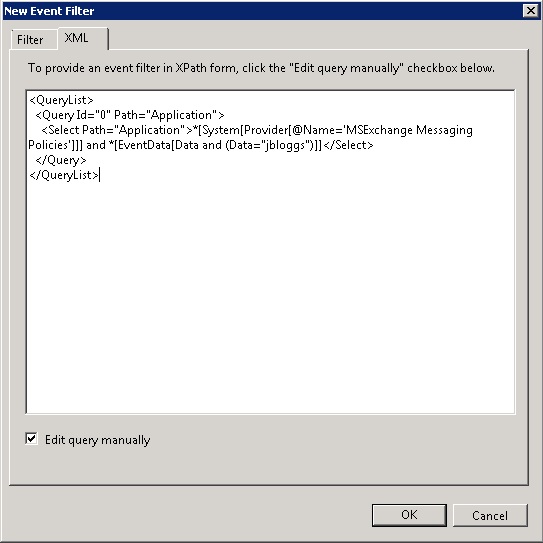
![create_task_05]() On the New Event Filter dialogue box select the XML tab and paste the code below. This is where it is important when you created the transport rule to have something unique in the description so that it can be selected here. This allows you to setup different events for different users.
On the New Event Filter dialogue box select the XML tab and paste the code below. This is where it is important when you created the transport rule to have something unique in the description so that it can be selected here. This allows you to setup different events for different users.
Once done click OK on this screen and then OK on the task screen.
This process with then notify an external contact of the receipt of an e-mail in an internal mailbox.
You may have reason to send a notification to an external recipient informing them that they have received an e-mail in their internal mailbox. Why would you want to? There could be a policy in place that prevents forwarding of e-mails or that prevents the use of direct connect mobile devices and you want to alert mobile staff that they need to check their email via webmail.
To achieve this, you need to do the following:
Create a receive connector to allow local relaying
Create a contact with the external email address
Create a transport rule that checks messages as they arrive to see if they are sent to the person you want to be notified. If they are, raise an event in the event viewer. (I also told the event to use the username of the user in case you wanted to do this for more than one person).
Create an on event trigger schedule to send an email to the internal address of the contact you created in step 1
Create a receive connector
By default unless you are using Small Business Server 2008 the exchange server will not be able to relay to itself. You therefore need to configure a Receive Connector to allow the local host to relay to itself. To do this using the Exchange Management Console navigate to Server Configuration > Hub Transport. Ensure you have the server highlighted that will host the scheduled tasks and click New Receive Connector in the Actions pane on the right hand side.
This will start the New Receive Connector wizard.
 Give the new Receive Connector a name and ensure that Custom is selected from the drop down list. Click Next.
 Enter the details for the FQDN of the Receive Connector, since all we will be using this for is the Task Scheduler it doesn't make any difference what you enter here. Highlight the IP address which will say All Unassigned and click Edit, enter the local loopback address which is 127.0.0.1 and make sure the port is 25. Click Next.
 On the following screen remove any entries that appear in the IP address list and then click Add and enter the local loopback address again of 127.0.0.1. This will prevent any other systems using this connector to relay mail. Click Next.
 The screen above is confirming the details you have entered in the previous screens. If anything needs to be changed click Back and make the required changes, otherwise click Next. And then Finish on the Confirmation Screen.
Once you have created the connector in the Exchange Management Console right click on it and select properties (you may need to refresh the screen for the connector to appear by pressing F5 or the refresh link in the Action pane on the right) and navigate to the Permission Groups tab and put a check box in the Anonymous Users box as illustrated below. Click OK to confirm.
Create contact
Using Exchange Management Console, navigate to User Configuration > Mail Contact and then from the action pane on the right hand side select New Mail Contact. This will start the wizard to create a new contact.
 There are 2 options on the first screen. The first is to create a new contact the second is to mail enable an existing Active Directory Contact. For this example, we will use the New contact option. Click Next
 Complete the user details, selecting the Active Directory Organisational Unit if required. Click the Edit button next to Extenal e-mail address and enter the external address you want the notifications to be sent to. Click Next.
 The confirmation screen will confirm the information you entered in the previous screen, if you need to change the details click Back, otherwise Click New to create the contact.
Create the Transport Rule
A Transport Rule now needs to be created to raise an event when the Exchange Organisation delivers a message to the mailbox of the user you want notified.
Using Exchange Management Console, navigate to Organisation Configuration > Hub Transport and then from the action pane on the right hand side select New Transport Rule. This will start the wizard to create a new transport rule.
 Enter a name for the rule. If you are likely to do this for more than one user then I would suggest entering the mailbox alias or username in the name so that it can be easily identified. Click Next.
 On the condition select the sent to people option in the top box then click the people link in the bottom box and select the internal mailbox you require the notifications for. Click Next.
 On the Actions screen in the top box select log an event with message then in the bottom screen click the message link and enter the message you will have created in the detail screen of the event viewer. If you will be doing this for more than one user it is important this part is unique. Click Next.
 On the Exception screen this is where you would add exceptions to the rule ranging from people sent from, to people/groups sent to. If you need to add an exception then select one from the list and then click the link created in the bottom box. Click Next.
 This screen provides final confirmation of the details entered. Check the information and if it needs changing click Back and make the required modifications, otherwise Click New to create the rule.
Create an Event Trigger
In Windows 2008 and Windows 2008 R2 we have the ability to create a scheduled task that runs on a trigger. One of the triggers available is the On an event trigger. This is triggered by an event being written to the event logs.
The first thing we need to do in this process is to have an event raised. Now that the transport rule has been created, send an e-mail to the mailbox you have created the rule for. This will trigger an event to be raised in the Application log.
Click Start > Administrative Tools > Event Viewer. Navigate to Windows Logs and then Application log. There should be an event with an Event ID of 4000 as illustrated below.
 Right click on the event in the Application Log list and select Attach task to this event this will start the create task wizard.
 Give your task a name and description. If you will be performing this process for more than one user it is important that the name is unique to make it easy to identify later if you ever need to make changes. Click Next then Click Next on the Event Details page.
 On the next screen, the From field must be a valid internal e-mail address (the mailbox doesn’t need to exist) and the To field is the internal e-mail address of the contact you created earlier.
The subject and text fields can be whatever you want them to be. You also have the option of adding an attachment. The SMTP Server is the IP address of the Exchange Server that has the Hub Transport role, in my example this was the local server so I have used the loopback address. Click Next.
 The final screen of the wizard is the confirmation of what you have entered on the previous screens. If you need to make any changes, then press the Back button and make the required changes.
Before clicking Finish check the box that reads “Open the Properties dialog for this task when I click Finish” this will open the event for editing. Click Finish
 Once the task opens on the General tab you need to select the Run whether user is logged on or not. This will allow the task to run even if no user is logged on to the console. Select the Triggers tab. Here you will see the On an Event trigger, highlight this and select properties. On the following screen check the radio box for Custom and then click the New Event Filter button.
 On the New Event Filter dialogue box select the XML tab and paste the code below. This is where it is important when you created the transport rule to have something unique in the description so that it can be selected here. This allows you to setup different events for different users.
<QueryList>
                        <Query Id="0" Path="Application">
                          <Select Path="Application">*[System[Provider[@Name='MSExchange Messaging Policies']]] and *[EventData[Data and (Data="jbloggs")]]</Select>
                        </Query>
                      </QueryList>
Once done click OK on this screen and then OK on the task screen.
This process with then notify an external contact of the receipt of an e-mail in an internal mailbox.
Have a question about something in this article? You can receive help directly from the article author. Sign up for a free trial to get started.
Comments (3)
Commented:
Commented:
Commented:
I have a customer who want to change domain.com to newdomain.com and when the email arrives to domain.com we should sent back a notification email that please write to the newdomain.com email... (335 users)
Thank you for the ideas in advance !!
Peter